Tutorial: How to display Gravity Forms entries on front end

Welcome to our comprehensive tutorial on how to display Gravity Forms entries on the front end of your WordPress website!
As the leading WordPress form plugin, Gravity Forms allows you to create and manage advanced forms with ease, streamlining your data collection process. However, many users are left wondering how they can showcase this valuable information on their site's front end in a way that is both visually appealing and functional. That's where the Posts Table Pro plugin comes into play.
In this in-depth, step-by-step guide, we'll walk you through the entire process of how to integrate and display Gravity Forms Entries with Posts Table Pro to effortlessly display user-submitted content in a searchable, filterable table. This powerful combination not only makes the submitted entries easily accessible to your website visitors but also provides them with an interactive and engaging experience by using the Gravity Forms view entries on front end.
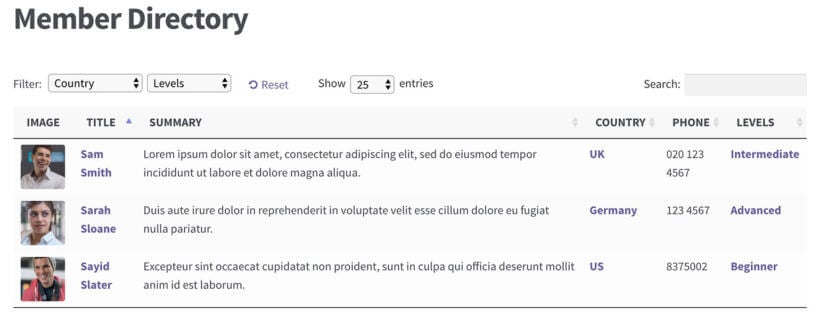
The end result will look something like this - a neat table listing your users' form submissions!
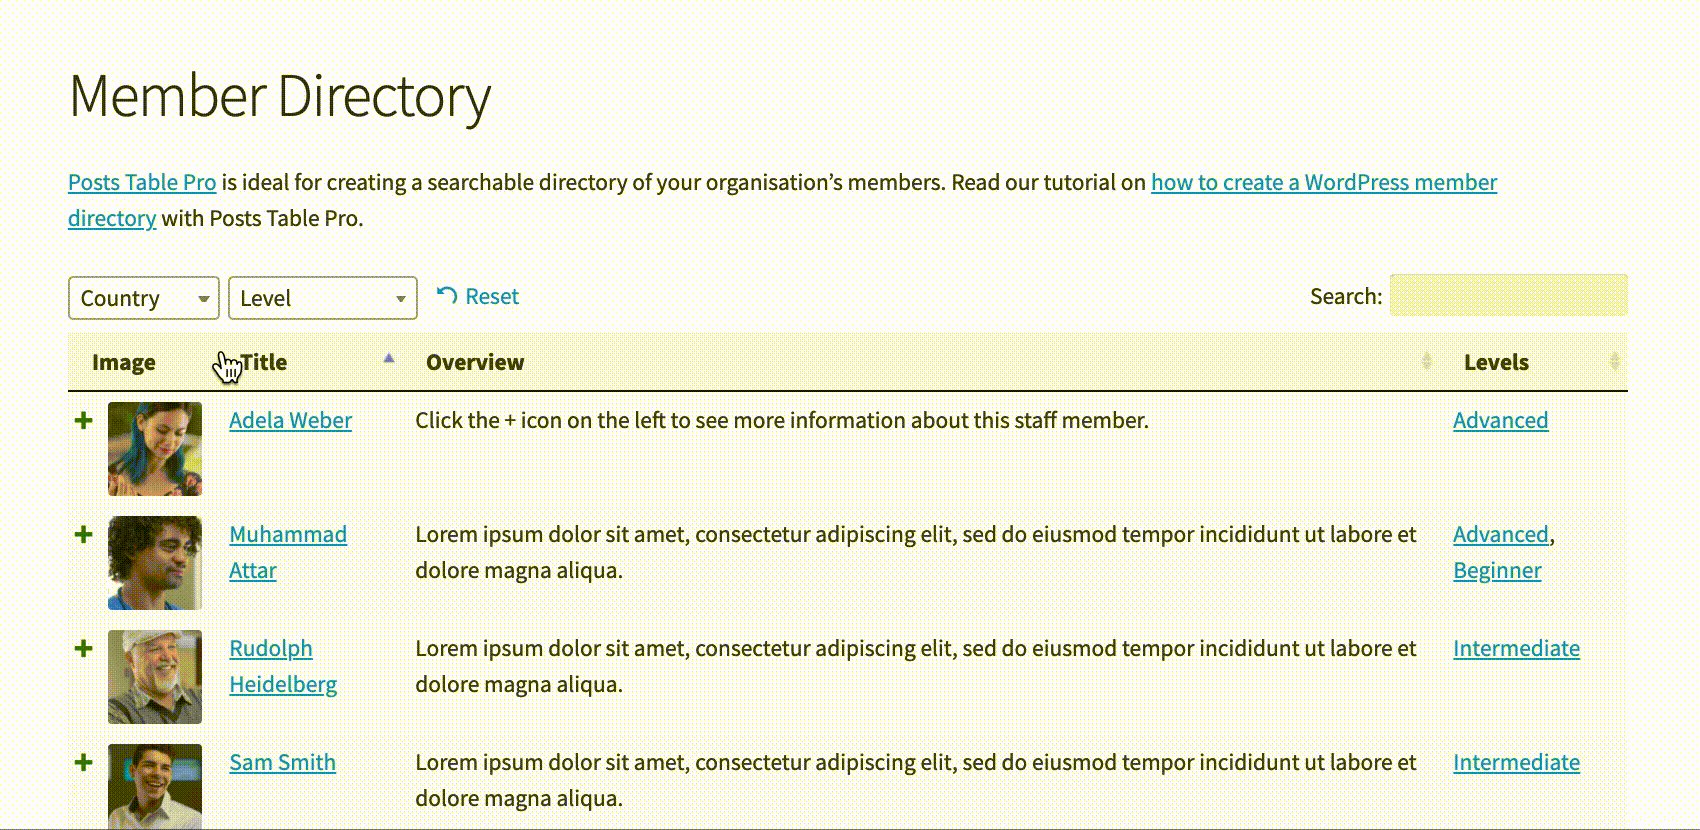
Display any type of user-submitted content from Gravity Forms
This tutorial is perfect for a wide range of applications, including community-driven websites, online directories, event listings, or any project where you want to create a seamless experience for users to view and interact with Gravity forms front end posting submitted date. By the end of this guide, you'll have a thorough understanding of how to:
- Set up and configure Gravity Forms to capture user-submitted content.
- Install and activate the Posts Table Pro plugin.
- Integrate the two plugins to display Gravity Forms entries in a sortable and filterable table on your website's front end.
- Customize the appearance and functionality of your table to match your site's design and meet your specific needs.
With detailed instructions, helpful tips, and best practices, this tutorial aims to be the ultimate resource for unlocking the full potential of Gravity Forms and Posts Table Pro. So, whether you're a seasoned WordPress professional or a novice just getting started, join us as we dive in and explore the powerful capabilities of Gravity Forms and Post Table Pro plugins working together in harmony.
Why display user-submitted information in the front end?
There are lots of reasons why you might want to let Gravity Forms get submitted data and display Gravity Forms Entries on your website:
- WordPress member directory with user profiles If you're using a WordPress member directory plugin to list members or consultants in a table, then you might want to allow people to register and upload a profile. If you don't want to install a heavyweight membership or e-commerce plugin, then it can be simpler to use Gravity Forms for member registration and profile upload.
- WordPress directory website If you're creating any type of directory, such as a business or local events directory, then it makes sense for users to submit listings. If you're trying to keep your website simple, then you can avoid installing a full directory theme or plugin by using Gravity Forms and a WordPress table plugin instead. You can even take payment via PayPal and hold submissions for moderation by the administrator before they're published!
- WooCommerce user-submitted products If you're using WooCommerce then you can let users submit products to sell in your store.
- User-submitted events If you're using a WordPress events plugin such as The Events Calendar, then your users can submit events to display Gravity Forms Entries on your website
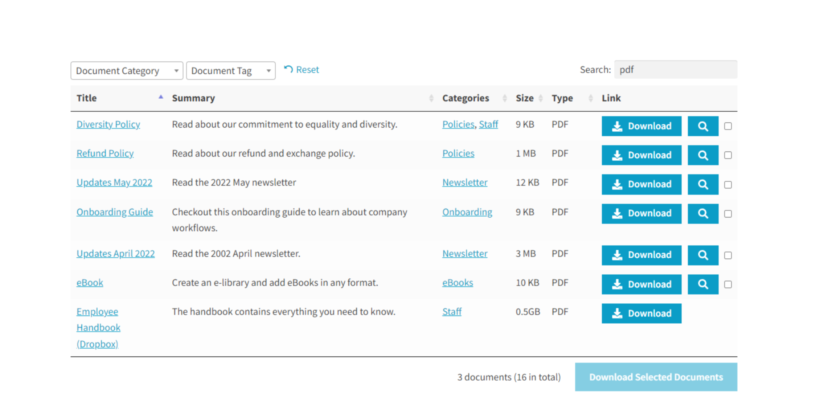
- WordPress document library with user-submitted documents Lots of websites use a WordPress document library plugin to allow users to type in the search bar to find and download documents. If you need a way for users to submit their own documents, then you can do this with Gravity Forms. However, unlike the other use cases listed above, there's actually an even simpler option! As an alternative to Gravity Forms, just install the Document Library Pro plugin and use its front-end upload form to let users submit downloadable documents to your site:
Unlocking the potential of Gravity Forms
As you can see, there are loads of reasons to let users upload information which you then display on your website. If you want to display website content rather than downloadable documents, then Gravity Forms is the best solution. Keep reading to see a real-life use case, and then learn how to set it up.
Case study - TV Production Contacts' Job Board

TVProductionContacts.com acts as a networking site for TV production professionals, it also hosts a WordPress job board listing jobs available in the industry.
The job board is powered by our Posts Table Pro plugin. The site also uses the Gravity Forms plugin and the Gravity Forms + Custom Post Types add-on to power the job board submission form.
Gravity Forms display entries on front end which makes the job board simple to manage. Hiring managers submit all the job details using the form. The user-submitted information is then approved before being automatically displayed on the sortable job board.
Keep reading to find out how to create your own Gravity Froms for users to submit information to your site.
What to expect from this tutorial
This tutorial will teach you how to add the following features to any WordPress website. Read it all, or skip straight to the sections you need:
- Use Gravity Forms to collect user-submitted information
- Store the information as a WordPress post, document, or custom post type
- Display the user-submitted data in a table on the front end of your website
You can also watch us setting it up from start to finish in this video:
Step 1 - Use Gravity Forms to collect user-submitted information
The first step is to install the Gravity Forms WordPress plugin and create a form. Your visitors will use this to submit information to you. This is useful whether you want them to upload a document, member profile, business listing, upcoming event, or something else.
- First, buy Gravity Forms, download the plugin, and install it on your WordPress website (Plugins → Add New).
- You'll see a 'Forms' link appear on the left of the WordPress Dashboard. Navigate to Forms → Add New.
- Enter a name for your form, then add all the fields. (If you haven't created a form before, please see the official documentation.)
- Title, content, and custom fields - Instead of using Standard and Advanced Fields, you should use Post Fields. These map to fields on your WordPress post type, so that the user data will be stored in the correct place.
- Custom taxonomies - Create a Standard Field and then click on the 'Advanced' tab when editing that field. You can use this to map the field to the custom taxonomy on your WordPress post type.
- If you want users to be able to upload documents via Gravity Forms, use the File Upload field type.
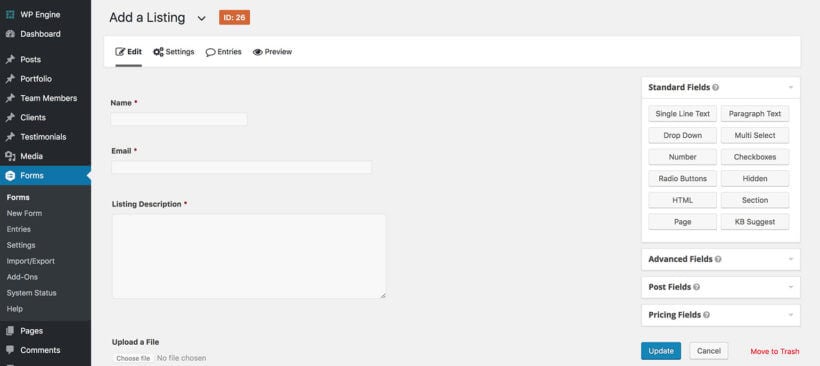
- Click 'Update' to save your form.
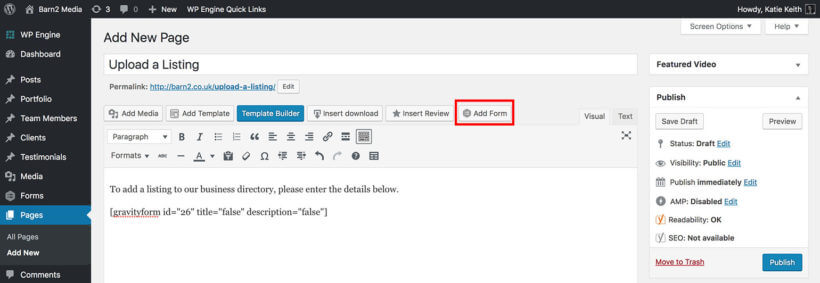
- Next, create a page (Pages → Add New) and click the 'Add Form' button above the WordPress toolbar if you're using the Classic Editor, or use a Gutenberg block if you're using Gutenberg. Select the form you just created and insert it into the page. You can also add other content to the page:
- Finally, view the page and make sure you're happy with it.
Your Gravity Forms get submitted data content page should look something like this:

Optional - hide and protect your Gravity Forms page
By utilizing the functionality of Gravity Forms to display entries on the front end, restricting user-submitted content to authorized individuals is possible. You can do this by protecting the page containing the form.
There are several ways to do this:
- The simplest way to secure the Gravity Forms page is to password protect it.
- If you're using an SEO plugin (e.g. Yoast SEO), then you can also use this to noindex the page. This will ensure it is hidden from search engines.
- For a more secure approach, use a WordPress membership plugin such as All Access Manager to restrict the page to logged in users with a certain role only.
Step 2 - Store the information as a WordPress post or custom post type
So far, you've learned how to use Gravity Forms to create a form that users can use to submit information to you. It looks pretty, but it's not much use yet! At this stage, the information will be emailed to you and stored in the WordPress database. In Step 2, I'll show you how to automatically use this Gravity Forms get submitted data to create WordPress posts, documents, WooCommerce products, and custom posts. This saves you from having to manually input the data to your website.
How to use Gravity Forms to save user-submitted information as a WordPress post
Gravity Wiz has an excellent tutorial about how to save Gravity Forms submissions as posts. Do this, then come back to learn how to display the user-submitted content in a table on the front end.
When you follow the Gravity Wiz tutorial, don't forget to set the 'Status' to draft. This is essential if you want to hold the form submissions for moderation for a WordPress admin to approve before they're published.
How to use Gravity Forms to create a custom post
Storing user-submitted information as normal WordPress posts is fine, but it can clutter up your blog. It's normally better to create a dedicated custom post type for this. For example, if you're creating user-submitted business listings then you can create a 'Business Listings' custom post type. This will add a 'Business Listings' link to the left of the WordPress Dashboard. It's a convenient way to organize the listings, separate from your other website content.
You'll also need to do this if you want to store Gravity Forms entries in a post type created by another plugin. For example, this might be:
- The 'Documents' post type is created by our Document Library Pro plugin.
- The 'products' post type created by WooCommerce, the 'tribe_events' post type created by the Events Calendar plugin, or any other custom post type.
You'll need a free plugin called Gravity Forms + Custom Post Types for this:
- Get the plugin and install it on your WordPress site.
- (Optional) If you don't already have a custom post type for this purpose, create one now. I recommend the free Pods plugin for this. For full instructions, please see my tutorial about how to create a custom post type, then return here and continue this tutorial.
- Use the how-to instructions on the plugin page to map your form fields to the custom post type.
Step 3 - Display user-submitted data in a table on the front end
So far, you've learned how to use Gravity Forms to let users submit information via your website and save it as a post, document, or custom post type. The next step is to showcase user-submitted posts on the front end of your WordPress website through Gravity Forms show entries frontend, the subsequent action is to be taken. You'll need a dynamic table plugin for this. We have 3 table plugins, so choose the one that lists the type of content that your users will be submitting:
- Posts Table Pro - to list posts, pages, or any custom post type.
- Document Library Pro - to list documents or other resources.
- WooCommerce Product Table - to list WooCommerce products. (However, we have a separate tutorial about how to display user-submitted WooCommerce products so you may want to read that instead.)
All three plugins list user-submitted information in a searchable, filter options of datatables view. It's the perfect way to display Gravity Forms Entries because each entry data is listed in a separate row of the table. Visitors to your website can use the search box to find specific or multiple entries, use the advanced filtering to refine the list, display entries depending on a user role, and sort by any column.
How to list user-submitted content in WordPress
- Get Posts Table Pro or Document Library Pro and install it on your WordPress website.
- Copy your license key from the confirmation page, then enter it on the plugin settings page.
- Stay on the settings page, and spend a minute choosing how you want your tables to look and behave.
- Next, create a new page. You'll use this to list the user-submitted content from Gravity Forms. Use the plugin documentation to add a table.
After completing the process, access the page to witness a table on the front end that displays all the posts, documents, or custom posts (depending on the post type chosen on the plugin settings page) that have been listed through the utilization of Gravity Forms show entries frontend. This is the information that your users have submitted using Gravity Forms. Perfect!
Choosing which items to display
You may wish to add multiple tables to your site, each containing different posts, documents, or custom posts. Suppose you're designing a WordPress business directory and wish to customize the view layout of each page with different business categories and field values. In that case, you may opt to display listings based on the respective category.
Fortunately, Posts Table Pro and Document Library Pro come with several options for choosing which user-submitted content is listed in the table. You can list items by category, tag, and much more using the Gravity Forms view entries on front end feature.
File uploads
Gravity Forms comes with 'Post Image' and ‘File Upload’ fields which allow users to upload an image or other file type. There are a couple of ways to display file uploads on the front end with Posts Table Pro and Document Library Pro.
Display user-uploaded media and documents on your website
- If users are uploading images then the easiest option is to add a 'Post Image' field to your Gravity Form and map this to the post/document featured image. You can then display this using the ‘image’ column of the table.
- If you are using Document Library Pro then you can add the 'File Upload' field to your Gravity Form and use the following snippet to set the document link. Make sure to replace the
$form_idand$file_upload_field_idvariable values to match those in the Gravity Form you have created.add_action( 'gform_after_create_post', function ( $post_id, $entry, $form ) { $form_id = 1; // The ID of your Gravity Form. $file_upload_field_id = 6; // The ID of the File Upload field. if ( $form_id !== rgar( $form,'id' ) ) { return; } $document = dlp_get_document( $post_id ); $file_url = rgar( $entry, $file_upload_field_id ); if ( ! $document || ! $file_url ) { return; } $document->set_document_link( 'url', [ 'direct_url' => $file_url ] ); }, 10, 3 ); - If you are using Posts Table Pro then you can map other file types to a custom field, and display it as a custom field column in the table. Gravity Forms saves the URL of the uploaded file in the WordPress database, and the table plugin will display this as a clickable link when you include it as a column. By itself, this may not be ideal, as the link will be very long and won't look very professional. To modify the text inside this link, you can add some shortcode to your site's backend to utilize one of the development filters. For example:
add_filter( 'posts_table_url_custom_field_text', function ( $link_text, $field_key ) {
    if ( $field_key === 'file_upload' ) {
        return 'Download';
    }
    return $link_text;
}, 10, 2 );
In this code snippet, "file_upload" is the 'Custom Field Name' specified in the Gravity Forms custom field, and "Download" is the text that will be displayed to users. Either of these can be updated to fit your circumstances.
If you're looking to achieve this without the aid of a developer skilled in CSS, HTML, PHP, or prefer a DIY approach to streamline your workflow, we recommend outsourcing the task to Codeable.
Can users edit posts after submitting them?

Yes, there are two ways that you can allow users to edit entries in the table:
- Use Posts Table Pro/Document Library Pro with a front-end spreadsheet editor plugin. Add an 'Edit' link above or below the table. Logged in users with the correct role can click this to access a front-end spreadsheet editor, which allows them to edit the content of the table. They then save their changes and return to the main table. (Read the tutorial.)
- Install a WordPress front-end editor plugin such as Editus. People can click through to the single post or document page on your website and edit the information from there. This is important because they can't edit the content from within the table itself. On the single post or document page, they can edit the content as required.
Where to get the plugins
That brings us to the end of our tutorial. You've learned how to use and display Gravity Forms Entries on page to allow users to upload information to your website and save it as a post, document, or custom post type. You know how to hold these posts for moderation so that they're not published until an administrator approves them. You've discovered the best way to display this information in a table on the front end of your WordPress website. It's the perfect way to create a user-contributed document library, member directory, or business listing.
To set it up, you'll need:
- Gravity Forms - to collect information from your users.
- Gravity Forms + Custom Post Types - to save the information as a custom post type in WordPress.
- Posts Table Pro or Document Library Pro - to display the information on your website.
I'd love to hear about how you use and display Gravity Forms entries on page for user-submitted content. Do you keep this private or list it on the front end of your website? What sort of Gravity Forms data do you collect and display? Please let me know in the comments below.
32 Comments
I really didn't understand nothing about how to let registered users submit their files into my Document Library! The tutorial shows how to create a SEPARATE listing or directory for user's submitted files, but how to let them UPLOAD their files into the Document Library???
Hi, Luca! Thank you for your comment.
To get started, I recommend watching this full video that demonstrates how to use Gravity Forms for collecting user-submitted information. You can find the video here: Watch the video. If you'd like to skip to the part where we demo the creation of the form (Gravity Form) and testing, simply go to this specific timestamp.
I hope this information is helpful. Should you have any further questions, don't hesitate to contact us through our Support Center. We would be more than delighted to provide further assistance. Many thanks!