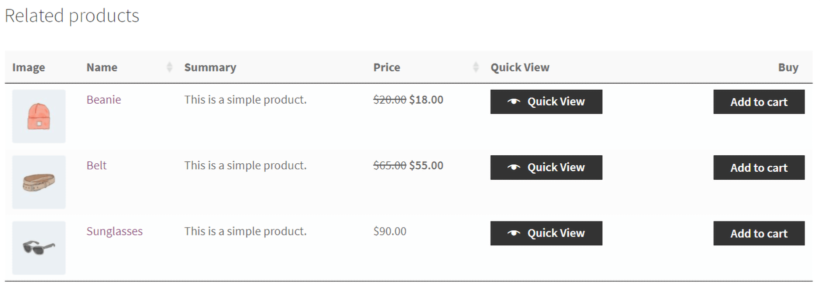
Use WooCommerce Product Table for Up-sells or Related Products
As well as adding WordPress Product Table via a shortcode or displaying them on the shop and category pages, we have provided a code snippet which will enable the product table layout wherever you display related products and upsells. These are the products that you select on the Add/Edit Product screen under Product Data → Linked Products. Upsells appear on the single product page, and cross-sells appear on the cart.
Although knowledge of coding is not necessary to complete the below steps, you will need to feel comfortable accessing and modifying your website using FTP or the WordPress Theme Editor. Doing so carries a significant risk of breaking your website, and so if you're nervous about doing this, we recommend getting a quote from the experts at Codeable. Post a project with a link to your site and this article explaining what you'd like to do, and they'd be glad to give you a fair and transparent estimate.

Step 1: Identify how you'll install the code snippet
In all cases, you are going to need to be able to access your website via FTP. If you are unfamiliar with this terminology or have no idea how you would go about doing this, that may be a good sign to stop right now and hire a developer. Managing your site code over FTP is an advanced topic that goes beyond the scope of this article.
Ideal scenario - use a child theme
If your site has a number of existing modifications to the design or functionality, it's likely it has been set up with a "child theme". This is a theme installed on your site that is used to retain the functionality and features of a major theme like Avada, Divi, Enfold, or Storefront, but allows you to make modifications that will not be overwritten when the theme updates. If this applies to you, go to Appearance → Themes in the WordPress admin - the active theme will be named something like "[theme name] child". If that's true, excellent! Move on to Step 2.
Also common - a custom theme
Perhaps you had your site custom developed, but your original team is no longer available. If that's the case, you may be able to add templates directly to the active theme. But do be careful in this case because your developer may have simply customized the settings in a popular premium theme, in which case you would not want to modify the code or it will be replaced the next time you receive an update. If you feel that it's safe to modify the active theme, move on to step 2. Otherwise, use the next option.
Fallback option - the "must-use plugins" folder
WordPress also allows you to add functionality to your website by dropping code into a folder named "mu-plugins". We can use this to remove the default templates for Related Products or Up-Sells, and drop in a new template.
Step 2: Decide where to put the code
Active theme
This is the option you'll take if you are able to safely modify the theme files on your site. All theme code on a WordPress site is installed inside /wp-content/themes/ - so if you can locate that over FTP, you're almost there. We'll just need to figure out which folder belongs to your child theme.
There are likely multiple folders in the /wp-content/themes/ directory. To figure out which folder contains your active theme, go back to the WordPress Admin, open Appearance → Themes and click "Theme Details" on the active theme.
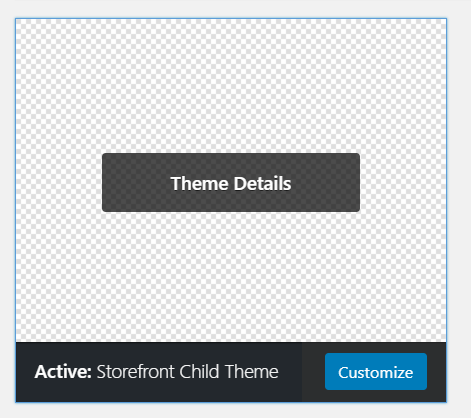
After a new window opens up, the URL of the page will have changed. Note the very end of the URL:
![]()
The text after the ?theme= portion of the URL contains the folder name of your theme.
The files we'll be creating need to be in a folder named "woocommerce", and then a sub-folder named "single-product" So the final destination of the new theme file(s) will be /wp-content/theme/[active-theme-name]/woocommerce/single-product/.
If you've found the theme and created these folders, jump to Step 3!
Must-use Plugins folder
If you can't modify your website theme, the folder you need to locate is found at /wp-content/mu-plugins/.
This should be fairly easy to find, and if it doesn't exist yet, you may create it.
Once you've found or created the mu-plugins folder, create a new folder inside it named "woocommerce-templates", and a sub-folder named "single-product". So the folder we'll be installing template files into is /wp-content/mu-plugins/woocommerce-templates/single-product.
Step 3: Install the templates
No matter which route you've taken up to this point, we're going to drop the same files into the appropriate folder. Copy one or both of the following files into one of these folders:
If you're installing templates into your active theme, use
/wp-content/theme/[active-theme-name]/woocommerce/single-product/.
Or if you are using the must-use plugins folder, use /wp-content/mu-plugins/woocommerce-templates/single-product.
These are the files you need to add to your site, they should be compatible with WooCommerce 3.9 and up:
| Template | File | |
|---|---|---|
| Related Products | woocommerce/single-product/related.php | DOWNLOAD |
| Upsells | woocommerce/single-product/up-sells.php | DOWNLOAD |
If you installed these files into your theme, you're all done here! You can already go check out your site to see WPT in place of your up-sells or related products. And if you'd like to customize the display of these tables, move on to Step 4.
If you're utilizing the must-use plugins folder to install these template files, we'll need to add one more file to your site so that the new template files are displayed. Inside the /wp-content/mu-plugins/ folder, add the following file:
| File | ||
|---|---|---|
| Related Products | mu-plugins/barn2-mu-wc-templates.php | DOWNLOAD |
And your new templates should be active! Go ahead and check them out on your site, and move on to Step 4 if you'd like to customize them.
Step 4: Customization (optional)
You may not want to use the default options for the WooCommerce Product Table on your upsells or related products table. If you'd like to change these options, it's as simple as modifying the shortcode contained inside your new template files! The documentation for the product table shortcode can be found here.
To make changes, open up related.php and line 30, or up-sells.php and line 33, you'll note it looks something like this:
$shortcode = '[product_table include="%s"]';
To change the table options, modify the shortcode contained inside the single quotation marks. Make sure to leave the quotes as-is, and always leave the include="%s" part in tact. For example, if you wanted to remove all the information displayed above and below the table, you might replace this with the following line:
$shortcode = '[product_table pagination="false" search_box="false" totals="false" page_length="false" reset_button="false" include="%s"]';
You can also see the full list of available options.
Once you have completed these steps, the product table will be used wherever your theme displays related products.