Choosing which posts to include in the table
Posts Table Pro comes with lots of options for choosing which posts are included in the table. You can display posts with a specific category, tag, post type, status, custom taxonomy term, custom field or date (year, month or day). You can also show or hide specific posts from the table based on their ID, and exclude certain categories.
Available options
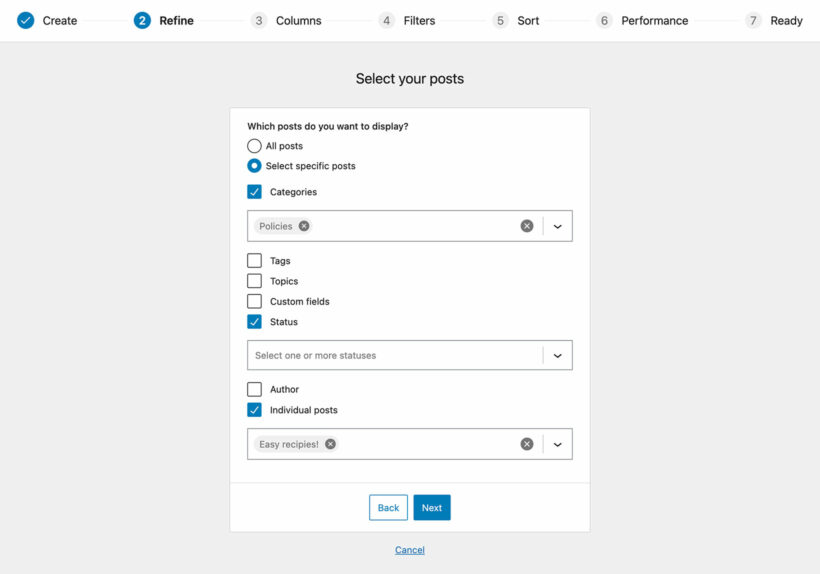
You can select the most popular options directly in the table builder when you create a new table. More advanced options are also available in the shortcode, which we have provided full instructions for below.
- Category - Lists posts from a specific category
- Tag - Lists posts with a specific tag
- Term - Lists posts with a specific custom taxonomy term
- Custom field - Lists posts with a specific custom field value
- Post type - Lists posts with a specific post type (e.g. products, events, or projects)
- Status - Lists posts with a specific status (e.g. publish)
- Year - Lists posts published in a specific year (shortcode only)
- Month - Lists posts published in a specific month (shortcode only)
- Day - Lists posts published on a specific day of the month (shortcode only)
- Author - Lists posts by a specific author/user
- Include - Lists specific posts in the table based on ID
- Exclude - Excludes specific posts from the table based on ID (shortcode only)
- Exclude category - Excludes entire categories of posts from the table (shortcode only)
- Exclude term - Excludes posts with specific taxonomy terms from the table (shortcode only)
- MIME type - Lists media library files with a specific file extension (table builder only)
Shortcode options
If you are creating tables using the [posts_table] shortcode instead of using the table builder, then you need to know the correct name and syntax for the data that you want to include in the table. We have provided full guidance on this below.
Category
The category option lets you choose which blog post categories are displayed in the table. This applies to blog posts only (i.e. the default, where post_type is set to post). If you’re displaying pages or other custom post types, this option has no effect and you need to use the ‘term‘ option instead (see below).
You should specify the category slug or ID – this can be found under the Posts → Categories menu in the WordPress dashboard. You can also specify multiple categories to display – either separated by commas or by a plus sign (+). If you use commas it means “posts in this Category A or Category B”. If you use a plus, it means “posts in Category A and Category B”.
For example, to display posts which are in the “design” category or in the “print” category, use: [posts_table category="design,print"]
To display posts which are in the “design” category and in the “print” category, use: [posts_table category="design+print"]
Warning: The category option only applies to normal WordPress posts, which you manage via the 'Posts' section on the left of the WordPress admin. It does not work for custom post type categories (e.g. event categories or document categories) because these are actually custom taxonomies and not categories. To show custom post types from a specific 'category', use the term option instead.
Can I list categories and sub-categories separately?
All posts are displayed in a single list, regardless of whether they are in a parent category or child category.
If you want to list posts separately based on their category, then we recommend adding multiple tables to the page. Each table should list posts from a different category or subcategory. You can divide up the page by adding the category name as a subheading above each table.
Tag
The tag option applies to blog posts only and lets you list WordPress posts based on their tags. If you’re displaying pages or other custom post types, this option has no effect and you need to use the ‘term‘ option instead (see below).
Use the tag slug or tag ID – you can find this in WordPress under the Posts → Tags menu.
As with categories, you can use one tag or several tags, and you can use commas or a plus sign to denote how tags should be checked. Using commas means “posts with this tag OR that tag”; using the plus sign (+) means “posts with this tag AND that tag”. You can’t mix and match commas and pluses – it’s one or the other.
Example 1: Display posts with tag “awesome”: [posts_table tag="awesome"][/no_shortcodes]
Example 2: Display posts with tags “cool”, “awesome” or “good”: [no_shortcodes][posts_table tag="cool,awesome,good"]
Example 3: posts with tags “cool”, “awesome” and “good”: [posts_table tag="cool+awesome+good"]
Post type
The post type option determines which post type (or types) will be displayed in the table.
Selecting a post type using the table builder
When you're using the table builder, you can select a post type from a list of the post types which are available on your site.
It is only possible to select one post type per table in the table builder. As a result, you should use the shortcode if you need to list multiple post types in the same table.
Using the post_type shortcode option
You can use the post_type shortcode option to set the post type directly in the
The default is post_type="post" which will display blog posts. For pages use post_type="page". For attachments you can use post_type="attachment".
For custom post types, you will need to find the ‘slug’ for that post type. The easiest way to do this is to go to the main page for your post type in the WordPress admin and look at the URL. For example, WooCommerce has a ‘products’ post type. If you go to the ‘Products’ menu in the admin, you will notice in the URL in your browser that it looks something like: “../wp-admin/edit.php?post_type=product”. The “product” bit is the post type you need to use. If you’re using Easy Digital Downloads, use post_type="download".
You can also use a list of post types, separated by commas. For example post_type="page,post", will display all blog posts and pages.
Example 1: Display pages: [posts_table post_type="page"]
Example 2: Display Easy Digital Downloads AND WooCommerce products in a table: [posts_table post_type="download,product"]
Example 3: Display a custom post type with the slug 'members': [posts_table post_type="members"]
Note: It is not possible to list the 'attachment' post type in the same table as other post types. This is because the 'attachment' post type is used for Media Library files, and works differently from other post types. If you need to list attachments and other post types, then you will need to create separate tables. Also see our separate article about displaying Media Library files directly in Posts Table Pro.
Post status
The status option displays posts in the table based on their status.
The default status is publish. The other options are draft, pending, future, private or any. Pending posts are those pending a review. Future posts are those scheduled to be published at a future date. Private posts have their visibility set to Private which means they can only be viewed by the post author or other administrators.
You can also use a list of post statuses separated by commas, for example:
[posts_table columns="title,author,categories" status="publish,draft"]
See also: How to automatically expire posts and remove them from the table on a certain date.
Custom taxonomy term
The term option creates a table that only displays posts with the the specified term or terms. The taxonomy that you specify here doesn’t have to be a column in your table.
Use the format: term="<taxonomy slug>:<term slugs or IDs>". You can select from one term or multiple terms. For multiple terms, separate them with a comma or a plus sign (+) to denote whether the posts should have any of the terms or all of them.
Using commas means “taxonomies with this term OR that term”, and using the plus sign (+) means “taxonomies with this term AND that term”. You can’t mix and match commas and pluses within a single taxonomy.
You can also use a comma or a plus sign if you are selecting from 2 or more taxonomies. For example: term="document_status:approved+document_type:memo" means select documents with the approved document status that also have the memo document type.
Example 1: Display posts with a document type of policy or memo:
[posts_table post_type="document" term="document_type:policy,memo"]
Example 2: Display posts with a document type of policy or legal, and a document status of approved:
[posts_table term="document_type:policy,legal+document_status:approved"]
Example 3: Display posts with terms cool, awesome or good from custom taxonomy label:
[posts_table term="label:cool,awesome,good"]
Example 4: Display posts with terms cool and awesome and good from custom taxonomy label:
[posts_table term="label:cool+awesome+good"]
If you haven't created your custom taxonomies yet, check out our tutorial on how to do this.
Custom field
The cf option is used to select posts based on a custom field value. You should use the format cf="<field name>:<field value>" when using this option. As with the above options you can enter one custom field to check, or several, and can separate them using a comma or a plus sign (see categories or tags for more details).
For example, if you are displaying a “car” custom post type and wanted to display cars which are either blue OR are Audis, you would use:
[posts_table post_type="car" cf="color:blue,make:audi"]
If you wanted to list posts with either of two values from the same custom field (for example cars that are blue or red) then you would use:
[posts_table post_type="car" cf="color:blue,color:red"]
However if you wanted to select the blue Audis (i.e. have color = blue AND make = audi) you would use:
[posts_table post_type="car" cf="color:blue+make:audi"]
If you haven't created your custom taxonomies yet, check out our tutorial on how to do this.
Custom fields added using the Toolset plugin
If you're using Toolset to create your custom fields, then you need slightly different syntax to display them in the table.
Toolset adds wpcf- to the start of the custom field name, so if you create a custom field called 'color' with a value of 'blue' then the correct syntax will be wpcf-color:blue. This means that if you want to create a table displaying posts with a custom field value of 'blue' then you would need to add it as follows:
[posts_table cf="cf:wpcf-color:blue"]
Display posts based on when they were published
The following three options control which posts are displayed based on the date they were published.
Year
The year option can be set to limit posts to a specific year. E.g.[posts_table year="2016"]
Month
Selects posts from a specific month. You should use a number here between 1 and 12. You can combine this with the year or day options if you want more fine grained control, e.g. [posts_table year="2015" month="11"]
Day
Selects posts from a specific day in the month. You should use a number between 1 and 31, and as above, you can combine this with the year or month options, e.g.[posts_table month="4" day="25"]
Author
The author option displays posts from a specific author. Use the author ID or a list of IDs.
Example: [posts_table author="1,4"]
Exclude posts
The exclude option can be used to exclude posts or pages from your results based on their post ID. You can enter one ID or a list or IDs.
Example: If you were displaying a table of pages, but wanted to exclude the current page (id=23) which the table is displayed on, you would use:
[posts_table columns="title,content" post_type="page" exclude="23"]
Include posts
The include option can be used to show only specific posts or pages in your table. You can enter one post ID or a list or IDs separated by commas. Note that include and exclude are mutually exclusive – if you set one, the other will be ignored.
Example displaying 4 specific posts: [posts_table include="23,45,67,90"]
Exclude category
The exclude_category option is used to exclude entire categories of posts from your table. You can use category IDs or slugs, and it can be one category or a comma-separated list.
Example: [posts_table exclude_category="3,6"]
Example: [posts_table exclude_category="design"]
Further reading: Check out our full tutorial on how to list WordPress posts using all these options.
Exclude taxonomy term
The exclude_term option is used to exclude posts with a specific custom taxonomy term. You can use taxonomy term IDs or slugs, and it can be one category or a comma-separated list.
Example: [posts_table exclude_term="label:staff"]
Example: [posts_table exclude_term="label:3,6"]
Example: [posts_table exclude_term="label:staff,region:devon"]
MIME type
If you're using Posts Table Pro to display files directly from the WordPress media library (instead of displaying another post type), then you can use MIME types to list specific file types in the table. For example, you might want to create a table that only lists image files or PDF's. We have a separate article about how to do this.
Can I list users with Posts Table Pro?
Unfortunately Posts Table Pro can't list users because users are not a post type in WordPress and are stored in a different database table. Instead, we recommend that you create a custom post type and use it to store your members. We have an in-depth tutorial about how to create a member directory with Posts Table Pro.