The ultimate WordPress table of contents plugin and how to use it
A good WordPress table of contents plugin can do a lot for your website, and in ways that are probably a bit outside of what you might be expecting.
This sounds perhaps a bit mysterious at this point, but I'm going to explain everything in just a minute.
In short, if you've been on the lookout for a great WordPress table of contents plugin then your search is basically over. In this post, I'm going to show you why Posts Table Pro is the ultimate such plugin, how to use it, and in which unusual ways it can help you make your whole site more reader-friendly.
Posts Table Pro: the best table of contents plugin
Posts Table Pro lets you create an easy table of contents for your entire website. And "entire" is the keyword here.
An example of what that might look like:
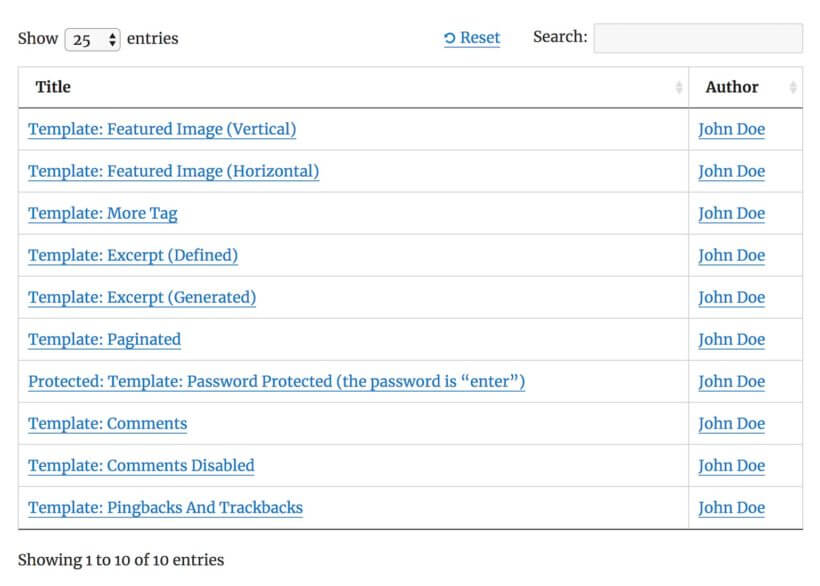
- What you can see in this particular example is a list of posts belonging to a given category. This can be customized (more on this in a minute).
So what sets this plugin apart from its competitors?
Most WordPress TOC plugins focus on creating a set of jump links within an individual blog post.
Posts Table Pro does something else.
In simple terms, it hooks up to your site's database and allows you to build a whole site table of contents. This can consist of any number and any combination of WordPress posts, pages, custom post types, taxonomies, custom fields or any other content type you might have on the site.
But there's more:
- Posts Table Pro is a user-friendly and simple TOC plugin that works through easy shortcodes, which means that you can include your table of contents in any post or page.
- The structure of your table of contents is fully customizable, and the overall styling is inherited from your current theme. No CSS code snippets required.
- You can present your table of contents as a single-column list, or as a multi-column table that's sortable, paginated (to prevent scrolling), and offering you a number of side features.
- You can add a search field to help the reader find any given entry in the TOC.
- The reader can filter through the website table of contents via a handy dropdown list.
- Everything is fully responsive and mobile-friendly.
- It can improve your website's SEO in search engines like Google.
- Posts Table Pro is compatible with WordPress themes as well as page builders like Elementor.
Here's how to use Posts Table Pro step by step:
How to start using this WordPress table of contents plugin
There are just two simple steps:
Step #1: Install Posts Table Pro
First, here's where you can get the plugin:
After you finalize the purchase, you will be able to download the ZIP containing the plugin. You will also get your personal license key.
Next:
- Log in to your WordPress dashboard, and go to Plugins → Add New.
- Click on the Upload Plugin button at the top of the page.
- Select the ZIP file of the plugin and follow the on-screen instructions to install and activate the plugin.
- Afterward, the setup wizard for Posts Table Pro will launch on its own and guide you to create your first table.
Step #2 Customizing your table of content
If you're looking to create a minimal table of contents for your document or project, you've come to the right place. A table of contents can be a helpful tool to guide your readers through the content and structure of your work. However, sometimes a simple and minimal approach is preferred. To create a minimalist table of contents, follow the steps below.
- You can create a table of contents in the setup wizard when you first activate the plugin, or by going to Posts Tables → Add New.
- Next, you need to provide a name and select the post type to display (in this case, "posts"). It's important to point out that Posts Table Pro also allows you to display a table of contents for your custom posts, whatever those might be. For example, let's say you have created a custom post type called "books". You can display a table of contents featuring all posts of that type by selecting the custom post type "books". Or if you want to make a table of content for a series of posts, add the custom post type 'series name'.
- Select which posts or pages to add to your table.
- Add columns such as the title.
- You can add filters to the table for users to easily find what they're looking for, such as article categories and titles.
- Set the default sorting option and the sort direction.
- If you have a lot of data, you can enable lazy loading to improve the table's performance.
- Then choose how to sort your table, setting the default sorting option and the sort direction that you prefer.
With Posts Table Pro, you can choose specific posts, pages, custom content types, and even WooCommerce products that you want to feature in your table of contents. This helps you deliver a better user experience.
Displaying a table of contents for custom posts
Once you've successfully created your table with the Post Table Pro plugin, the setup wizard will let you know that you've completed the process and give you clear instructions on how to insert the table onto your WordPress site. The plugin offers several options for adding the table to your site, depending on your preference.
You can choose to use the "Post Table" block in the Gutenberg editor to directly add the table to your page. Alternatively, you can copy the shortcode from the table builder and paste it onto any page on your site. This gives you the freedom to place the table wherever you want, regardless of the content on the page.
5. Creating an index of your website content
An index is kind of like a table of contents, only a much bigger one, and lists your articles in alphabetical order.
An example:
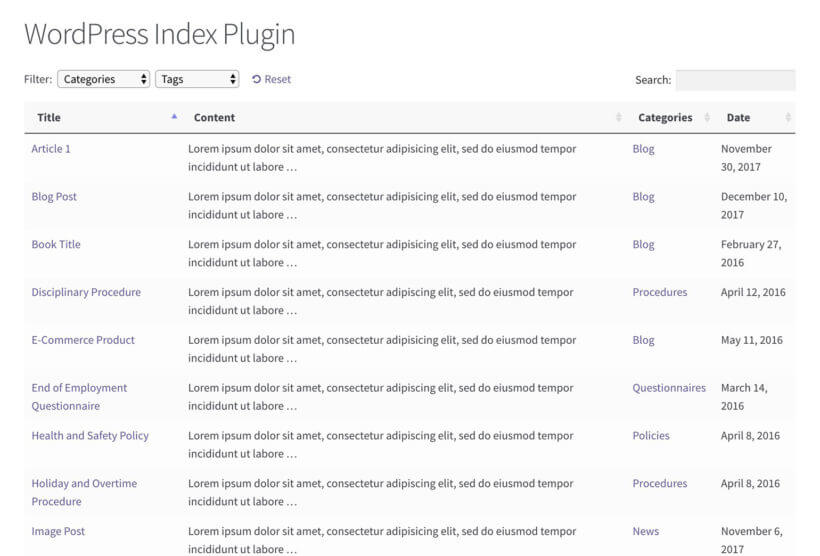
You can create something like that with Posts Table Pro as well. Here's how.
6. Listing ALL your website content in a single TOC
Granted, taking all your content and listing it inside a single table of contents is a bit extreme. However, it can be useful. Two scenarios:
- Instead of creating a sitemap by hand (through HTML), you can generate it automatically with Posts Table Pro. Plus it's going to be searchable and much easier to navigate than a standard sitemap would be.
- You can take this "mega TOC" and put it on a page published privately (meaning that only the logged-in users can see it). This can be a useful resource for your internal editorial team. That's because using such a TOC to find specific pieces of content on the site is going to be much quicker than going to the WordPress dashboard.
Just remember to choose the custom post types in refine tab of the table builder. You can always choose more than two post types.
Where to get the plugin
To learn all the ins and outs of the WordPress plugin and master structuring your shortcode to get the exact effect you desire, check out Posts Table Pro's official reference file here.
This sums up how to use Posts Table Pro - the best WordPress table of contents plugin out there for bloggers. If you have any questions at all, feel free to submit them below.
2 Comments
Thank you for this amazing article, it has helped me a lot, however I'm still unable to completely solve my issue. I'm using a shortcode to generate my 'Related Posts' and they're being displayed in the TOC table, I'm using the shortclode as a globally across my website. How can I excluse the shortcode from showing in the TOC table?
Thanks for letting us know, Aleksandar. I'm glad to hear our article is helpful. My apologies for missing anything obvious - So that I can better understand your concern and be able to assist you best, please could you describe your concern in more detail by submitting a support request via our Support Center. Please could you also reply with a screenshot or screen recording video to help describe the issue you're experiencing. You can do this for free by going to screencast.com, getcloudapp.com (or a service of your choice), uploading the screenshot and sending us the URL. You can also attach the screenshot file(s) to your support request. Many thanks!