


Over 100,000 WordPress sites run the free Pods plugin. It's a fantastic way to create custom post types, custom fields, and taxonomies - everything you need to store extra data. Keep reading to discover an easy way to install Pods and list the data in a searchable, sortable table.
At Barn2, we love the WordPress Pods plugin because it makes it so easy to add extra content types to any WordPress website and has a list of premium addons. Instead of messing up your site by adding everything as pages and posts, you can create WordPress custom post types or CPT and create custom settings pages. Your new custom post types appear as separate sections on the left of the WordPress admin menu. They're perfect for storing articles, events, publications, members, directory listings, or something completely different. However, there is a problem.
While Pods is a wonderful and versatile plugin for creating custom post types, fields, and taxonomies in WordPress, it does have a limitation regarding displaying the custom data in the back end, which is great for storing and organizing information for internal use. However, it does not include any functionality to display the custom data on the front end, meaning that you will need to use additional tools or code to display the information on your website.
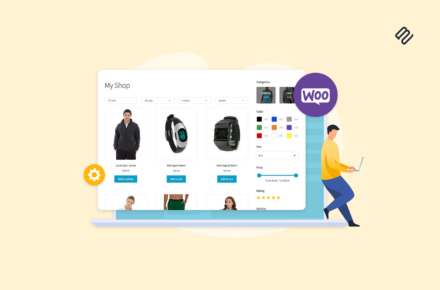
The solution is to use WordPress Pods plugins with the Posts Table Pro plugin. Posts Table Pro is a WordPress table plugin that displays your custom post types, fields, and taxonomies in a searchable, filterable table. It's the perfect way to show custom content.
This Pods WordPress plugin tutorial is the complete guide on how to use Pods to create WordPress custom post types, custom fields, and taxonomies. I'll show you how to create each of these extra content types. You'll also learn how to display them on your website using Posts Table Pro.
In this article

- In this article
- What are the alternatives?
- How to create a WordPress custom post type with Pods
- Creating WordPress custom fields with Pods
- How to create WordPress custom taxonomies
- Displaying Pods content in the front end of your WordPress website
- How to password protect custom post types
- Pods: The verdict
Either read the whole article or click straight to the section you need. Alternatively, you can watch us create and display a custom post type in this video:
What are Pods?
Pods is a powerful and feature-rich plugin for WordPress. Whether you're looking to add custom post types, custom taxonomies, or custom fields that are meta boxes added to your posts to input additional information, this plugin provides you with all the tools you need to do so. Pods - Custom Content Types and Fields make it easy to create custom content types and fields, even for those without technical expertise, thanks to its user-friendly function.
One of the standout features of Pods is the level of support that it receives from a team of well-known WordPress.org experts. This ensures that the plugin is always up-to-date and in line with the latest development in WordPress.
I've obviously had my head in the sand for the last 4 years because according to the plugin changelog, Pods was released back in 2014 - and it has been updated every few months since then. For some reason, I only heard of it recently when customers started asking if our plugins work with Pods.
I did some investigation and discovered that lo and behold, Pods is a fantastic way for creating the extra data that people need to display using our WooCommerce and WordPress table plugins.
What are the alternatives?
There are various other plugins for creating WordPress custom post types, fields, and taxonomies. These include:
- Advanced Custom Fields - Excellent for creating custom fields. There's a free and a Pro version. If you just need to create custom fields, then ACF is ideal for WooCommerce. ACF is compatible with Elementor, Gutenberg, WooCommerce, and WPML Multilingual plugin. But if you want custom post types and/or taxonomies too, then Pods is a better all-round plugin.
- Toolset - This plugin is well-supported and from On the Go Systems, the company behind WPML. You can use it to create custom post types, fields, and taxonomies. I recommend Pods in this article because it's just as good as Toolset and completely free, but Toolset is a valid option too.
- Custom Post Type UI - A free plugin for creating WordPress custom post types and taxonomies. I've used this a lot and it's a good option, but use Pods if you need custom fields too.
If you're using Posts Table Pro to list custom post types on your WordPress site, then you can equally create the data using any of the above plugins. However, we like Pods because you can use it to create custom post types, fields, and taxonomies. That way, you just need one WordPress plugin (Pods) to create and store the data, and another (Posts Table Pro) to display it on the front end.
How to create a WordPress custom post type with Pods
First, I'll show you how to use Pods to create a WordPress custom post type. I'm assuming that you have already installed the free Pods WordPress plugin. If you haven't done that yet, do it now.
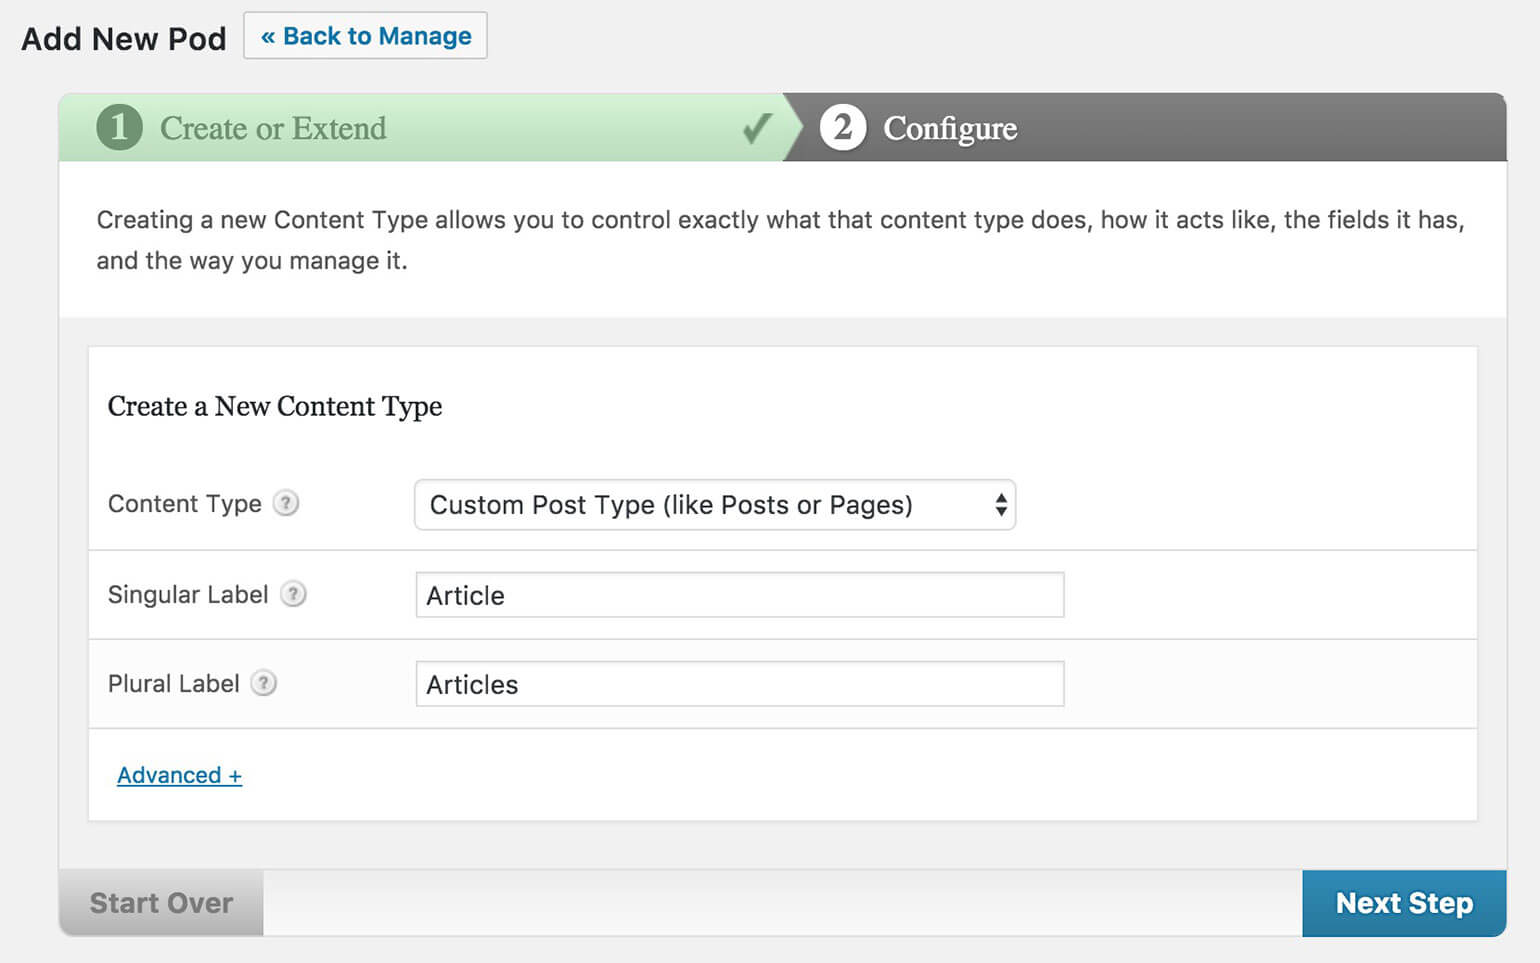
 Navigate to Pods Admin → Add New → Create New.
- On the 'Add New Pod' screen, choose 'Custom Post Type' from the 'Content Type (like Posts or Pages)' dropdown.
- Add a Singular and Plural label. This is how your WordPress custom post type will appear in the admin. For example, if you're creating a 'Documents' custom post type for a WordPress document library, then the Singular Label would be 'Document' and the Plural 'Documents'.
- Click 'Next Step'.
- The next screen lets you add custom fields to your custom post type. We'll look at this in the next section. For now, click on the 'Advanced' tab and scroll down to the 'Supports' and 'Built-in Taxonomies' sections. Tick any extra fields that you want to be available for your custom post type.
- Click 'Save Pod' and you can start adding custom posts straight away!
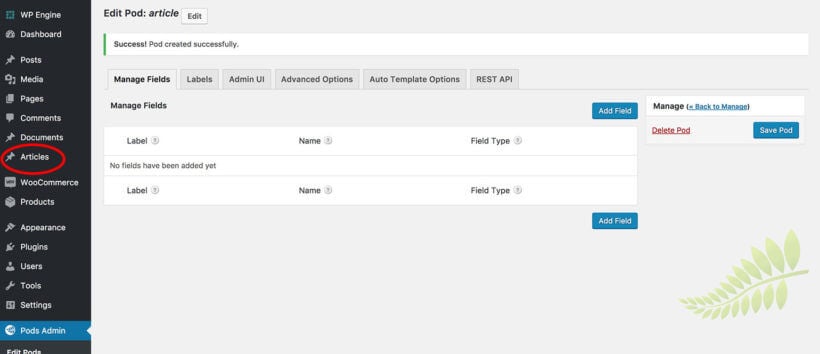
Adding posts to your WordPress custom post type
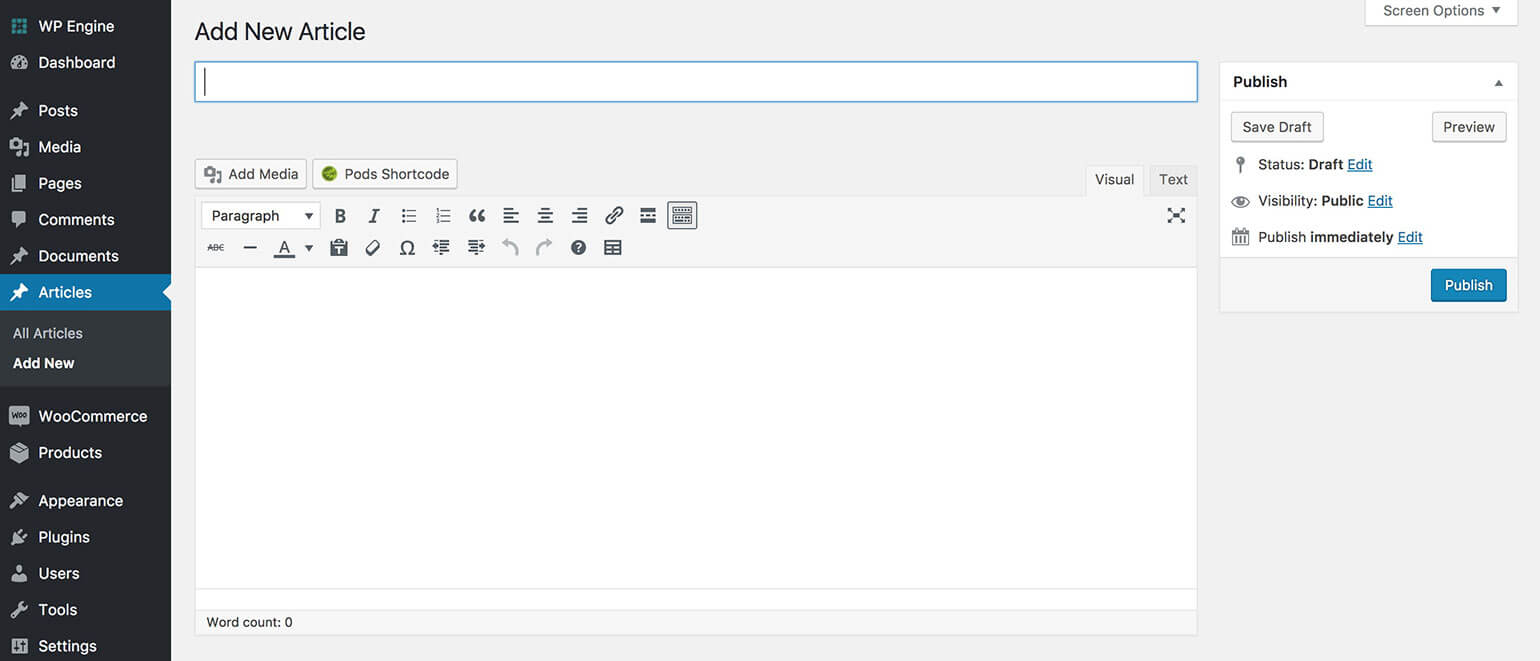
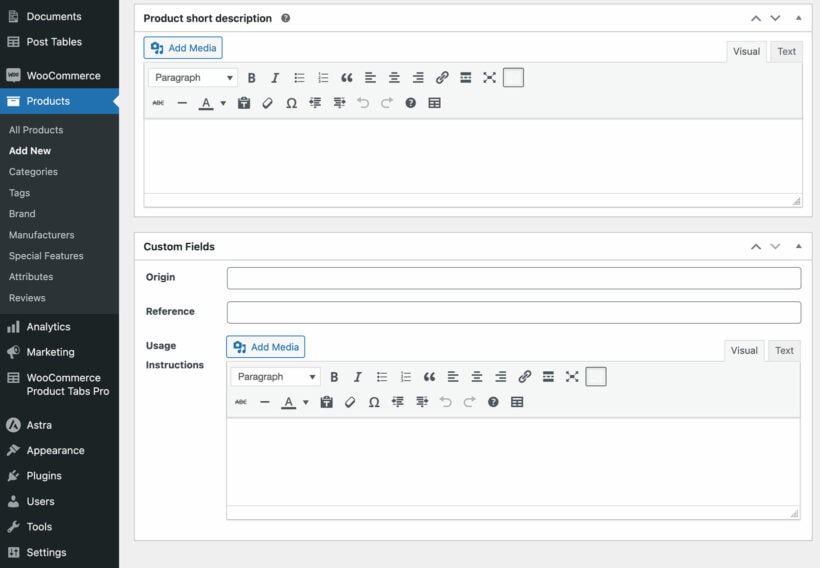
If you look to the left of the WordPress admin, you'll see a new link with the Plural Name you just added. To add a post to the custom post type you just created, go to [custom post type Plural Name] > Add New in the WordPress admin (e.g. Articles > Add New if your custom post type is called 'Articles').
The 'Add New' screen for your custom post type will look like my screenshot, plus any extra fields that you ticked in Step 5, above. Add all the data for your custom post and click 'Publish'.
Keep reading to learn how to create custom fields and taxonomies for storing extra data in WordPress. Or if you want to get started with displaying your custom post types on your website without any extra fields, skip ahead now.
Creating WordPress custom fields with Pods
In this section, we'll explore how to use Pods to create custom fields for any post type in WordPress, including post types created with Pods, standard blog posts, pages, WooCommerce products, events, portfolios, and more.
Before diving into the process of creating custom fields with Pods, it's important to understand the various field types available. Pods offer a wide range of custom field types, including text, date, file uploads, checkboxes, and more. In this section, I'll provide a comprehensive list of all the custom field types you can create with Pods, to help you make informed decisions about which fields to use for your specific needs.
Pods custom field types
Posts Table Pro lets you display these Pods custom field types:
- Plain Text - Unformatted text.
- Website - A clickable link to any website or URL. Good for website links or downloads (e.g. in a WordPress document library).
- Phone - Displays phone numbers. Use the 'Advanced' tab to select a format, and Pods will automatically add any dashes.
- Email - A non-clickable email address. If you want to make it clickable, then I suggest adding it to a WYSIWYG field instead. That way, you can highlight the email address and add the link.
- Plain Paragraph Text - Paragraphs of text with line breaks but no formatting.
- WYSIWYG (Visual Editor) - Probably the most useful field type, this adds a full WordPress visual editor to your custom field. You can add any type of content and format it using the WordPress toolbar. You can even add images, videos, audio files, galleries, etc.
- Date/Time, Date & Time - These 3 fields display dates and/or times. Use the 'Additional Field Options' tab to choose the format. Pods will show a date/time picker when you add data to this custom field. It will then show it on your website in the correct format.
- Plain Number - Use this to store any number with no special symbols or extra formatting.
- Currency - This field lets you display a currency or price. Use the 'Additional Field Options' to choose the currency symbol etc.
- oEmbed - Displays any of the oEmbeds supported by WordPress. For example, if you paste a YouTube video URL then WordPress will automatically display it as an embedded video player using Posts Table Pro. (Note: You can also insert oEmbeds into the WYSIWYG field type.)

Pods custom fields that work but are less relevant/useful
- Color Picker - With this field type, Pods will display a color picker when you add a custom post. Posts Table Pro will then show the hexadecimal value of the color. Not sure why you'd ever want to do this, but it's there if you need it!
- Yes/No - In theory this field does work with our plugins. However, if you select 'Yes' then it will just display as '1', which isn't very user-friendly! I'd recommend a different field type for displaying this sort of information.
- Code - Useful for displaying shortcodes or source code on your website.
Custom field types that can't be displayed using our plugins
- Password field - You can use this to add an encrypted password in the back end, but the password column will appear blank if you try to display it using Posts Table Pro. This is for security reasons.
- File / Image / Video - If you need to add files, images, or videos, then you can easily add these to one of the other field types. For example, you can add images using the 'Add Media' button of a WYSIWYG Visual Editor field, add videos by pasting a YouTube link to a WYSIWYG Visual Editor field or use the oEmbed field type.
How to create WordPress custom fields
Alright, now that you're familiar with the various custom field types that are available to you, it's time for me to guide you through the process of creating custom fields. Whether you want to add custom fields to a post type created using Pods or an existing post type, such as blog posts, pages, WooCommerce products, events, and others, the instructions will vary. However, don't worry, I'll walk you through the process step-by-step to make sure you end up with the custom fields you want.
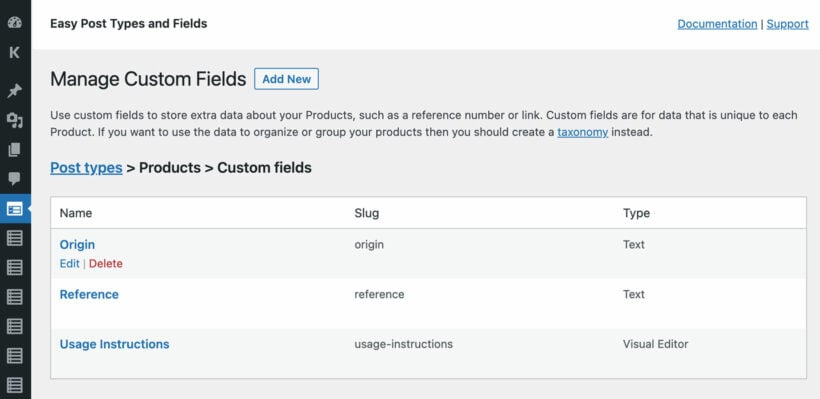
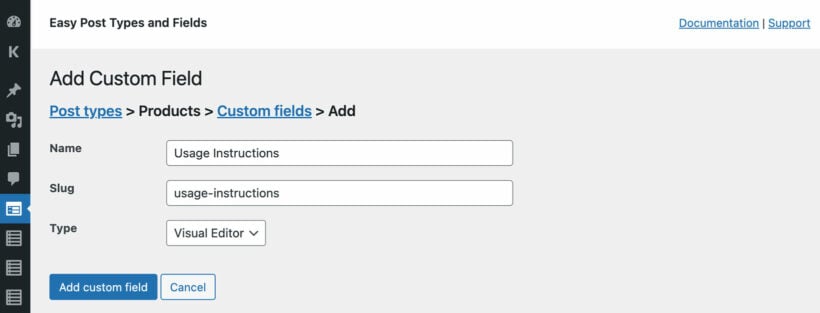
Adding custom fields to Pods custom post types
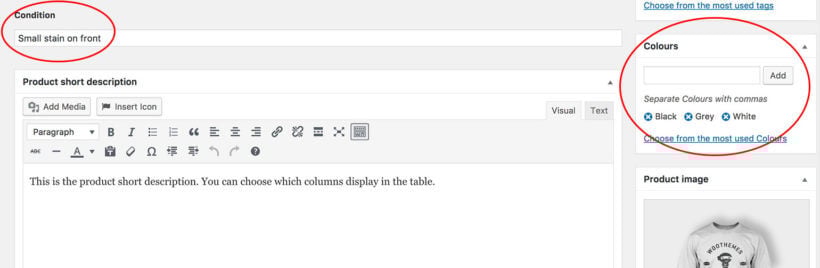
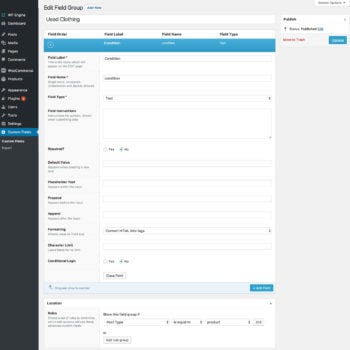
- Go to Pods Admin > Edit Pods and click on the WordPress custom post type that you're creating custom fields for. This will take you to the 'Manage Fields' tab on the 'Edit Pod' screen.
- Click 'Add Field' and enter the data for your custom field:
- Label - This will appear above the custom field on the add/edit custom post screen.
- Name - (Generated automatically when you add the Label.)
- Description (Optional.)
- Field Type - Choose a supported type of custom field from the list above.
- Options - Choose whether this field is mandatory when you create and save a custom post, or whether you can leave it blank.
- Click 'Save Field'.
- Repeat steps 2 and 3 to create as many WordPress custom fields as you need.
Adding custom fields to other WordPress post types
To add extra fields to other post types such as posts, pages, products, or events, the instructions are the same as above. However, instead of Pods Admin > Edit Pods, you need to go to Pods Admin > Add New and click the 'Extend Existing' option. From there, you can add custom fields to any post type - not just those created in Pods.
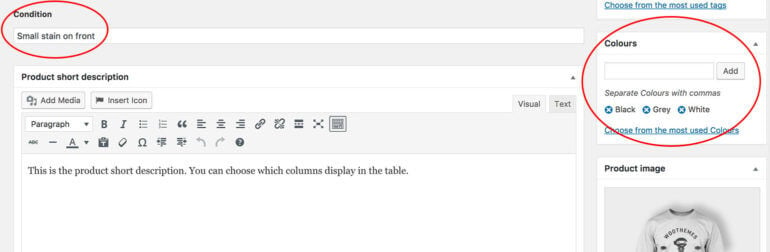
Entering data for your Pods custom fields
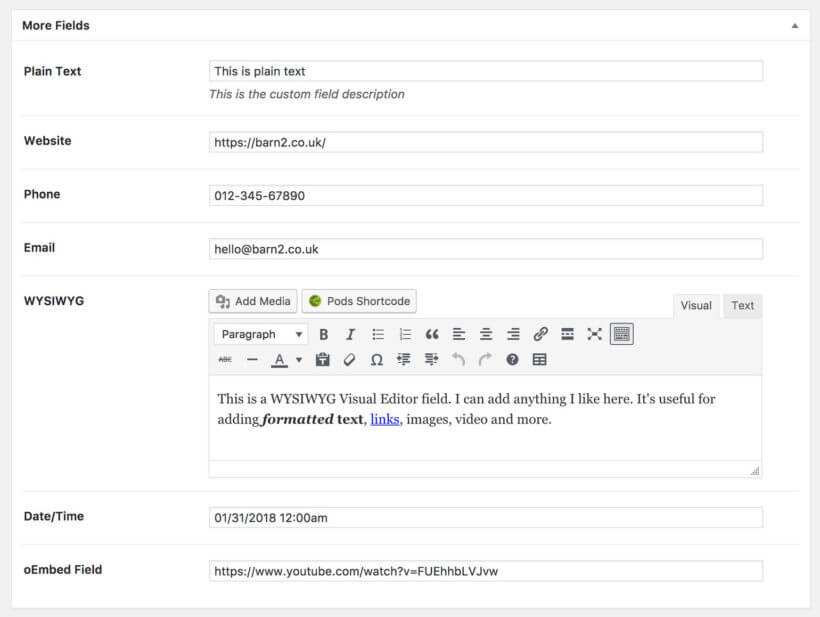
As you move forward with creating or editing a post in your WordPress custom post type, you'll notice a section named 'More Fields' that displays all of your custom fields. This section is located just below the main content editor for the post.
Enter all the relevant information for your custom fields and proceed to publish or update the post. With Pods, you don't have to worry about formatting errors as it provides helpful warnings if you attempt to enter any information in an incorrect format.
Now that you know to add custom fields to your posts, I'll explain how you can create custom taxonomies using Pods. On the other hand, if you're eager to start showcasing the custom post types and fields directly on your website, feel free to move ahead.
How to create WordPress custom taxonomies
So far, you've learned how to create a custom post type using the Pods framework. You've also learned how to create custom fields for your custom post type. Next, I'll teach you how to create taxonomies for your post types.
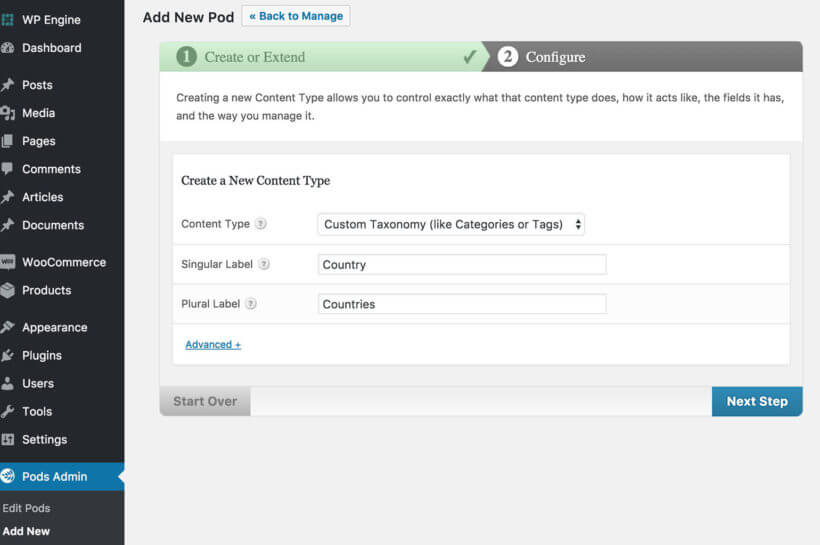
- Go to Pods Admin > Add New and click the 'Create New' option.
- On the 'Add New Pod' screen, select 'Custom Taxonomy (like Categories and Tags)' from the Content Type dropdown.
- Add a Singular Label and a Plural Label. For example, if you need the custom taxonomy to store country data then the singular should be 'Country' and the plural should be 'Countries'.
- Click 'Next Step'.
- Most people reading this article won't bother adding fields to their taxonomies because (a) this is a niche case, and (b) they're not supported by our plugins. So go straight to the 'Advanced Options' tab and scroll down to 'Associated Post Types'. This is really important, as it's where you link WordPress taxonomy with the post type that you need to use it on. Choose a post type from the list. This could be normal WordPress pages or posts, or a custom post type.
- Click 'Save Pod'.
How to add custom taxonomy terms in Pods
 Now you've created a WordPress custom taxonomy for your post type, it's time to add data to it.
You can add categories and tags to your custom post type, allowing them to be displayed in multiple archive pages and appearing on your home page or blog page. To do so, go to the "Add or Edit" page for the post type you want to apply the taxonomy to. Just like WordPress categories, you'll see the taxonomy option on the right side of the page.
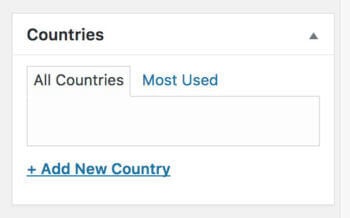
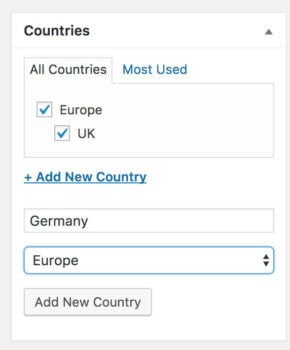
At first, it will look something like this screenshot, as you haven't added any data yet. Click 'Add New Country' (or whatever you called your taxonomy) and add 1 or more terms. These will appear as checkboxes. You can make terms parents of each other to create hierarchical taxonomies in a nested structure:
Tip: You can also add, edit, delete and restructure your custom taxonomies centrally. Find the post type on the left of the WordPress admin, and hover over it to find the link for the taxonomy. This page will be just like the main 'Categories' page in WordPress, and you can use it to manage the taxonomy terms.
Displaying Pods content in the front end of your WordPress website
Pods is an excellent tool for creating custom post types, fields, and taxonomies that can store additional data in the backend of your WordPress website. However, displaying custom post types metadata on the front end can be challenging, especially for non-technical users who do not have the time or expertise to add custom code to their template files.
For those who want an easier solution, Posts Table Pro is a WordPress table plugin that can help display the Pods fields on the front end of your website without the need for complex coding. This plugin makes it easy for you to showcase the custom data stored in Pods in a dynamic and organized manner on your public-facing pages. So, whether you're a developer or a non-technical user, Posts Table Pro provides an accessible way to bring your Pods fields to life on your website.
What is Post Table Pro?
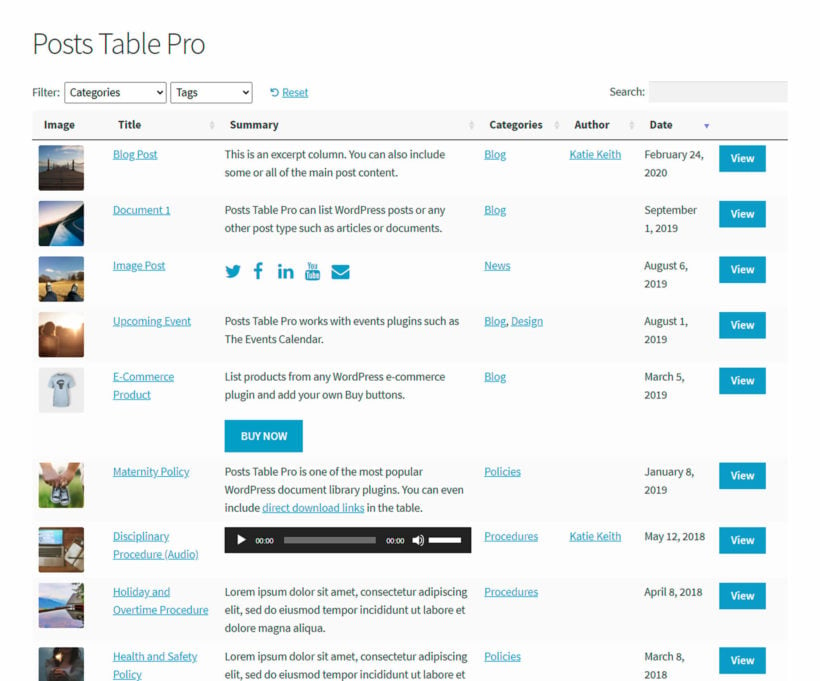
Posts Table Pro is a powerful WordPress plugin that provides an easy solution to display all types of WordPress content management system, including custom post types, custom fields, and custom taxonomies, in a table format. The Table is fully searchable and sortable, which makes it easier for visitors to find the information they're looking for.
Additionally, Post Table Pro offers a range of filter options, so you can choose to display only specific columns or items, making it a highly flexible solution for displaying data on your website. With it, you can create tables of custom post types and fields that are easy to navigate, making it the ideal choice for anyone who wants to display their Pods fields on the front end of their website.
You can also use the plugin to display WordPress custom post types, with each custom post appearing as a separate row in the table. It can also display custom fields as columns in the table. You can list custom taxonomies as columns in the table, and also as filter dropdowns above the table. With WordPress Pods, you can even create tables that list posts with a specific value for a custom field or a term for a custom taxonomy. You can then add custom taxonomy filters. Additionally, using the WordPress Pods get field value function, you can retrieve the value of a specific field for a post.
I'll show you how to do all this next.
How to list custom post types Plugin on a WordPress website
- Install the Posts Table Pro plugin.
- Set up Posts Table Pro using the instructions in the 'Getting Started' email.
- Go to Pages > Add New and create a page that you'll use to list the custom post type.
- Add the following shortcode:
[posts_table post_type="your_post_type"] - Replace your_post_type with the label for the post type you want to display. If you created the post type using Pods then this will be the Singular Label you added earlier. If you added the Label as multiple words, then you need to add an underscore (not a hyphen) between each word, as I did in my example.
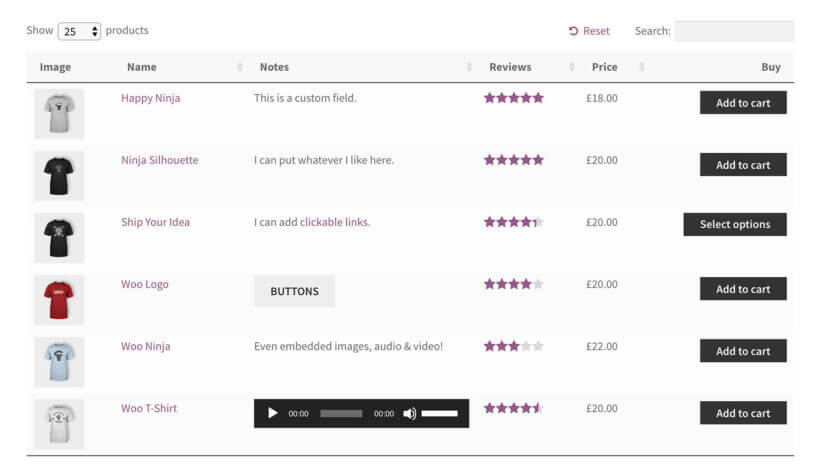
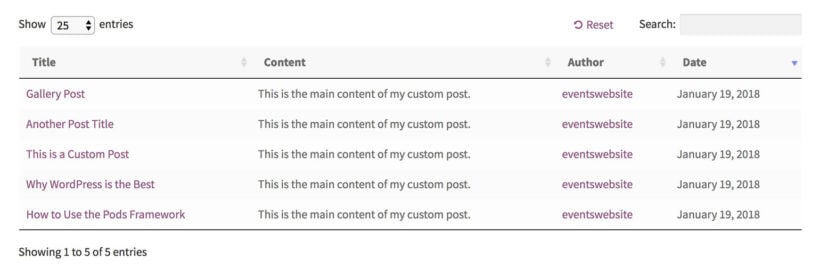
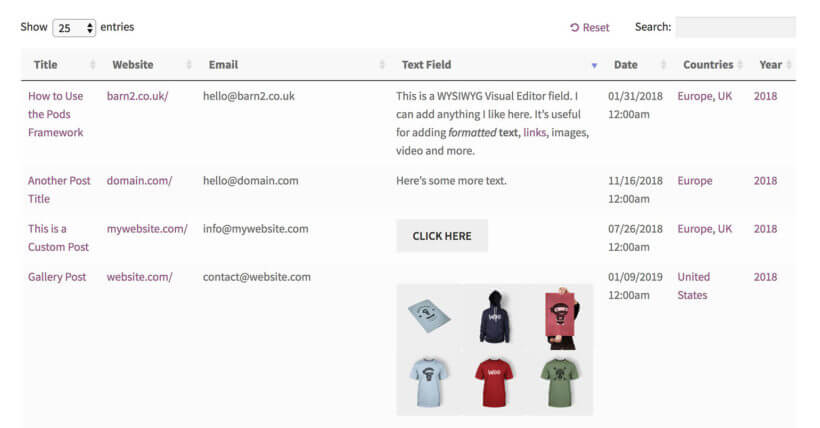
- Now view your page, and you will see all the posts for that custom post type listed in a neat table layout.
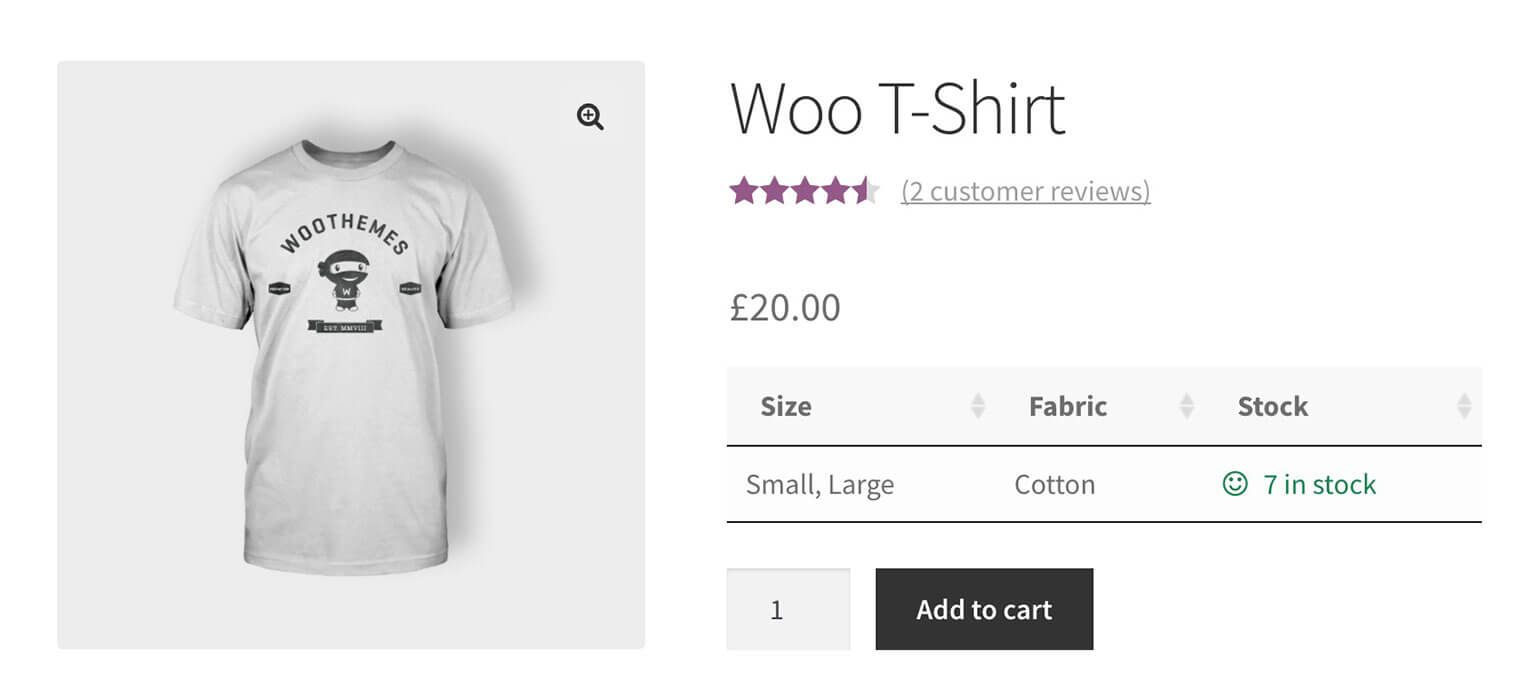
At this point, your list of custom posts will look something like this:
You can use the Posts Table Pro knowledge base to show different columns, rename the columns, and much more.
How to list custom fields in the front end
Next, I'll show you how to list your Pods custom fields as separate columns in the table. Again, you'll need Posts Table Pro for this:
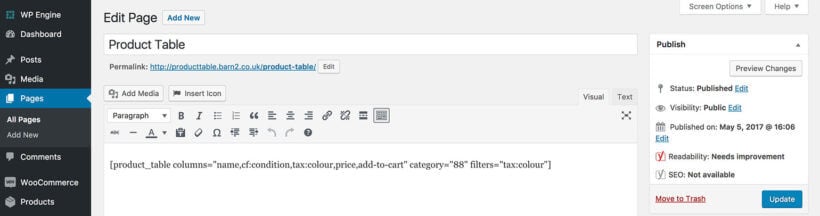
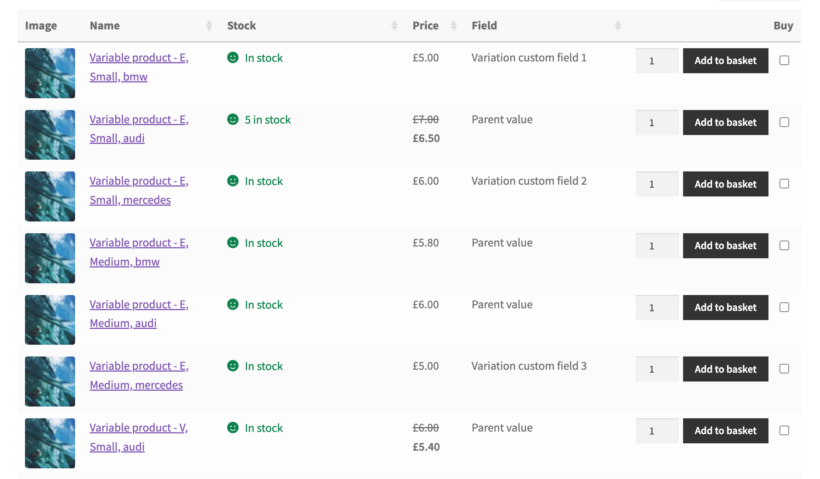
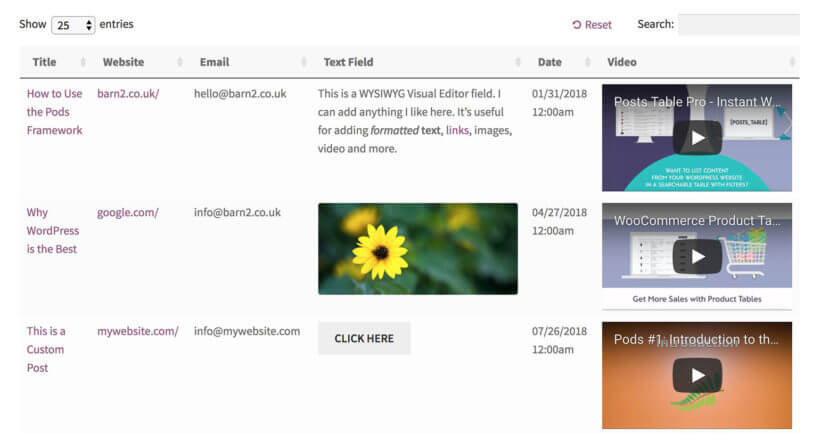
- Create a table using Posts Table Pro, as per the instructions in the previous section. Extend your shortcode to something like this:
[posts_table post_type="your_post_type" columns="title,cf:your_custom_field_1,cf:your_custom_field_2"]. Replace the blue text with the Singular Label of the custom fields you want to display. If the Singular Label consists of more than one word, then you need to add an underscore between each word. In my example shortcode, I have shown you how to add 2 custom field columns. You can add as many as you like - separated by commas, with cf: before each one. - If you want to display formatted content (e.g. links, text formatting, HTML, shortcodes or video), then you should also add shortcodes="true" to the shortcode. For example:
[posts_table post_type="your_post_type" columns="title,cf:your_custom_field_1,cf:your_custom_field_2" shortcodes="true"]
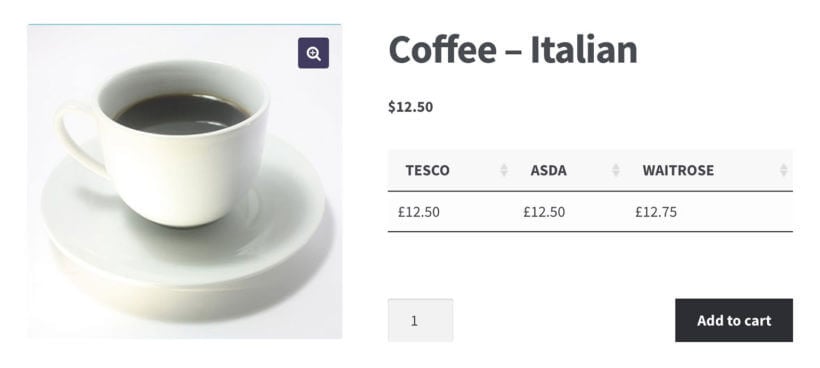
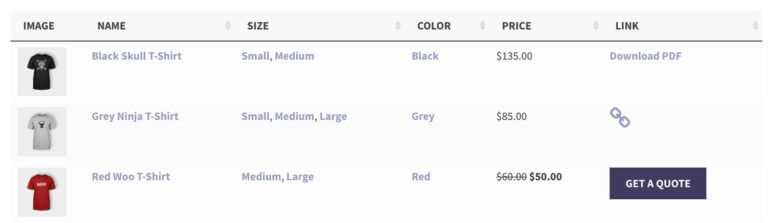
Now, your table will look something like this:
How to show custom taxonomies in the front end
By now, you've learned how to display WordPress custom fields in a table with extra columns for custom fields and other data. You should see new fields appear in the sidebar of your dashboard or the label you designated. Now, let's extend it by showing a custom taxonomy:
- Use Posts Table Pro to create a table, as per the instructions in the previous two sections.
- Extend your shortcode by adding tax: followed by the Pods custom taxonomy. For example:
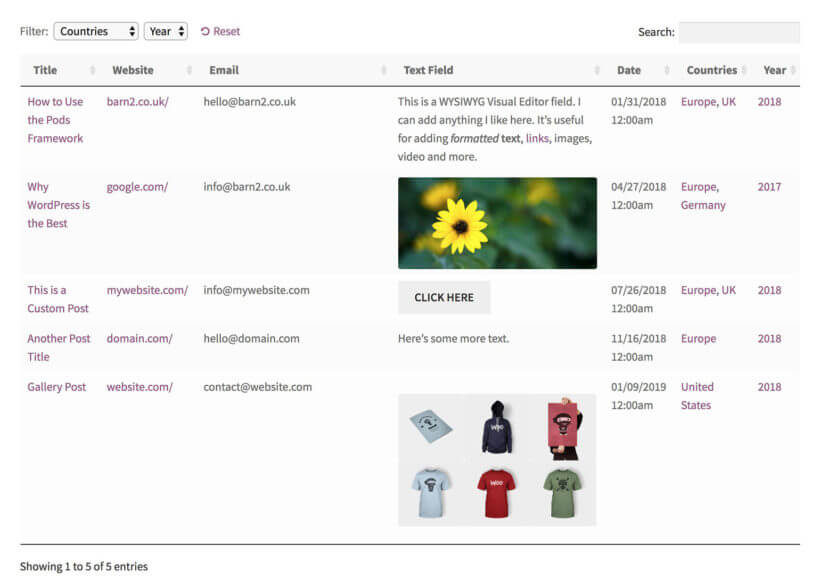
[posts_table post_type="your_post_type" columns="title,cf:your_custom_field_1,cf:your_custom_field_2,tax:country" shortcodes="true"]. This time, replace the text in green with the actual Singular Label (separated by underscores if it's multiple words) for your WordPress taxonomy. If you want to show multiple taxonomies, then just separate them with commas and make sure you add tax: before each one. - Save the page and view the table.
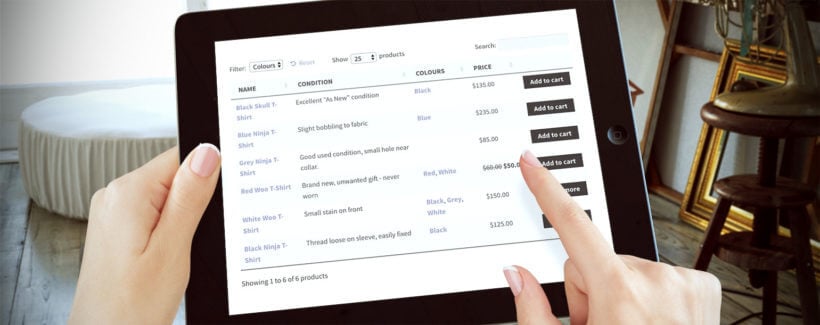
Your table will now contain the custom post title, custom fields, and custom taxonomies:
Nice!
People can click on any custom taxonomy in the table to filter by that term. Read on to discover how to add taxonomy filter dropdowns above the table too.
Now you know how to create WordPress custom post types, fields, and taxonomies, and to list them on your website. Let me show you how to create tables that display only those posts that have a specific custom field value or taxonomy. Additionally, I'll explain how to add custom taxonomy filters to help users easily find your posts. This can be done by using WordPress Pods get field value that provides access and display the custom fields and taxonomies of your posts. With this plugin, you can easily filter and sort posts based on their custom field value or taxonomy term.
How to list posts based on a custom field value
You can use Posts Table Pro to show posts with a specific custom field value. For example, if you have a custom field called 'Vegetarian' then you can create a table listing all posts with a custom field value of 'Yes'.
To do this, you need to add cf="<field name>:<field value>" to the posts table shortcode. To use my example with Posts Table Pro, this would be:
[posts_table cf="vegetarian:yes"]
How to list posts with a specific custom taxonomy term
It's also possible to use our plugins to show posts that are labelled with a specific custom taxonomy term. For example, if you have a custom taxonomy called 'Country' then you can create a table listing all posts with the term 'France'.
You can do this by adding term="<taxonomy_label>:<term slug or ID>" to the posts table shortcode. To use my example with Posts Table Pro, this would be:
[posts_table term="country:france"]
How to let your users filter by custom taxonomy
Finally, I'll tell you how to add custom taxonomy filters above the list of posts. The filter will appear as a dropdown list - 1 for each custom taxonomy. Users can refine the list of posts by clicking on the taxonomy terms in the dropdowns.
To do this, add filters="tax:<taxonomy_label" to your posts table shortcode. For example, this shortcode will list posts with filters for the country and year taxonomies:
[posts_table filters="tax:country,tax:year"]
How to password protect custom post types
Before we close, I'll quickly tell you how to hide your WordPress custom post types from public view. There are lots of reasons you might want to protect some or all of a custom post type. For example, you might be creating a private document library that only specific people can access. If you're a designer then you might need a private portfolio that is hidden from public visitors to your website.
There are 2 ways to do this:
- Password protect categories within your custom post type
- Create private custom post-type categories that are only visible to logged-in users based on their role
You can learn how to use both methods in our tutorial: Password Protect Any WordPress Custom Post Type (In Just 5 Minutes).
Pods: The verdict
In conclusion, Pods is a top-notch plugin that offers a comprehensive solution for creating Pods - custom content types and fields, and taxonomies within the WordPress platform. You can also create custom content types and fields by writing code, but it requires a good understanding of the functions.php file and custom CSS codes. With its user-friendly interface, versatility, and support from a team of WordPress experts, Pods provides an efficient and effective way to enhance the functionality of your website.
Used alone, you need some technical know-how to display Pods custom fields on the front end of your WordPress website. However, that's not a problem because you can use Posts Table Pro to list your Pods data, without needing any technical expertise.
What do you think of Pods compared to other plugins for creating custom data in WordPress? Did you find this Pods WordPress plugin tutorial helpful? Please let me know in the comments.