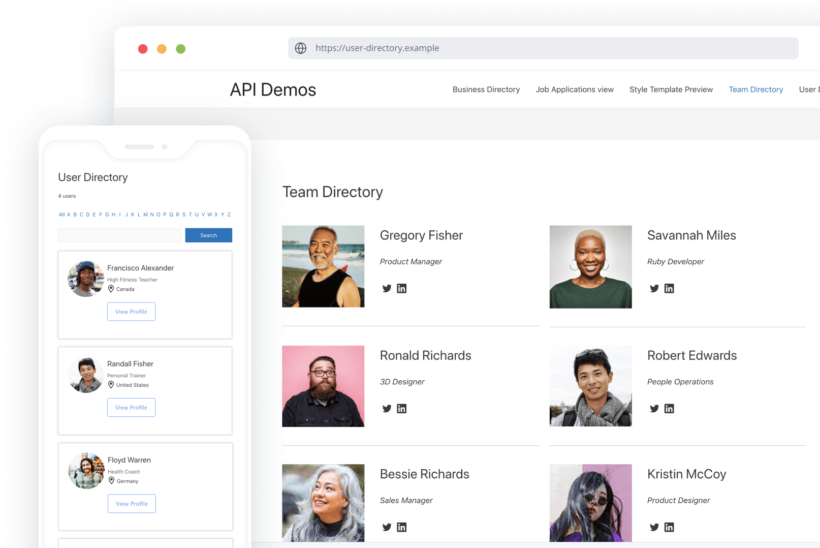
If you enroll students in courses or programs – whether that’s through an educational institute, school, university, tuition, or private classes – you probably maintain a student database such as a Microsoft Access database, Microsoft Excel, or Google Sheets. It might contain basic information about your students, such as their names, contact information, and the courses they’re enrolled in.

You might consider displaying this information on your site’s front end to make it easily accessible to students, parents, and staff members - either publicly or within a password-protected private area. One way to do this is by using the Posts Table Pro plugin to create a simple student database.

Preview of student database created using Posts Table Pro and Gravity Forms

In this post, we’ll explain why you need a student database plugin and how to choose the right one for your needs. We’ll also walk you through a step-by-step tutorial on how to create a student database on your WordPress site that:

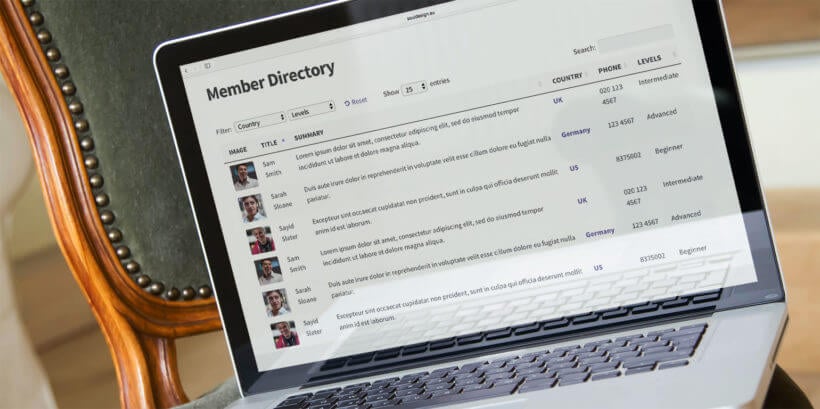
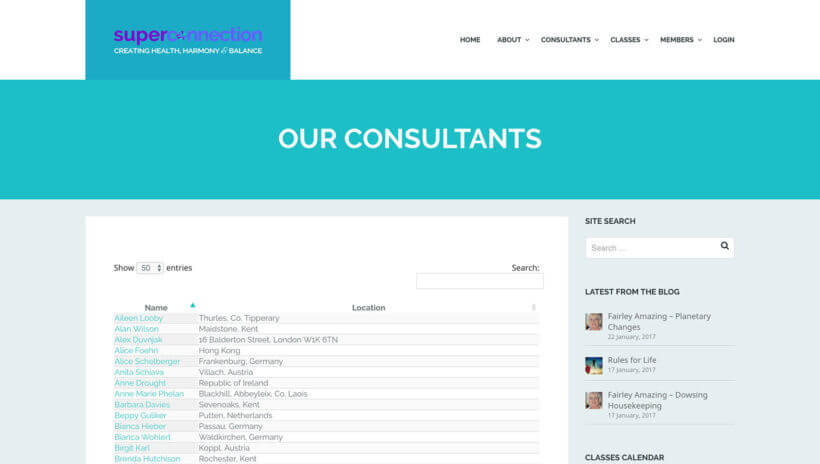
  • Displays all student profiles on a single page in a neat and organized table layout.
  • Lets users look up students using built-in search, sort, and filter options.
  • Enable admin staff to update student information directly from the front-end of your site.

Let’s get started!

Why you need a WordPress student database plugin

Every school, college, and university needs to create a database of all their students. This directory typically contains student names, student ID, email, photo, date of birth, year of graduation, and department. Creating a physical record of all your students is useful for administration purposes and so is storing that information digitally on your website.

An online student database is convenient, can’t be misplaced, and can easily be updated. For WordPress users, the best way to create one is by using a WordPress student database plugin that offers these features:

  • A simple and easy way to add individual students and list them in one place.
  • Option to add as many additional fields as you need.
  • Searching and/or filtering functionality to enable users to quickly find what they’re looking for.

Once you have a student database in place, you can use it as a data system or a student information system for better school management.

Introducing Posts Table Pro

Fortunately, finding the best WordPress student database plugin isn’t as difficult as it may seem. Our Posts Table Pro plugin is a robust solution that meets all of the requirements mentioned above. More specifically, it lets you create a searchable and sortable student database that can be modified to fit your particular needs and then displayed on the front end of your WordPress site.

You’ll be able to include as much information as you want in your student records using a customizable shortcode, easily organize everything, and enable users to quickly find the student they’re looking for. Plus, by purchasing this plugin you’ll get expert support in case you need help getting started.

Key features on offer with Posts Table Pro:

  • Supports custom post types, fields, and taxonomies, which are perfect for creating a student custom post type with extra fields to save information about each student.
  • It offers easy-to-use search and sort features making it easy for users to find a specific student in the database.
  • Option to embed media files that you can use to display photos of students in the database on your site’s front end.
  • It offers several customization options for modifying the look and feel of your WordPress student database in any way you like!

How to create a student database using Gravity Forms and Posts Table Pro

In this tutorial, we’ll show you how to create a functional front-end student database in WordPress. You can read it from start to finish or jump to the specific steps you need:

  1. Use Gravity Forms to create a submission form
  2. Store the student information as a custom post type in WordPress
  3. Display the student database in a table on the front-end of your website

Step #1: Use Gravity Forms to create a submission form (optional)

Note: This step is optional. If you're happy adding students directly in the WordPress admin, then you can skip to Step 2

The first thing you need to do is use Gravity Forms to create a submission form that new students can use to upload their information.

Log in to your WordPress website and navigate to FormsNew Form from the admin panel.

Add a new student using Gravity Forms

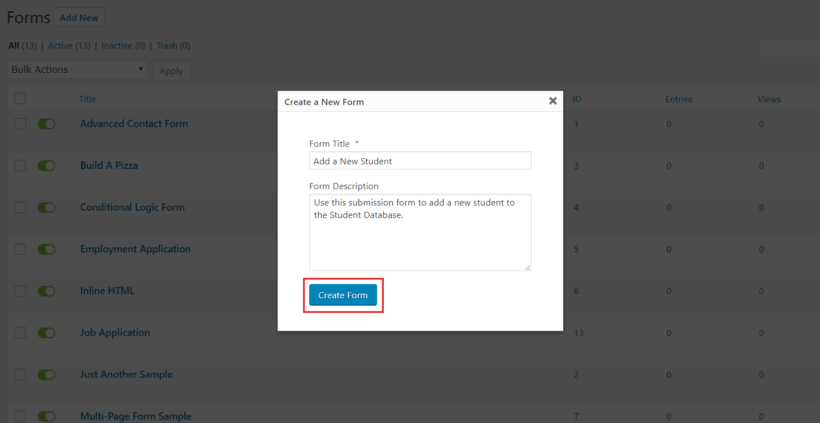
In the Create a New Form pop-up, enter the form’s title and a brief description. Click the Create Form button to proceed.

Next, we’ll add relevant fields to the submission form depending on the type of educational institute you’re creating the student database for.

For example, if you’re creating a student database of high school students, you might consider asking for the student’s name, date of birth, locker number, class section, student attendance, school district, and teacher name. However, if you’re creating one for university students, you might instead ask for the student’s name, contact information, department, and year of graduation. And if you have a global student body, you could include information about the student's city (New York or Toronto) and country (the United States or Canada). This should give you a window into some of the student attributes you can include in your student database.

Here are some of the most common form fields to help you get started with a step in the right direction:

  • First and last name
  • Email
  • Student ID
  • Date of birth
  • Year of graduation
  • Student photo

First name, last name, and email address

For First and Last Name, add the Name field from Advanced Fields.

Gravity Forms form builder name and email fields

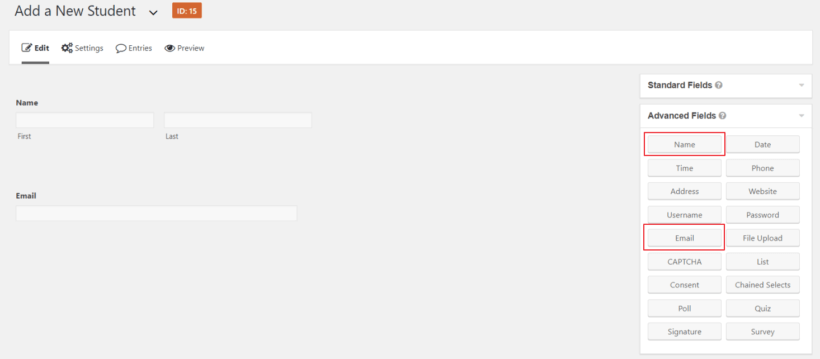
Similarly, for Email, use the Email field (under Advanced Fields).
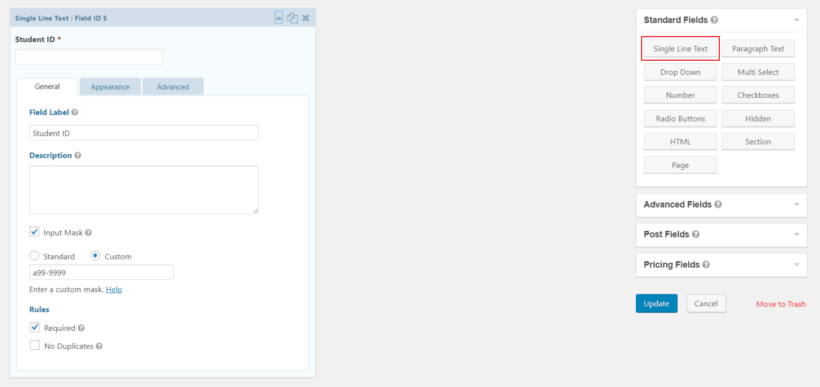
Student ID

For student IDs simply add a Number Field (under Standard Fields) if you assign numeric student IDs. However, if your student IDs are alphanumeric, you’ll have to use a Single Line Text field instead. For alphanumeric student IDs, you can also choose to add an Input Mask.

Gravity Forms form builder single line text field

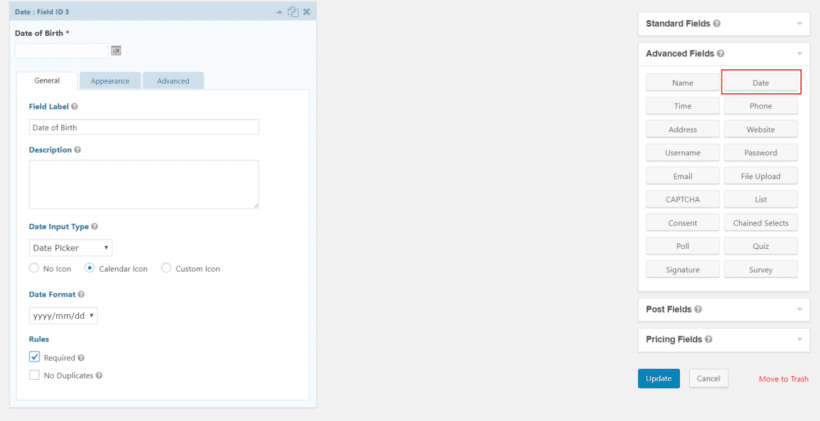
Date of birth and graduation year

For Date of Birth, add a Date field from Advanced Fields. Rename the field to Date of Birth and change the date format to yyyy/mm/dd.

Gravity Forms form builder date field

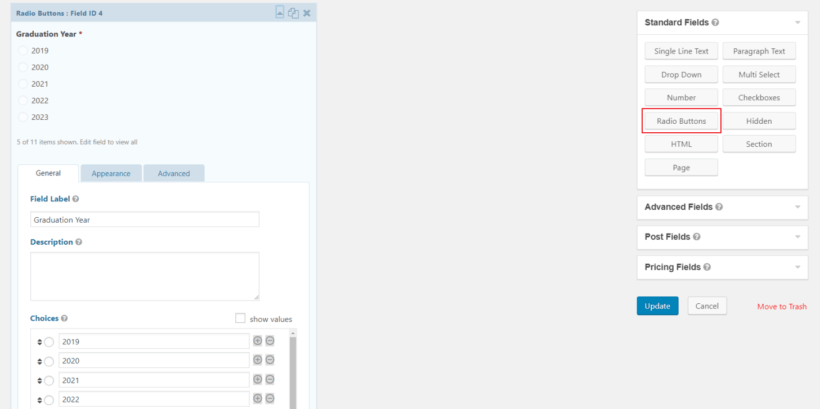
For the Graduation Year field, you can create Radio Buttons (under Standard Fields) instead of a date picker.
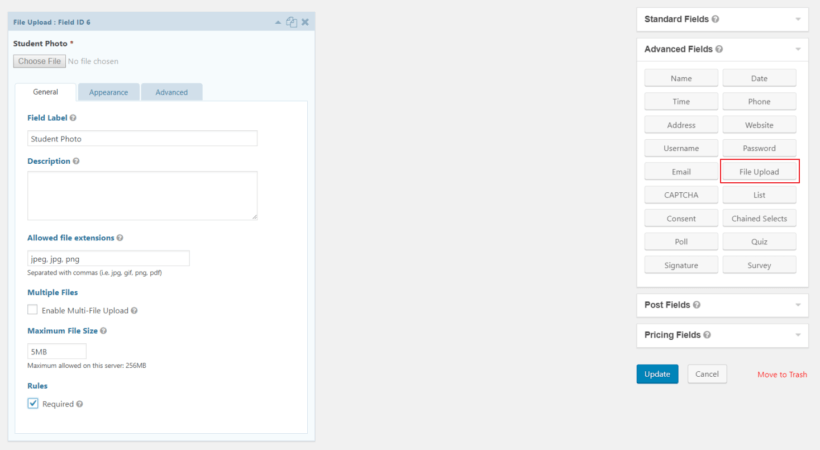
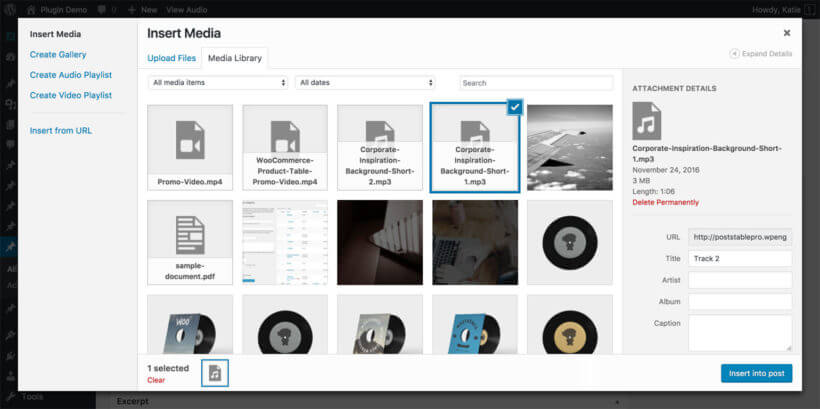
Gravity Forms form builder radio buttons field

Student photo

For Student photos, use the File Upload field (under Advanced Fields). Here’s what you need to do:

  • Change the Field Label to Student Photo.
  • Type jpeg, jpg, and png in the Allowed file extensions option. This will restrict users from uploading other image formats.
  • Enter a Maximum File Size value (such as 5MB or 10MB).

Gravity Forms form builder file upload field

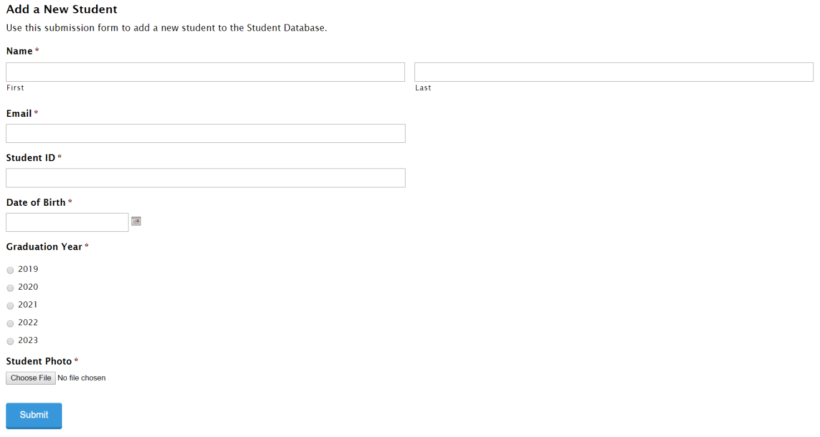
Once you’ve created the submission form, click the Update button to proceed. Your submission form might look something like this:

Gravity Forms submission form preview

Step #2: Store the student information as a custom post type in WordPress

In Step #1, we showed you how to create a submission form using the Gravity Forms plugin that students can use to submit their information. Once a student fills out the submission form, you’ll receive this information via email and it will also be stored in the WordPress database.

In this step, you’ll learn how to create a custom post type and store the information you collect from students directly in custom posts on your WordPress website. This way, you won’t have to manually enter the data into your site.

Note: We don’t recommend storing user-submitted data as regular WordPress posts because it will quickly clutter up your entire website. Instead, we suggest that you create a dedicated custom post type for storing student data. Since we want to create a student database from user-submitted data, we can create a ‘Students’ custom post type. This way, you’ll be able to organize student data separately from other site content.

To create a custom post type that works seamlessly with the Gravity Forms plugin, we recommend using the free Gravity Forms + Custom Post Types plugin. Here are the steps you need to follow to create a custom post type and integrate it with your Gravity Forms submission form:

  1. Install the Gravity Forms + Custom Post Types plugin to your WordPress website and activate it.
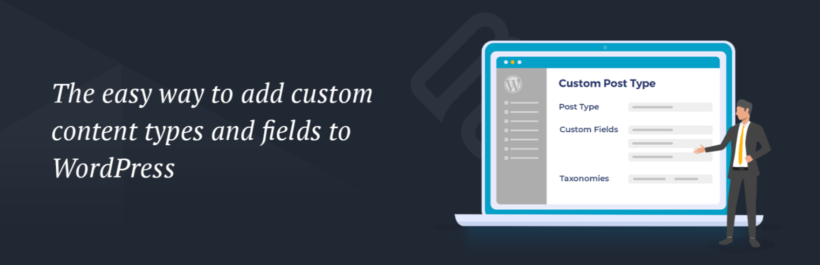
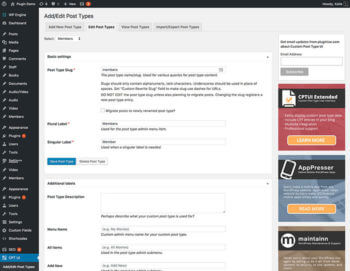
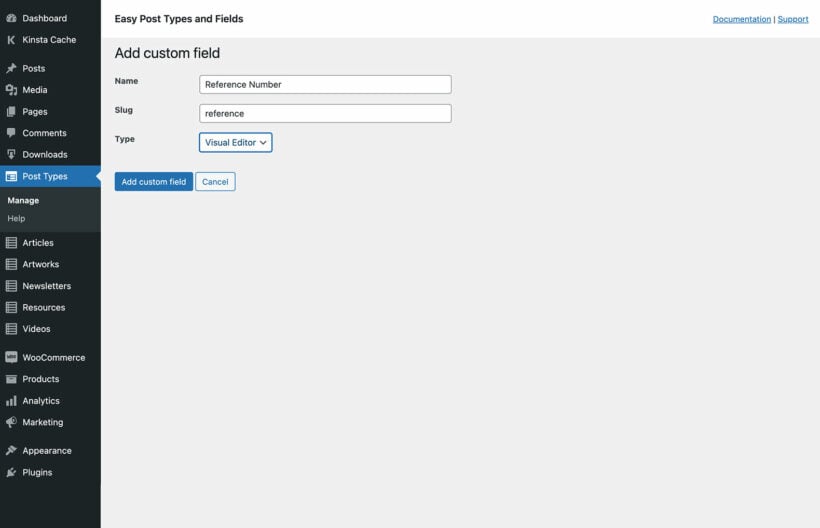
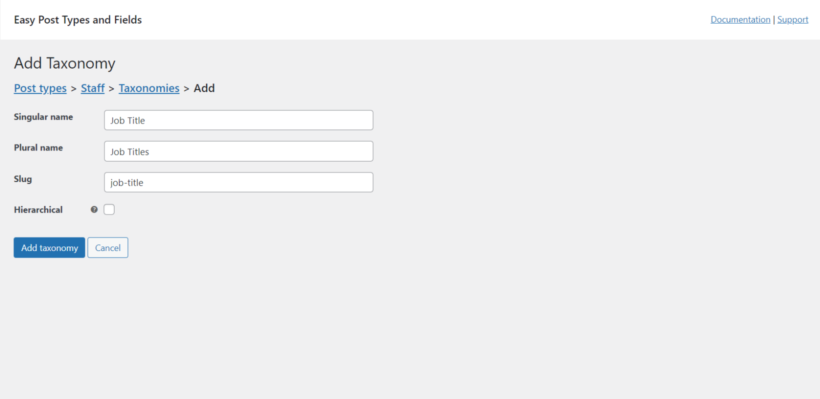
  2. If you haven’t already created a custom post type, use the free Easy Post Types and Fields plugin to do this. For complete instructions, check out this step-by-step tutorial on how to create a custom post type then come back here to continue this tutorial.
  3. Finally, you need to map your form fields to the custom post type using the instructions provided on the plugin’s page under the FAQ section (How to map a form to a custom post type).

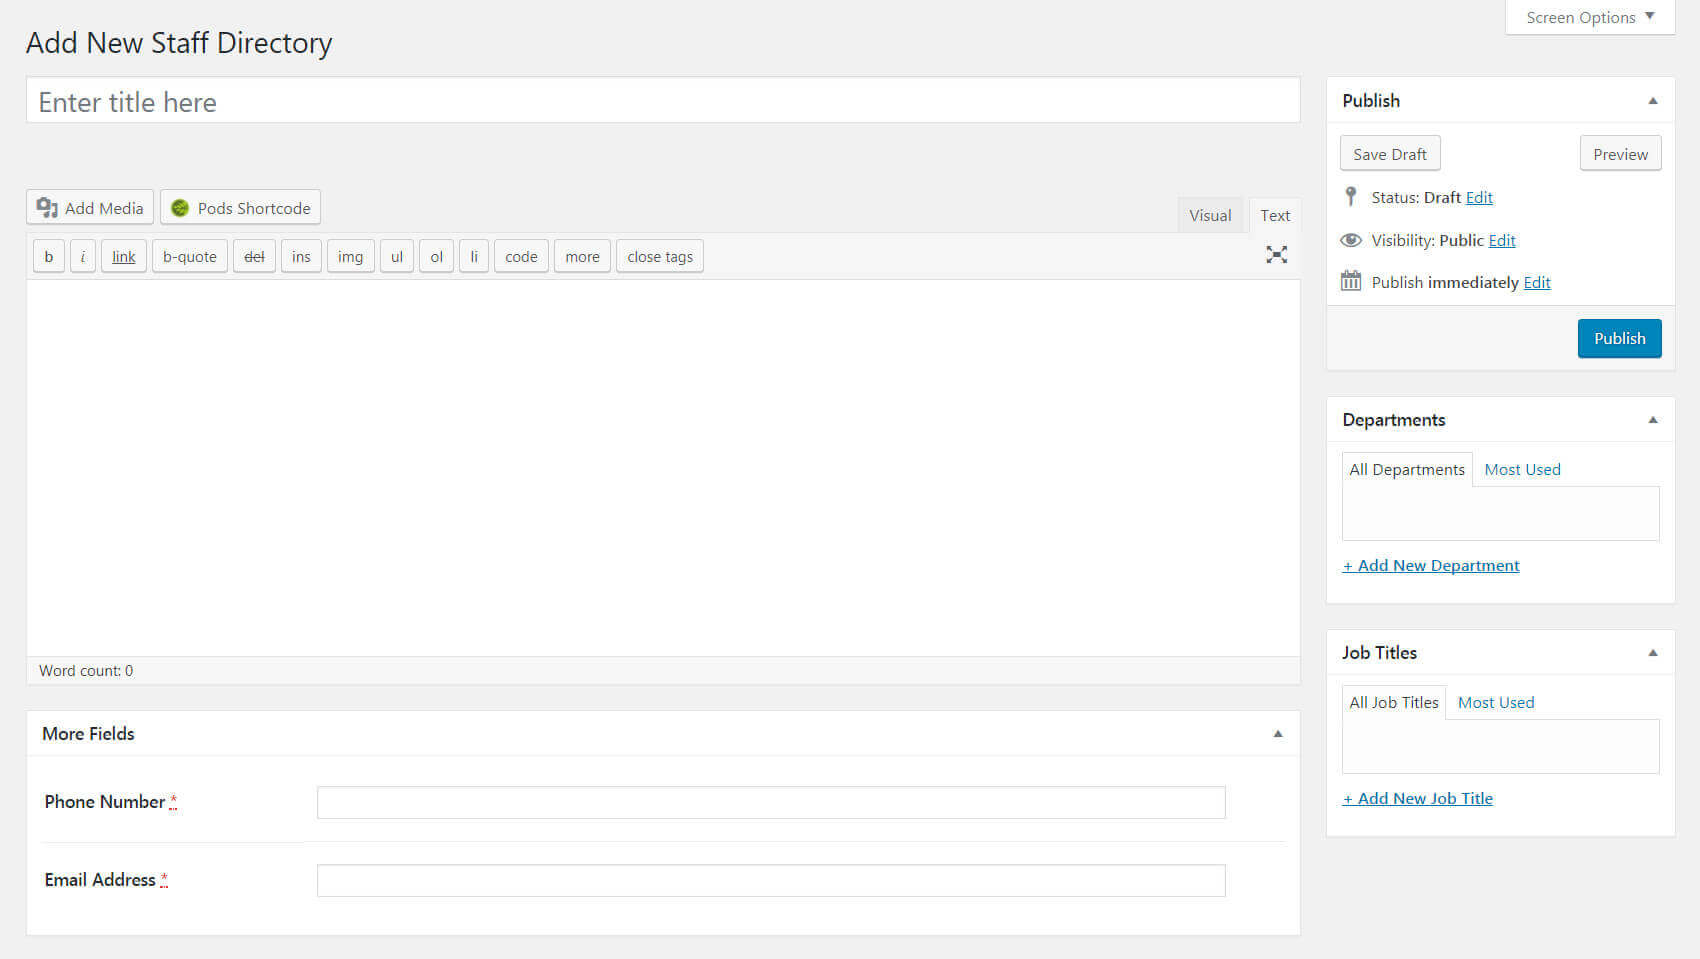
Or if you don't need a way to submit students from the front end, then you don't need to bother with Gravity Forms. Instead, just go to Students → Add New in the WordPress admin and add the students from there.

Step #3: Display the student database in a table on the front end of your website

By now, you should have a submission form that’s linked to a custom post type on your WordPress website. In other words, whenever a student fills out the form and submits their entry, the student data should automatically be populated into your WordPress site as a custom post.

Next, you’ll learn how to display the user-submitted custom posts on your site’s front end in a dynamic and organized table layout. We’ll use the Posts Table Pro plugin to do this.

Install Posts Table Pro to your WordPress website

If you haven’t done so already, get the Posts Table Pro plugin and install it on your WordPress website. You’ll receive the plugin files and license key in a confirmation email. Then follow the steps below:

  1. Download the plugin from the link provided in your order confirmation email. This will save a zip file to your computer.
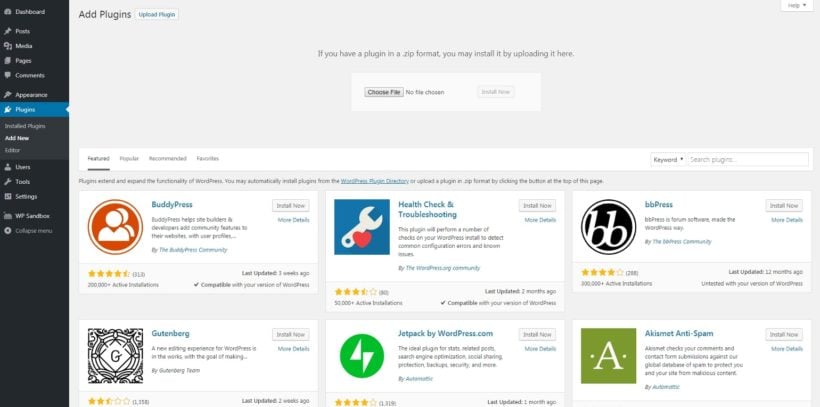
  2. Go to your WordPress admin dashboard, then navigate to Plugins → Add New → Upload Plugin.
  3. Click the 'Choose File' button and select the posts-table-pro.zip file you downloaded earlier.
  4. Once the file has finished uploading, click the 'Activate' button to enable the plugin.
  5. The Posts Table Pro setup wizard will automatically open.

Create your database and set the post type option

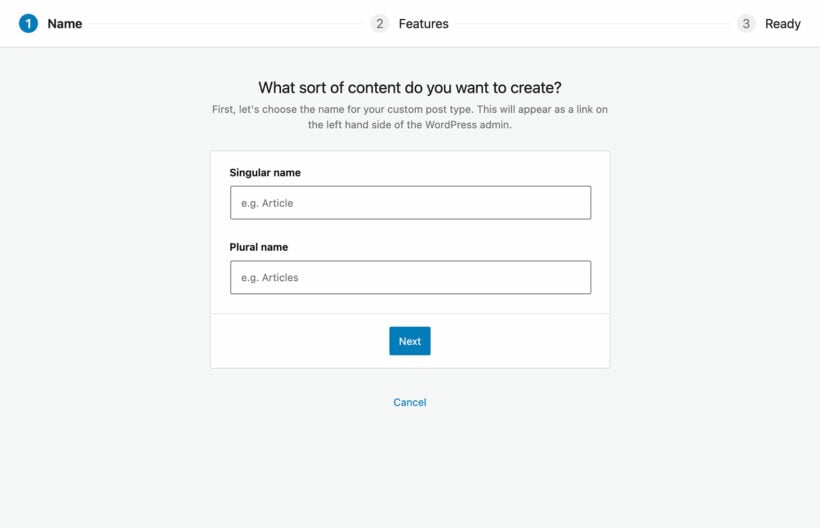
When you first install the Posts Table Pro plugin, you will be guided through a setup wizard that walks you through the steps of creating your first table. If you need to create additional tables, you can access the 'Add New' option in the Post Tables section of your WordPress admin. Regardless of the method you choose, the plugin provides clear instructions for each stage of the table creation process.

The setup wizard will then guide you in a step-by-step process to create your first table.

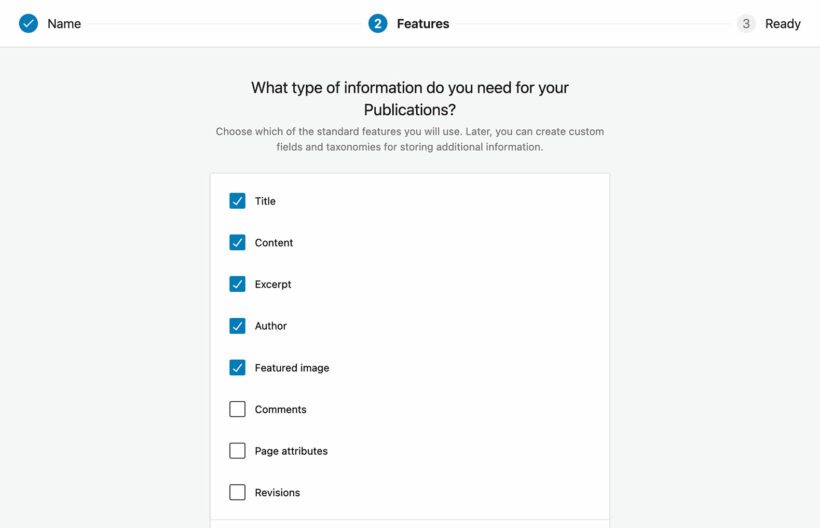
  1. To get started with creating a table, give it a name and select the post type you want to display. If you don't have a content type yet, you can create one using the Easy Post Types and Fields plugin.
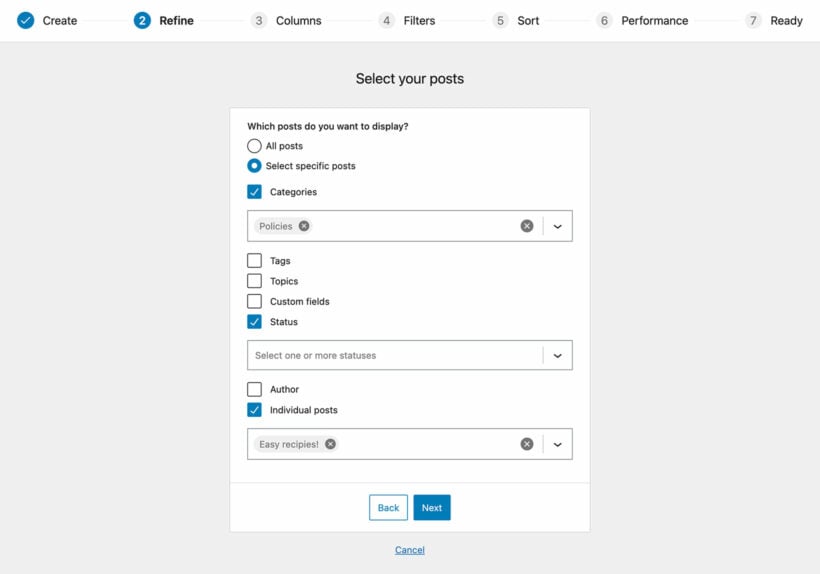
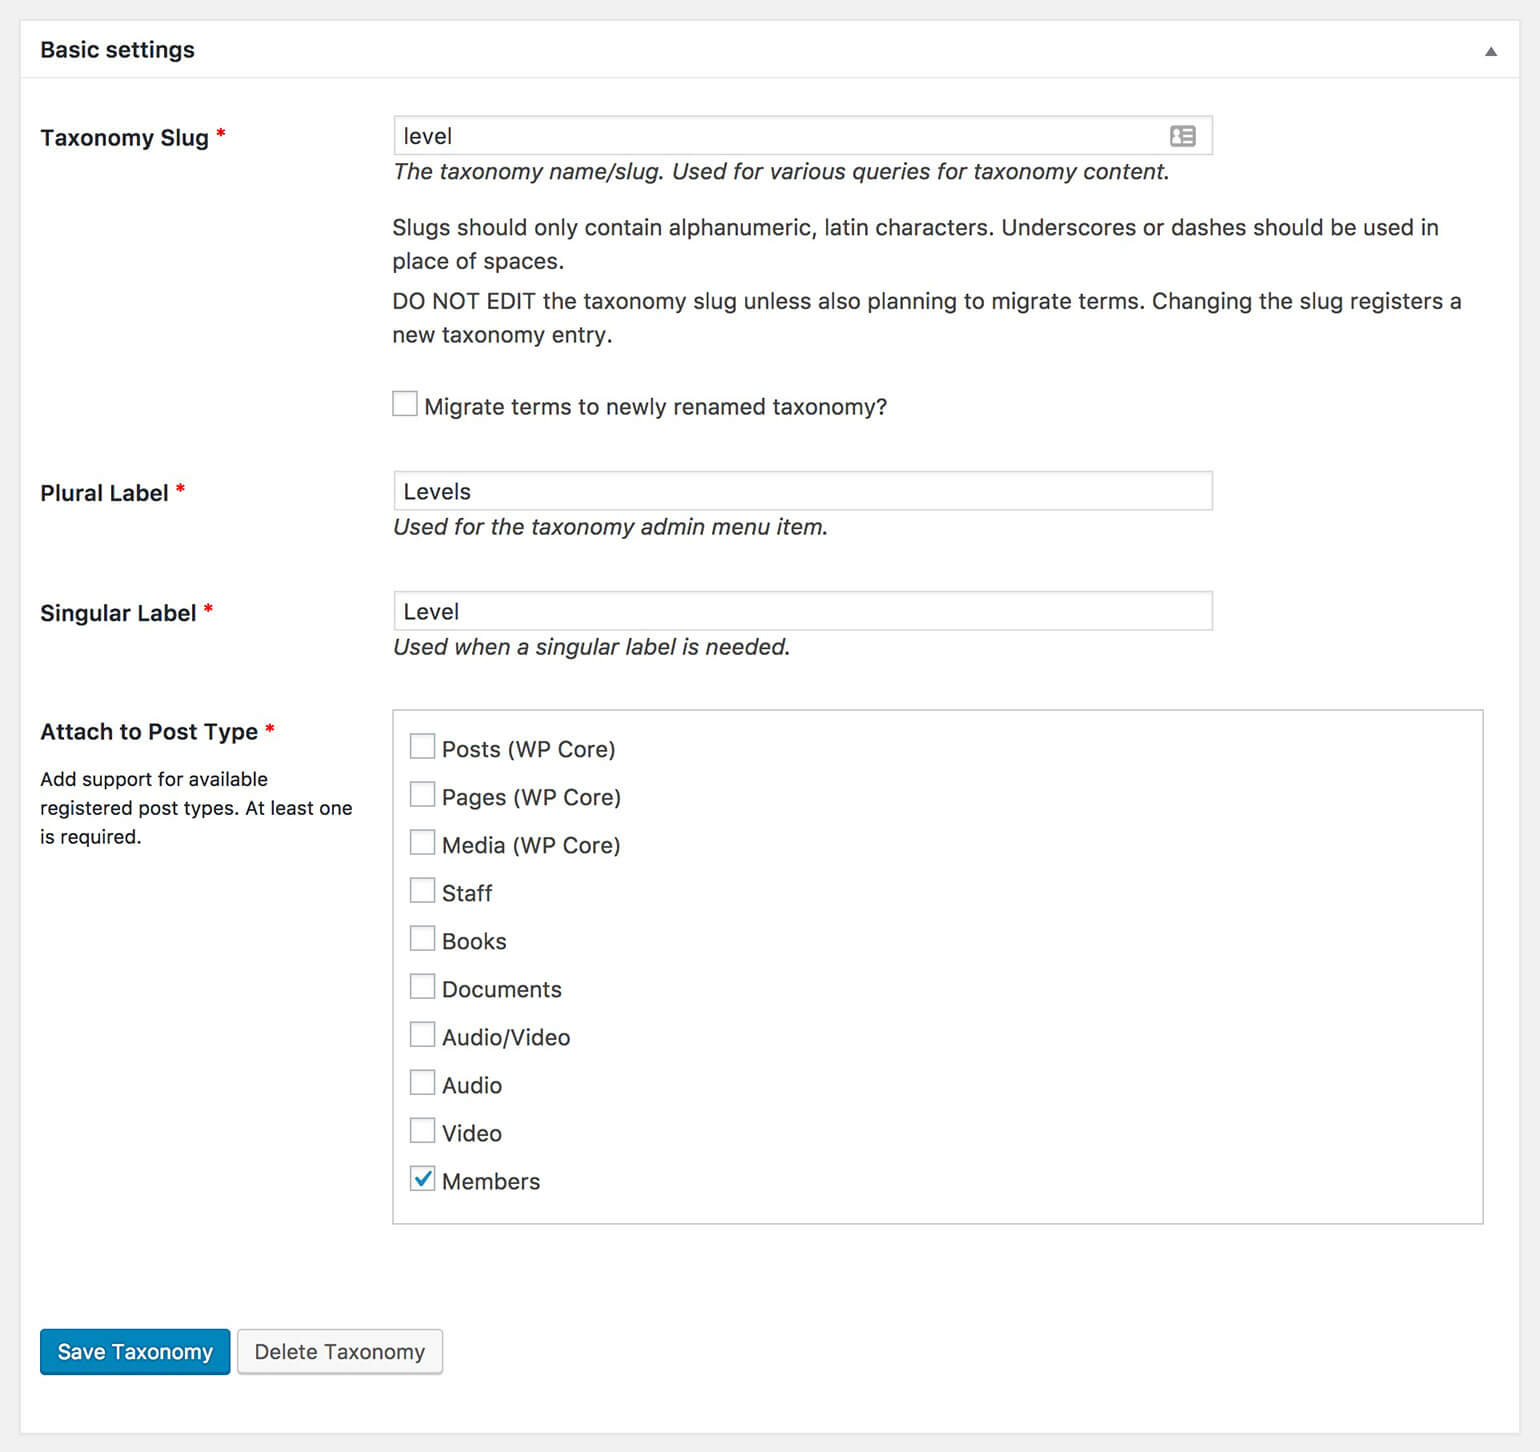
  2. Choose the posts or pages you want to include in the table. You can select from posts, pages, and custom post types (e.g. student). The options available will depend on the post type you selected earlier. For instance, custom taxonomies will be listed for post types with them.
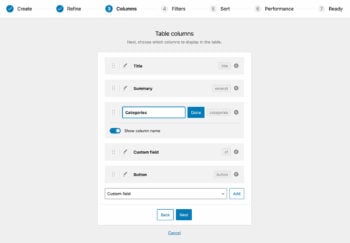
  3. Customize your table by choosing which columns to display and in what order. To add a new column, select the column type from the dropdown menu and click "Add". For example, you can display the following information in our student database:
    • Student photo
    • Student ID
    • First name
    • Last name
    • Email
    • Date of birth
    • Graduation year

    You can also reorder columns by dragging and dropping the sort icon or column heading.

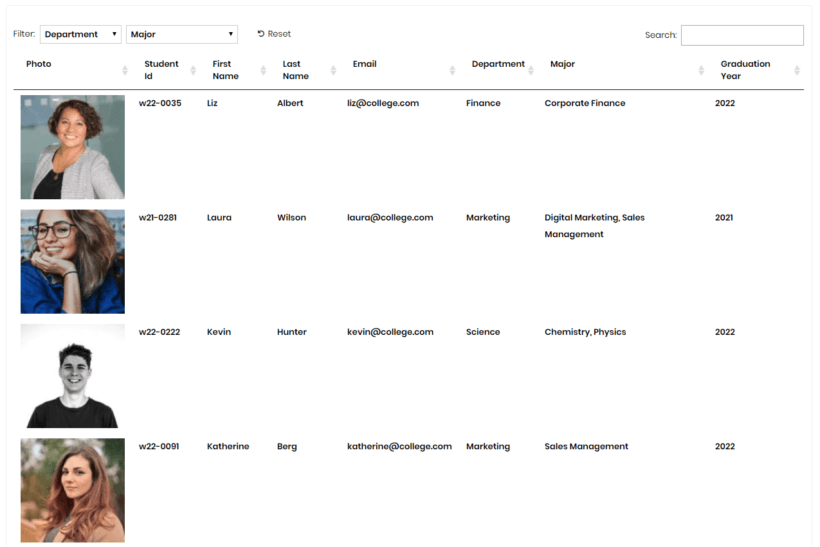
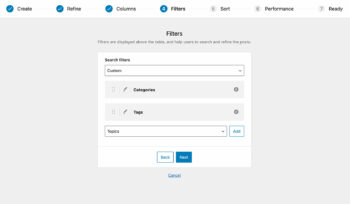
  4. Add filters to your table to help users narrow down their selections. You can add as many as you like If you want to collect additional information from students such as their ...
    • Department (Department of Education or Department of Information Technology) or
    • Majors (Small Business Sales Management or Corporate Finance)
    Posts Table Pro student database with extra fields
  5. Improve the table's performance by enabling lazy loading, which allows it to handle hundreds or thousands of items without slowing down.
  6. Choose how to sort the table, including the default sorting option and the sort direction.
  7. Once you've finished creating your table, the setup wizard will provide instructions for inserting it onto your site.

Check out our step-by-step guide to creating tables with Post Table Pro!

Create a page to display the student database

Finally, we’ll create a page where we want to display the student database. Head over to PagesAdd New from the WordPress admin panel. Give your page a suitable title, such as the student database.

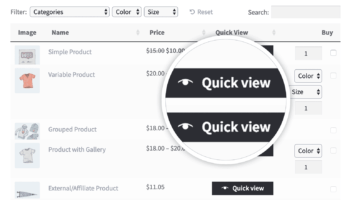
There are two easy ways to display the finished table on your site:

  • You can either use the 'Post Table' block in the Gutenberg editor or
  • Copy the shortcode from the table builder and paste it anywhere on your site. This gives you the flexibility to place the table on any page regardless of its content.

You can learn more about how to use custom fields with Posts Table Pro here!
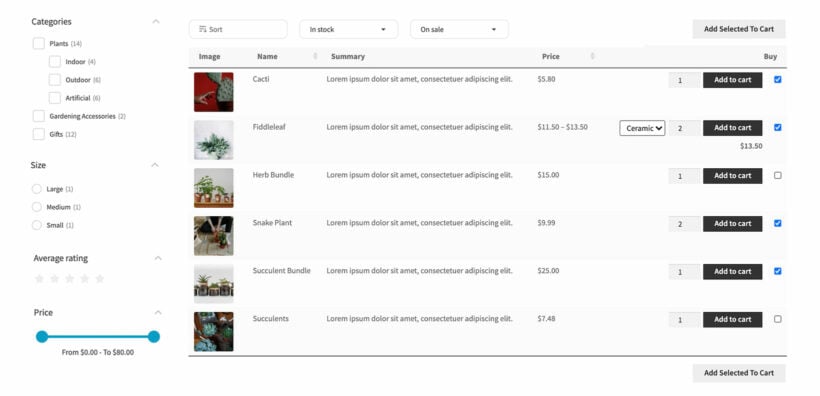
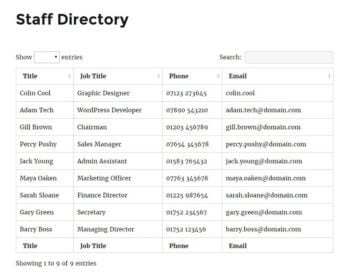
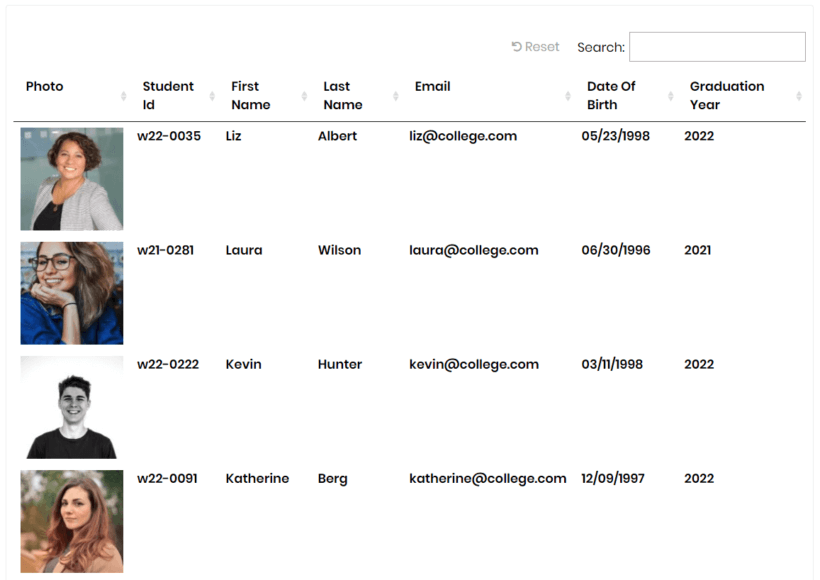
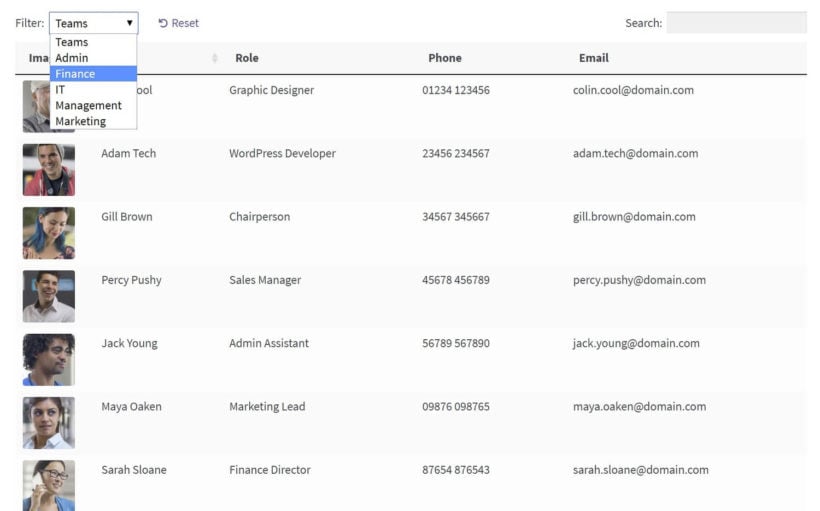
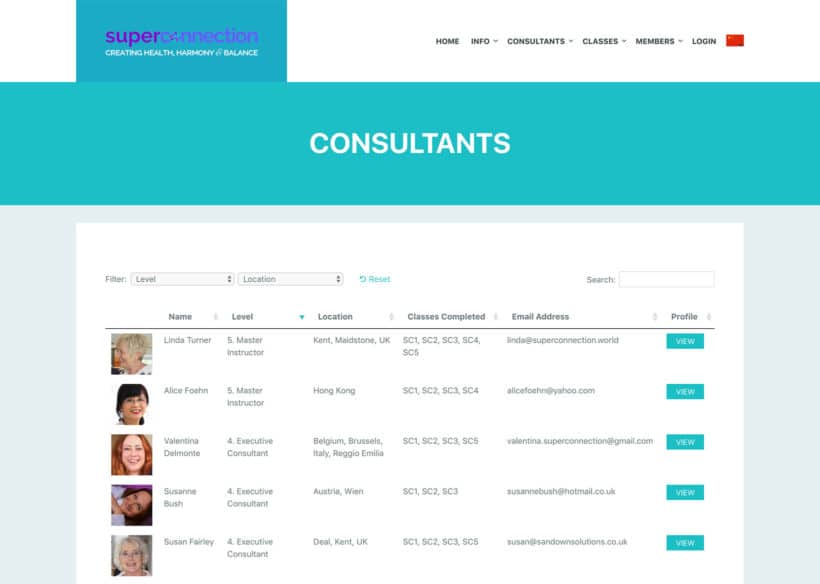
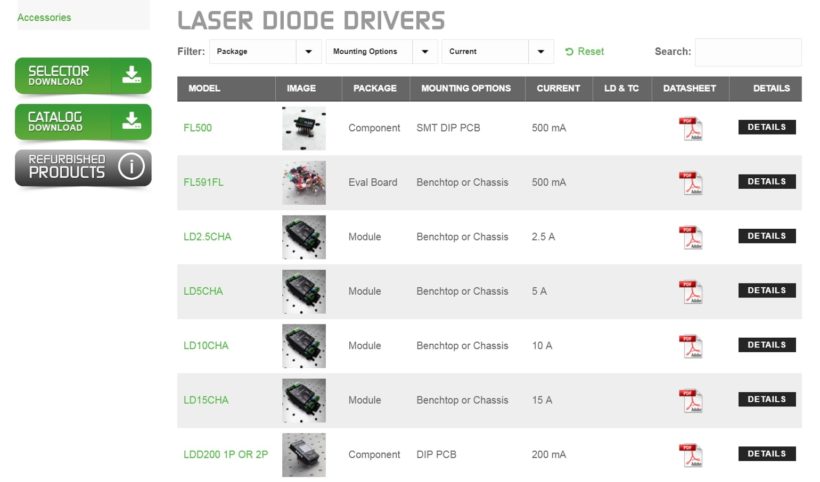
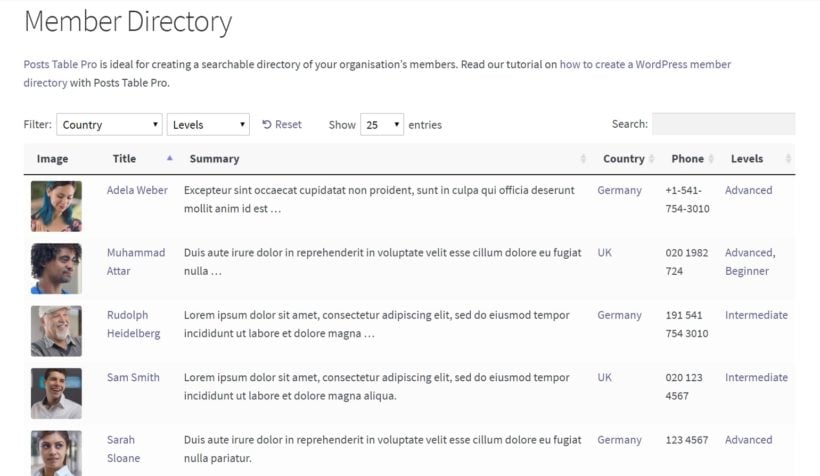
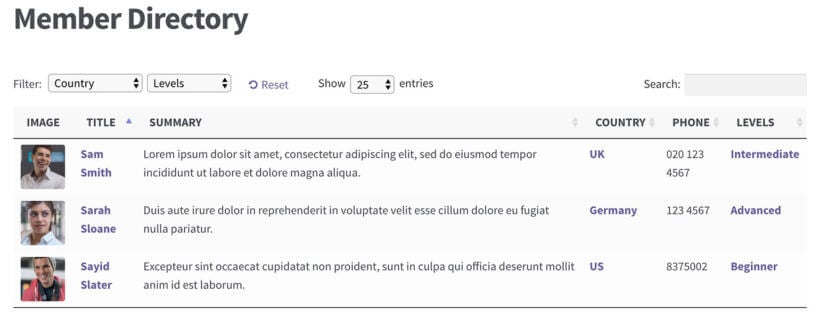
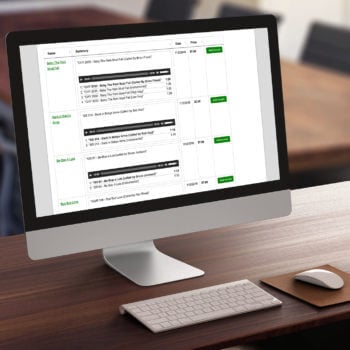
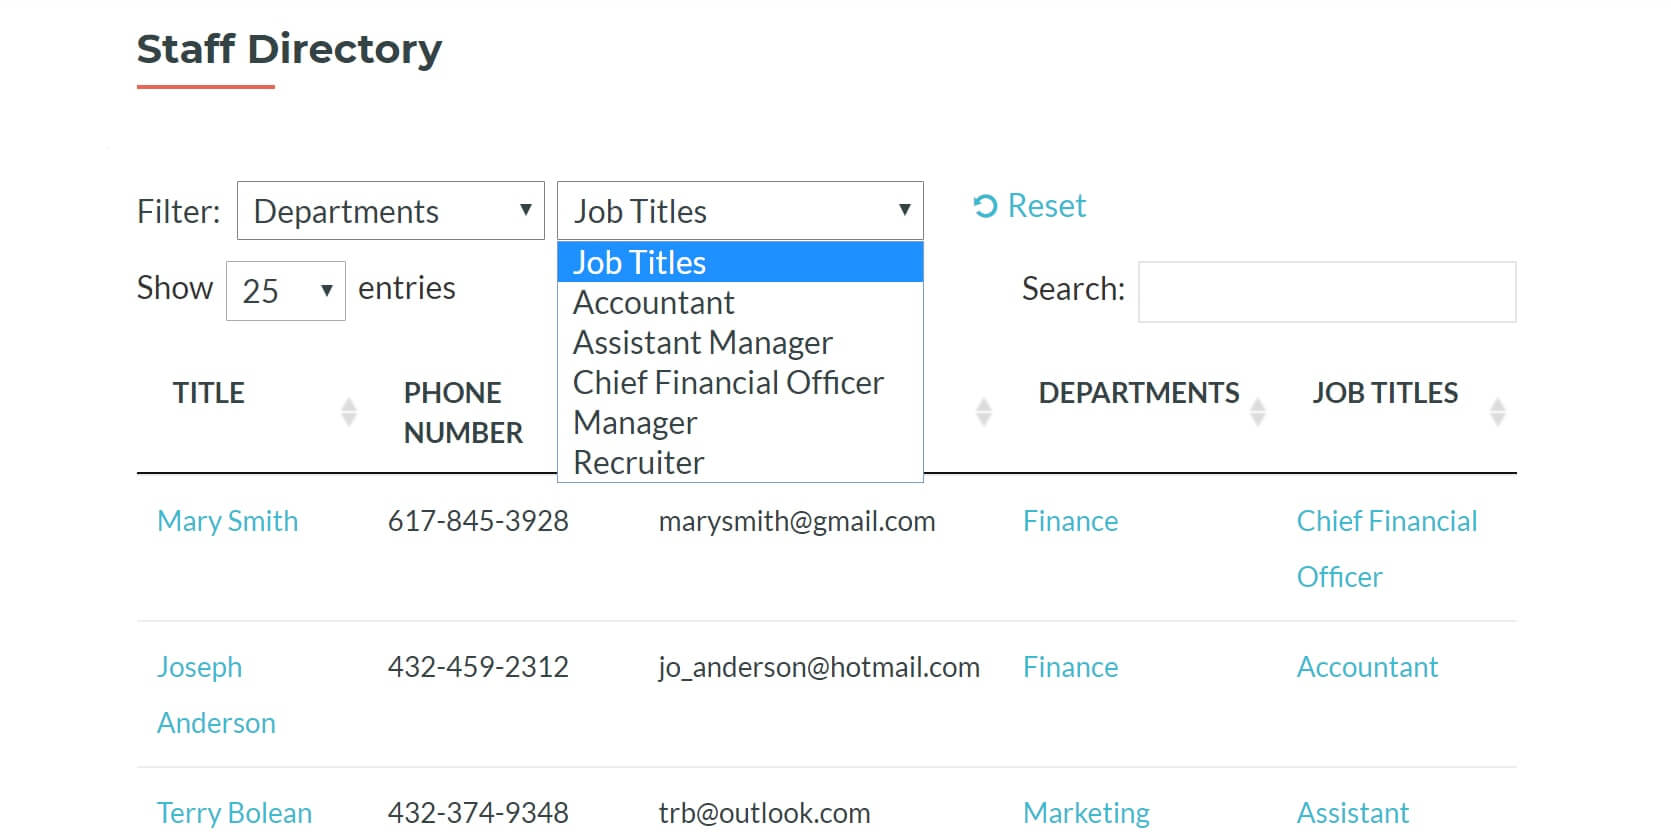
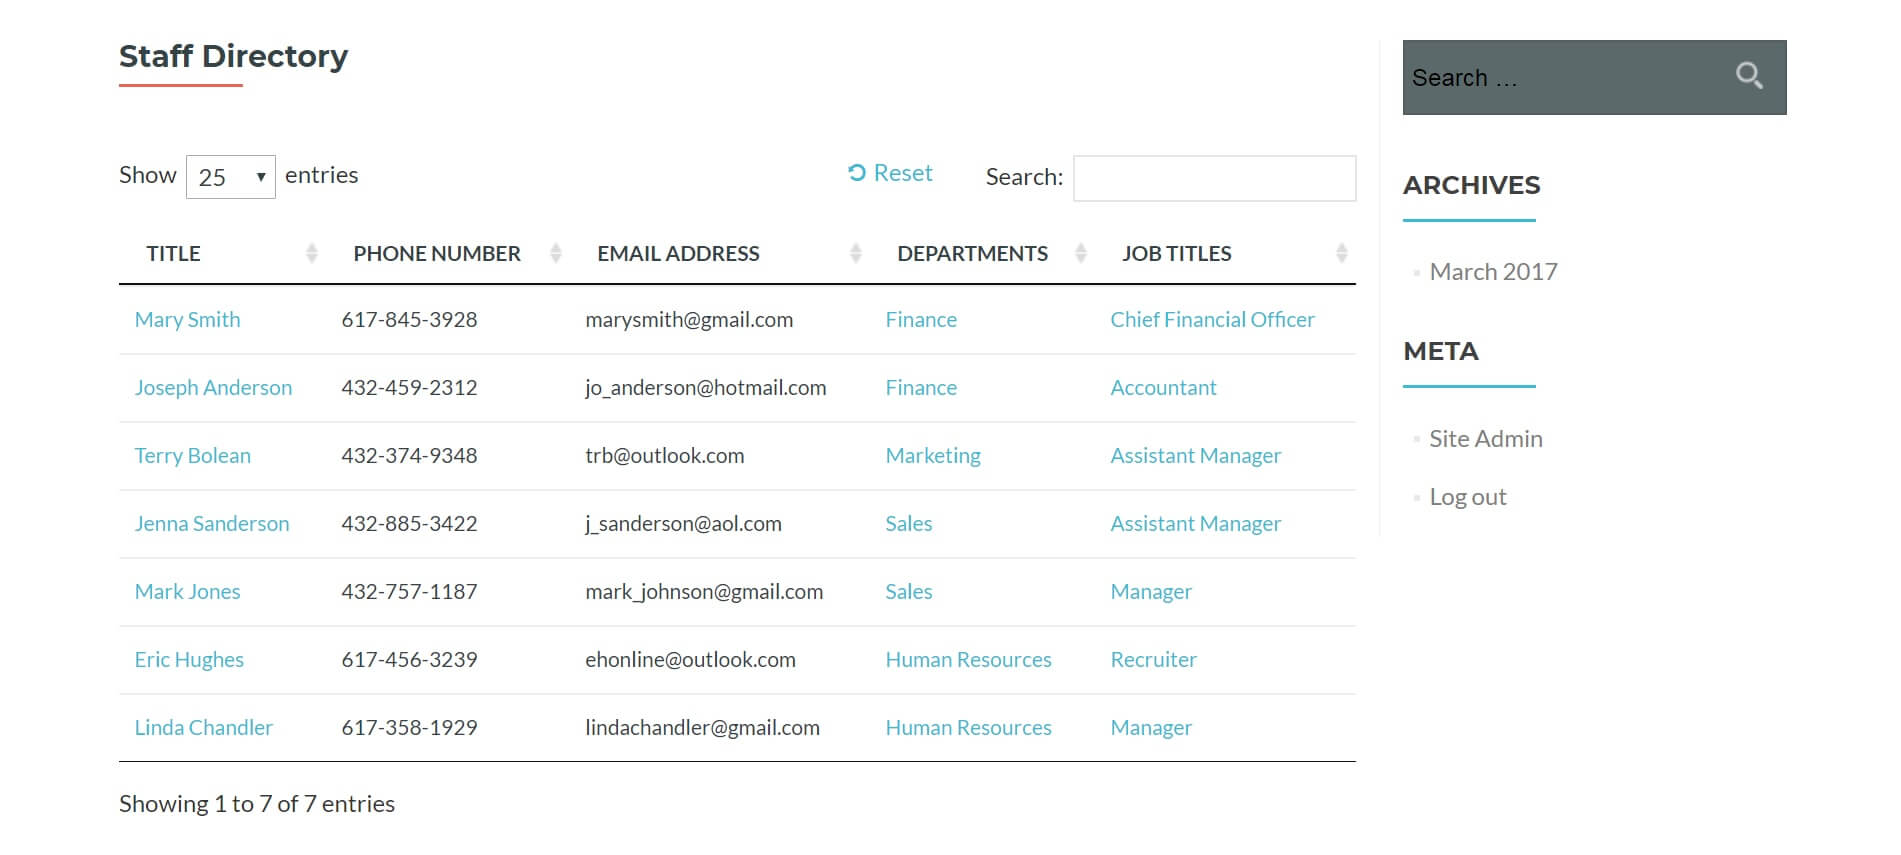
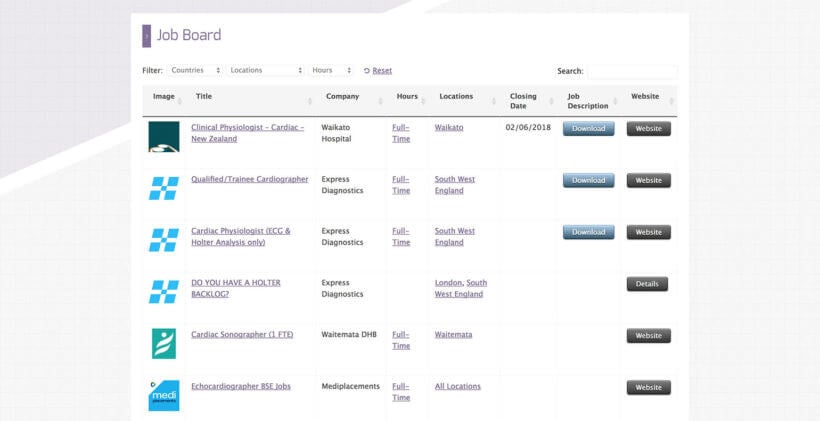
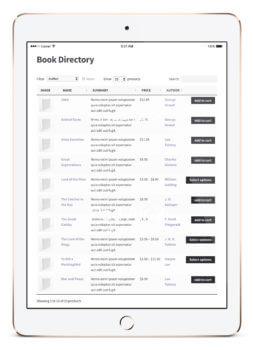
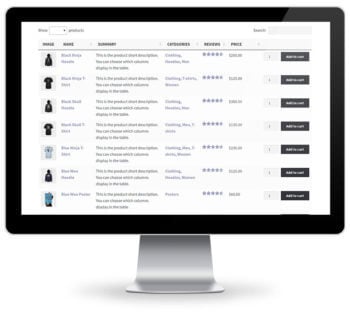
Preview

Your student database should look something like this:

Posts Table Pro student database

Can students edit entries after submitting them?

Unfortunately, Gravity Forms doesn’t give users the option to let students edit entries or other information after they’ve submitted them through the submission form. However, you can make edits using Editus – a WordPress front-end editor plugin.

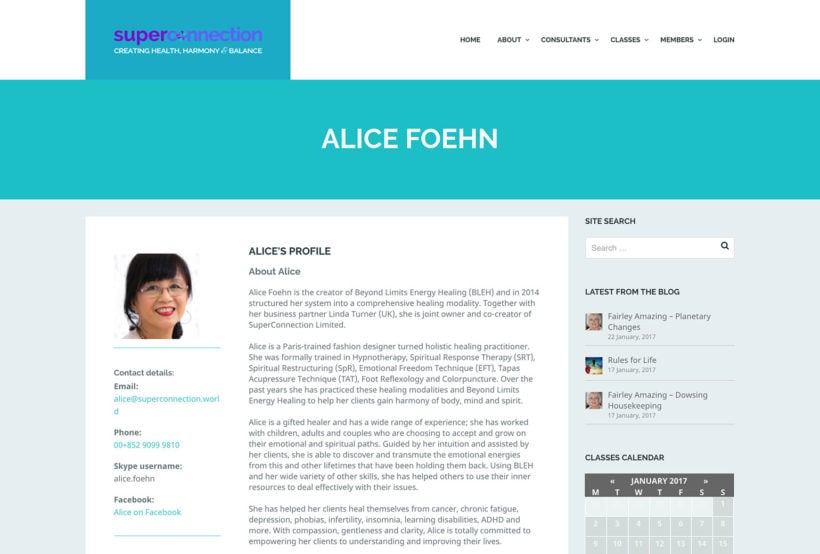
To achieve this, the students would have to click through to the single student profile page on your site. This is necessary because they can’t make changes to entries from within the Posts Table Pro table itself. However, they will be able to edit the content on the single post page as necessary.

Can I display Gravity Forms entries on the front-end without creating a custom post type?

The Posts Table Pro lets you display posts or custom post types in a table layout on your site’s front-end. Since form submissions are stored in a separate database field by Gravity Forms, you can’t list entries directly in a table layout using Posts Table Pro. The information needs to be stored as a post or custom post type.

This is why you’ll need to follow the instructions provided in the tutorial section above if you want to automatically store the information as a custom post type and then display these entries on the front-end in a table layout.

Can I import students in bulk?

Absolutely. You can mass-import students into the database using any WordPress import plugin such as WP All Import. This saves having to add each student individually, either via a front end form or the WordPress admin.

Create a private student database

Finally, let's talk about how you hide your WordPress student database and make it secure. Some student directories are available to the public, and that's fine. However, others need to be hidden from public view.

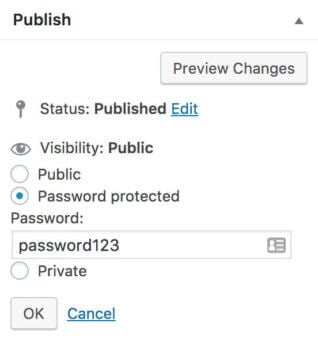
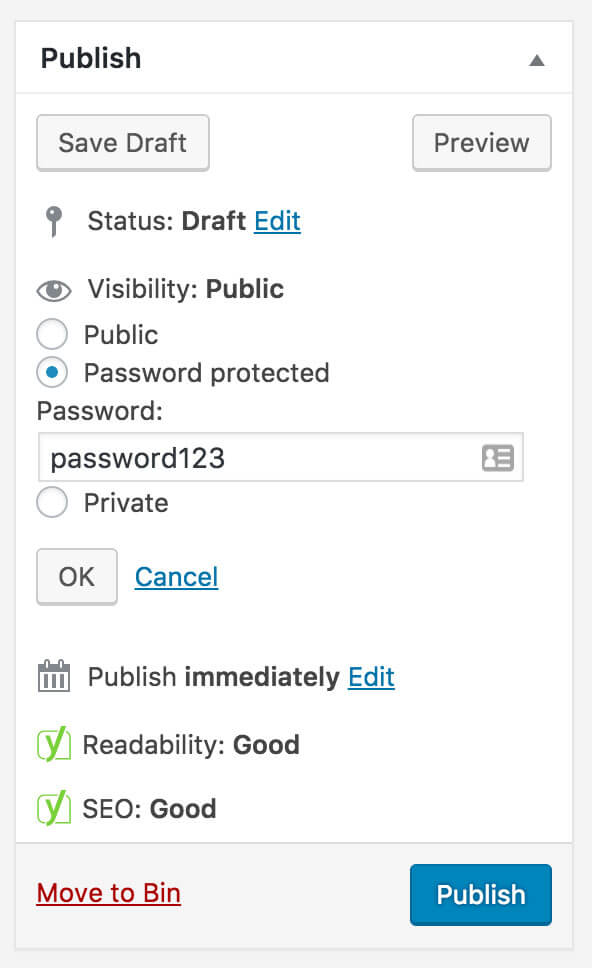
The easiest way to protect your student database is to password protect the page where you're listing all the students. You can easily do this by setting the page to 'Password protected' and giving the password to your students and staff.

Password Protect Page WordPress

Conclusion

The Posts Table Pro plugin offers several useful features for private or public schools (elementary schools through high schools), non-profit educational institutes, colleges, and universities to create a searchable and filterable student database. By following the step-by-step instructions provided in this article, you’ll be able to create an all-in-one flexible student database (or student management system) that can easily be searched, sorted, and filtered directly from the front-end. In addition to this, you won't have to worry about creating student accounts or giving students access to your site's back-end.

What are some of the different fields you’re looking to display in your front-end student database? Let us know by commenting below!

WordPress directory plugin

If you need to create a browsable list of information on your site, a WordPress directory plugin is the right tool for the job. It's the perfect way to create a searchable database in WordPress.

The word we've used here – "information" – is intentionally vague because you can use a good WordPress directory plugin to organize and showcase different types of content. You can collect:

  • Businesses, similar to a Yelp or Yellow pages format
  • Users/members
  • Locations
  • Products
  • Files (documents, videos, audio files)

...the sky's the limit - with the right tool, of course!

What's more, your visitors will be able to search and filter all that information to find what they're looking for. You'll give yourself tons of chances to rank in Google with all the various entries in your directory.

To help you find the best WordPress directory plugin for your needs, we've collected eight great free and premium options. They're all excellent WordPress searchable database plugins.

Then, after we share more about each WordPress directory plugin, we'll also give you a step-by-step tutorial for how to add a directory to your WordPress site using the first option on our list – Posts Table Pro.

Your ideal WordPress directory plugin: Key features

Every plugin comes with a different toolset, so it's important to consider what you want from a directory plugin. Think about your site's needs and make sure that any plugin you pick fulfills your requirements. There's no point using an advanced geolocation plugin if you're simply building a simple directory of your staff members; for real estate listings, though, map integration might be crucial.

Here we'll run down some of the key features to consider when deciding which WordPress directory plugin is suitable for you.

  • Simple to manage - is it easy to add new listings and adjust old ones? If you deal with a lot of entries then this process needs to be as streamlined as possible.
  • Media support - is the plugin able to display a directory of images, videos, or other media on your site?
  • Ecommerce compatibility - can the directory integrate with your store products to act as a central product review and pricing database? This leads us to...
  • Rating / review systems - does the directory plugin support frontend submission of user reviews - ideal for creating a TripAdvisor-style site?
  • Frontend submission of listings - perhaps you want to create an independent local business directory and address book. You'll need some way for local business owners to submit their listings without going through the WordPress backend.
  • Customizable form fields - depending on what kind of directory you want to make, you might not want to be locked into a certain content type. You'll want to be able to organize your directory by categories, tags, or custom taxonomies to make it relevant to your users' needs.
  • Shortcode compatibility - so you can add your directory anywhere on your site.

The 9 Best WordPress directory plugins in 2024

Below, we'll share details for eight of the most popular directory plugins for WordPress. You'll find both free and premium searchable database plugins on this list...

1. Posts Table Pro - Most flexible WordPress directory plugin

The Posts Table Pro WordPress directory plugin

In terms of flexibility, Posts Table Pro is the best WordPress directory plugin because it lets you build a 100% custom directory for any type of content, rather than forcing you into a pre-made framework, like many other directory plugins.

Essentially, Posts Table Pro lets you take any post type and display it in a WordPress searchable database (AKA a directory). It comes complete with lots of search and filter options to help visitors browse the directory listings and find what they're looking for.

You can use it as a simple business directory plugin for WordPress, but you can also display other types of information.

Create any type of WordPress directory

Here are just a few examples of the types of directory that you can use Posts Table Pro for:

If you pick a different WordPress directory plugin, it's likely going to lock you into a single "type" of directory content. But with Posts Table Pro, you'll have total flexibility for how you put together your directory.

To use Posts Table Pro, you'll typically create a custom post type for whatever content you want to collect and then use Posts Table Pro to display that content in a directory format. We'll show you exactly how to do this at the end of this post in the tutorial.

You can use Posts Table Pro with any WordPress theme, and it makes for a great "WordPress searchable database plugin" too. Posts Table Pro uses AJAX search, so visitors can get instant search results from your searchable database content.

Make Posts Table Pro your own

Because you're working with your own custom post types, you can build out your system exactly how you want it to be. Here are some examples of how you'll be able to set things up:

  • You can use categories, tags, or custom taxonomies to organize your directory items.
  • You can use custom fields to store as much or as little information about each item in your directory. Or, you can also collect addresses to create a geodirectory.
  • If you want to let people submit their own listings, you can use Gravity Forms' drag-and-drop editor to create a front-end submission form and collect as much information as needed. You can even charge users for submitting content and connect to any of the payment gateways Gravity Forms supports, including Stripe and PayPal.
  • You can also use Gravity Forms to let users submit reviews for directory items, which lets you create your own lightweight Yelp clone.
  • Using something like WP All Import, you can bulk add listings via CSV import or XML import.

Finally, as well as being the most user-friendly, Posts Table Pro is one of the more affordable WordPress directory plugins.

2. HivePress WordPress directory plugin

HivePress WordPress Directory Plugin

HivePress is easily the best free WordPress directory plugin. It allows users to create directory websites with ease. It's a free and open-source plugin that comes with many features and customization options. HivePress is perfect for creating directories for businesses, services, products, and job listings. It can also be used for creating niche-specific directories such as real estate listings or car dealerships.

One of HivePress's main features is its user-friendly interface. It makes it easy for users to navigate and add listings to the directory. The plugin allows users to create custom fields for their listings, which can be customized to fit their specific needs. The plugin also comes with a range of templates that can be used to display listings in different ways.

HivePress is excellent for creating business directories, such as directories for restaurants, hotels, or shops. For example, if you're creating a job listings directory, you can use the plugin to allow job seekers to search for jobs by industry, location, and job type. HivePress is also useful for creating niche-specific directories such as real estate listings or car dealerships, where users can search for properties or cars by location, price, or other criteria.

You can download it for free from wordpress.org, and it comes with easy-to-use instructions and videos to get you started.

For the best results, you can use HivePress with the free ListingHive theme. However, you can use any theme if you have specific branding requirements.

3. Business Directory Plugin - Dedicated business directory plugin for WordPress

Business Directory Plugin for WordPress

As the name suggests, Business Directory Plugin is a popular business directory plugin for WordPress.

It helps you create a Yellow Pages-style directory, including an option to add reviews, which also lets you go in more of a Yelp direction with your directory.

With the paid version, you can let visitors filter by location information, which helps you create a local business directory. And there's also a Google Maps module that lets you display the local directory listings on a map view.

Beyond that, you have the option to create a front-end submission form and accept payments via payment gateways like PayPal and Stripe.

This WordPress directory plugin has a limited free version at WordPress.org, but you'll need the premium extensions to get access to the most important functionality. The premium plan starts at $199.99 for use on a single site, which makes it a little pricey in comparison to other options on this list.

4. GeoDirectory - Local business directory plugin for WordPress

Geodirectory plugin for WordPress

Another aptly named plugin, GeoDirectory helps you create a local business directory for one or more locations. It's focused more on physical listings, which makes it a great business directory plugin for WordPress, but not so great if you want to create a directory of people or other non-tangible items.

The free version only lets you create a directory for a single location, but the premium version adds support for multi-location directories. Visitors can then search your directory by zip code or proximity, as well as more traditional keyword searches.

If desired, you can let users submit reviews, which lets you create a directory similar to Yelp.

And like the previous two options, you can create a front-end submission form using a drag-and-drop form builder. And it also comes with a built-in CSV import feature to help you bulk import directory listings.

If you want to charge people for submitting listings, the premium version lets you add prices for your listings and accept payments via PayPal or Stripe.

To access all the premium functionality, you'll pay $199 per year, which, like the Business Directory Plugin, is one of the higher prices on this list.

5. Formidable Directory - a WordPress directory plugin with powerful forms

WordPress directory plugin

Formidable Forms is a form-building plugin that's been around since 2009. Forms are just one part of the directory building equation, but Formidable has features that can turn form data into websites too.

Naturally, people began using these features to build directory sites as well. The only issue was that it required a bit of coding but with the release of Formidable Directory, coding is no longer needed.

Formidable Directory includes everything from Formidable Forms + an automated directory building wizard to get started quickly. It comes in three different formats: business, employee, and user - each with their own quick start wizard.

Like other options on this list, this WordPress directory plugin lets you create paid or free listings with all the major payment gateways. Simply adjust your submission form using the drag and drop form builder or create a new one!

And if you don't like the included formats, you can also use Formidable's Views feature to turn all your form data into whatever kind of website you want.

Formidable Directory starts at $298/year - which also includes the entire Formidable Forms plugin as well.

6. Sabai Directory - Affordable, but not as flexible, WordPress directory plugin

Sabai Directory plugin for WordPress

Sabai Directory is a popular WordPress directory plugin sold through CodeCanyon. It's an affordable option, but it lacks the flexibility that you'd get with Posts Table Pro or some of the other more customizable plugins.

Because it offers built-in multi-location support and reviews, Sabai Directory makes a good option for a geodirectory or Yelp clone.

Users can search by location, and you also have the option of showcasing directory listings on Google Maps.

If you want to accept payment in exchange for directory listings, you can create a frontend submission form and sell paid listings via PayPal, Stripe, and other payment gateways.

Finally, Sabai Directory includes a CSV import feature to help you bulk import listings.

Sabai Directory is available from CodeCanyon.

7. Connections Business Directory - a simple, free option that needs its premium extensions to really shine

Connections Business Directory is a free business directory plugin with a range of premium add-ons to improve its functionality.

It allows you to easily create a simple address book, staff, or member directory and is compatible with some of the most popular page builders for WordPress websites out there: Elementor, Beaver Builder, Visual Composer, and more. It also comes with custom blocks for the WordPress Block Editor, adding Carousel, Directory, Team, and Upcoming List block options.

Although its free functionality is fairly limited, this WordPress directory plugin offers a wealth of premium add-ons, such as contact forms, CSV imports, custom category orders, as well as templates to help you design a great looking directory. Individual extensions start at $4.99 for a single site, with access to all templates and extensions bundled at $74.99 for a single site.

8. Directories Pro

Directories Pro is a powerfully featured plugin that hits many of the key features of a good WordPress directory plugin in a single package. It's made by the same team as Sabai Directory but based on custom post types and taxonomies. This means it's easy to manage custom fields and add them to listings, tags, geolocations, reviews, and more.

You can also charge users for featured listings using WooCommerce payment gateways, as well as let business owners "claim" their own listings to verify them and edit any data they need to keep up to date.

Firmly focused on building fully-functioned directories, Directories Pro doesn't offer many of the styling and customization options of some of the other options on this list but is a great pick for sites that want a simple solution to create a well-functioning directory. Note that there is currently no multisite license offering, so you will need to buy a new license for any new sites you use the plugin on - starting at $51.75 for a year's support on a Regular License, or $258.75 for Extended.

9. LDD Directory Lite

LDD Directory Lite is a free and powerful directory plugin for WordPress websites, offering a range of premium add-ons to support exports and imports in several formats, star-rating reviews, social logins, and more.

Unlike some of the offerings on this list, this WordPress directory plugin doesn't have an intuitive GUI for building your directories. Instead, it relies on the WordPress backend to generate directories automatically. As such, you're somewhat limited in your styling options, and it requires a bit more work to make sure everything looks as it should. Nevertheless, it's a good option for those looking to create a directory on a budget.


How to create a WordPress directory with Posts Table Pro

Now that you know your options, let's dig into how to actually create a directory with one specific plugin – Posts Table Pro.

As we mentioned before, Posts Table Pro gives you the flexibility to use it as a business directory plugin for WordPress, as well as a variety of other applications.

In a nutshell, Posts Table Pro takes the listings that you add to the WordPress admin (e.g. business listings, staff contact details, etc.) and displays them in a table on the front end. It transforms the information into a fully functional directory website.

What else can the WordPress directory plugin do?

Of course, that’s just the beginning. You can also:

  • Choose exactly what information will be included about each item in the table (including images and other media).
  • Link out from each item to another page, post, or other content type.
  • Include as few or as many entries in your table as you’d like.
  • Enable visitors to quickly find information by searching, sorting, and filtering the table (for example, they could search for an item with a specific keyword, or filter the table to only include entries in a particular category).

All of this results in a listing or database that is dynamic – meant to be used rather than just passively looked at. You're able to create a searchable database, with the search results shown instantly:

An example of an eBook listing.

Plus, the highly customizable nature of this WordPress directory plugin means it can be adapted to all of the uses we mentioned in the previous section, and more.

To illustrate the types of WP directory you can create, let’s look at some examples of Posts Table Pro in action.

3 case studies using the Posts Table Pro directory plugin

Perhaps the best indicator of Posts Table Pro’s flexibility is how many WordPress sites it’s used on, and for how many different applications. We’re going to introduce you to three such sites, so you can get a better feel for the ways this WordPress directory plugin might be useful to you.

What's more, all of these examples implement more unique directories, rather than just using Posts Table Pro as a business directory plugin for WordPress.

SuperConnection - member directory

The nice thing about a highly-customizable plugin like Posts Table Pro is that it can be used to create both simple and complex directories. For instance, SuperConnection is a site offering various self-improvement courses, and includes an online directory of consultants for its audience’s reference:

SuperConnection WordPress Directory Plugin

This WordPress members directory is kept as simple as can be. It just displays each consultant's name and location and you can click on each name to visit a more detailed profile and find contact information. (However, you can also include contact details in the table itself.)

RJ Lee Group - publications directory

Next up, RJ Lee Group is a forensics laboratory and scientific consulting firm in the U.S. As part of their work, they often publish papers and make presentations. To make all of those publications available to their website’s visitors, the firm created a document database. This includes an advanced search for all of the paper titles and citations:

The RJ Lee Group website.

In this WordPress document directory, you can see the name of each paper, its full citation, and the date it was published. There’s also a handy search bar, since the table contains a lot of items. Clicking on a paper’s title will take you to a page where you can download a copy.

Wavelength Electronics - product directory

While both of the previous tables kept things simple, this final example uses the WordPress directory plugin in a different way. It makes use of the full range of Post Table Pro’s feature set:

The Wavelength Electronics website.

This product directory listing includes quite a bit of information about each item, including an image and even a technical data sheet with download links. In addition, the filters above the table let you sort the entries based on the specific criteria you’re looking for. All in all, the table makes product comparisons very simple.

How to create a WordPress database, directory, or listing (in 4 steps)

If you want to create a WordPress directory or front end database for your own website, the good news is that it’s an easy task. Of course, how you customize your table will depend on the type of database, directory, or listing you’re building. Still, the process remains the same regardless of the application.

Let's walk through how to create your own WordPress directory using Posts Table Pro!

Step 1: Install and activate the plugin

Before you can create any kind of dynamic table, you’ll need to purchase the Posts Table Pro WordPress directory plugin.

Once you’ve bought the plugin, you’ll be provided with a zip folder containing all of its contents. In your WordPress site’s dashboard, head to Plugins → Add New, and click on the Upload Plugin button:

Adding a new plugin to WordPress.

Use Choose File to find and upload your Posts Table Pro folder, then hit Install Now. Once that process is complete, you’ll also need to activate the plugin:

Activating a plugin in WordPress.

After activating the plugin, the Posts Table Pro setup wizard will open automatically and guide you in entering your license key.

Step 2: Customize the plugin’s settings

When you first install the plugin, a setup wizard will open automatically. This guides you through a step-by-step process to create your first table.

You can also create new tables at any time by going to Post Tables → Add New.

Start by giving your table a name and select the post type you wish to display. If you don't have a content type, create one using Easy Post Types and Fields plugin.

Choose your posts

On the page for selecting posts or pages to add to your table, you will have the option to choose from posts, pages, and custom post types. The available options will vary depending on the post type you previously selected. If your post type includes custom taxonomies, those will also be listed for you to select from.

PTP table builder select posts to include

If you just need to include a few pieces of information, as in the first two case studies introduced earlier, you may be fine selecting either posts or pages here. (Using posts is usually more convenient than pages - just add each listing as a separate post.) If you want to keep your directory listings separate from your blog posts, however, you may want to create a custom post type.

Customize your columns

Customize columns in WordPress table plugin

To customize the columns in your table, you can select which ones to include and in what order. Let's say you run a book review website and want to show important details about each book, such as:

  • Image
  • Title
  • Summary
  • Country
  • Phone
  • Levels

To add a column, select the type of column from the dropdown menu and click 'Add'. The new columns will appear in the list of columns above, which you can rearrange by dragging and dropping the sort icon on the left or the column title. You can also edit the column name by clicking the pencil icon or hide the column name altogether using the toggle. If you need to remove a column, simply click the X icon next to it.

Make your WordPress directory easy to navigate

Continuing to scroll down, you’ll see plenty of additional options. You can enhance the usability of your WordPress directory by taking advantage of various options. These include adding filters, enabling lazy loading to speed up the table, and choosing how to sort the table.

All of the settings here can be useful, depending on the contents and purpose of your directory. No matter what kind of directory you’re building, however, we’d recommend checking out the filters option:

WordPress table builder plugin with filters

You can add filters that allow users to refine their selections. Filters appear as dropdown menus above the table, and you can add as many as you need. The filter options available depend on the post type you selected on the first page.

For example, standard blog posts can be filtered by categories and tags, as well as any custom taxonomies added. However, other post types that don't have built-in categories and tags will only display the custom taxonomies added to them, which can be created using the Easy Post Types plugin.

Step 3: Create the individual entries for your directory

Next, you’ll need to create an individual piece of content on your site for every entry you want to include in your WordPress database or listings. The way you approach this step can vary, depending on your goals.

As we mentioned earlier, you can simply use regular WordPress posts as your database entries. This approach works well if you don’t use posts for other types of content (such as a blog). You can use the title and description fields in the WordPress post editor to add the name and bio for each member of your staff, for example.

However, by default posts will only enable you to add a few pieces of information. What if you also want to include each staff member’s phone number, location, and other details? For that, we’d recommend downloading and installing the free Easy Post Types and Fields plugin. This works alongside the Posts Table Pro WordPress directory plugin:

Easy post types and fields plugin

This is an easy-to-use tool that will let you add custom fields and taxonomies to your posts. That way, you can supplement your database entries with whatever information you need.

Consider creating a directory custom post type

Of course, this method can cause problems if you do use posts to create blog entries, news articles, or any other type of content. You don’t want those posts showing up in your directory, so you’ll need a way to differentiate database entries from everything else on your site.

For that, you can create a custom post type. This is essentially a separate type of post with its own name and section in your dashboard. For example, you might call it 'Directory' or 'Listings' and put all your directory listings under there. You can customize it however you'd like, and include custom fields as well.

The following tutorial video will walk you through using Easy Post Types and Fields plugin to create a custom post type, and then add new fields to it:

When you’re done, go back to the Posts Table Pro settings page and select your Directory custom content type. Then, you can go ahead and create an individual custom post for each entry in your WordPress directory.

Step 4: Add the directory to your website

Finally, it’s time to display your new directory, listing, or database on your site and this is the easiest step of all. The Posts Table Pro WordPress directory plugin lets you list directory entries anywhere on your site.

After creating your table with the Post Table Pro plugin, the setup wizard will notify you that the process is complete and provide instructions for displaying the table on your WordPress site.

  • You can display the table using either the 'Post Table' block available in the Gutenberg editor or
  • By copying the shortcode from the table builder and pasting it anywhere on your website. This flexibility allows you to place the table on any page, regardless of its content.
An example of a membership directory.

You can add any content you like above and below the table – we’d suggest including a heading at the very least. Then publish the page, and visitors will be able to start using the table!

How can users add their own directory listings (including paid listings)?

So far, you've learned how to use the best WordPress directory plugin to add and display directory listings yourself. But what about letting users submit items to the directory themselves?

For example, let's say you wanted to create a WordPress car sales directory where individual car owners can advertise their vehicles. That's where Gravity Forms comes in.

Gravity Forms is a WordPress forms plugin that lets you create interactive online forms to collect information from your users. You guessed it, you can even use it to create a 'Submit a listing' form for a WordPress directory website.

Use Gravity Forms to create a 'Submit directory listing' form which will collect all the information for the listing. You can then add some useful add-ons to add the remaining functionality:

  • Use the Gravity Forms + Custom Post Types extension to automatically add your user's listings to your 'Directory' custom post type. If you like, you can hold new listings for moderation before they go live in your WordPress directory.
  • Use the take payment via PayPal addon to take payment online before users can submit their listing (Gravity Forms has multiple payment gateway addons including Stripe, 2Checkout, and Authorize.net, so you can use any of these too).

You'll also be able to set Gravity Forms to get email notifications, and you can add customizable form fields too so that you're getting the information you need.

Check out our full tutorial on how to set this up.

Create your WordPress directory today

In the end, the best WordPress directory plugin is simply the one that meets your needs.

Overall, if you want something that can work as both a business directory plugin for WordPress, as well as a directory for users, WooCommerce products, files, and pretty much anything else, you should consider Posts Table Pro.

As you saw in the tutorial above, it's going to give you the most flexibility when it comes to creating a directory on WordPress.

And for a list of the best WordPress Directory Themes, read this post.

To get started, click below:

Do you have any questions about these plugins, the best business directory plugin for WordPress, or how to use Posts Table Pro as a WordPress directory plugin? Ask away in the comments section below!

WordPress Member Directory Plugin with Profile

A WordPress member directory plugin lets you create a list of your organisation's members. The member list will appear on a public or private page on your website.

Creating a member directory in WordPress can help you showcase your community and provide valuable resources for your users. In this tutorial, we'll walk you through how to set up a searchable table with user profile fields using the Posts Table Pro plugin. In addition, we'll cover how to allow members to sign up from the front end and sell access to the user directory using Gravity Forms payment extensions.

Members will be listed in a table with options to sort, search, or filter to find a particular member. When a user finds the member they're searching for in the members' directory, they can just click through to read their full profile. With the added ability to sign up for membership and pay for a directory listing, your member directory will become a valuable resource for your users and a source of revenue for your business.

WordPress member directory plugin

A new type of WordPress member directory plugin

This is completely different from a WordPress membership plugin. While a membership plugin lets you create a private members-only area for your members to log into, this member directory plugin creates a directory of people or members that's sortable and filterable by the user. The directory can list people whether they're members or not.

It's also different from most WordPress member directory plugins, which typically create a fairly basic directory listing all the users from your WordPress website (i.e. everyone from the Users section of the WordPress admin.)

While this might be fine for some membership site directories, what happens if your members are not WordPress admin users? Your directory of members might contain different people from your list of WordPress users.

This makes it tricky to find the best plugin for your WordPress member directory with your profile. If you search for this sort of plugin, you'll find membership plugins designed to create a protected members-only area of your website, or member directories listing all your WordPress users.

This tutorial will show you how to build a different sort of WordPress member directory. We'll use the Posts Table Pro plugin, alongside other free WordPress plugins for creating member profiles. The members in your directory don't need to have logins for your website - your users are kept completely separate.

The best part about this tutorial? It's surprisingly simple (and you don't need any technical expertise!). If you follow these steps, you'll have your WordPress member directory up and running in no time.

You may also like: How to Use Posts Table Pro to Create a WordPress Staff Directory

How others use the WordPress members directory

Check out these examples of WordPress websites with a searchable member directory with the profile. See what's possible and find inspiration to start building your own directory of members today.

Case study 1 - CEPPs members directory

CEPPs is a charity that supports mothers and early childhood. They use the Posts Table Pro plugin to create a WordPress member directory with profiles.

CEPPs WordPress Member Directory Plugin


The CEPPS directory of members lists their supporters in a mobile-friendly, fully responsive WordPress table. Each supporter is listed within a custom post type in WordPress. Information about each member is stored as custom fields, categories, and taxonomies. Each piece of data is stored as a separate column in the table. Visitors can sort the table by clicking on any column header. They can search for any keyword by typing it into the search box. They can also filter the WordPress member directory by clicking on country, city, type or tag. This makes the member directory really flexible and quick to use.

You can click on a logo, name, or 'Visit' link to view the individual member profile page. This contains further information about each member.

Case study 2 - SuperConnection consultants directory

SuperConnection has a WordPress member directory, listing their expert consultants. Each consultant has attended their training and is available for consultation.

Consultants are listed in alphabetical order with their names and location. You can sort by either column or perform an instant search using the search box. This makes it easy to find a consultant in your area.

You can click from the directory to the individual member profile pages. These include various custom fields about each member including contact details, location map, and classes completed.

Consultants directory table:

WordPress consultants directory of members plugin

Member profile page:

WordPress member profile plugin

If these examples are the sort of WordPress member directory that you want to build, keep reading... This tutorial will teach you how to do the same for your own website. We'll actually be going even further as I'll show you how to add extra columns and filter drop-downs to the directory, too!

Case study 3 - Private members-only database of authors

WordPress member directory plugin examples

WordPress member directory plugin reviewsChristopher Graham uses our Posts Table Pro WordPress table plugin for his private members directory of thriller, mystery and crime fiction authors.

He was looking for an easily searchable members database that would allow the authors to search for other members with skills or knowledge in a particular area.

When one member finds another with the skills they are interested in, they can contact them, ask questions, or chat.

Christopher set up his WordPress members-only directory by following the instructions in this tutorial and was delighted with the result. You can read his review of the plugin.

What are your requirements for a WordPress membership directory with profiles?

First, it's important to think about your requirements. What do you want to achieve from your WordPress member directory plugin? This will help you decide if the type of member directory covered in this tutorial is right for you.

Planning your member directory

  • Will your WordPress member directory be publicly available or hidden from public view? I'll show you how to create a public member directory and how to password protect it. If you want to add further security - for example, by making it available to specific groups via a WordPress membership plugin - then we won't be covering this. However, techniques covered in this tutorial can be used anywhere on a WordPress site. This means that you can put it on a page that is restricted using another membership plugin, if you like.
  • Can members create and manage their own profiles? This tutorial is about how to create a WordPress member directory with profiles that you will maintain as the website administrator. If you want members to be able to create their own profiles then you'll need to do some extra work outside of this tutorial. (Bonus tip: You could use Gravity Forms with the Gravity Forms + Custom Post Types plugin to let members submit their own profiles to the directory. You could even take payment via PayPal if required. New members would complete an online form with their profile information which would then be saved in the 'Members' custom post type to be displayed in the directory. Please see our tutorial on how to set this up.) 
  • Do your members have to be WordPress users? Unlike other membership directory WordPress plugins, you'll be adding the members as a custom post type in WordPress. The Posts Table Pro plugin we'll be using as our member directory plugin displays custom post types but NOT WordPress users or user roles. If your members are also WordPress users (i.e. they're listed in the Users section of the WordPress admin) then you can't list them in the directory. To do this, you'd need to add each member to the 'Members' custom post type we'll be creating in this tutorial.

What information will the WordPress member directory plugin contain?

You should also consider:

  • What information do you want to display about each member? Write a list of the data you want to display using Posts Table Pro, the best WordPress member directory plugin. This can include various text fields (name, description, experience, etc.), one or more images, icons (e.g. linking to their social media profiles), etc. Basically, anything you like. You'll use this later in the tutorial when you create the custom fields for your WordPress directory of members with member profiles.
  • How will you structure your WordPress directory of members? As well as the unique data about each member such as their name and email, you'll probably want to categorize your directory of members. Write a list of the different ways you want users to be able to sort and filter the member directory.

Armed with this information, you're ready to start building your WordPress member directory.

1. Create a 'Members' custom post type

Part 1 covers the initial setup of creating a WordPress member directory. You can also read the full instructions below.

Each WordPress member in your directory will be stored with their profile data in a WordPress custom post type called 'Members'. (Don't worry, you can call it something else if you prefer.) This will create a 'Members' section on the left of the WordPress admin. Each member will be added as a separate 'post' within this section.

If you're a developer, you can create a 'Members' custom post type the way you would usually. If not, you can do it using the Custom Post Type UI plugin.

  1. Go to Plugins > Add New and search for 'Custom Post Type UI'.
  2. Install and activate the plugin.
  3. Go to CPT UI > Add/Edit Post Types.
  4. Complete the following fields on the 'Add New Post Type' tab:
    • Post Type Slug - Add a lower case label for the post type, e.g. 'members'. This will be used in the URL for your member profile pages, e.g. www.yoursite.com/members/joebloggs.
    • Plural Label - Add a plural label for your Members post type, e.g. 'Members'. This will appear in the left of the WordPress admin.
    • Singular Label - Add a singular label, e.g. 'Member'. This will appear when you add a new post in your Members post type, e.g. 'Add New Member'.
  5. Now scroll down to the Supports section, ignoring everything in between. (Feel free to check these fields and change them if they're relevant.) Tick the boxes for the fields that you plan to use for your member profiles. Most member directories will need the title, editor (main content area/description) as a minimum. You may also want a featured image and excerpt. I'll also show you how to add custom fields and taxonomies later in this tutorial.
  6. Scroll a bit further to the Built-in Taxonomies section. Tick 'Categories' and 'Tags' if you plan to use these.
  7. Click the blue 'Save Post Type' button at the bottom of the page.
Add Custom Post Type WordPress Plugin

2. Create your categories, tags & custom taxonomies

Categories, tags, and custom taxonomies let you store information that will apply to multiple members in your directory. People viewing your members directory can filter the table to find all the members with a specific category/tag/taxonomy.

For example, you might want to categorize your WordPress member directory by local area. You could create a category, tag, or taxonomy for each geographical area. An 'Area' filter could appear above the member directory so that users can filter the table for members in a specific area.

These 3 ways of organizing content in WordPress are quite similar. To be honest, it's not that important which you use, but here are some tips to help you decide between them:

  • Categories - Use WordPress categories as the primary way of organizing your member directory plugin. All members should come under one or more categories.
  • Tags - Tags are labels that provide extra information about your members. They're optional and members can have no tags or several.
  • Custom Taxonomies - Use these for additional categorization that you want to use in the WordPress member directory. For example, if you're using your main categories for the geographical area then you might want custom taxonomies for any other ways you want to categorize your members.

Some examples

For example, you might use categories to record the geographical area of each member, e.g. 'England'. Each member might have some tags relating to their specific skills such as 'French speaking' or '5+ years experience'. You might have custom taxonomies for 'Level' (e.g. Junior, Intermediate, or Senior Consultant).

You can create tags when you add the members later, but you need to add the categories and custom taxonomies now.

2a. Create your categories

  1. Go to Members > Categories in the WordPress admin.
  2. On the left-hand side, add the name and slug (the end bit of the URL) for each category you want to create.
  3. Click 'Add New Category'.
  4. Repeat the process for all the categories you want to create.

Tip: You can create sub-categories by selecting another category as the 'parent'. However, your member directory will list all the categories and sub-categories on the same level, for example in the 'Categories' filter dropdown. If you want to list them separately then you should create a custom taxonomy instead. For example, you might be using your top-level categories to record each member's country. Instead of adding the regions within each country as sub-categories, you can create a custom taxonomy for 'Region'. This will let you list the regions as a separate dropdown filter above the members table, instead of combining the countries and regions in a single list of categories.

2b. Create your custom taxonomies

Add Taxonomy WordPress PluginCreate custom taxonomies using the Custom Post Type UI plugin you used to create the 'Members' post type:

  1. Go to CPT UI > Add/Edit Taxonomies in the WordPress admin.
  2. Complete the following fields in the Add New Taxonomy tab:
    • Taxonomy Slug - a lowercase label for the taxonomy (e.g. 'town').
    • Plural Label - The name for the taxonomy in the plural (e.g. 'Towns').
    • Singular Label - The name for the taxonomy in the singular (e.g. 'Town').
    • Attach to Post Type - Select the Members custom post type.
  3. Click the blue 'Save Taxonomy' button.

Now when you add new members to the directory, you'll be able to add data to the taxonomy you have added. You can create as many custom taxonomies as you like.

3. Custom fields

Custom fields let you store unique data about your members that isn't possible within standard WordPress fields. Look at the list you wrote earlier about the data you need in the WordPress member directory. This probably includes things like member name, phone number, etc. Mark which items in the list correspond to the following WordPress fields:

  • ID - This is the unique ID for the member which is stored in the WordPress database and will be created automatically when you add each member. The IDs will be non-sequential as they are used for other types of content in WordPress too. You may want to use this to store member ids. Or if you want to choose the ID, you should use a custom field instead.
  • Title - Use this for the member's name.
  • Content - Use this for the main description on the member profile.
  • Excerpt - Use this if you want to display a brief introduction to the member on the main directory page. (If you prefer, you can leave this blank and just display the first few words of the main description instead.)
  • Image - Use this for the member's photo or logo.
  • Date - This is the date when the member was added to the website. You can change the date if needed.

Any fields that don't come under the above list and aren't suitable for categories, tags, or custom taxonomies (i.e. they're not unique to each member) should be added as custom fields. Examples of the sort of member data you'll need custom fields for include email address, phone number, and date of birth.

3a. Create your custom fields

WordPress member directory custom fieldsOnce you've decided which custom fields you'll need, it's time to add them to your Members custom post type. We'll do this using the Advanced Custom Fields plugin.

  1. Go to Plugins > Add New.
  2. Search for 'Advanced Custom Fields'.
  3. Install and activate the plugin.
  4. Go to Custom Fields in the WordPress admin.
  5. Click Add New Field Group. Enter the name for the group of custom fields you'll create for your Members post type.
  6. Now click 'Add Field' and add the following information for each of the custom fields you want to create. (e.g. add 1 custom field for 'Phone' and another for 'Email'):
    • Field Label - The title for your custom field (e.g. 'Phone').
    • Field Name - Lower case label for the custom field (e.g. 'phone').
    • Field Type - Select the method that you'll use to complete this custom field in the WordPress admin. e.g. select 'Text' to add basic information about each member. Or 'Email' for an email address. Or maybe a Select dropdown, Check Box or Radio Button to add some pre-set options to choose from.
    • Also complete any of the other fields, as needed.
  7. Location Rules - Select 'Show this field group' if the post type is equal to your members post type.

Now, your custom fields will appear on the 'Add New Member' page. You can store this information about everyone in your member directory.

4. Add your members to the directory

Now you've finished creating the infrastructure for storing your member profiles in the directory. It's time to add all your members:

  1. Go to Members > Add New in the WordPress admin.
  2. Add the member profile using the standard WordPress fields, categories, tags, taxonomies, and custom fields you created earlier.
  3. Click the blue 'Publish' button.
  4. Repeat the process for all your other member profiles.
Add Member to Directory WordPress Plugin

5. Create your searchable member directory table

The next step is to add a members directory table to a page on your website. This will list all your members, with optional click-throughs to the individual member profile pages.

Here's Part 2 of my video tutorial on how to create a WordPress members directory with profiles. Or you can read the written instructions below.

EMBED THIS VIDEO ON YOUR WEBSITE
Embed code: <iframe src="https://www.youtube.com/embed/wGrx8BUsTB4?rel=0" width="560" height="315" frameborder="0" allowfullscreen="allowfullscreen"></iframe>
  1. Buy the Posts Table Pro plugin, download the plugin files from the order confirmation page and copy your license key.
  2. Go to Posts → Add New in the WordPress admin.
  3. Click 'Upload' and upload the Posts Table Pro files.
  4. Activate the plugin.
  5. Go to Post Tables → Settings, enter your license key and click save.
  6. Go to the page on your WordPress website where you want to add the member directory table. Add the shortcode: [posts_table post_type="members"]. This tells Posts Table Pro to list all your member custom posts in a table. (Note: If you chose something other than 'members' as the slug for your custom post type, enter this instead.)
  7. Save the page and view it.

You will see all your members listed in an interactive table.

WordPress directory of members plugin

6. Customise your WordPress member directory

By default, your member directory table will include columns for title, content, author, and date. Some of these are more relevant to a blog than a directory of members. Next, I'll show you how to customize the columns and various other elements of your WordPress member directory.

The WordPress table plugin Posts Table Pro comes with lots of options to control how your member directory looks and behaves. You can read about all the options in the knowledge base. Here's a summary of the ones most relevant to a WordPress member directory.

Choose your columns to appear in the table

Your member's table can include columns for ID, title, content, excerpt, image, date, author, categories, tags, status, or any custom field or taxonomy. Add these to the shortcode in the following format. This example will add columns for image, name, excerpt, categories, a custom field called 'phone', and a custom taxonomy called 'level'.

[posts_table post_type="members" columns="image,title,excerpt,categories,cf:phone,tax:level"]

Add filter dropdowns to the table

By default, the WordPress member directory includes a search box above the table. You can also add filter dropdowns to let users filter by category, tax, or custom taxonomy.

You can enable all possible filters as follows:

[posts_table post_type="members" columns="image,title,excerpt,categories,cf:phone,tax:level" filters="true"]

Alternatively, you can add some filters but not others. This example will only show a category filter:

[posts_table post_type="members" columns="image,title,excerpt,categories,cf:phone,tax:level" filters="categories"]

Change the order of your members' list

The default member directory lists members on the date they were added, with the most recent first. You can change it to sort by any column in the table or other options such as setting a custom order.

Most WordPress member directory plugins sort the list alphabetically. This shortcode will sort the table alphabetically by name in ascending order (i.e. A-Z).

[posts_table post_type="members" columns="image,title,excerpt,categories,cf:phone,tax:level" filters="true" sort_by="title"]

Disable individual member profiles

In the default members table, you can click on a member's title or image to view their profile page. You can disable this as follows:

[posts_table post_type="members" columns="image,title,excerpt,categories,cf:phone,tax:level" links="none"]

This will disable all links in the WordPress member directory. If you want people to be able to click on the categories, tags or taxonomies to filter the table, while still disabling the profile page links, use this instead:

[posts_table post_type="members" columns="image,title,excerpt,categories,cf:phone,tax:level" links="categories,tags,tax:level"] (you may need to change this slightly depending on which taxonomies you're displaying)

This way, all your members will still be listed in the directory table. But users won't be able to view separate profile pages for each member.

Advanced: Create a directory listing specific members only

The examples above will list all members in the directory table. If you prefer, you can create multiple tables - each listing different types of members. For example:

  • You may want to list members with different skill levels on different pages of your website.
  • Alternatively, you might want to divide your member directory page into multiple sections. You might have a 'Europe' subheading followed by a table of members in the Europe category. Then you could have an 'Asia' subheading and a table of members in the 'Asia' category. And so on.

You can add tables containing members with a specific category, tag, taxonomy, or custom field. (It's also possible to create tables with members who were added on a specific day, month or year but you're less likely to need this.)

WordPress Member Directory Plugin with Profile

7. Test the member profile page

Next, go to the individual profile page for a member and check if it looks ok. You can find this by clicking the name of a member in the directory. Or go to the Members page in the WordPress admin, hover over a member, and click 'View'.

By default, the member profile pages will use the same template as the standard blog posts in your theme. The exact content depends on the theme but probably includes the title, content, featured image, tags, and categories. There may also be information you don't want such as the date or author. It definitely won't include any custom fields or taxonomies.

Customizing the member profile

This is where it gets a bit tricky. If you're happy with the member profile page as it is, that's great. Your custom fields and taxonomies are listed in the member directory table so you may not need them on the individual member profile. If you've disabled the links to the member profile pages (see above), that's fine too.

However, if you want to change the content or layout of your member profiles then this requires a bit more technical know-how. The only way to customize the member profile page is to create a new template for the custom post type in your theme or child theme. You then need to edit the code to make the required changes.

This is beyond the scope of this introductory tutorial and if you're not comfortable editing code, I recommend posting a job on Codeable. Codeable is a well-known marketplace of tried and tested WordPress experts. It's a good place to find someone good for small jobs like this. Alternatively, the Advanced Custom Fields documentation includes instructions on adding custom fields and taxonomies to your template.

How to password protect your WordPress member directory

Password protect WordPress member directory pluginIf you want your WordPress member directory and profiles to be publicly available then you've finished - well done! To create a private members directory, the easiest option is to password protect the relevant page in WordPress.

  1. Go to 'Pages' in the admin and click on the page used for your WordPress member directory table.
  2. Click the 'Edit' link next to 'Visibility' in the 'Publish' panel at the top right of the screen.
  3. Choose 'Password protected' and enter a password for the page.
  4. Click the blue Publish or Update button.

You can then give the password to everyone who needs access to the member directory.

For a more advanced solution, you can use a WordPress membership plugin to protect the page or to create a wider members area. The Groups WordPress plugin offers a simple, user-friendly way to create a protected members area.

Create a members sidebar widget

If your WordPress member directory website has a page sidebar, then it can be a good idea to list members in a widget. The best way to do this is to show the full member directory on the main page, and a simpler version in a sidebar widget.

This is how to add a simplified member directory to your website's sidebar:

  1. Go to Tables → Add New.
  2. Create a table listing the 'Members' post type you created earlier in this tutorial.
  3. On the 'Columns' page, just choose two or three columns. I would recommend something like "image, title, button". This will create a 3-column WordPress member directory containing the name of each member, plus their image and a button linking to their full member profile.
  4. If your page sidebar is created using the Gutenberg block editor, then use the 'Posts Table' widget to insert the new table. Alternatively, copy the shortcode from the last page of the table builder and paste it into a text widget.

How to allow members to sign up from the front end and sell access to the member directory

One of the best ways to make your member directory more valuable is to allow users to sign up for membership directly from the front end of your website. This can be done easily using Gravity Forms, a popular form builder plugin for WordPress.

The way it works is that you'll use Gravity Forms to create a membership signup form. You'll set this up so that when a new member registers, it will save their information to the 'Members' post type you created earlier in this tutorial. When you approve the new registration, the member will automatically appear in the member directory which you created using Posts Table Pro.

This is the fastest way to create an automated WordPress member directory. I recommend holding new member registrations for moderation, but you can automate it 100% by auto-publishing the new member posts instead of saving them as drafts and publishing them manually.

Step 1: Create a member's custom post type with Gravity Forms

Make sure you have followed the instructions above to create a members custom post type in WordPress. Once this is set up, you can use Gravity Forms to create a form that allows users to sign up for membership. To do this, you'll need to install the Gravity Forms add-on, which allows you to save the information submitted by the user to the member's custom post type.

To create a form, simply navigate to Forms → New Form in your WordPress dashboard and add the necessary fields. You can include fields for user information, such as name, email address, and a brief description, as well as any other relevant details you want to collect. Make you have created a field for each of the pieces of data that you added to your members custom post type.

Next, you need to use the Gravity Forms + Custom Post Types plugin to map the form fields to your members custom post type. This means that when a new member registers, their data will automatically be saved to the correct fields in your member directory. Gravity Wiz have a tutorial about how to save Gravity Forms submissions as custom posts. Do this, then come back finish the process of setting up the WordPress members directory plugin.

Once you've created your form, you can add it to a page on your website using the Gravity Forms shortcode. Name the page something like 'Member Registration' or 'Become a Member'.

Step 2: Use Gravity Forms payment extensions to sell access

To sell access to your member directory, you can use Gravity Forms payment extensions to create a payment gateway for users who want to be included in the directory. There are several payment gateway options available, including PayPal, Stripe, and Authorize.net, so you can choose the one that works best for your business.

To set up a payment gateway, you'll need to install and activate the appropriate Gravity Forms payment extension. Once this is done, you can create a new form and add the payment fields to it. This will allow users to pay for their membership directly from your website.

Create your own WordPress member directory with a profile

Now it's your turn! I've given you all the information to create a fully functional member directory for your WordPress site. You know how to create a 'Members' custom post type with various fields of data about your members. I've told you how to use Posts Table Pro to create a searchable members directory table. You know how to customize the members' table and where to get the resources to edit your member profile template. I've even shown you how to hide the member directory from public view.

Once you've finished your member directory, you can also use Posts Table Pro to present other types of content. For example, you can use it as a WordPress document library plugin or create a publications library. You can even use it as a WordPress audio libraryvideo gallery, or events list.

Allowing users to sign up for membership directly from the front end of your website and selling access to your member directory can also greatly increase the value of your directory while generating revenue for your business. By following the steps outlined above, you can easily set up these features using Gravity Forms and WordPress. Don't forget to enable moderation to ensure your directory stays up-to-date and relevant.

I'd love to see a link to your own WordPress member directory after you've created it. How did you get on? Is there anything I can do to improve this WordPress tutorial? Please leave your comments below.

WordPress audio library plugin

This tutorial will show you how to create a WordPress audio library or MP3 player using the Document Library Pro plugin. Your visitors will be able to find and play audio tracks directly in a searchable and sortable table. They can play individual audio tracks or even complete audio playlists.

Audio galleries are a popular feature of many websites. There are lots of reasons for wanting to know how to create a filterable music library or audio track directory. You may be a band, artist, composer or musician and want to display your music or sound effects on a single directory page with embedded audio. Maybe you're a CD and want to include a track listing with samples.

You might need to provide samples as part of an audio or music catalogue or directory. Perhaps you're a voiceover artist and want to create an audio track library with examples of your work. Alternatively, your site might feature audio learning materials such as recorded tutorials or lectures, foreign language classes, or podcasts.

Whatever your reason for creating a WordPress audio library, this tutorial will show you how to do it using the Document Library Pro plugin.

The perfect WordPress audio library plugin

The Document Library Pro plugin has everything you need to create a WordPress audio library. While it has 'Document' in the name, it's perfect for listing any type of resource - including audio.

You add your audio files to the WordPress media library (or host it elsewhere, e.g. on Spotify), and the plugin displays them in a searchable table or grid. It contains embedded music tracks or MP3 players which you can listen to directly from the audio library page:

WordPress audio library grid layout
An audio library with a grid layout and embedded media players

It's a really neat way of displaying audio tracks. People can listen to them, play, pause and fast forward directly within the table.

Document Library Pro also works as a WordPress audio playlist plugin. It creates a container for playlists by listing them in a table-like directory structure. You can listen to playlists and navigate between the tracks from the table. People don't have to click through to a separate page to listen to them - it's all on one page.

You can use Document Library Pro to display audio players and playlists created using the audio shortcodes that come with WordPress itself. I'll also share some third party WordPress audio plugins that can be used to display more fancy audio players.

Read on to learn how to create a searchable, filterable WordPress audio library.

It works!
Beautiful product! I did a nice filtering and dynamic search for my music library without any strong skills in web development.

What type of audio can you include in a WordPress audio library?

WordPress audio library plugin with gallery embeds
A WordPress audio library with a playlist and 2 individual music players

These days, people use audio files for a huge variety of purposes. The good news is that you can publish any of these in a WP audio library. This includes:

  • Multiple audio file formatsMP3, WAV, MPEG and more.
  • Types of audio recordingAudiobooks, bands, choir music, foreign language lessons, karaoke backing tracks, orchestra music, relaxing background music, samples, singles and albums, podcasts, stock music (e.g. corporate background music, royalty free music, sound effects, etc.).
  • Audio from third party websitesIf you host your audio files externally, that's fine. The WordPress audio library also supports embeds from other platforms such as Mixcloud, ReverbNation, SoundCloud and Spotify.

How to set up your digital WordPress audio library

Now, we get to the tutorial part of this article. Keep reading to learn how to set up a WordPress audio library.

1. Add the audio files to WordPress

To get started, you need a WordPress website with the Document Library Pro plugin installed.

First, you need to add each audio item to WordPress as a 'Document' post. Each 'Document' will appear individually in your front end audio library. You need to do this even if your actual audio files are hosted outside of WordPress.

There are several ways to do this:

  • Option 1: Add document manuallyGo to Documents → Add New in the WordPress admin and add all the information you want to display about each document. Don't worry about uploading the actual audio file yet - we'll do this in Step 2.
  • Option 2: Use drag and drop file uploadGo to Documents → Import and drag and drop the audio files into WordPress. Then, go to Documents and manually edit each one as needed. For example, the name will be the same as the filename, and you can change this to make it more user-friendly.
  • Option 3: Upload from CSVYou can also go to Documents → Import and upload a CSV file. This should contain all the information that you want to display for each audio track, as well as the URL where the audio file is hosted (e.g. in the WordPress Media Library or on another website).

2. Add embedded audio players

The next step is to add an embedded audio player to each of the audio items (i.e. 'Documents') that you added in Step 1. For each one, you can add either a standalone audio track or a full audio playlist.

Initially, we'll use the native WordPress audio and playlist shortcodes. Later, I'll show you how to create even more impressive-looking audio embeds using other plugins which work with the WordPress audio library.

  1. Go to the Documents section of the WordPress admin and click on one of the documents.
  2. Add an audio player to the main content area using one of these methods:
    • If you plan to store the audio files in the WordPress Media Library, then you should click the 'Add Media' button and upload the file. When you insert it into the document content, WordPress will automatically convert it into a full functional audio player. It must be a valid audio file type such as MP3, AAC, WAV or FLAC.
    • To embed audio files hosted on Mixcloud, ReverbNation, SoundCloud or Spotify, simply paste the URL into the content area. Again, WordPress will display this as an embedded audio player.
    • If your audio files are hosted on another third party platform then you need to get an embed code. To add it, go to the 'Text' tab and paste the embed code there.
  3. Click 'Update' to save the document post.
WordPress audio library plugin embedded
Adding audio to the WordPress Media Library

Adding audio playlists

You can also add complete playlists to the WordPress audio library. If you're planning to treat the entire table as a playlist then you should add each embedded audio track as a separate 'Document' as described above. This would look like this:

wordpress audio playlist plugin example
An audio playlist with 1 track per row

Alternatively, it's also possible to add actual playlists which appear in a single row of the table like this:

playlist of playlists example
An audio library with an entire playlist in the first row of the table

To add a playlist to one of your 'Documents' - like in the second screenshot above:

  1. Edit the document.
  2. Click 'Add Media'. Instead of adding an individual MP3 file or similar, click 'Create Audio Playlist'. If you can't see this link, it's because you haven't uploaded any audio tracks to your WordPress media library yet. Once you have uploaded some audio tracks, this link will appear.
  3. Select all the audio or music tracks that you want to include in the playlist and click 'Create a New Playlist'.
  4. On the next page, you can add the track name underneath. This will appear on your playlist so make it as descriptive as possible - e.g. the song name. There are also some settings on the right, for example whether to display the artist name.
  5. Finally, click 'Insert Audio Playlist'. WordPress will automatically create and embed your playlist.
  6. Click 'Update'.
WordPress audio library plugin
Adding an audio playlist using the Classic WordPress editor

3. Create a front end WordPress audio library

Now it's time to list the audio files on the front end of your website so that everyone can see (and hear!) them.

Document Library Pro has already created a main audio library page for you. To find it, go to the Pages section in the WordPress admin and find the page called 'Document Library'. Rename this to something more relevant such as 'Audio Library' (remember to change the permalink too).

View the page and you'll see your audio files listed in a table or grid view with one on each row. However, it may not have the information that you want to display yet.

To customize it to your requirements, go to Documents → Settings. Read through the page and change the settings as needed.

Recommended settings for an audio library

Document Library Pro has over 50 options and you can set it up however you like. In particular, I recommend that you use the following options:

  1. Layout - Choose between a table layout with 1 audio track per row; or a grid layout with a tile for each document (like Netflix).
  2. Content - There are lots of available content types to choose from. For a WordPress audio library, add something like: title, content, excerpt. This will display the title, the content field (which contains your embedded audio player or playlist), and an excerpt (which is useful for showing a brief overview of the audio file). You can rename the columns by adding a colon after each one like this: title: Song, content:Listen Now, excerpt:Description.
  3. Shortcodes - Enable this option. This tells Document Library Pro to display the embedded music players in the main audio library, instead of the unrendered shortcode which WordPress has created behind the scenes.
  4. Links - By default, people can click on the title column to access a separate page for each audio item. The separate page will have the name at the top with the embedded audio player underneath, and any other data you've entered on the right (e.g. the file size). If you don't need these pages then add none to the Links option.
  5. Filters - If you have added categories or tags to your audio items, then add some filter dropdowns so that people can find then more easily.
  6. Lazy load - Enable this if you will be listing lots of audio files. This tells the plugin to load one page of the audio library at a time, speeding up the load times.

4. View the audio library

Your finished audio directory will look something like this:

WordPress audio library

This has created a professional-looking WordPress audio library listing all your music tracks. You can add as many as you like.

If you have lots or music tracks or audio playlists then the plugin will add pagination buttons at the bottom.

So far, I've shown you how to display the built-in audio and playlist shortcodes in a searchable WordPress audio library.

WordPress compact audio player plugin
If you don't like how the basic players look or function, then you can enhance them by adding the free Compact WP Audio Player plugin. This works nicely with Document Library Pro.

Use it to create a very simple audio player, which appears as a small play button in a circle. When you click on the circle, the audio track plays and a pause icon appears within the button instead. If space is at a premium in your WordPress audio library, then this is an ideal plugin to add small audio players.

To display a compact audio player in the audio library, just install the plugin. Next, add the shortcode [sc_embed_player fileurl="URL OF THE MP3 FILE"] to the content field for each document.

Some WordPress audio libraries simply embed the audio files on the page, like the examples above. This is very secure because visitors can listen online but can't download the files.

If you want people to be able to download the audio files, then that's fine too. You can add download links, buttons or file type icons. Visitors click on these to download the audio file to their computer.

  1. Go to Documents and click to edit a document.
  2. Find the 'Document Link' option in the top right hand corner. Use it to either select the audio file from the WordPress Media Library, or add the URL where it is hosted on another website.
  3. Go to Documents → Settings and add a 'link' column to your list of columns.
  4. Use the other link-related settings on the page to choose a style for the download links.

This will add a download column to the WordPress audio library.

Need to sell audio online?

If you want to sell audio files in your WordPress audio library then you need an e-commerce plugin. You can sell audio files using either WooCommerce or Easy Digital Downloads.

Either way, you can use our other plugins to list the audio products in a searchable table. Your audio store will look like the other screenshots in this article, but will also have 'Buy' buttons so that people can make purchases.

Selling audio with WooCommerce

WooCommerce Audio StoreThe free WooCommerce plugin lets you sell absolutely anything online. Use it with our other plugin, WooCommerce Product Table, to create a searchable audio library.

For example, Dosado used WooCommerce Product Table to sell audio files with embedded music players in the table.

Selling audio with Easy Digital Downloads

Easy Digital Downloads Audio Store Plugin

Easy Digital Downloads Table Plugin

If you only sell digital audio files then you can also sell them using the Easy Digital Downloads (EDD) plugin.

EDD is a bit simpler than WooCommerce because it doesn't have any options you don't need, such as Shipping.

For example, Fascinated Sound use EDD with our Posts Table Pro plugin to sell royalty-free sound effects and music tracks. They list over 600 downloadable audio products in their WordPress audio library.

Each audio download is listed in a table with columns for audio player, title, description, category and add to cart button. You can click on a category in the table to filter by that category. There's also a category filter dropdown above the WordPress audio library.

Customers can listen to each track by clicking on the embedded play buttons. The play buttons were created using the free Compact WP Audio Player plugin, which works perfectly in the audio library.

We love Fascinated Sound's WordPress audio library because it's such a user-friendly way to list and sell music and other audio products.

It's time to create a WordPress audio library!

So now you know how to create an audio library in WordPress. Now it's your turn. Follow the steps in this tutorial to create your own WordPress audio library or music directory. To get started, download Document Library Pro today - it's one of the best WordPress audio plugins around.

  • Supports all types of audio file.
  • Aimed at beginners or developers.
  • Full support and documentation.
  • Money back guarantee.

If your business is made up of more than a few individuals, you probably maintain a staff directory. This kind of listing is very useful internally, as it helps to keep everyone’s information in one place. It can also be beneficial to include it on your website, as long as you can find a way to organize it properly.

As with many tasks you’ll perform on your WordPress site, the best solution here is to install a dedicated WordPress staff directory plugin. With the right solution, such as Posts Table Pro, you can add a simple staff list to your site and customize it to suit your exact needs. You can even use custom fields and taxonomies to further refine and organize your directory.

In this post, we’ll talk about what to look for in a WordPress staff directory plugin. Then, we’ll introduce Posts Table Pro – a beginner-friendly yet powerful WordPress solution – and show you how to use it. Let's get started!

Why You Need a WordPress Staff Directory Plugin (And How to Choose One)

It's often smart to create a simple staff list of everyone who works for your company or organization. This directory generally contains names, contact information, profile pictures, and other pertinent details such as job titles. Having a hard copy of your staff directory handy is smart – and so is putting that information on your website.

An online staff directory is convenient, can’t be lost, and is easy to update. For WordPress users, the best way to create one is to use a WordPress staff directory plugin with the following features:

  • A way to easily add individual staff members and list them in one place.
  • Options for adding as many extra fields as you need.
  • Searching and/or filtering functionality, so users can find what they want quickly.

As with any plugin, it’s important to make your choice carefully. That’s why you’ll also want to pay attention to ratings and reviews, how frequently the WordPress staff directory plugin is updated, and what kind of support options are available.

You may also like: How to create a WordPress member directory.

Posts Table Pro

Fortunately, finding the best WordPress staff directory plugin isn’t hard. Our own Posts Table Pro is a flexible tool that meets all the above criteria. It helps you create a searchable and sortable staff list that can be tweaked to fit your precise needs, then displayed on your WordPress site.

Using a customizable shortcode, you can include as much information as you want in your staff directory, organize it all clearly, and enable users to quickly find the staff member they're looking for. What's more, with the purchase of this plugin you'll get access to expert support in case you need a little help getting started.

See a Posts Table Pro staff directory in action!

Key Features:

  • Supports custom post types, fields, and taxonomies - perfect for creating a staff custom post type with extra fields to record information about each person.
  • Includes search and sort features that are easy to use - perfect for helping people to find a specific person in the simple staff list.
  • Provides the option to embed media files - perfect for showing a profile photo or avatar of each staff member in the directory.
  • Offers plenty of flexibility and customization options - perfect for customizing your WordPress staff directory in any way you want!

Download Posts Table Pro Now!

How to Create a Staff Directory in WordPress Using Posts Table Pro (In 4 steps)

Now, let’s walk through how to actually set up your WordPress staff list. First, make sure you have a recent backup of your site in place. Then, you’re ready to begin!

Step 1: Create a Custom Post Type for Your Staff Page

A 'post type' is a unique format for content – WordPress default pages and posts are two examples. In this initial step, you’ll need to create a custom post type for your staff information. To do that, you can install the free Easy Post Types and Fields plugin:

Easy post types and fields plugin

This free plugin enables you to create all kinds of custom content and data on your site. Once you’ve installed and activated it, there will be a new Post Types tab in your dashboard. Click on Add New at the top of the screen, and follow the steps in the setup wizard.

Firstly give your custom post type singular and plural names.

create wordpress custom post type

Then, select the type of information you wish to display and click Create.

new custom post type Wizard

You have successfully created a custom post type. You should see a new tab appear for your new custom post type in the left-hand menu of your WordPress dashboard.

Step 2: Add Custom Fields and Taxonomies for Staff Data

Next, it’s time to create the categories that will appear in your staff directory. Before moving on, list out all the information you’ll want to include, such as each person’s phone number, email address, department, job role, etc. Then, split your list into two categories. Some of the information will be static data that users will simply want to look up, such as contact details. Other information needs to be ‘filterable’. For example, users may want to sort the directory by department or job role.

First, let’s address static data, like phone numbers and email addresses. For these details, you’ll create custom fields. To add custom fields, go to Post Type → Manage in your WordPress dashboard. Click on the Custom Fields button for the post type you wish to update.

Click on Add New to add a new custom field to that post type and enter the Name, Slug and select the field type (text or visual editor).

custom field WordPress

Click Add custom field button when you're finished. You've successfully added a custom field. Repeat the steps above if you want to add more custom fields.

For data that needs to be filterable, you’ll use custom taxonomies instead. To create custom taxonomies, go to Post Type → Manage. Click on the taxonomies button for the respective post type you wish to customize. Click on the Add New button.

job titles custom taxonomy

Enter the singular and plural names and the slug for your new taxonomy. When you are done, click on the Add taxonomy button.

If you want to add more filterable taxonomies, repeat the steps above.

Step 3: Enter the Data for Each Staff Member

At this point, it’s time to start entering data for your WordPress staff list. Go to the tab in your dashboard that’s named after the custom post type you created, and select Add New:

Entering staff member data.

You’ll see the basic WordPress editor with a few new options. In the Title field, enter the name of the first individual in your directory. Then, add their contact details to the custom fields. On the right side of the screen, you can set a Department and Job Title for this individual (or use whatever custom taxonomies you created). Publish the entry when you’re done, and repeat this process for each team member.

Step 4: Use Posts Table Pro to Display Your Staff Directory

The final step is to actually display the directory on your site. To do this, you'll need to install the Posts Table Pro WordPress staff directory plugin.

After purchasing Posts Table Pro, you will receive a confirmation email containing your license key and a download link to the plugin. If you don't receive this email, please submit a support request. To install the plugin, follow these five steps:

  1. Download the plugin by clicking the link in your order confirmation email. This will save a zip file to your computer.
  2. Go to your WordPress admin dashboard and navigate to Plugins → Add New → Upload Plugin.
  3. Click the "Choose File" button and select the posts-table-pro.zip file you just downloaded.
  4. Once the plugin is uploaded, click the "Activate" button to enable it.
  5. The Posts Table Pro setup wizard will open automatically, prompting you to enter your license key and complete the setup process.


Step 5: Customize Your Staff Directory

A filterable staff directory.
You can customize your staff directory to include dropdown filters

Upon installation, the plugin will open a setup wizard that will guide you through a step-by-step process to create your first table. Once you have created your first table, you can customize its appearance to suit your preferences. If you want to create new tables, simply go to Post Tables → Add New, where you can create as many tables as you need.

  1. Choose a name for the directory that is meant only for internal use and will appear on the list of tables in the WordPress admin. Next, select the desired post type to be displayed. In this case the custom post type for your staff that you created.
  2. On the page for adding posts or pages to the table, you can choose from posts, pages, and custom post types. The available options depend on the post type selected in the previous step. If your post type has custom taxonomies, they will also be shown for you to pick.
  3. You can specify which columns to show and their order. For your directory, you might want to include critical details like the names of your staff, phone numbers, email addresses, departments, and job titles. To add a column, you can pick the column type from the drop-down menu and click on "Add." The added columns appear in the column list above, and you can change their order by dragging and dropping the sort icon or the column title.
  4. You can add filters to your table that enable users to refine their selections. Filters appear as dropdown menus above the table, and you can add as many as you like. The available filter options will vary depending on the post type selected on the first page. For instance, you can add departments and job titles as filters.
  5. Next, you can customize how your directory will be sorted.
  6. After creating your directory, the setup wizard will verify that you have completed the process and guide you on how to display the table on your WordPress site. You can display the table using the 'Post Table' block in the Gutenberg editor, or copy the shortcode from the table builder and paste it anywhere on your site, which allows you to put the table on any page, irrespective of its content.

Once you’re done, your directory will look something like this:

An example of a staff directory.

Conclusion

Displaying your staff directory on your website is a smart way to make sure that information is available to anyone who needs it. Team members will be grateful for an easy way to get in touch with the right person. What’s more, creating a staff directory is simple with the right plugins.

If you’re looking for the best WordPress staff directory plugin, you’ll want to check out Posts Table Pro. This flexible solution enables you to display and customize your simple staff list, especially when used alongside the free Pods plugin. To get started, you’ll want to install both plugins and then:

  1. Create a custom post type for your staff page.
  2. Add custom fields and taxonomies for staff data.
  3. Enter the data for each staff member.
  4. Use Posts Table Pro to display your staff directory.
  5. Customize your staff directory.

Do you have any questions about how to use Posts Table Pro on your WordPress site? Ask us anything in the comments section below!

Get Posts Table Pro

Image credit: Pixabay.

Today, I'm going to show you how to use Posts Table Pro as a WordPress job board plugin. This WordPress table plugin is an ideal way to list job vacancies in an easy-to-find, user-friendly format. Job hunters can quickly search, sort and filter the list of jobs to find the vacancies they're interested in.

WordPress Job Board Plugin

As companies post job alerts on your site, you'll build your backlinks and authority with search engines, boosting your SEO and your traffic - creating a virtuous cycle that will help cement your site's place as the job site in your niche. Who needs LinkedIn?

I'll also show you how to add extra features to the job portal. This includes online job applications, a 'Submit a job' form with PayPal payments, and automatic expiry dates for when a job reaches its closing date. I'll provide step-by-step written instructions as well as a YouTube video tutorial that you can follow along with.

Before we start, I'll share three case studies of companies who have used this tutorial to create a real-life WordPress job board. Afterwards, I'll tell you how to do the same on your own website!

Case study #1 - WordPress job board plugin for Cardiac Output

Cardiology job site

Cardiac Output is a cardiology job board owned by ourselves at Barn2 Media. It has been the UK's leading cardiology job portal for over 25 years. We took it over back in 2013 to give it a fresh start and modernize its online presence.

We originally used WPJobBoard as the WordPress jobs plugin for Cardiac Output. However, it has never been as reliable as we would have liked. And at $97/year, it was more than we wanted to spend on a WordPress job board plugin. Our web host WP Engine recently told us about a security loophole in WPJobBoard. This was the final straw, so we decided to rebuild the job manager using our own Posts Table Pro plugin.

Posts Table Pro is hugely popular as one of the best WordPress job board plugins, and lots of our customers use it in this way. It made perfect sense to use it for Cardiac Output, so we decided to make the change.

In this tutorial, I will tell you exactly how I used Posts Table Pro to create a WordPress job portal for Cardiac Output. I'll include detailed screenshots and a full video tutorial. You can even see it in action on the Cardiac Output website! This will give you everything you need to create your very own WordPress job board.

Case study #2 - TVProductionContacts.com's Job Board

TVProductionContacts.com Sortable Job Board

TVProductionContacts.com is a networking site for professionals in the TV production industry. The site's creator wanted to add a sortable job board to his site, to do this he chose to use Posts Table Pro. And this is the tutorial that he used to help him create the job board.

The job board has been customized to show just the right amount of columns. Info varies from job title and location, to rate of pay and contract duration. Job seekers can quickly sort through the table by using the dropdowns above the job board to filter out what they're looking for.

The table is easy to manage as there's a job submission form powered by the Gravity Forms plugin and the Gravity Forms + Custom Post Types add-on. Once each job submission has been approved, the table is automatically updated with the information.

Case study #3 - Ian Martin Job Board

WordPress job board plugin case study

IanMartin.com followed the instructions in this tutorial to create a job board for their WordPress website. They chose the Posts Table Pro plugin specifically because it handles custom post types and displays jobs in the required layout.

Developer Scott Russell said: "We do engineering, IT and technical project staffing so have a LOT of jobs we need to display, organize etc. We’re using a plugin called Matador that pulls jobs from our applicant tracking system, displays the job ads as custom post types and allows people to apply for jobs."

Each job is added to the custom post type created by the Matador plugin. The jobs can be divided into categories and industries, with an 'Industry' filter dropdown above the table. This makes it easy for jobseekers to sift through the long list of jobs and quickly find jobs in their industry. They can also click on an industry in the table to filter by that industry.

As well as the central list of all jobs, they have used the job board plugin to list jobs from specific industries only. For example, there's a page listing Power Generation jobs only. They also have location-specific pages where users can sort by location to find jobs in their area.

Read on to find out how to create your own job board.

How the WordPress job board works

We'll create a WordPress job manager by combining Posts Table Pro with free plugins to add all the features we need. This is what you'll need:

  1. WordPress website with a theme, a domain name, and hosting. Note that Posts Table Pro is designed to work with any page builder plugin, such as Elementor, Beaver Builder, etc. It also works with the Gutenberg or Classic WordPress editors and has its own Gutenberg block. So however you've built your site, you'll be covered!
  2. Easy Post Types and Fields - you'll use this free, lightweight plugin to save your jobs in the WordPress back end. It does this by creating a 'Jobs' custom post type, which adds a dedicated Jobs area to the WordPress admin. This is where you'll create jobs, add extra fields of information, and structure job types into categories.
  3. Posts Table Pro - this WordPress job search plugin lists your job postings in a table layout on the front end of your website. It provides extra functionality such as search, sort, and filter.
  4. (Optional) Post Expirator - use this free plugin if you want to automatically remove vacancies from the job board after the closing date.
  5. (Optional) To add even more features to your WordPress job board portal, you can use a WordPress forms plugin (e.g. the free Contact Form 7 plugin) to take job applications online. Or you can use Gravity Forms to create a 'Submit a Job' form where employers can post vacancies directly to your website.

Video - How to create a WordPress job board

Watch this video to see me create a complete WordPress job portal with these plugins. You can pause as many times as you like, and create your own job board alongside me. I've also provided step-by-step written instructions below:

Step 1 - Create somewhere to store your job vacancies

To build a WordPress jobs board, you need an area for storing the job vacancies. We'll do this by creating a 'Jobs' custom post type. You'll have a dedicated 'Jobs' section on the left hand side of the WordPress admin. This keeps your job vacancies separate from other content, such as pages and posts.

1a. How to create a Jobs custom post type in WordPress

  1. Install and activate the free Easy Post Types and Fields plugin from WordPress.org.
  2. Look for Post Type → Manage in your WordPress dashboard. Click 'Add New'.
  3. Click 'Create New' on the next screen.
  4. Enter the singular and plural post type names.
    • Singular Label - The singular name for your jobs, e.g. 'Job' (make a note of this, as you'll need it to list the vacancies using the WordPress job board plugin in Step 2).
    • Plural Label - A plural name for your vacancies, e.g. 'Jobs'.
    • Click 'Next'.
  5. Select the type of information you wish to display and click Create.

Next, it's time to use the Easy Post Types and Fields plugin to create custom fields and taxonomies. These let you store extra data about each job vacancy in WordPress, such as job grade, hours, job description download link, and the 'Apply now' button.

Use custom fields to store one-off data about each job, such as the job reference or 'Apply now' link or button. Use custom taxonomies for data that you want to use to filter the WordPress job portal. For example, you might want to add filter dropdowns so that people can refine the jobs list by grade or hours, so use custom taxonomies for these.

Tip: You only need to create custom fields or taxonomies for data that WordPress can't store by default. Your Jobs custom post type can have all the standard WordPress core fields such as title, content, excerpt, featured image, tags and categories. You just need to create any additional fields that are needed on top of this, such as working hours or salary.

1b. Create custom fields for storing extra data about your jobs

  1. Head over to Post Type → Manage in your WordPress dashboard.
  2. If you want to add a custom field to a custom post type, click on the custom fields button for the respective custom post type. If you can't locate your pre-built post type in the list, it should be in the other post types tab (Such as posts, pages, products, or media).
  3. On the manage custom fields page, click on the Add new button to add a custom taxonomy.
  4. Give your custom post type a name, slug, and select the field type (text or visual editor). Click the Add custom fields button.
  5. Repeat these steps for all the custom fields that you wish to create.

1c. Create custom taxonomies for grouping and filtering the jobs

  1. Go to Post Type → Manage in your WordPress dashboard.
  2. This time, click on the Taxonomies button for the post type you wish to customize.
  3.  Click on the Add New button.
  4. Enter the singular and plural names and the slug for your new taxonomy, as before. (Remember to make a note of the singular label for Step 2.)
  5. Click on the Add taxonomy button.
  6. Repeat the steps above to add more custom taxonomies.

Now, you'll see a 'Jobs' section on the left of the WordPress admin. This is where you'll manage the vacancy in your WordPress job board. When you create a job board, you'll see all the extra fields available to fill in for each job listing.

1d. Add vacancies to the WordPress jobs plugin

Next, it's time to add the job vacancies to WordPress:

  1. Go to Jobs > Add New on the left of the WordPress dashboard.
  2. Add all the information for the job and click 'Publish'.
  3. Repeat steps 1 and 2 for each job vacancy.

Tip: To create clickable links, you should either add the HTML for a link to a Text custom field, or use a WYSIWYG Visual Editor field and add a link using the 'Insert/edit link' icon from the WordPress toolbar. If your WordPress theme comes with buttons, you can also add buttons to these fields. For example, you might want to create a 'Download' button where people can access a PDF of the job description. (If your theme doesn't have a button style, then I recommend the free Shortcodes Ultimate plugin.)

Ok, so now you've finished creating the backend infrastructure for your website job portal. The next step is to use Posts Table Pro as a WordPress job board plugin that will list your jobs in a filterable table layout on your public-facing website.

Step 2 - Create a WordPress job board page

  1. Install and activate the Posts Table Pro WordPress table plugin.
  2. Once activated, the setup wizard will appear and guide you through the process of entering your license key.
  3. Once you have installed the plugin, you can use the automatic setup wizard to create your first table. However, if you prefer to start right away or are already familiar with the plugin, you can create new tables anytime by going to Post Tables → Add New.
  4. Follow the table wizard and customize your table by columns, filters, sort, and more.
  5. To add your table to your WordPress site, you have two options. Firstly, you can use the Gutenberg editor by adding a 'Post Table' block and customizing it further with your preferred settings. Secondly, you can copy the shortcode from the WordPress table builder and paste it anywhere on your site, such as a page, post, or widget. You can find the shortcode for each table in the main list of tables in Post Tables → Tables.
WordPress job directory plugin

2b. Choose your columns

On the table builder, you can add columns to your job board. To customize the columns displayed on your board, you have the option to select which columns to display and in which order. For instance, you can add:

  • Image
  • Title
  • Company
  • Hours
  • Locations
  • etc.

You can add a column by choosing the type of column from the dropdown menu and selecting 'Add'. As you add columns, they appear in the list of columns above, and you can rearrange them by dragging and dropping the sort icon on the left or the column title.

2c. Add filters to help people find a job

If you're planning to list more than about 5 jobs, then I recommend adding filter dropdowns at the top of the WordPress job board. You can add filters for categories, tags, or any custom taxonomy - each as a separate dropdown. This job portal has 3 filters, so users can find jobs of all stripes based on the country, location, and working hours:

WordPress job portal plugin

To add a filter, select the appropriate option from the dropdown menu and then click on the 'Add' button.

Lastly, choose how to sort the table. You can set the default sorting option and the sort direction.

Job seekers can now sort by any column or use the search box or filters to find a job. If you've included any custom taxonomy columns in the list of jobs, then they can also click on this to filter the table. Any links or buttons will appear as clickable links on the job board.

Step 3 - Configure the single job page

In your WordPress job board, you'll see that people can click on the job title or image to access a separate page about that job. This page will show the job title, main content (where you may have added the full job description or person specification), and possibly the featured image - depending on your theme.

The easiest way to show extra information such as location and salary is to add this within the main content box for each job. There are 2 ways to automate this:

  1. If you're technically minded, then you can create a custom template for the Jobs post type and use it to display the custom fields and taxonomies. For non-developers, I recommend posting a job on Codeable - this is a good way to find good developers with specific skills.
  2. If you don't want to create a custom template, then you can use Posts Table Pro to display the custom fields and taxonomies directly on the single job pages. I'll tell you how to do this next. It's a neat way to show custom fields and taxonomies for specific jobs without having to edit any template files.

Use Posts Table Pro to show the extra job fields on the single vacancy page

WordPress job board plugin single vacancy
On the Cardiac Output job site, I used Posts Table Pro to display the custom fields and taxonomies for each job at the top and bottom of the individual job page.

For example, in this screenshot, you can see two extra tables, which I added directly to the main content box for the job vacancy. The first table shows the job image, working hours, company name and location. The second table appears under an 'Apply for this job' heading and contains the contact details for enquiries, plus buttons linking to the downloadable job description and website.

The process for showing these fields on the single job vacancy page is similar to creating a table listing all your jobs, which I showed you in Step 2. However, there are a few differences to be aware of:

  • Add id="123" to the Posts Table Pro shortcode, replacing 123 with the ID of the job vacancy post. You can find the ID by going to the Edit Job screen for that job, and looking for post=123 in the URL. For example, if the URL ends in /wp-admin/post.php?post=33563&action=edit then the ID for the post is 33653.
  • Add links="none" to the shortcode to disable the links to the single job page. Your users are already on that page, so these links aren't needed!
  • Add page_length="false" reset_button="false" search_box="false" totals="false" to the shortcode. This will remove any elements you don't need such as the number of jobs and search box, which aren't appropriate here.

For example, I used this shortcode to create the table shown at the top of the above screenshot:

[posts_table post_type="job" include="123" columns="image,tax:hours,cf:company,tax:location" shortcodes="true" links="none" page_length="false" reset_button="false" search_box="false" totals="false"]

Step 4 - Automatically expire vacancies from the job portal on the closing date

Expire post WordPress plugin
Lots of WordPress job boards need to automatically expire the job listings when the closing date passes. This saves manual work, as you don't have to set a reminder to delete the job on the closing date.

You can easily achieve this by adding the free Post Expirator plugin. Install the plugin and it will add a 'Post Expirator' box on the right of the Add Job screen. Use this to set a job vacancy expiry date to change the job status to 'Draft' when it expires.

Can jobseekers apply for a job vacancy online?

It's easy to add an 'Apply online' facility to your WordPress job board or portal.

You just need to create an enquiry form to use alongside the WordPress job board plugin.

You can do this using any WordPress contact form plugin. These instructions are for Contact Form 7 as it's free and hugely popular, but any contact form plugin is fine. (Tip: If you're planning to add a 'Submit a job' facility anyway, then you might as well use Gravity Forms for this. As you'll see in the next section, you'll be needing Gravity Forms so that employers can upload a job.)

  1. Install Contact Form 7 and go to the 'Forms' section on the left of the WordPress dashboard.
  2. Use the Contact Form 7 Documentation to create a Job Application form with all the fields you need. You can create short or long text fields, check boxes, radio buttons, and even extras like file uploads.
  3. Add the contact form to a separate page on your website.
  4. Next, add an 'Apply for Job' link to one of the fields in your job board. I recommend creating a custom field for the job application link (see Section 1b, above). You can display this as a column in the job board table (see Section 2). For each job, add a clickable button or link to the page with the contact form.

Do I need a separate application form for each job?

It's entirely up to you. The simplest option is to create 1 job application form and use it for all your jobs. Include a compulsory 'Job Title' field in the form so that applicants can tell you which job they're applying for.

Alternatively, you could create a separate form for each job. This is obviously more work, or you could ask a developer to dynamically generate separate forms for each vacancy and link to these from the 'Apply for Job' column in the job board.

Can I link to a 3rd party job applications page?

Absolutely. If you want people to apply via a third party job site (e.g. NHS Jobs if you're listing NHS jobs), just link to that URL from the 'Apply for Job' column in your WordPress job board, instead of using your own contact form.

If you're just using the WordPress job board plugin to list your own job vacancies, then you can stop now and start setting up your jobs portal. Keep reading if you want employers to be able to post job vacancies directly to your website.

You may also like: how to create a WordPress member directory

Can employers submit and pay for jobs online?

WordPress job portal submit a job form
If you want recruiters to be able to post jobs on the website, then you can do this with the Gravity Forms WordPress forms plugin. You need to add a 'Submit a Job' form to your website where employers can enter all the vacancy details. You can also use it to take other information such as the employer's contact and payment details. This method means there's no need for each recruiter to set up their own company profile in order to post jobs to your site.

When a job advertiser submits the job vacancy, you will receive an email notification and a new job post will automatically be added to your WordPress job board. (If you want to approve each vacancy before it's added to the job board, then you can hold each post for moderation by an administrator.)

Check out our full tutorial on how to use Gravity Forms to create a form, which will automatically add job posts to your website. You can also see it in action on the TV Production Contacts website - they followed the instructions in this tutorial to create their own 'Post a job' form:

Post a job form

You can use this method for free job listings, or you can take payment via invoice or PayPal:

  • Manual payment for job listings Set up the form as described above. Make sure it's held for moderation if people have to pay before the job advert goes live. Manually send an invoice to the job advertiser.
  • PayPal payment for job adverts Gravity Forms has a PayPal add-on that lets employers pay using PayPal before they can submit a vacancy to your WordPress job board.

How will you use the WordPress job search plugin?

In this tutorial, I've told you everything you need to know about how to combine different, simple job board software to create a fully functioning jobs site. You've learned how to create a dedicated 'Jobs' section within WordPress. You know the customization potential of adding extra fields of information to your jobs. You've also learned to list your jobs in a front end WordPress job board, with extra features such as job search and filters. And you know how to set up approvals for the email alerts you'll receive each time a recruitment agency submits a vacancy to the site.

Now it's time to put it into practice. Posts Table Pro comes with full support, so get in touch if you need any help or advice. I'd love to hear how you get on with our WP job manager plugin - please leave your comments below.

As the number of WooCommerce websites continues to grow, more and more people are using it for large product directories. A WooCommerce directory plugin lists products on a much bigger scale than typical online stores. Products are listed in a logical structure with extra data to help customers find what they're looking for.

In this article, I'll explain the main features needed in a WooCommerce directory plugin. I'll then provide full instructions on how to use WooCommerce Product Table to create an online store directory.

Your WooCommerce directory will include all the features you need to display large numbers of products. This includes searching, sorting and filtering to help customers find your products more easily. I'll show you how to display different types of product data including all the standard WooCommerce data, plus custom fields and taxonomies. Customers will be able to click from the directory listings to the single product page and/or buy straight from the table.

Create a complete WooCommerce directory with the WooCommerce Product Table plugin.

How to create a product directory in WooCommerce

  1. Plan a logical WooCommerce directory structure
  2. Add products to the directory
  3. Set up WooCommerce Product Table
  4. Launch & promote your WooCommerce directory

What makes a good WooCommerce directory plugin?

There are several things that make WooCommerce directory sites different from other types of e-commerce store. Directories need some extra features to list products in a suitable layout, often with extra information.

Essential directory features

  • Table-based product layout WooCommerce product directories list many products per page in a less visual way than traditional online stores.
  • Extra product data Directory databases list various product information. Most WooCommerce stores just list basic data such as name, image and price. A WooCommerce directory can display far more product data. This can include descriptions, embedded audio/video, custom fields, product attributes and variations, prices, reviews, stock and more. You can even include extra options created with the WooCommerce Product Options plugin.
  • Easy to search & filter With a WooCommerce directory plugin, customers aren't forced to scroll through many pages of products to find what they need. Instead, should be able to use advanced search, sort and filter options to find products matching their criteria.
  • One-page ordering A lot of product directories function as a one-page WooCommerce order form. This means that customers can view all the directory listings and add products to the cart from a single page. Some WooCommerce directories will disable the add to cart buttons and let customers click to the single product page in order to view more information and purchase. However, one-page ordering is an important feature for many directory sites.
  • Ability to handle large numbers of products A directory-based e-commerce store may have 100's or even many 1,000's of products. A WooCommerce directory plugin needs to be able to handle large amounts of information without server crashes or performance issues.
  • See information quickly without multiple page loads Many online directories are frustrating to use because you have to visit a separate page for each product. It's better to be able to view extra information in a quick view lightbox, without being taken away from the directory listings. You can do this by using WooCommerce Product Table with its sister plugin, WooCommerce Quick View Pro.

What sort of websites need a directory structure?

WooCommerce bookstore

WooCommerce Directory Plugin
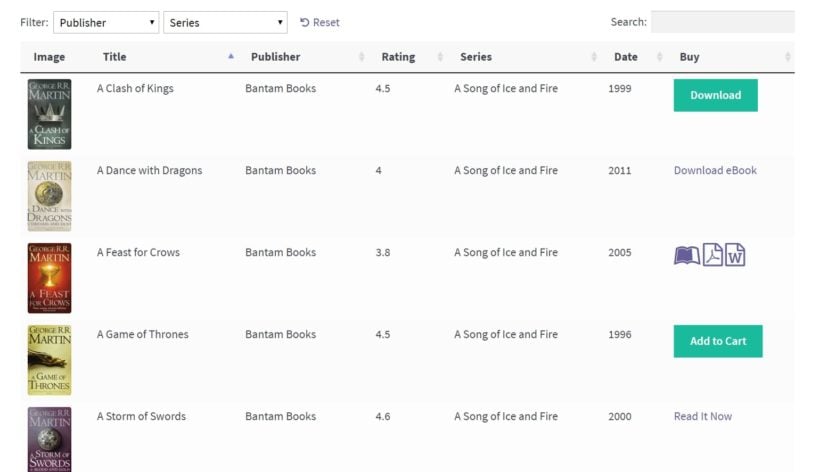
Many WordPress websites sell large numbers of books. A good directory plugin can be used as a WooCommerce bookstore plugin.

Books for sale can be listed in a table with relevant data such as title, author, publisher, date, price and add to cart buttons. It's even possible to display a small image of the front cover in the book directory listings.

You can sell both printed books and digital e-books in WooCommerce. By adding each book to the directory as a variable product, each version can be sold at a different price. Customers can choose from the directory results page and buy one or more books.

WooCommerce audio directory

WordPress audio gallery
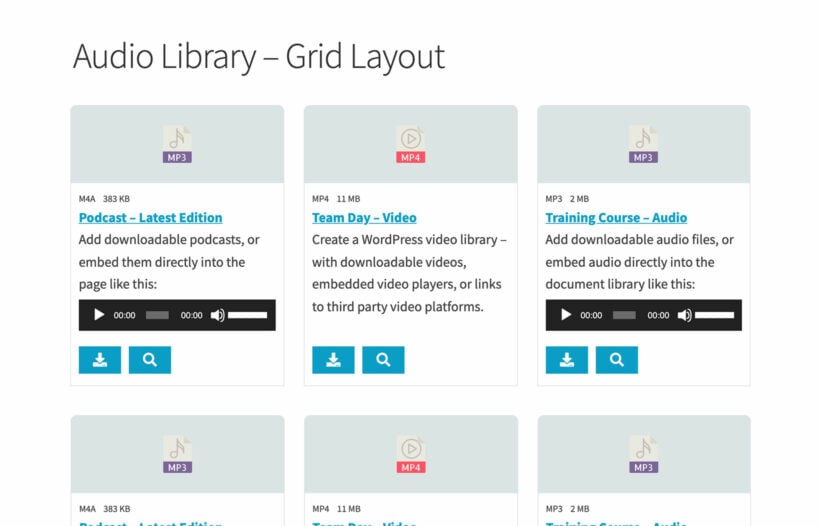
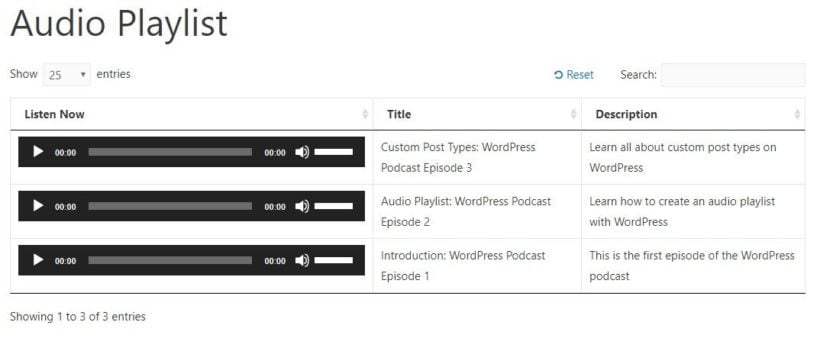
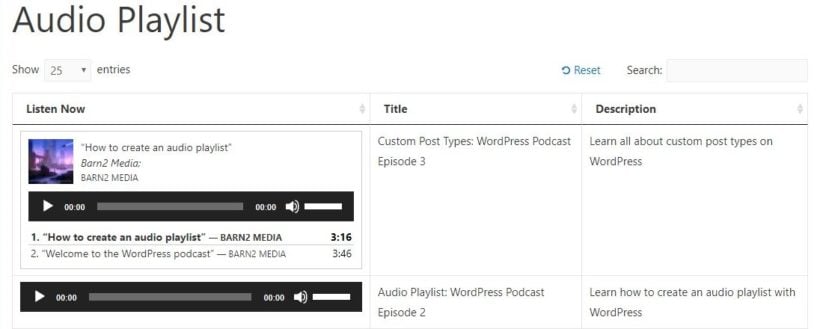
If your WooCommerce directory plugin supports embedded audio players then you can use it as a music or audio directory.

Lots of audio stores display 100's or 1,000's of CD's or audio products. Since large images aren't relevant to selling music online, the best layout is a table-based directory view. Many more products can be displayed per page. Customers can use the keyword search, sort options and product filters to quickly find the music products they're looking for.

The best WooCommerce directory plugins support embedded audio players. This is a good opportunity to sell more music by including audio samples, embedded directly into the music directory. You can include sample tracks alongside other information about each product such as CD name, track name, artist, length and more.

If you sell physical CD's and downloadable versions of your audio products then you can add each one as a variation. The variation options can be listed a dropdown on the directory page, or customers can click to the single product page to view the options and buy online.

WooCommerce business directory

Like all WordPress sites, WooCommerce is hugely popular as a business directory. This is less common than a more generic business directory in WordPress because not all business directories need to sell online. However, this is an option with a WooCommerce directory - for example, if you need to sell products for each business via the directory.

(Tip: If you want to create a WordPress business directory without the ability to buy online, check out our other plugin Posts Table Pro. This lets you create a custom post type for your businesses and display these in a tabular directory structure with search, sort and filters.)

Directory of telephone numbers

WooCommerce product table for selling phone numbers
WooCommerce directory with phone numbers for sale

Directory structures are excellent for selling data-base products such as phone numbers. For example, Numbergroup uses WooCommerce Product Table to create a telephone number directory. Customers can browse the phone numbers and buy using WooCommerce.

You can search the directory for a specific number, change the number of products per page, and sort by telephone number or price. Once you've found the number you want, you can add it to the shopping cart and buy through the usual WooCommerce checkout.

The WooCommerce Product Table plugin is perfect for creating any type of directory like this. Check out our demo of a WooCommerce book directory in action!


How to create a WooCommerce directory to sell absolutely anything!

As you can see, there are lots of reasons to use a WooCommerce directory plugin. Next, I'll show you how to use WooCommerce Product Table to create a directory selling books, music or other types of product.

Buy Plugin

1. Plan a logical WooCommerce directory structure

The first step is to plan your WooCommerce directory. It's worth doing this beforehand to make sure it's logical and intuitive to navigate.

These questions will help you to plan your store's directory structure:

  • Will you have a central directory page listing all the products?
  • Would you be better off with multiple pages, each listing different products based on their category, tag or custom taxonomy term?
  • Will each page of directory listings contain a single table of products? Or will you add multiple tables to each page, listing different products?
  • Is your server powerful enough to support the number of products per page in the directory? Later, I'll tell you about the lazy load plugin option which boosts performance for large WooCommerce directories. However, if you want to list 100's of products on a single page without pagination, performance could be an issue and you'll need a fast server.

2. Add products to the directory

WooCommerce add new productNext, you need to add the content for your WooCommerce store directory:

  1. Install the free WooCommerce plugin and run the Setup Wizard. Use the plugin documentation to configure store settings such as tax and postage.
  2. Add all your products to the directory in WooCommerce. You can do this manually via Products > Add New. Or if you have a large product directory, use a WooCommerce listing plugin such as Product CSV Import Suite to import products from CSV to WooCommerce.

3. Set up WooCommerce Product Table

WooCommerce Table View
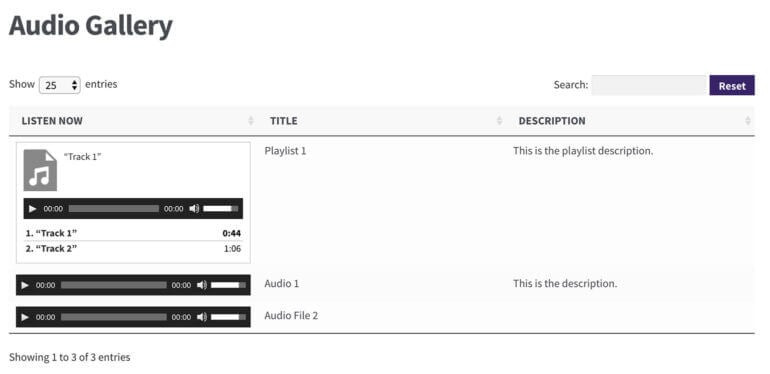
Now you're ready to display your WooCommerce products in a directory structure. You'll need the WooCommerce Product Table plugin for this:

  1. Get WooCommerce Product Table and install and activate the plugin.
  2. Go to WooCommerce > Settings > Products > Product Table. Enter the license key that you received in your confirmation email and click Save. On this page, you can also choose any default settings that will apply to all your product tables.
  3. Go to any page or post and add the shortcode: [product_table].

This will create a basic directory listing your WooCommerce products in a table-based grid layout.

Use the product table knowledge base to customise your directory. It's hugely flexible and there are many different personalisation options. Here's a summary of the main options you're likely to use to perfect your WooCommerce store directory.

Choose the product data & directory headings

WooCommerce Product Table supports all the standard product data such as name, short and long description, price, dimensions, stock, reviews, and attributes. It also supports custom data via WooCommerce custom fields and taxonomies.

You have full control over which columns appear in the directory. It's also possible to rename or remove the column headings.

Turn your directory into an order form with add to cart buttons, variations & quantity selector

Transform the store directory into a one-page WooCommerce order form by letting customers order straight from the directory page. You can do this by including an 'Add to Cart' column in the table.

Choose between 3 styles of add to cart buttons, including standard boxes and multi-select check boxes. It's also possible to display variable products and a quantity selector directly in the table. Customers can select variations, choose quantities and add multiple products to the cart without having to visit the single product page. You can even disable links to the single product page.

And if you're using the WooCommerce Product Options plugin, then you can also display your add-on options in the product directory. For example, you might want to add checkboxes or text fields to your products and have them appear on the directory page.

Search, sort & filter

You can choose how customers can interact with the WooCommerce directory to find products quickly and easily. There are options to show, hide or reposition various elements such as the keyword search box. Customers can click on a column heading to sort by that column. You can also add product filters so that customers can narrow down the directory listings by category, tag, price, custom taxonomy, etc.

One plugin that can be particularly useful for adding advanced product filtering options to your directory is the WooCommerce Product Filters plugin. With this plugin, you can add a range of different filters, including categories, attributes, tags, custom taxonomies, price, ratings, and stock status, and display them as dropdown lists, checkboxes, radio buttons, labels/tag cloud, images, or color swatches.

Garden centre website with filters

By adding these advanced filters, you can help customers quickly and easily find the products they're looking for in your directory, which can ultimately lead to increased sales and customer satisfaction. Plus, with the ability to customize the placement and appearance of the filters, you can create a user-friendly browsing experience that encourages customers to spend more time exploring your product offerings.

Lazy load/AJAX option for large WooCommerce directories

As your WooCommerce directory grows, the plugin needs to grow with it. Fortunately, WooCommerce Product Table has a lazy load option to boost performance as your store grows.

By default, all the product listings in your directory load straight away. This is fine for small directories but can cause a performance hit if you have many products. With lazy load, only 1 page of the directory is loaded at a time. This means that you can have an unlimited number of products in the directory. Even if you have many thousands of WooCommerce products, lazy load keeps everything running smoothly without slowing down your site.

There are further options to boost performance, such as setting a limit for the number of products in the directory. You can also change the number of products shown on each page of the directory.

Embed audio & video in the directory

WooCommerce Product Table supports embedded audio and video. If you're creating a music or video directory then customers can watch or listen straight from the directory listings page. This is ideal if you use audio or video snippets to convince people to buy your products.

Add multiple tables to your directory

Most WooCommerce directories list all their products in a single directory, with easy search options such as the keyword search and filter.

If you prefer, you can add multiple directories to your WooCommerce store. For example, you might want to create a different directory table for each product category.

The plugin supports adding as many directories as you like. For each one, you can choose which products are included (or excluded) based on category, tag, ID, custom taxonomy term, custom field, date, etc.

Create an A-Z directory

You can also use a directory planning to create A-Z listings. Simply use the tabs that come with your theme or a plugin such as Shortcodes Ultimate to create a tabbed layout with a tab for each letter. Include a separate product table to each tab containing a directory of products for that letter.

You may also like: WordPress Member Directory Plugin Tutorial with Searchable Table & Profiles

Add extra information in a quick view lightbox

WooCommerce Product Table Quick View Magnifying Glass
Add quick view buttons to your WooCommerce directory.

If you use WooCommerce Product Table on its own, then customers can click through to the single product page to view more information about each product.

That's fine if you only expect each customer to buy one product. But most WooCommerce directory websites want to increase the value of each sale. And that requires buying more than one product.

That's why you can significantly increase revenue by adding the WooCommerce Quick View Pro plugin. This lets you add a 'quick view' column to the WooCommerce directory (which you can rename to anything you like). Customers use this button to view more information about each directory product in a handy lightbox popup.

You can choose what information to show in the lightbox. This might be more product images, variation and add to cart options, the short description, meta information such as categories and tags, or something else.

This is a perfect way for customers to learn more about each products without being taken away from the main WooCommerce directory listings. That way, there's no chance they'll get lost. They remain on the list of products at all times. As a result, they spend longer browsing the products in the directory, and are likely to buy more and more.

4. Launch & promote your WooCommerce directory

WooCommerce Directory Plugin

Your store directory is now complete and ready to launch:

  1. Test everything thoroughly to ensure your WooCommerce directory is running smoothly. You need to be certain that customers can order from you from different browsers, mobile devices etc.
  2. Follow our go-live checklist to make sure the launch goes smoothly.
  3. Plan and implement a marketing strategy to make sure people can find your website and buy from you. Our WordPress SEO packages can help you with this.
  4. Continue improving your WooCommerce directory with our top 10 tips on using product tables to optimise conversion rates.

It's time to build your WooCommerce directory!

I hope this tutorial has provided everything you need to create a fully functioning store directory using WooCommerce Product Table. The plugin comes with full support from our UK WordPress experts at Barn2 Media.

Get in touch if you have any questions about how it works that aren't covered in the knowledge base, or if you need any advice on setting it up to create the perfect directory. Or if you like the plugin, sign up as an affiliate and we'll pay you 30% commission for reselling it!

I'd love to know which method you use for your own product directory. What do you sell in your WooCommerce directory? Please leave your comments below.

WordPress table plugin

Our sortable table WordPress plugin - Posts Table Pro - lets you display various types of content from your WordPress website in a searchable and sortable jQuery table.

Based on the jQuery DataTables plugin, your visitors can view your posts, pages, or other content from your website in a fully sortable table.

You can set up the WordPress table to sort by any column by default, and you can change the default sort order. Your visitors can click the column headers to sort the table as they wish. They can also search for a keyword or filter the table by category, tag, custom taxonomy, etc.

In this video tutorial, I explain how to install and configure Posts Table Pro, using the example of a staff directory to help you create a sortable table. If you prefer written instructions, please see below for a step-by-step written tutorial.

The best WordPress sortable table plugin

Posts Table Pro is the premium version of our free sortable table plugin for WordPress - Posts Table with Search & Sort.

The free plugin lets you display blog posts from your WordPress website in a searchable, sortable table. The Posts Table Pro plugin builds on this by adding support for custom post types, custom fields, and custom taxonomies. It has various other options to create more sophisticated sortable tables.

WordPress sortable table plugin

Posts Table Pro is perfect for many different use cases including:

As you can see, the Pro plugin lets you create sortable tables in WordPress for many use cases that aren't available with the free plugin.

How to set up the Posts Table Pro sortable table plugin

1. Install the plugin

  1. First of all, you purchase the plugin on our website and download the plugin.
  2. Then you go into your WordPress admin and go to Plugins → Add New.
  3. Then you click Upload → Choose File and select the file from the link in your order confirmation email. This will save a zip file to your computer.
  4. Once uploaded, click Activate.
  5. After activation, the Posts Table Pro setup wizard will automatically open and guide you through entering your license key.

Now we'll use the plugin to create a WordPress Staff Directory. It will add a simple staff list to your website with links to the staff profiles. The list will appear in a searchable, sortable table. You can use the plugin to display various types of content, so this is just an example.

2. Add the information to display in the WordPress table

Post Table Pro's role is to create a sortable table of content already on your website. It does not create custom post types or taxonomies or anything, it just displays them. So you would add those previously using whatever method you're using to set up your website and data. You then get Posts Table Pro to allow you to display that data within a table.

If you want a separate 'Staff' section in the WordPress admin to store your staff data, I recommend the Easy Post Types and Fields plugin to create a custom post type and any extra fields of information. I used this to create a Staff custom post type and add various data relating to the staff profiles. Once you've decided how to store your staff data, go ahead and add all your staff members to the website.

3. Create your sortable table in WordPress

https://barn2.com/wordpress-content-table/
  1. Upon installing the plugin, an automatic setup wizard will initiate, guiding you through the process of creating your first table. The setup wizard takes you through a step-by-step process, making it easy for you to create a sortable table that suits your needs.
  2. To begin creating your sortable table, you'll need to provide a name for it and select the post type that you want to display. After that, you can choose the posts or pages that you wish to include in the table.
  3. The plugin allows you to choose from a range of options, including posts, pages, and custom post types. Suppose you're building a database and want to include documents. In that case, you can select the custom post type option and proceed accordingly.
  4. The plugin offers a wide range of customization options, allowing you to determine which columns to display and in what order. To add a new column, choose the column type from the dropdown menu and click "Add". You can also reorder columns by dragging and dropping the sort icon or column heading.
  5. You can also add filters to your table. Filters appear as dropdowns above the table, and you can add as many as you like.
  6. To customize the sorting options for your table, select the default sorting option and the sort direction that you prefer. This gives you complete control over the order in which your table is displayed.
  7. If you're dealing with a large amount of data, you can enable lazy loading to improve the table's performance. This ensures that even when your table contains hundreds or thousands of items, it loads quickly and smoothly.
  8. Next, you can choose how to sort your database, setting the default sorting option and the sort direction that you prefer. With all these options, you can create a table that is functional, easy to use, and visually appealing to your users.
  9. Finally, once you have completed creating your sortable table using the Post Table Pro plugin, the setup wizard will confirm that you have finished and provide you with instructions for displaying the table on your WordPress site. You have two options for displaying the table: using the 'Post Table' block in the Gutenberg editor, or copying the shortcode from the table builder and pasting it anywhere on your site. This gives you the flexibility to place the table on any page regardless of its content.

Create sortable tables more easily

The Posts Table Pro plugin is a versatile and user-friendly tool for creating sortable tables on WordPress websites. With its easy-to-use setup wizard and customizable features, you can create sortable tables that suit your specific needs, whether it's for displaying blog posts, product listings, or other types of content.

The plugin's ability to add filters and customize sorting options makes it easy for users to navigate and find the information they need quickly. Overall, the Posts Table Pro sortable table plugin is a must-have for website owners who want to enhance their user experience and improve the organization of their content.