

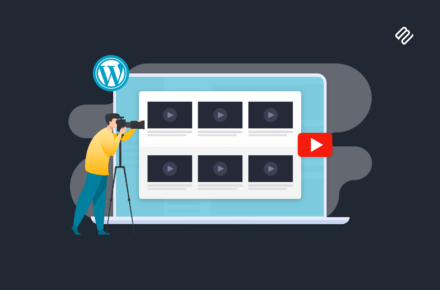


Discover the best WordPress podcast hosting options to build your listener base, and how to set them up.
Podcasts have never been more popular, and for good reason: they're highly engaging, and a great way to draw attention to your business, sell your products, and earn money through advertising – but they also take a good deal of work to create. You need microphones, audio editing, and podcast hosting. It's easy to focus on the first two on this list, but quality WordPress podcast hosting is going to let you take your podcast to the next level.
In this article, I’m going to tell you why it’s important to choose the best WordPress podcast hosting option which will give you maximum exposure. We’ll talk about why it can be a great idea to host podcasts on your WordPress website. I’ll also show you how to display them more effectively in a way that keeps your podcast episodes evergreen so that people can continue to find and enjoy them long after they’re published. We’ll do this using the Posts Table Pro WordPress plugin, which is perfect for displaying podcast episodes and playlists in a searchable, filterable table.
Why does podcast hosting matter?
Choosing the right podcast hosting platform can make all the difference in the success of your podcast. While microphones and audio editing software are important, podcast hosting is equally crucial. A quality podcast hosting platform will enable you to upload and share your podcast episodes easily and ensure that your listeners can access them quickly and without interruption.
The right podcast hosting platform can also provide advanced features and tools to help you grow your audience, such as analytics to track listener behavior and preferences, as well as built-in marketing and promotion tools. It can also give you full control and ownership over your podcast content, allowing you to decide how and where it is distributed.
Therefore, it's important to invest in a reliable podcast hosting platform that can offer fast and secure hosting services for your listeners and help you grow your audience and monetize your content. Without a good podcast hosting platform, your podcast may not be able to reach its full potential, and you may miss out on valuable opportunities to engage with your listeners and grow your brand.
Self hosted WordPress podcast hosting vs managed hosting
When it comes to podcast hosting, there are two primary options available: self-hosted WordPress podcast hosting and managed hosting. Both options have their own pros and cons, and understanding the differences between them is crucial for choosing the best hosting solution for your podcast.
Self-hosted WordPress hosting means that you are responsible for hosting and maintaining your own website and podcast. This means that you will need to purchase your own web hosting plan and install WordPress on your own server. You will also need to install and configure podcasting WordPress plugins, such as Seriously Simple Podcasting or PowerPress, to manage your podcast content. This option gives you complete control over your website and podcast, but it also requires technical knowledge and can be time-consuming to set up and maintain.
Managed hosting, on the other hand, is a hosting service where the hosting provider takes care of all technical aspects of hosting and maintaining your website, including security, backups, updates, and optimization. Managed hosting services often include a range of additional features and services, such as automatic updates, and advanced caching. This option is ideal for podcasters who want a hassle-free hosting experience and do not have the technical knowledge or time to manage their own hosting.
Why is self hosted WordPress podcast hosting better?
Self hosted WordPress podcast hosting can be a better option for several reasons. First, it gives you full control over your podcast and website. You have the freedom to customize your site as you wish and can choose which plugins and tools to use to manage your podcast content. This flexibility is particularly useful if you have specific design or functionality requirements.
Another advantage of self hosted WordPress podcast hosting is that you have complete ownership and control over your data. You are not reliant on a third-party hosting service to store and manage your content, which means you can back up and restore your data at any time.
A self hosted podcast also offers greater scalability, as you are not limited by the storage or bandwidth restrictions of a managed hosting service. This means you can upload and share as much content as you need, without worrying about running out of space or exceeding your monthly bandwidth allowance.
Getting started with WordPress as a podcast hosting platform
If you are looking to create a successful podcast, one of the most important decisions you will make is choosing the right hosting platform. While there are many hosting options available, WordPress stands out as a great choice for podcasters.
WordPress for podcast hosting is that it is highly customizable. With WordPress, you can choose from a wide range of themes and plugins to create a unique and professional-looking podcast website. You can also customize your site's design and functionality to meet the specific needs of your podcast and your audience.
In this post, we will provide you with a comprehensive guide on how to use WordPress as your podcast hosting platform. You will learn how to create a filterable and sortable database for your podcast episodes, as well as easily navigable archives, analytics, and email signup forms on your self hosted WordPress website. Additionally, we will cover how to keep your listeners engaged by automatically sending them new episodes via email.
Our step-by-step guide covers all you need to know about getting your podcast working, including:
- Getting a WordPress website online.
- Adding podcast episodes to your site using the Seriously Simple Podcasting WordPress plugin.
- How to list podcast episodes in an archive using the Posts Table Pro plugin.
- Submitting your podcast to iTunes, measuring its success with analytics, and turning listeners into subscribers with an email newsletter signup + auto sending of new episodes.
We'll keep costs to a minimum here: you'll need to pay for WordPress hosting (and a domain name, if you need one) and the Posts Table Pro plugin for podcast archives, but that'll be it. You can get a head start by getting Posts Table Pro right away.
Get started with WordPress
Back when it was hard to get high-quality hosting at reasonable prices, hosting companies would get a bit huffy about the large amounts of data transferred by podcasters' audio files. Because of this, it might have made more sense to subscribe to an all-in-one podcast hosting service. Compared to a website with just text and a few images, podcasts do use more data.
Thankfully, we now have ready access to super fast, reliable hosting, so the data transfer issue is becoming increasingly irrelevant. For most, going the self hosted podcast route is now by far the most beneficial.
By choosing the open source software, WordPress, rather than a traditional podcast hosting service, you'll maintain complete ownership over your podcast content. You'll also be able to maintain a core focus for your podcast marketing, with a central point to direct social media and search engine traffic to, a place to analyze listener numbers and engagement, and the option to hook listeners or advertise in whichever way fits your business model.
Overall, it's just much more flexible.
To get started, all you need is:
- A domain name
- A WordPress hosting plan
- A WordPress theme
If you already have a WordPress website up and running, skip ahead in one section, to add your podcast episodes to WordPress.
If you don't already have a website ready to go, read on. Here are the three steps you need:
1. Domain name
Firstly, you'll need a domain name so people can find your website and podcast easily. If you have a domain name already, you'll simply need to direct it to your WordPress hosting. If not, you can pick one up for a few dollars through a domain name provider, such as NameCheap. You should pick a domain name that matches either your brand or your podcast name (Domain Wheel is great for generating ideas).
2. WordPress hosting plan
We've previously discussed in detail how to choose a host for your WordPress website. For the purposes of hosting your podcast, we recommend getting started with some robust managed hosting, such as that offered by WP Engine.
WP Engine specializes in WordPress hosting, offers exceptional support, and has useful tools you can access directly from your WordPress dashboard.
The other benefit of using a WordPress hosting specialist like WP Engine is that all the work of installing WordPress is done for you. That means you'll be able to get on with the important business of designing your website and getting your podcast online.
3. WordPress theme
There are thousands of free and premium themes available in the WordPress theme directory – you can search and install these from your WordPress Dashboard by going to Appearance → Themes → Add New. One of the recent (free) themes which are included in all WordPress installations (the Twenty Something series) would be a convenient starting point. You can always change your theme later.
If you aren't familiar with WordPress, check out our top tips on creating a low-maintenance WordPress website. If you choose your theme wisely, you won't even need to do any code – perfect for non-techies! CodeinWP has a good list of free WordPress themes.
Make your own podcast hosting: Add podcast episodes to WordPress
Now you have your WordPress website ready, the next step is to upload and organize your podcast files.
There are a couple of ways you can go about uploading your podcast. The less desirable option is to add your media files directly to a post or page on your WordPress site. This will work fine in that people will be able to access your podcast on your website. However, it makes it tricky to measure your podcast's success, and even trickier to get the formatting correct for submitting to iTunes.
To solve these issues you can create a specific custom post type to make sure all the information is in the right place. Instead of reinventing the wheel, we recommend taking the quicker, easier (and free) alternative, which is to use a plugin that does exactly what you need it to.
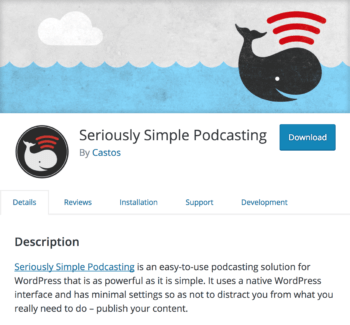
The Seriously Simple Podcasting plugin is ideal for WordPress podcast hosting. It's free, and does all of the above for you:
- Creates a custom post type automatically, so it's easy to upload, assign metadata and manage your podcast files in one place from your WordPress website
- Supports both audio and video podcasts
- Pairs with extensions, including one that lets you analyze podcast usage stats
- Formats your podcasts ready for submission to iTunes
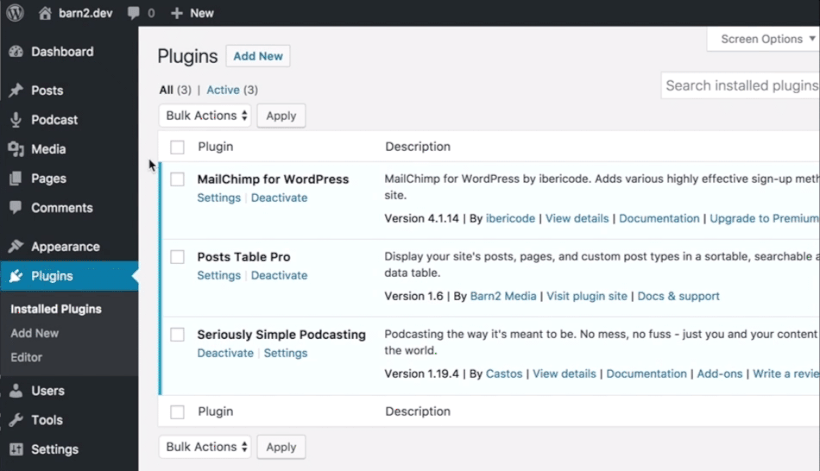
First up, you'll need to add this plugin to your WordPress site. Go to Plugins → Add New and search 'Seriously Simple Podcasting'. Click Install Now then click Activate.
Starting to use Seriously Simple Podcasting
Once installed, the Podcast menu item is added to the sidebar in your WordPress Dashboard, and a new custom post type podcast is created:
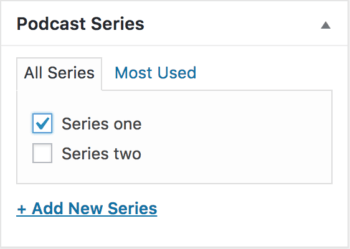
If you're going to group your podcast episodes by series, you'll need to create a series category.
To do this, go to Podcast → Series. Fill out the fields to give your first series a name (e.g. Series one) and, optionally, a description. Click Add New Series.
Go ahead and create another series (or multiple other series) if you have more podcast series ready to upload.
Add podcast episodes to your WordPress podcast hosting
Next up, you'll want to start adding your podcast episodes to the site.
Head over to Podcast → Add New. Just like you would do with a new blog post, you'll need to give your podcast episode a title. I've called this example 'First ever podcast episode':
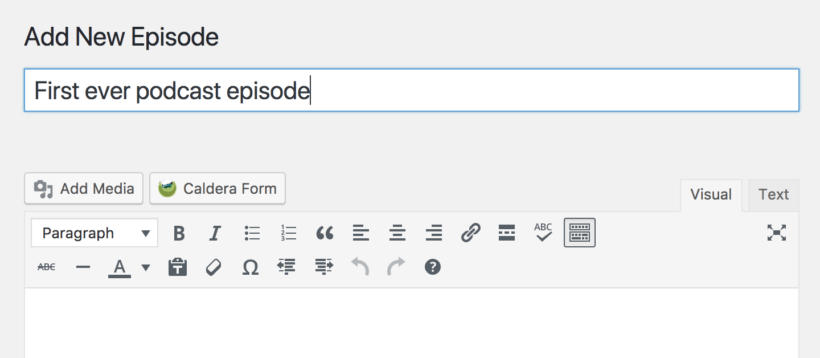
If you like, you can include a full description or transcript of your podcast episode in the content box just under the title in the editor. And, if relevant, you can select which series the podcast belongs to on the righthand side of the editor. You can also add any relevant tags to each episode. We'll show you listeners can filter your podcast episodes by these taxonomies later on.
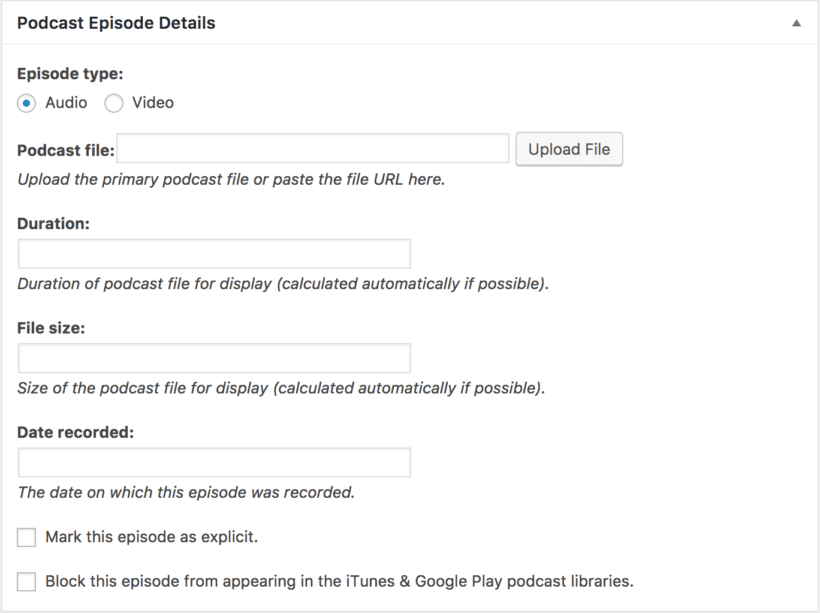
If you then scroll down, you'll find the Podcast Episode Details box. Here is where you'll upload your first podcast episode.
Checklist of steps for adding each podcast episode
These are the steps you need to run through for each episode:
- Select whether you're uploading an Audio or Video file, click Upload File, upload your first podcast file, then click Select.
- You can manually add the duration and file size, or leave these fields blank to auto-calculate.
- Add in the date recorded so listeners will know how old or new your podcast is.
- If necessary, there's also the option to mark specific episodes as explicit or choose to block them from appearing in any external podcast libraries to you submit your podcast.
- It's a good idea to add a summary of the episode in the Excerpt box as we can display this later in our searchable podcast library.
- Add your podcast's series and any relevant tags. Users will be able to use these to quickly filter the episodes they want.
- Hit Publish and your first podcast is ready to go!
Add in any remaining podcast episodes, by going to Podcast → Add New again and repeating the steps above.
Once you've added all your episodes, it's time to display them nicely on your website. Next, we'll cover how to enhance your self hosted WordPress podcast hosting, by creating a sortable podcast archive that can display your latest episodes in a convenient format.
How to list podcast episodes in an archive: quickly find episodes
Your website needs to be an easy place for visitors to listen to your podcast. Visitors should be able to find episodes they're interested in, easily listen to them, and sort through your archives. This section will show you how to list podcast episodes on your WordPress site.
Seriously Simple Podcasting lets you display your most recent podcasts, but just displaying a long list of podcasts in the order of newest to oldest isn't always the most helpful – especially if you're trying to engage new listeners or those who have missed a few episodes.
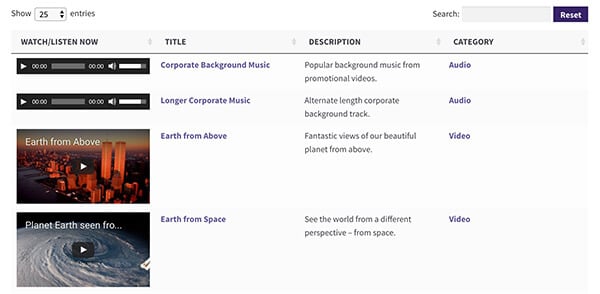
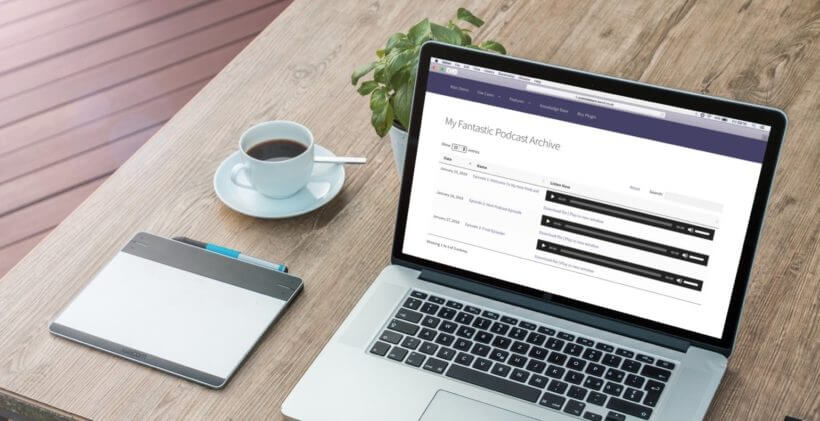
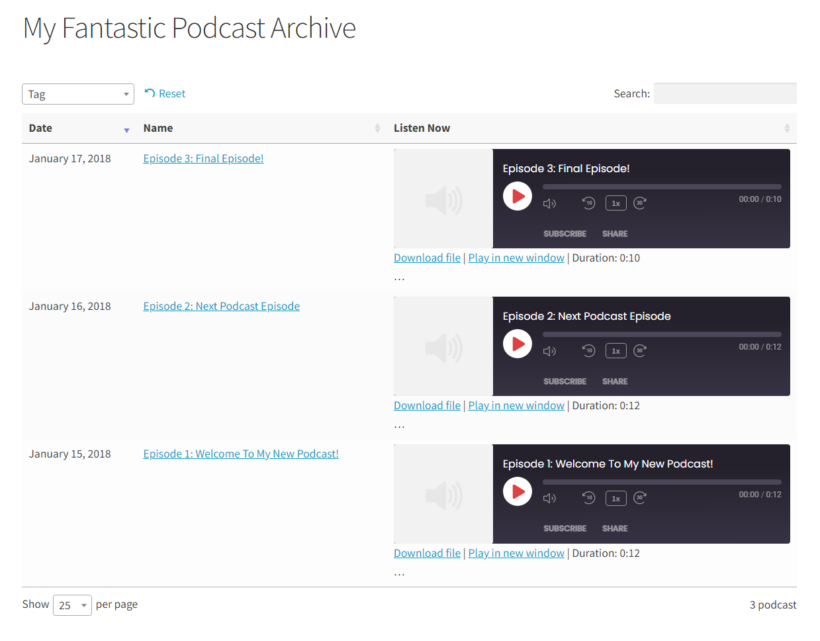
A better solution is to create a library of your podcasts by displaying them in a sortable and searchable table. This will let your listeners quickly sort through episodes, conveniently listen to them, and makes everything extremely simple for you.
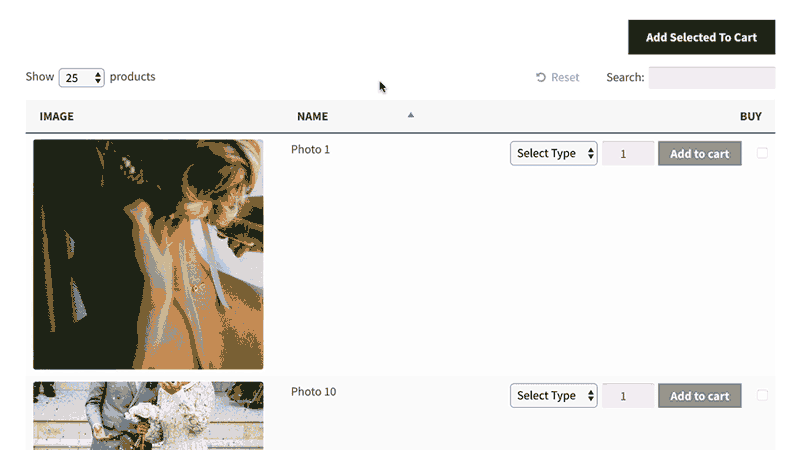
The Posts Table Pro plugin can pull in all the information you've already added using Super Simple Podcasting. It uses this information to autogenerate your podcast library, in a sortable, filterable, and searchable list. This is the perfect format for podcast archives.
Plus, each time you add a new episode to your website, Posts Table Pro will update your library automatically :)
WordPress podcast hosting is superior :)
The animated screenshot above shows this in action. Note how listeners can even conveniently filter by podcast series!
In addition to the benefits mentioned already – listeners can search all your podcast episodes in one place, easily find the episode(s) they're looking for by sorting the table or filtering by series or tags, and listen to episodes directly from your podcast library – you can even add newsletter signups to this page in order to keep listeners hooked, which we'll cover after this section.
To get started, purchase and download the plugin.
Your purchase will include instructions on installation and setup. Once installed, decide whereabouts on your website you'd like to display your podcast library. This might be on your home page, or on a separate podcasts page. In this example, we'll be putting our podcast on a homepage.
How to create your sortable table
When you've chosen where to display your podcasts, generating your podcast library is simple. Upon installing the plugin, an automatic setup wizard will initiate and provide a comprehensive guide to creating your first table.
The instructions below will describe each step involved in creating a table.
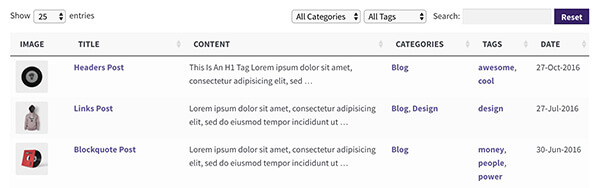
- Choose a name for the library and select the post type you want to display. Here we're displaying the custom post type podcast.
- Select the posts or podcast episodes to include in your library.
- Customize the columns you want to display in your table by selecting which columns to add and in what order. You can also rename or hide column names and remove columns as needed. I suggest adding a column for episode date, title and listen now.
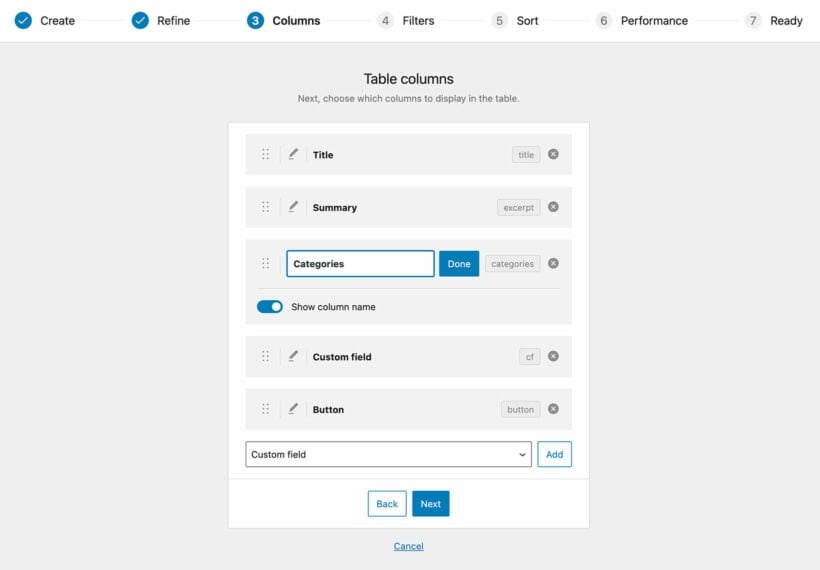
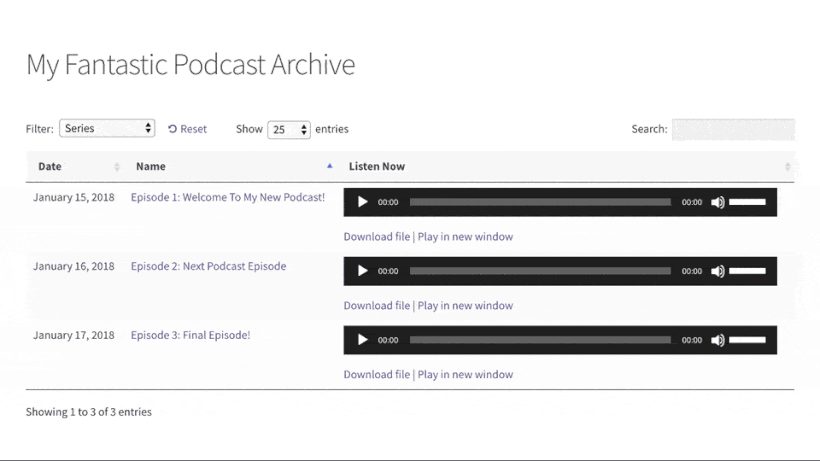
- Add filters. will set your table to be filterable by the podcast series, as shown in the example below. You can also add filters like tags and categories.
- Customize the sorting options for your table, including the default sorting option and the sort direction
Display your podcast library
Once you have completed creating your table with the Post Table Pro plugin, the setup wizard will confirm that you are finished and provide instructions for inserting the table onto your website. By choosing one of these two options, you can easily add your table to your website and make it accessible to your visitors.
- Use the "Post Table" block in the Gutenberg editor.
- Copy the shortcode from the table builder and paste it anywhere on your site. This option gives you the flexibility to place the table on any page, regardless of its content.
Ready to publish your podcast
When you're done making your library look great, click Publish and the page will publicly display the table with your podcasts. Nice work! Visitors can now easily find your entire archive of podcasts, and you've made a fantastic self hosted podcast solution.
You can use a similar technique to create a WordPress audio library. The linked post will even show you how to use WooCommerce Product Table to sell access to your podcast.
Podcast hosting: next steps
Now your WordPress podcast hosting is all setup and your podcasts are beautifully displayed on your website, you're ready to get promoted and grow your podcast further.
This section will show you three advanced next steps you can take, two of which you can only do because you've chosen to self host your WordPress podcast hosting. We'll show you how to submit your podcast to iTunes, how to set up podcast analytics, and how to add an email signup box in order to convert listeners into long-time subscribers.
Submit podcast episodes directly to iTunes from WordPress
To increase your audience reach, you need to submit your podcast to iTunes.
Yet another useful feature of the Seriously Simple Podcasting WordPress plugin, is that it organizes your podcast episodes in an iTunes-friendly format. Once you've uploaded your episodes to your WordPress website, you're almost ready to submit them all in one go to iTunes.
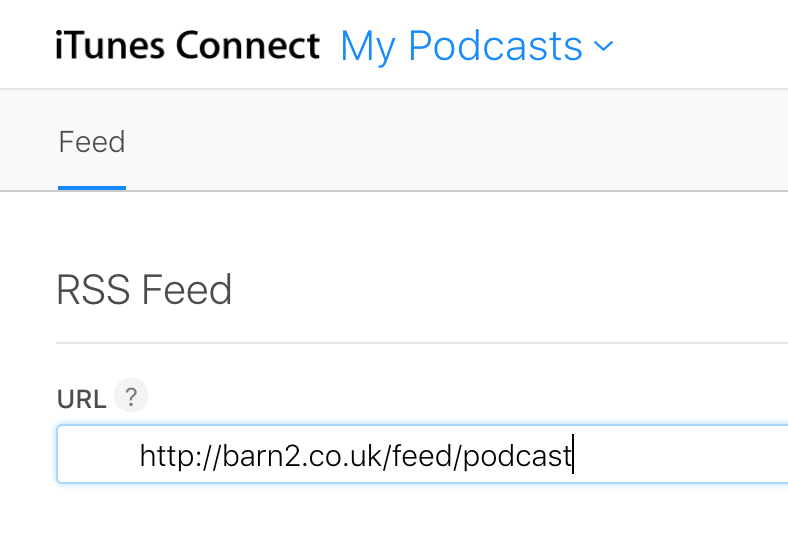
Before you do, you'll just need to go to Podcast → Settings → Feed details and upload a Cover Image for your podcast.
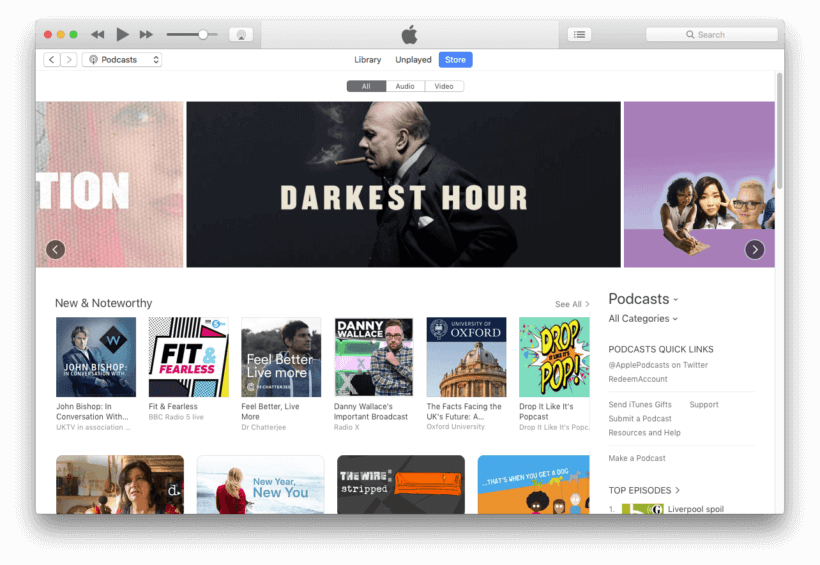
Once you've done that, to submit your podcast to iTunes, simply go to Apple's podcast submission page and sign in using your Apple ID (or create one if you don't have one already).
The Seriously Simple Podcasting plugin will autogenerate a URL for your podcast. You can find this in your WordPress Dashboard by going to Podcast → Settings → Publishing.
The URL you need is the Complete feed and will be something similar to https://yourwebsite.com/feed/podcast
Copy and paste your Complete feed URL into the box on the iTunes submission website and click Validate:
You'll then see a preview of how your podcast will appear on iTunes.
Once iTunes is happy your podcast meets the requirements, and you're happy with how everything looks, click Submit.
Podcasts can take up to 10 days to make their way through the iTunes approval process but are often processed much faster than that. Once complete, you'll be able to see your podcast in iTunes – alongside the best podcasts in the world.
While you're waiting for your podcast to be approved on iTunes, it's worth getting your analytics set up too. We'll look at these next.
Podcast analytics
If you want to successfully grow your podcast audience, it's important to keep track of how many listeners you have, and how they're consuming your podcasts.
There is a multitude of analytics tools out there, but seeing as we've already installed Seriously Simple Podcasting, let's go ahead and use their add-on plugin, Seriously Simple Stats.
Just like the name suggests, this plugin is seriously easy to use and ideally suited to measuring the success of your podcast.
Among other things, it can measure where people are listening to your podcast (e.g. iTunes, your website, or via a download), how many listeners you have, and what your most popular episodes are.
This is all vital information you can use to optimize future podcasts, source sponsorship, and boost advertising revenue.
You can download Seriously Simple Stats free from the WordPress plugin directory. Go to Plugins → Add New then search "Seriously Simple Stats". Click Install Now then click Activate.
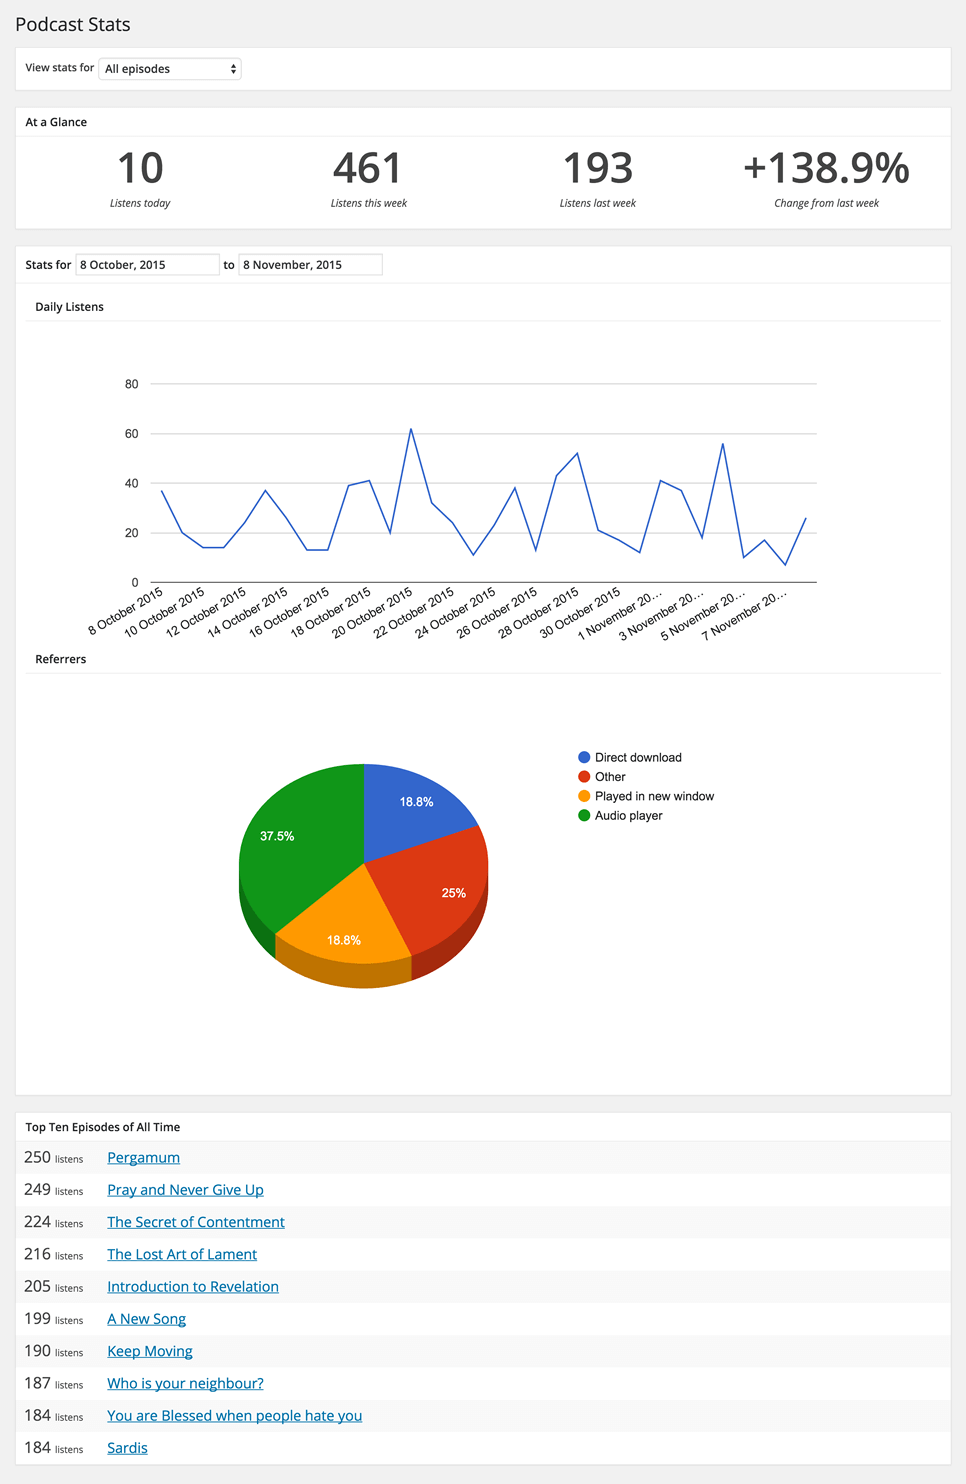
You can access Seriously Simple Stats right from your WordPress dashboard, head to Podcast → Stats. Your stats will start showing up here over the coming days.
The industry secret is podcast stats are horribly unreliable: keep in mind that a download to your podcast isn't necessarily a listen to your podcast. My podcast app, for example, downloads the latest episode of my favorite podcasts every week. I don't necessarily listen to them, and if I do listen, I don't necessarily listen all the way through.
Don't be disheartened by this; given podcasts are downloaded and listened to separately, there's no prospect of fixing this in the short term. What you can do, however, is keep your listeners hooked by connecting with them in your email inbox and your podcast app. We'll cover how to handle this next.
Collect email subscribers for your podcast using MailChimp
Don’t miss out on turning one-off listeners into long-term subscribers! Getting inside your listeners' email and their podcast app is a great way of ensuring listeners know about the latest episodes, and what you're doing, and are excited about the podcast in the long term.
We'll let you collect email subscribers by adding an email subscription box to your podcast page using MailChimp and the MailChimp for WordPress plugin. This is a major benefit of handling your WordPress podcast hosting yourself.
First, sign up for a free MailChimp account if you don’t already have one. The free account lets you have up to 2,000 subscribers, which is plenty to be started with.
Next, add the MailChimp for WordPress plugin to your site: in your WordPress Dashboard, go to Plugins → Add New, then search "MailChimp for WordPress plugin". Click Install Now then click Activate.
You’ll need to pair this plugin with MailChimp. From the Dashboard, head to MailChimp for WP → MailChimp, and click Get your API key here. Copy your API key from MailChimp and go back to MailChimp for WP → MailChimp. Paste the key into the API Key box and click Save Changes.
Once connected, you’ll also need to create a new list in MailChimp to start collecting email subscribers. From MailChimp, go to Lists → Create List → Create List, and fill out the details.
Add your email signup form to WordPress
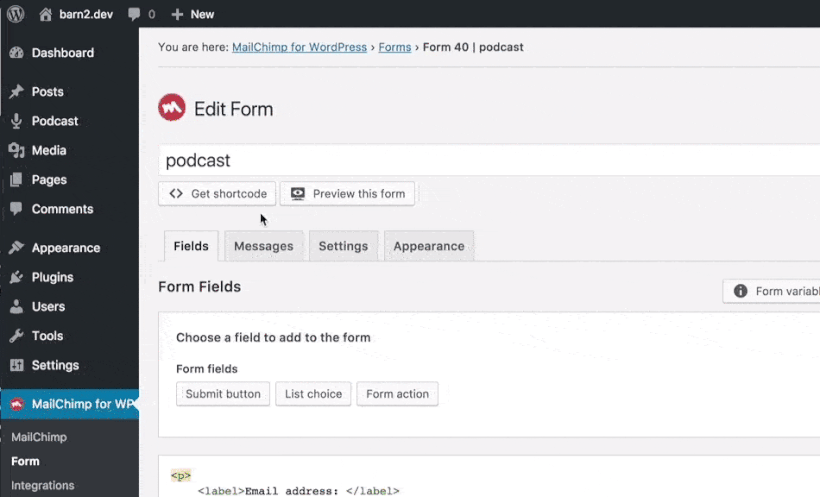
Next, create the signup form for your website. From your WordPress Dashboard, go to MailChimp for WP → Form, give your form a title, select the MailChimp list you want subscribers to be added to then click Add new form.
The plugin will generate a shortcode for your form. Click Get shortcode, copy the shortcode, and paste it on your podcast library page so listeners can easily subscribe to future episodes:
You'll be collecting podcast subscribers in no time! Hooray! You know, however, need to be emailing new episodes out to your subscribers. You can automate this by connecting your podcast RSS feed to Mailchimp. Our popular tutorial on how to create an RSS-Driven Campaign in MailChimp shows you how to do this, and take a step out of your podcast email setup.
Best practices for podcast SEO on WordPress
Search Engine Optimization (SEO) is crucial for any website or content to gain visibility on search engines such as Google. It involves optimizing your website's content to make it easier for search engines to crawl and index, and ultimately rank it higher in search results. Similarly, optimizing your podcast for SEO can help it reach a wider audience and increase its visibility.
Tips for optimizing your podcast for search engines
- Use descriptive titles and descriptions: Make sure to use descriptive titles and descriptions that accurately reflect the content of your podcast episodes. This will help search engines understand what your podcast is about and display it in relevant search results.
- Include relevant keywords: Identify relevant keywords and incorporate them naturally into your titles, descriptions, and episode summaries. However, avoid keyword stuffing, which can negatively impact your SEO.
- Use transcripts: Transcripts of your podcast episodes can be helpful for SEO as they provide search engines with text to crawl and index. They also make your content more accessible to those who may prefer to read or skim content rather than listen to an entire episode.
- Optimize your website's metadata: Ensure that your website's metadata, such as titles and descriptions, are optimized for SEO. This can help your website rank higher in search results, which can indirectly help your podcast gain more visibility.
- Use internal linking: Internal linking, or linking to other relevant content within your website, can help improve your website's overall SEO. By linking to other relevant content, you can also help search engines understand the context and relevance of your podcast.
Troubleshooting common WordPress podcast hosting issues
Even with the best WordPress podcast hosting, issues can sometimes arise. Here are some common issues you may encounter and how to troubleshoot them:
Slow website performance
Slow website performance can lead to a poor user experience and may cause visitors to leave your site. This issue can be caused by a number of factors, such as poorly optimized images, an outdated WordPress version, or a plugin conflict.
To troubleshoot slow website performance, you can use tools like Google PageSpeed Insights or GTmetrix to analyze your website's speed and identify areas for improvement. You can also try optimizing your images by compressing them and resizing them to the appropriate dimensions. Updating WordPress and plugins to their latest versions can also improve website performance.
Audio file playback issues
Audio file playback issues can be frustrating for listeners and may cause them to stop listening to your podcast. These issues can be caused by incorrect file formatting or encoding, insufficient bandwidth, or compatibility issues with the podcast player.
To troubleshoot audio file playback issues, make sure that your audio files are in the correct format (usually MP3) and encoded at the appropriate bitrate. Check your web hosting plan to ensure that you have sufficient bandwidth to handle podcast downloads and playback. You can also test your podcast on different podcast players to ensure compatibility.
RSS feed issues
RSS feed issues can prevent your podcast from being distributed to popular podcast platforms like Apple Podcasts and Spotify. These issues can be caused by incorrect RSS feed formatting, missing or incorrect tags, or a plugin conflict.
To troubleshoot RSS feed issues, use a tool like Cast Feed Validator to analyze your RSS feed and identify any formatting errors. Ensure that your RSS feed includes all the necessary tags, such as title, description, and artwork. If you are using a podcast plugin, try disabling it to see if it is causing the issue.
Self podcast hosting is easy! Now you're ready to go
Choosing to manage WordPress podcast hosting yourself is remarkably easy, and this tutorial has shown you everything you need to know. We've shown you how to set up WordPress, add the podcast, and then make use of features you can only get if you self host your podcast, including a sortable archives page, and effective email signups.
Just to recap, here are the main steps needed to host your own podcast using WordPress:
- Set up a WordPress website – with managed hosting and a simple theme.
- Download the Seriously Simple Podcasting plugin.
- Upload all your podcast episodes to your website.
- Download the Posts Table Pro plugin.
- Customize your searchable podcast library using the table builder.
- Power up your podcast by submitting it to iTunes right from your website, and monitoring your analytics using Seriously Simple Stats.
- Automatically email your podcast subscribers with new episodes.
Now you have the equipment to make your podcast and your website can delight listeners.
Please let us know how your self-hosted podcast library is working for you. We can't wait to see the clever things you do with it!

 In the Pages section of WordPress, create a page for your WooCommerce gallery view.