The Complete Guide to setting up related products in WooCommerce for effective upselling

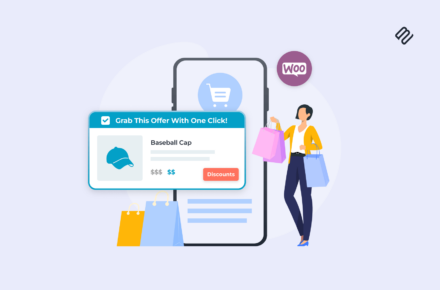
If you want to increase the average order value in your e-commerce store, then a WooCommerce related product plugin is the perfect way to achieve this.

WooCommerce related products is a simple but effective way to recommend products to your customers. It works by suggesting additional products that are related to the ones the customer is currently viewing, has recently viewed, or added to their cart. This can help increase your sales by encouraging customers to purchase more products from your online store.

In this tutorial, I will tell you:

  • How to set up the basic related products feature which comes with WooCommerce itself, and why there are better ways to do it.
  • How you can sell more by using the bestWooCommerce related product plugins. I'll share two plugins with you: one to display related items above the add to cart button on your product pages; and one to display them in a popup cart. 
  • And finally, I will provide step-by-step instructions on how to add related products using these two WooCommerce plugins.

In the world of e-commerce, customer experience is everything. Offering personalized WooCommerce product recommendations can go a long way in making customers feel valued and engaged with your brand.

There are few better ways to increase your average order value than by using a WooCommerce related product plugin.

Research shows that customers who click on related products have a 5.5x higher conversion rate than those who do not. Isn't that amazing! And to add to that, if customers click on related products then they are more likely to purchase multiple items, also increasing your average order value.

What you can achieve with related products in WooCommerce

In practical terms, you can use the idea of related products to do a couple of things:

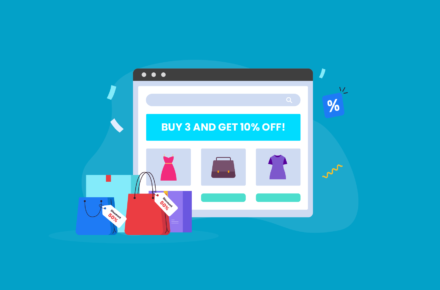
  • Make it easier for customers to find additional products that are relevant. A good recommendation is one that's related to what the customer is thinking of buying already and increases the overall value that the customer gets from the whole purchase. For example, whoever's looking at guitar strings will most likely also be interested in guitar picks and maybe also capos, slides, straps, and other accessories. WooCommerce related products are where you can show them all that.
  • Use WooCommerce recommended products to upsell product variations or customizations. This is in the realm of "things that not all customers think of out the gate". For example, for a business that sells hand-made jewelry, offering a custom engraving service/upsell can be a great way to increase the average order value.
  • Encourage customers to buy more expensive products or special versions of the current product. This type of related product is more about showing people some options that they might not have considered on their own.

Honestly, this is just the tip of the iceberg. There are no limits when it comes to how you can use WooCommerce related products plugin in your store or the kinds of products you can showcase. Speaking of showcasing related products.......

How related products are shown by default

WooCommerce has some basic functionality for related products built in from the get-go. However, that functionality is a little limited in how it's presented and how it works overall.

First things first, WooCommerce lets you assign two main types of related products: upsells (products related to the current one but more expensive or with higher margins) and cross-sells (products that "are frequently bought together").

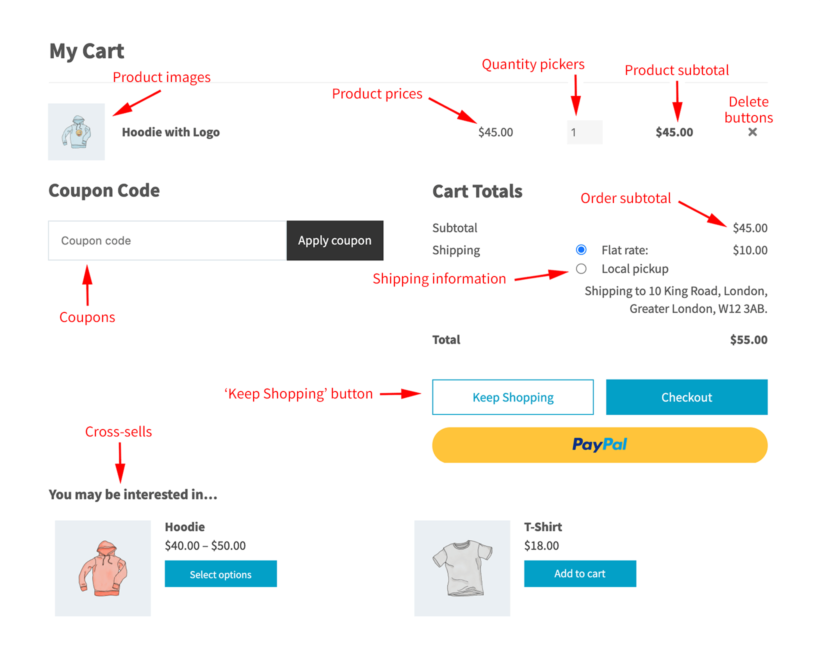
WooCommerce displays upsell products right on the front-end product page and cross-sell products in the shopping cart (similarly to how Amazon does this).

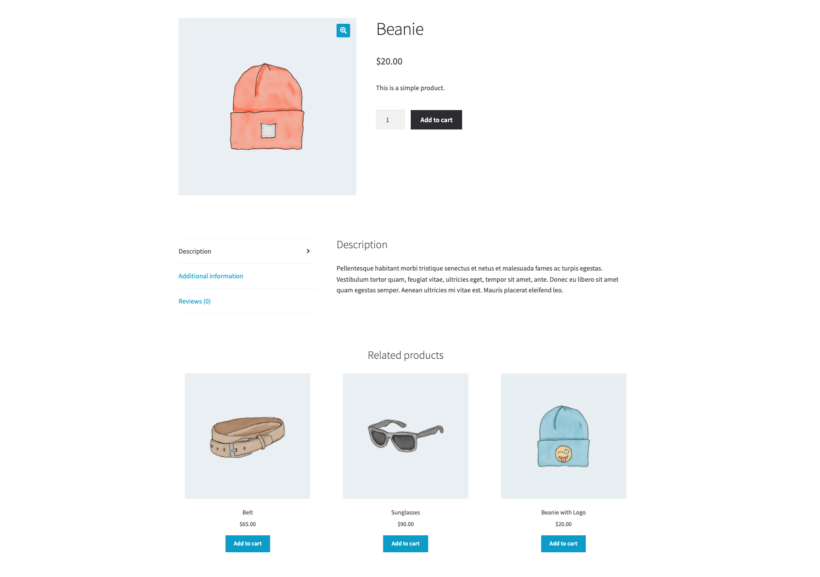
Here's what upsells look like in default WooCommerce:

WooCommerce related products: upsells on a page

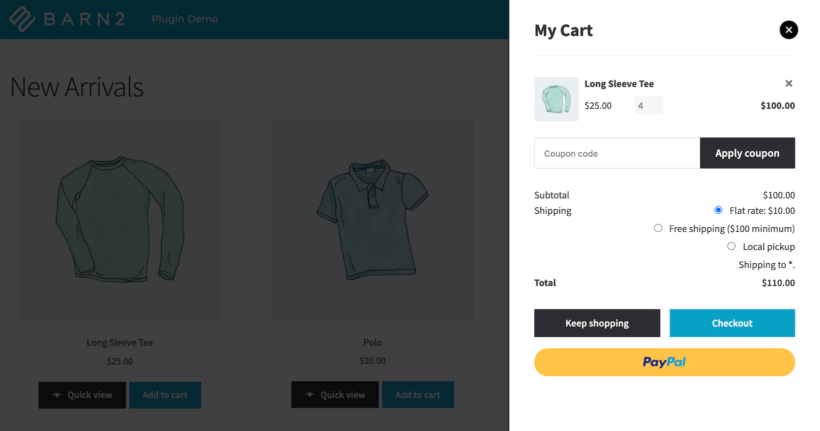
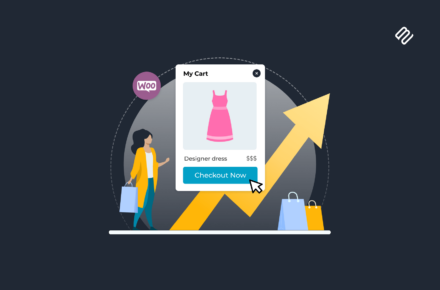
And here's what cross-sells look like by default in the shopping cart:

WooCommerce related products: cross-sells in cart

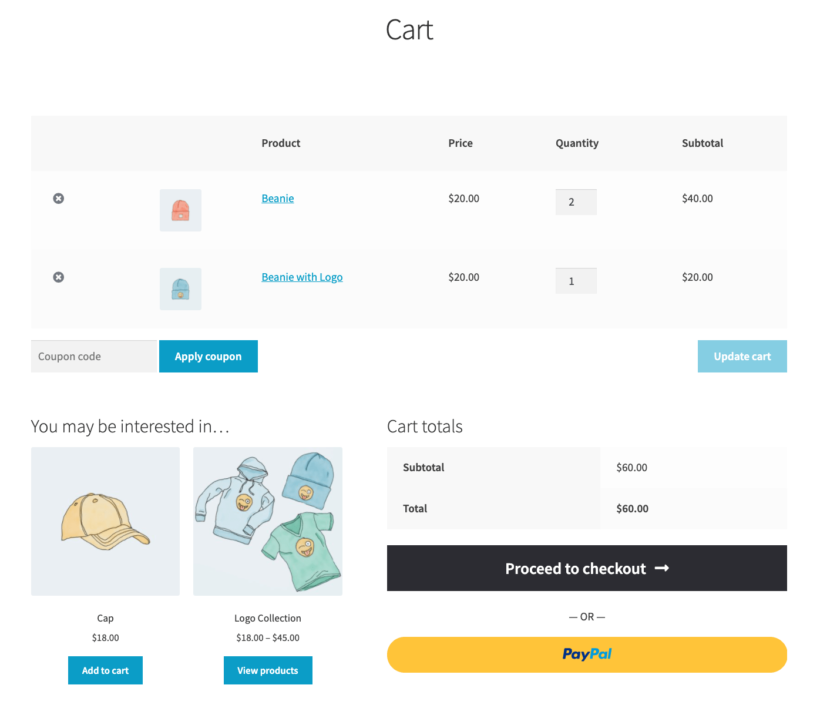
You can enable both of these on the 'Edit Product' screen. Just go to the 'Product Data' part of the page and open the 'Cross-Sells' tab.

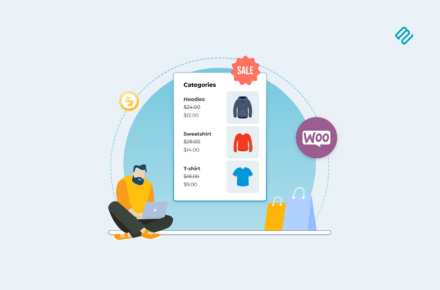
Apart from these, WooCommerce will also show a small related products section automatically on each product page. Those are lined up based on the product category or product tags they share with the currently viewed item. You'll usually find those listings at the very bottom of the product page or you can add them via shortcode.

The downside of how WooCommerce displays related products

Now, even though I'm showing you examples here, this doesn't mean that it's all going to work the same on your WordPress website. The way upsells, cross-sells, or related products are displayed all depends on the theme (or child theme) your WooCommerce store uses. Some templates ignore related products completely and don't display them.

However, even for themes that do display them, they typically appear quite low down on the single product page or in the cart. This can be problematic for store owners with long product descriptions. As a result, those related products are easy to miss.

The most common issues with the default way of displaying related products in WooCommerce are:

  • Related products are buried on the product pages or in the shopping cart.
  • Not all themes support the native way of handling WooCommerce related products settings.
  • It's easy for customers to miss your related products.
  • Related products cannot be added to the cart quickly.
  • There's no way to customize the presentation of your related product listings.

How to solve all this? You've guessed it; plugins! The right lineup of WooCommerce extensions will allow you to handle related products in a much better way.

Next, I will share two recommendations on the best WooCommerce related products plugins which are much more effective than the built-in upsells and cross-sells.

WooCommerce Product Options - Display related products above the add to cart button

WooCommerce related products add-ons

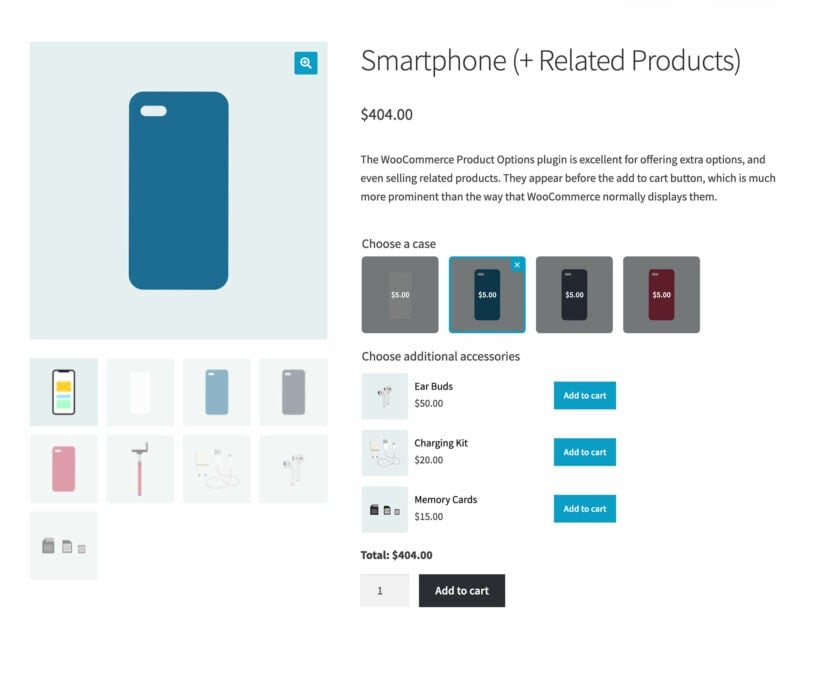
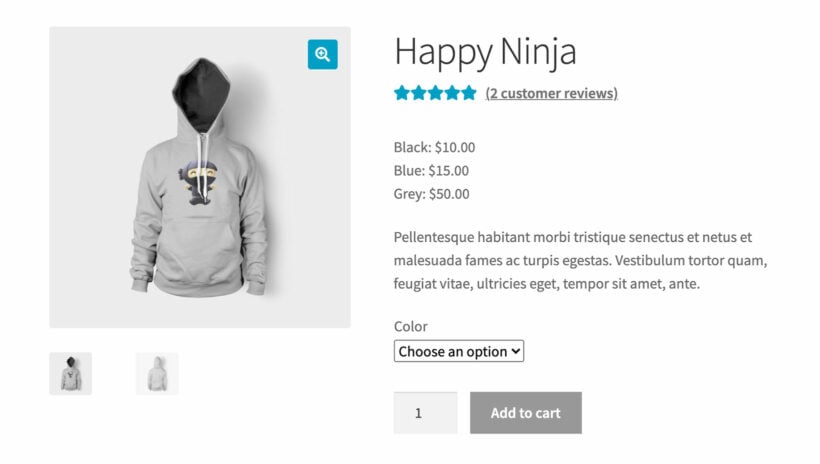
Look at the smartphone product in the screenshot above. Can you see how incredibly prominent the related products are?

That's right - instead of displaying WooCommerce related products at the bottom of the page, they've given pride of place above the add to cart button. The customer is taken on a carefully planned journey which prompts them to make a series of decisions on related products to buy alongside their smartphone. First, they are asked to select a case. Next, they are asked to add accessories. After making their selections, they click a single 'Add to cart' button to add the smartphone and the related products together.

As you can see, presenting related products in this way is significantly more likely to generate sales then hiding them at the end of the page. And you can do it with the WooCommerce Product Options plugin.

This handy plugin lets you add a range of extra add-on options to your products. One of these is the ability to display products from other parts of your store as options. I'll show you how to do that now.

How to display related products above the add to cart button

  1. Install the WooCommerce Product Options plugin on your WordPress site.
  2. Go to Products → Options.
  3. Click 'Add new' to create a new options group for the product that you wish to display related products on.
  4. Select the product. Either select just one product, or if you want to show the same related products on all products in a category, then select the entire category instead.
  5. Click 'Add Option' and choose the 'Products' option type.
  6. Configure and select each specific product that you wish to display, or let the plugin select related products dynamically from a certain category.
WooCommerce select other products as options

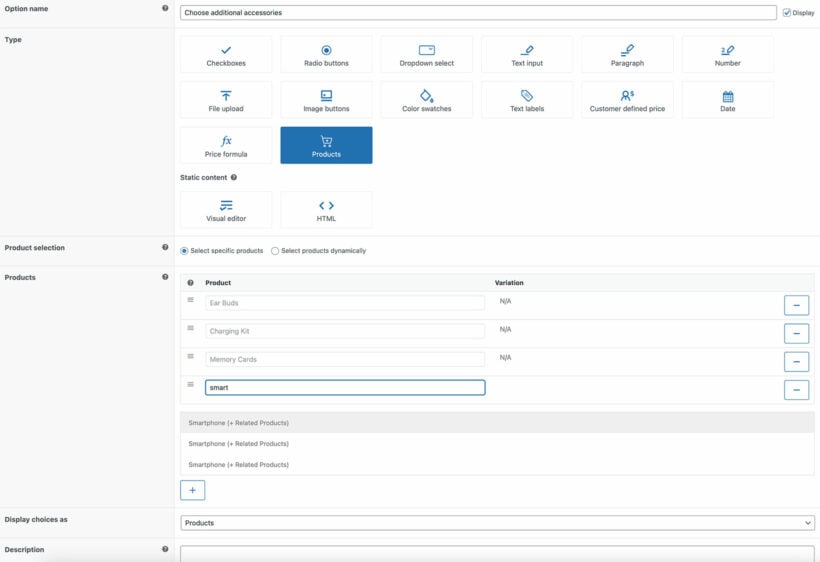
When you add the new option, there are lots of other options to customize it as you like. For example, you can choose from a wide range of styles for displaying the related products. These include checkboxes, radio buttons, clickable images, and so on. You can also set them as required fields, or set minimum and maximum quantities. There's even a conditional logic option so that you can show and hide different related products based on the customer's other selections.

Once you've saved your product options group, view the product page. You'll see the related products neatly displayed above the add to cart button. Perfect!

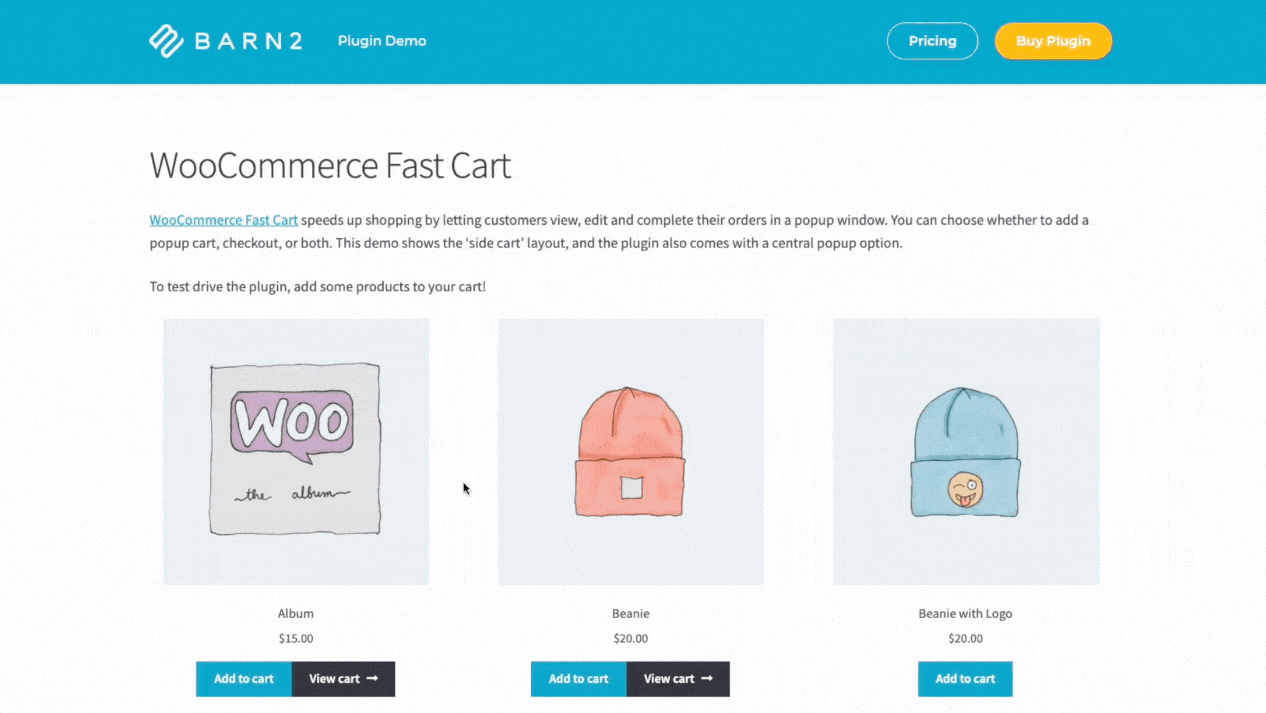
WooCommerce Fast Cart - Display related products in a popup cart

WooCommerce popup cart demo

So far, I've told you how to use the WooCommerce Product Options plugin to display related products above the add to cart button on product pages. That's step 1 of the journey to encouraging customers to buy more. But how can you convince the customers who didn't respond to step 1?

The solution is to display related products in the cart, too. This creates a drip-drip effect, as customers may respond to the second prompt rather than the first.

Now, as we saw earlier, WooCommerce itself does have an upsell feature which displays related products on the cart page. However that's no use because it displays them low down the page where they're easy to miss.

Instead, you can use the WooCommerce Fast Cart to display related products in a popup mini cart.

Why is a mini cart a better way to display related products?

The popup cart replaces the main cart page, which brings many benefits:

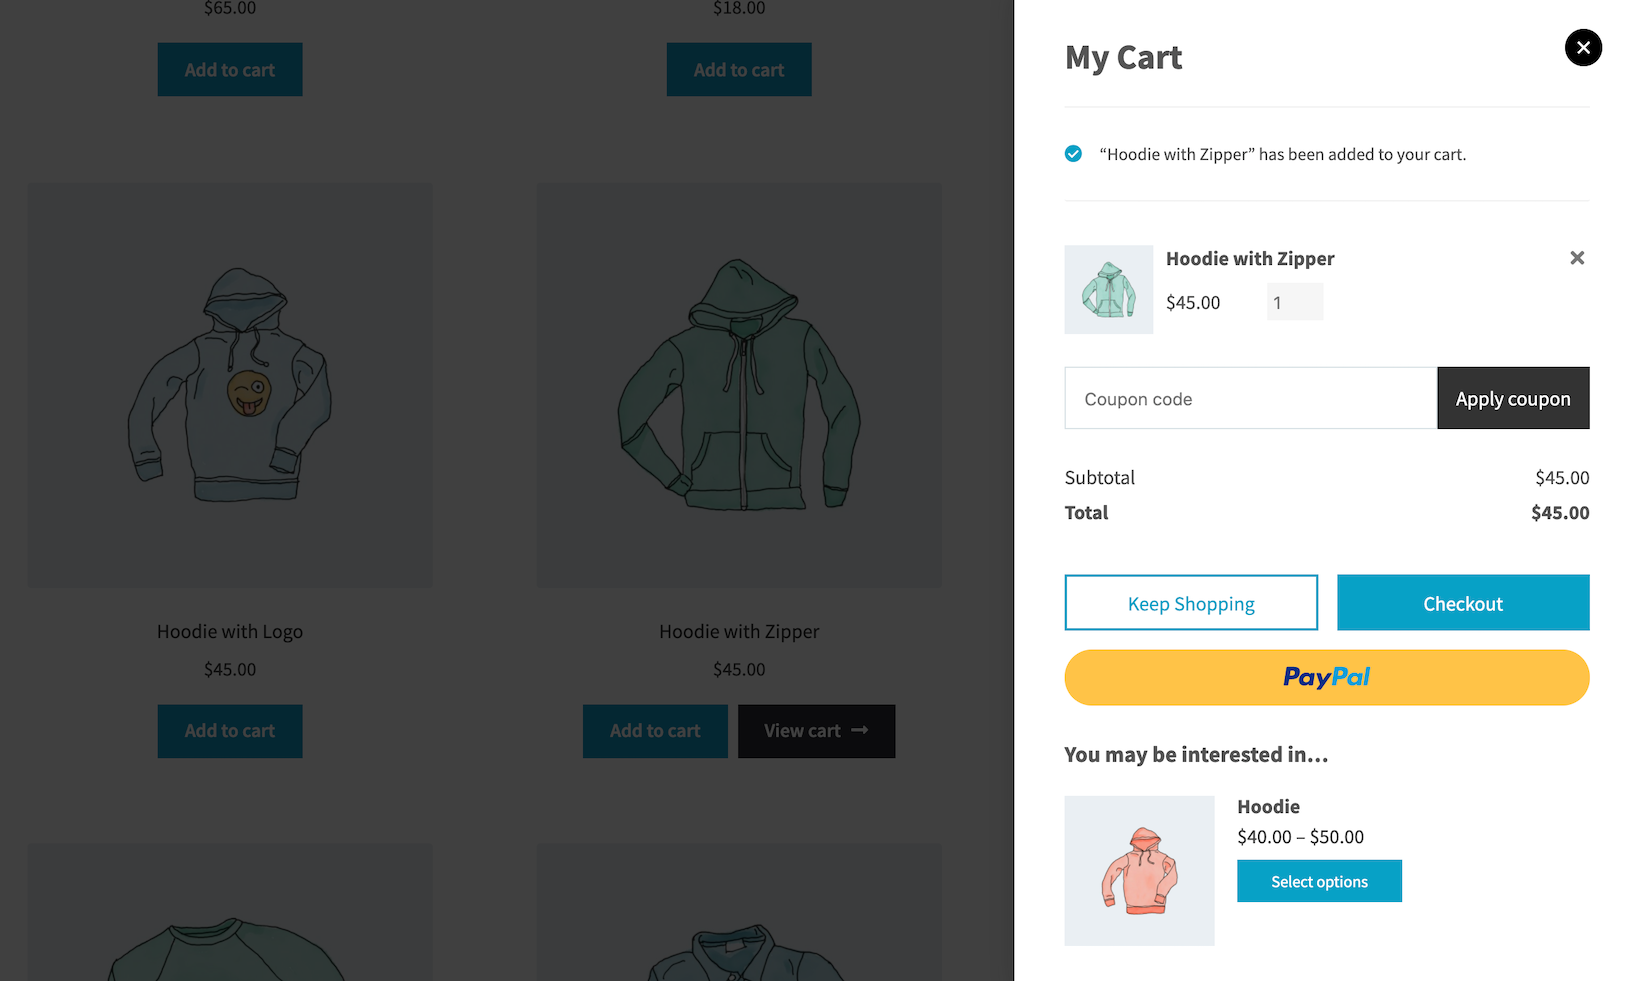
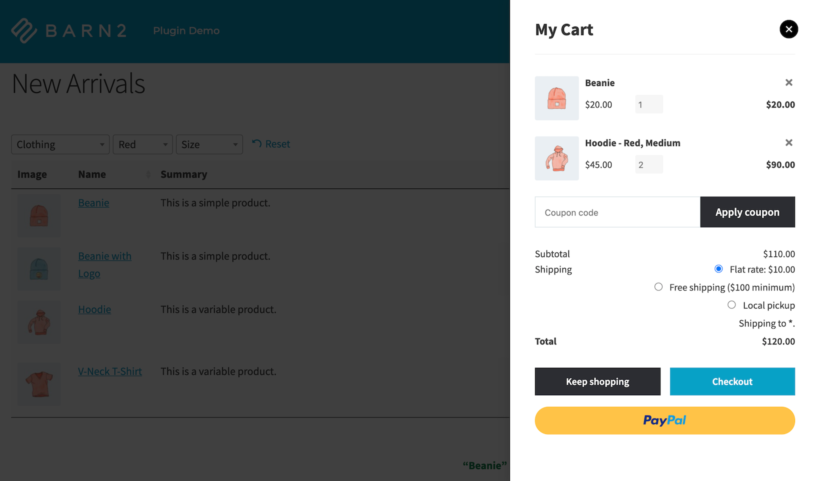
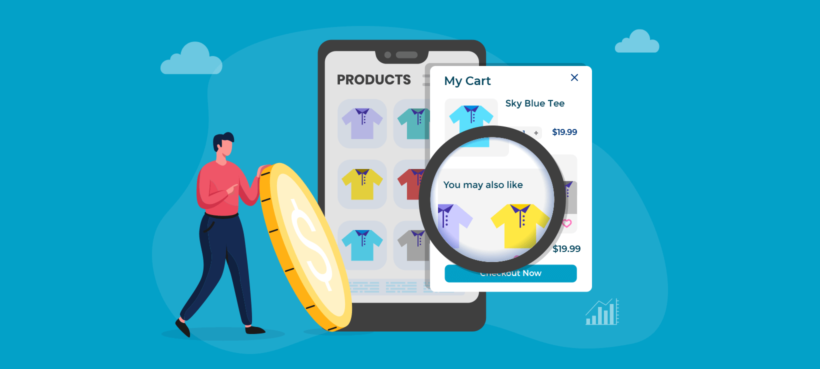
  • Prominently displays related productsThe popup cart includes related products in a "You may also like" section. This as appears as a "You may be interested in..." carousel. It's powered by the cross-sells feature which comes with WooCommerce itself, and simply displays the products in a better way that is more likely to convert.
    WooCommerce Fast Cart - 2 layout options: Choose from a side cart of central popup
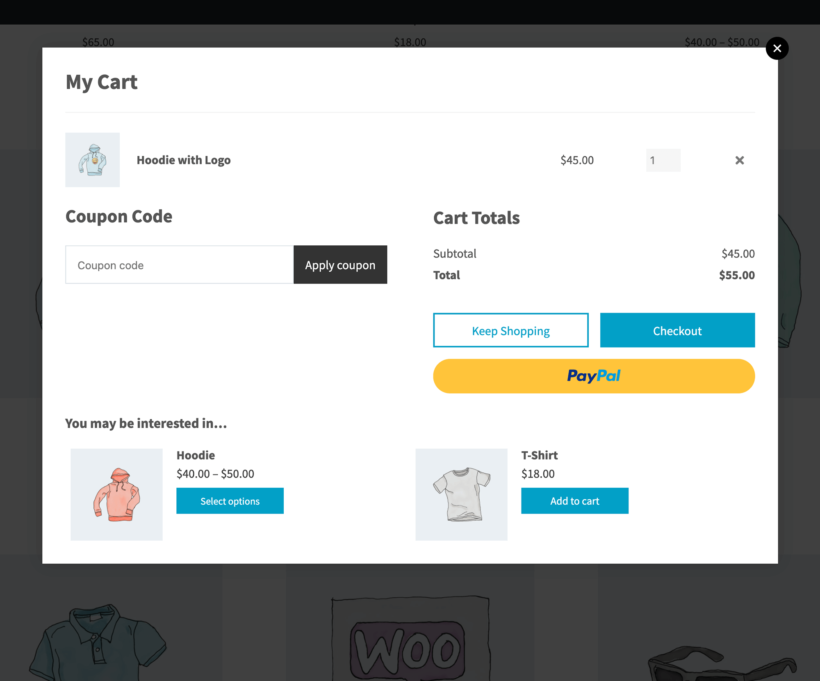
    A fast cart popup containing related products
  • Easy to review cartYou can either launch the mini cart as soon as customers add items to their cart, or they can click a floating cart icon. Either way, the popup cart provides a quick and easy way for shoppers to review their order, make changes, add related products, and proceed to the checkout page.
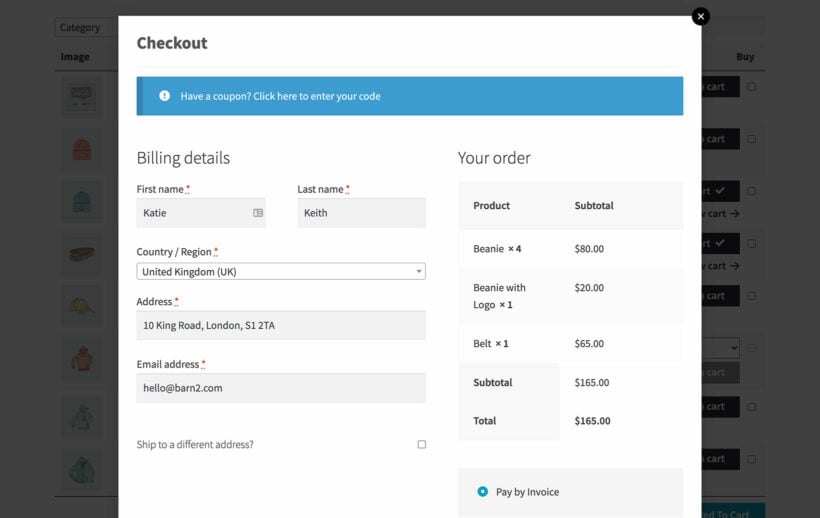
  • Fast on-page checkoutWooCommerce Fast Cart doesn't just replace the cart page. It also comes with a fast on-page checkout so that customers can complete their order without ever leaving the current page. This makes a big difference to conversion rates by removing friction and enabling customers to submit their order as quickly as possible.
    WooCommerce one page checkout popup

Step 1. Add cross-sells to your products

As I mentioned above, the related products in WooCommerce Fast Cart use the cross-sell feature which is part of WooCommerce. This means that in order to display related items in the add to cart popup, you need to add some cross-sells.

I recommend doing this manually for each product so that you can choose the most relevant similar products for each one. For example, let's go back to our smartphone example from earlier, where customers were prompted to choose a case and accessories on the product page. In this case, I'd recommend adding the most popular case and accessories as cross-sells to display in the popup cart.

How to add product cross-sells to appear in the WooCommerce cart:
  1. Go to the 'Products' section of your WordPress dashboard, and click on a product that you want to add upsells to.
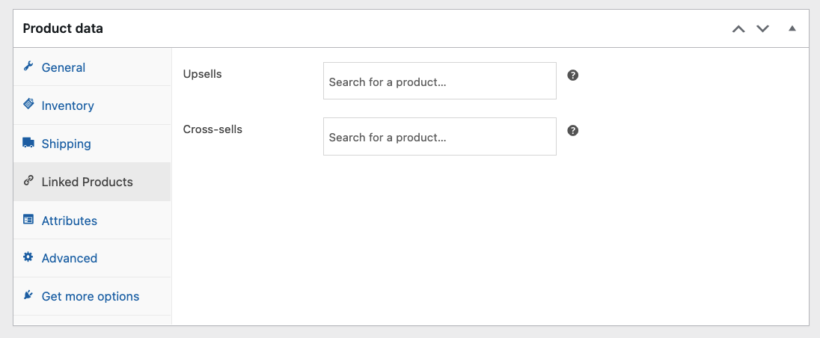
  2. Scroll down to the 'Product Data' panel and open the Linked Products tab.
  3. Start typing a product name or ID (not SKU) in the 'Cross-sells' field. WooCommerce will display some suggestions for you to click on.
  4. Add as many cross-sell products as you like, and then click Update.
linked products in WooCommerce

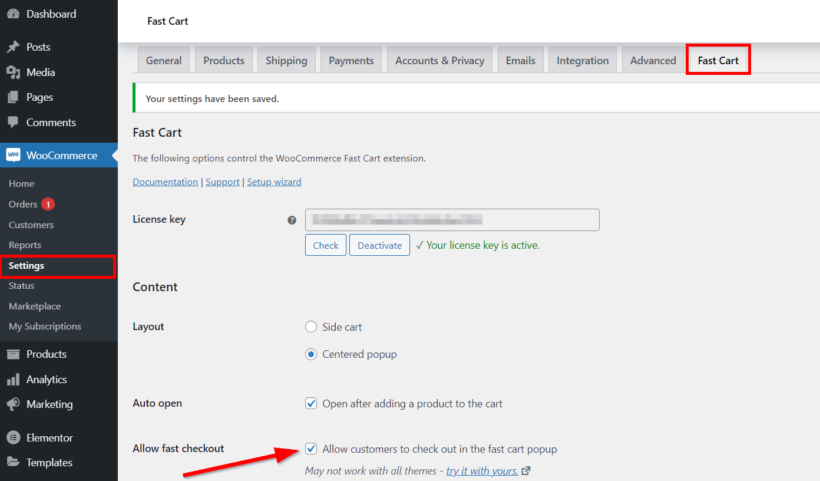
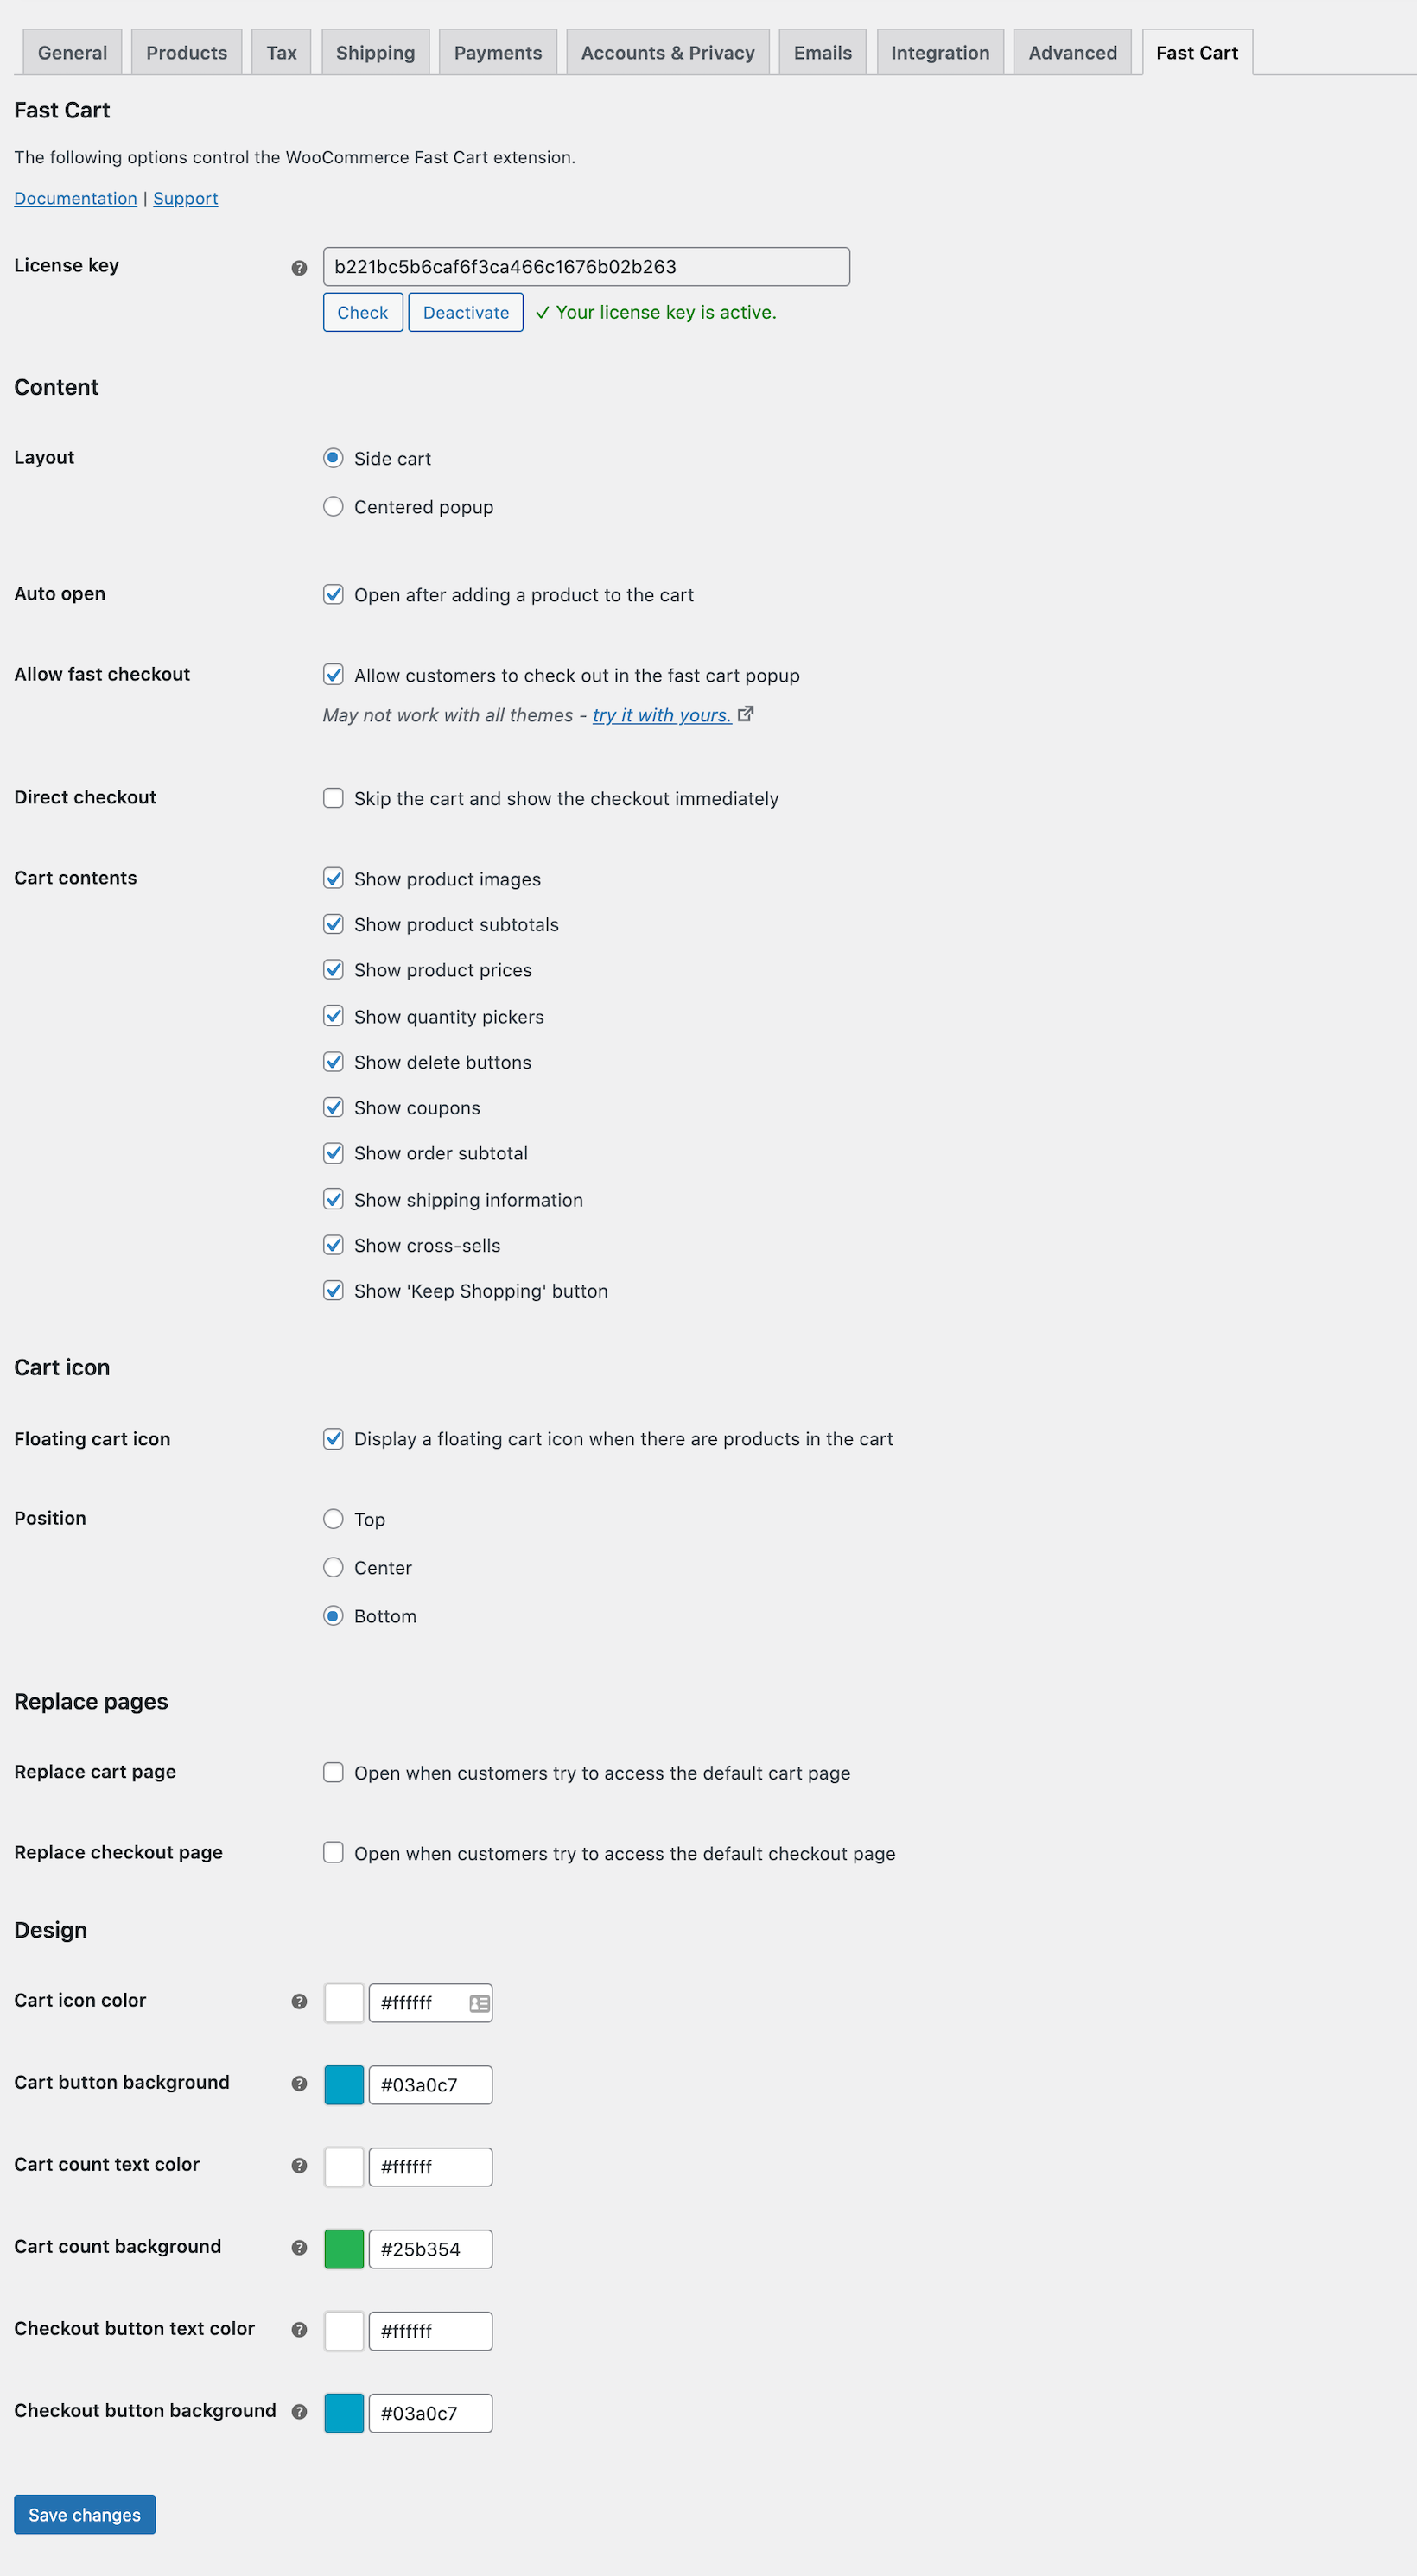
Step 2. Set up WooCommerce Fast Cart

Next, it's time to install the WooCommerce Fast Cart plugin and use it to display the cross-sells in a popup cart:

  1. Install WooCommerce Fast Cart and activate the plugin.
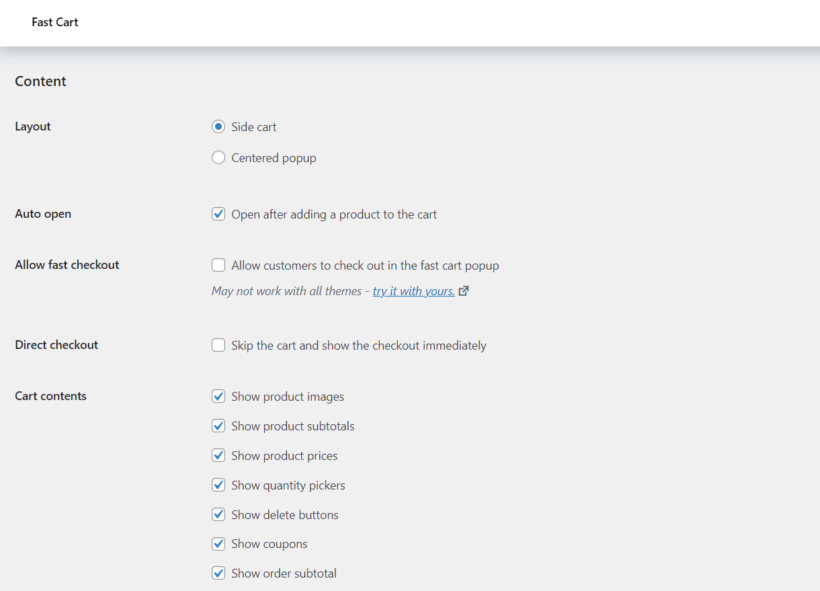
  2. In the setup wizard, choose the content that you want to appear in the fast cart. Make sure that you enable WooCommerce related products.
  3. Choose whether or not to enable the popup checkout, and other features like whether to open it automatically when customers add products to their cart.

Here are the elements that you can customize in the popup cart, and where they appear. As you can see, you can include a product image and choose what to include in the product data section:

WooCommerce Fast Cart Settings

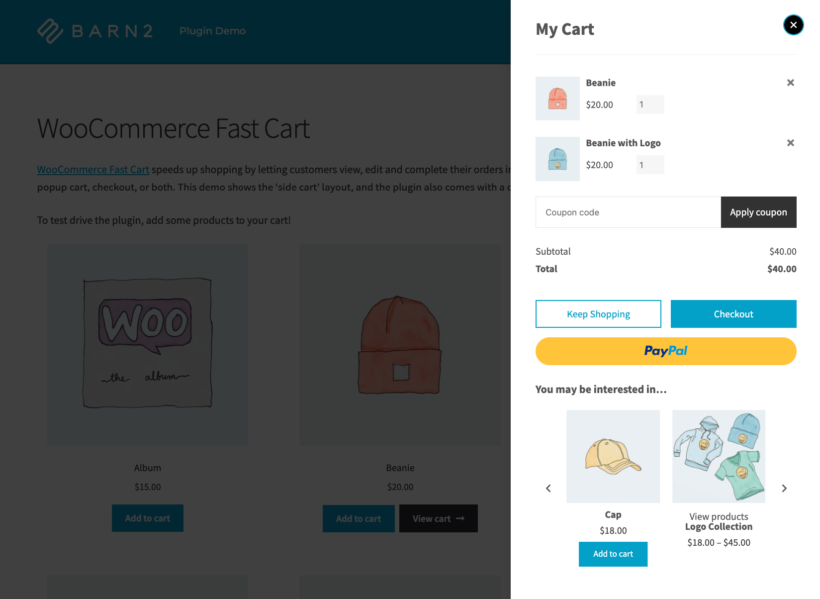
What's great about all this is that WooCommerce Fast Cart adapts the appearance and layout of related products based on how many such products are available for the items already in the cart.

For example, here's a case where there are just two WooCommerce related products assigned to the main product in the cart:

WooCommerce related products: 2 related products in cart

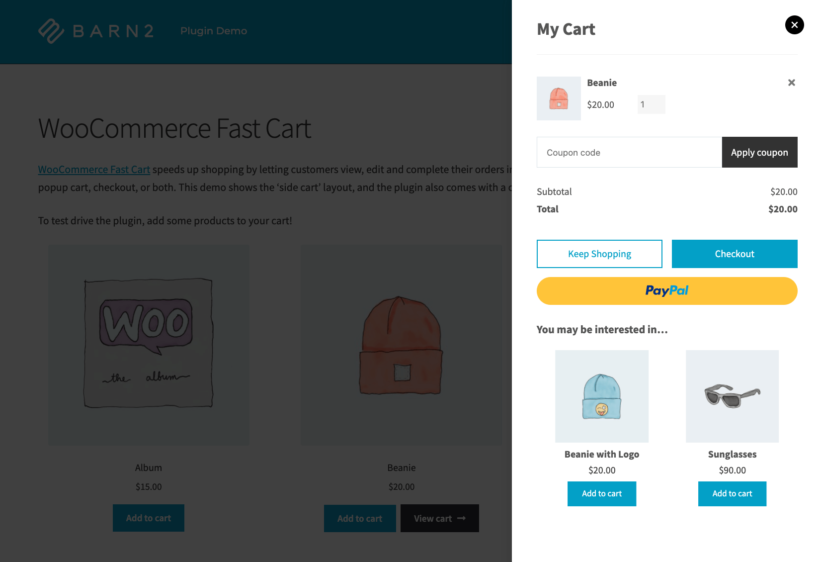
As you can see, the plugin displays custom related products straight up under the main buy button. However, if there's a higher number of related products available, WooCommerce Fast Cart will add a slider/carousel feature to show them all:

4 related products in cart

How to choose the right related products

Before we finish, I will give you some bonus tips to help you to choose the right related products for each item in your store. This is important because it makes a huge difference to whether customers buy the extra items. And when shopping online, I see a lot of eCommerce stores get this wrong!

You shouldn't pick related products at random. Think carefully about which products really are a fit with the current one. Also consider which customers are most likely to buy.

A good way to think about this is to consider a couple of types of related products:

  • First, gather the products that are a natural upgrade over the current one - maybe they're of better quality, come from a better-known manufacturer, or are simply more profitable for you.
  • Think of all the products that will improve the customer's experience with the current product (make it easier or more enjoyable to use).
  • List all the products that previously customers have commonly bought together with the current product.
  • List all the products that would make a nice set or bundle with the current one for whatever reason.

Use this to prioritize which related products to display on the product page. Once you've done that, display the top few in the popup cart to give them an extra boost.

Remember to check your related products regularly, as these may benefit from being tweaked over time. For example, if you have a new product then you can boost sales by displaying it for other products in your store.

WooCommerce related products can be a great way of increasing your store's revenue without any additional investments needed. This is a really cost-effective strategy and can be incredibly powerful.

For maximum results, use the following plugins together to make related products super-prominent in your store:

  • Use WooCommerce Product Options to force customers to make an active decision on which related products to buy. The related products appear above the add to cart button, making them impossible to miss rather than an afterthought.
  • Also use WooCommerce Fast Cart to display the most important related products in a popup cart window. This gives you a second change to convince customers to add them to their cart, maximizing your chances of conversion!

Questions about how to craft your strategy with related products for WooCommerce? Let us know in the comments below.

Complete guide to setting up and managing WooCommerce email notifications

Want to set up WooCommerce email notifications for customer orders and send them to multiple recipients?

Improving email communication for your business is crucial for nurturing leads. It enhances customer service and improves brand loyalty. The best way to do this is by using a WooCommerce email notifications plugin.

In this post, we’ll show you how to supercharge your WooCommerce email setup by:

  • Setting up the email notifications that come with WooCommerce itself.
  • Using WooCommerce email customizer plugins to add extra features. For example, they let you send email notifications to multiple recipients with total flexibility.

Why should you use email notifications for your WooCommerce site?

WooCommerce offers some basic email functionality out of the box. It automatically sends customers an email when their order moves from one order status to another.

Transactional emails are essential for communicating with customers about their orders. For instance, customers will automatically receive an email notification for any processing order or when the order has been shipped from your warehouse.

As a store owner, you also increase your business’s profitability by automating repetitive tasks such as sending customer order notifications. A WooCommerce email notifications plugin lets you automatically send order notifications to the appropriate contacts, team members, and suppliers. This way, everyone stays in the loop and knows what’s going on with the order.

Email notifications also play a huge role in protecting and recovering orders that would otherwise get lost. For instance, you will receive a notification when a customer cancels their order. This will prevent your team members from shipping out the order.

In addition, it helps stay in touch with leads and customers. This allows you to nurture them to convert and become a loyal audience. Since you know more about shoppers’ behavior, you can work towards delivering better user experiences.

Email notifications also offer a great way for you to engage with your customers and keep them interested in your product offerings. Therefore, this results in more sales and helps you generate more revenue for your business.

How to set up and customize email notifications

As we have seen, WooCommerce out of the box lets you set up and customize email notifications for your online store. These include emails for new orders, canceled orders, failed orders, refunds, processing orders, completed orders, and more.

Here’s a quick tutorial describing how to configure the standard WooCommerce email settings:

WooCommerce email settings
  1. Install the WooCommerce plugin on your WordPress site.
  2. Navigate to WooCommerce → Settings → Emails tab from the WordPress admin panel.
  3. Click on the Manage button next to the email you want to edit and enter the recipient address.
  4. You can also customize Email sender options to customize to sender information and the Email template. Email sender options include “From” name and “From“ address.
  5. Click on the Save changes button to continue.

This is a pretty bare-bones email notifications system. Thankfully, there are lots of other ways you can improve your WooCommerce email and send advanced notifications.

What are WooCommerce email customizer plugins and why should you use them?

A WooCommerce email customizer plugin is a great way to make your email notifications more sophisticated. These plugins allow you to customize your emails in different ways - for example, to add additional email recipients to your customer order emails. This is useful especially if you have a team or you want to share the order details (like the order number, status, contents, or shipping class) with someone else.

However, with so many options available, it’s important to choose the right WooCommerce email customizer plugin. Let’s go over some of the best options available for WordPress websites:

1. WooCommerce Multiple Email Recipients

WooCommerce Multiple Email Recipients offers an all-in-one solution for managing and customizing email notifications for your online store. This means that you don’t have to worry about manually forwarding WooCommerce order emails to customers on time or suppliers. Instead, the plugin does all the work for you.

The WooCommerce Multiple Email Recipients plugin also lets you control and customize the recipients for all email notifications in your store. You can:

  • Store multiple email addresses per customerYou can select which email addresses of a specific customer you want to send notifications to as soon as they order from your WooCommerce site. You can also control the number of additional email recipient fields and display them on the account or checkout page – no need to set up a separate contact form. This helps you offer a more personalized shopping experience that’s unique to your brand.
  • Include contacts such as the fulfillment center or the dropshipper in your list of email recipients. By sending new order notifications to the correct contacts automatically, they can ship the order with no manual input from you. WooCommerce Multiple Email Recipients lets you do this either globally or on a per-product or per-category basis.

The best part about the WooCommerce Multiple Email Recipients plugin is that it lets you choose which notification emails to send to the additional recipients. This is a great way to ensure that email notifications are automatically sent to the correct person, store, or supplier.

The WooCommerce Multiple Email Recipients plugin is also incredibly easy to configure and get started with. Here are step-by-step instructions explaining what you need to do:

A: Install and activate the WooCommerce Multiple Email Recipients plugin

Get the WooCommerce Multiple Email Recipients plugin and install it on your WooCommerce site. Once that’s done, navigate to WooCommerce → Settings → Products and click on the Multiple email recipients link.

Enter your license key and click on the Check button to validate it.

B: Configure plugin settings

You can set the number of customer email addresses allowed per customer using the text field next to Customer email addresses and enter the labels using the text fields below.

WooCommerce Mulltiple Email Recipients settings

Click on the Save changes button to continue.

To add the additional emails per customer, simply navigate to the user edit page and add email addresses to the text fields. The plugin also adds the fields to the account page and checkout page where customers can enter multiple email addresses themselves.

You can also choose which emails to send to the additional customer addresses. To do this, navigate to WooCommerce → Settings → Emails and select the email you want to add extra recipients to. You can enable the extra recipients for the built-in customer emails, plus emails added by third party plugins. This includes emails created by WooCommerce Wholesale Pro, WooCommerce Subscriptions, WooCommerce Memberships, AutomateWoo, etc.

This will give you a more detailed customizer page, compared to the default one:

Send email to multiple recipients

C: Edit WooCommerce email templates

So far, we have learned how to send WooCommerce email notifications to multiple customer addresses. Next, we'll learn how to add extra recipients to the admin emails which notify you of new orders received.

Like before, navigate to WooCommerce → Settings → Emails and select the email you want to add extra recipients to. However, this time select an admin email rather than a customer email:

WooCommerce add order email recipients

You can set up multiple email recipients and send advanced notifications to specific recipients based on the product or category of the new order.

2. YITH WooCommerce Email Templates

YITH WooCommerce Email Templates

YITH WooCommerce Email Templates is designed to customize the default emails in WooCommerce and give them a more professional look and feel. It works for both HTML and plain text email types. For example, you can add your store’s logo to the email header.

The plugin lets you style all default WooCommerce emails and gives you full control over how emails look to customers. You can start from four attractive pre-designed layouts including Default, Informal, Elegant, and Casual. In addition to this, you can also assign different templates for each kind of email and preview the template before finalizing it. It’s also a good idea to send a test email to a team member to make sure it looks fine in the inbox.

To sum it up, YITH WooCommerce Email Templates is a great plugin for changing the design of the built-in WooCommerce emails. The best part is that it’s fully compatible with the WooCommerce Multiple Email Recipients plugin by Barn2. This way, you can customize emails and add multiple email recipients for your emails using WooCommerce Multiple Email Recipients.

3. YITH WooCommerce Coupon Email System

YITH WooCommerce Coupon Email System

The YITH WooCommerce Coupon Email System plugin lets you create custom WooCommerce coupons and send them directly to customers based on specific events. For instance, you can send a discount coupon if the customer exceeds a certain amount of new orders for a month or send a discount code to customers on their birthday.

This is a great way to build a loyal customer base and encourage them to make purchases from your store. Using the plugin, you can also send coupons to your customers after their first purchase, send coupons to newly registered users, or when users purchase a specific product from your store and let users redeem coupons on the checkout page of your WooCommerce site.

4. AutomateWoo

AutomateWoo

AutomateWoo is a WordPress plugin designed to automate your WooCommerce store management. Among its many features is powerful automation of your email notifications. You can use it to automate your WooCommerce email notifications to customers.

It's particularly useful for sending different emails to customers based on which products or categories they ordered. For example, if you have a WordPress membership site then you might want to send a 'Welcome' email when customers buy your 'Membership' product. Alternatively, you might want to send a set up follow-up emails to onboard new customers after buying your highest value product. Each email can contain instructions to the relevant product, targeted upsells to other related products they might be interested in, or anything else you want to say.

5. Mailchimp & MailOptin

Mailchimp

Mailchimp is an all-in-one email marketing platform that offers one of the best solutions for creating and managing email marketing campaigns for your business.

MailOptin

You can use the MailOptin plugin to integrate Mailchimp email marketing campaigns onto your WooCommerce site. This way, Mailchimp works as an SMTP plugin for WooCommerce. It also lets you display opt-in forms anywhere on your website based on customer behavior and send automated emails based on events triggered by customers on your WooCommerce store.

The best part is that you won’t have to find a separate SMTP plugin for your e-commerce store.

6. Flow Notify

Flow Notify WordPress email plugin

Flow Notify is a powerful email notification plugin tailored for WooCommerce stores. As eCommerce platforms are shifting towards more user-centric approaches, Flow Notify prioritizes giving store owners the flexibility to create personalized email notifications that resonate with their audience.

One of the significant advantages of using Flow Notify is its intuitive drag-and-drop editor. It offers store owners the freedom to design emails that align with their brand's aesthetics without any coding necessary. Whether it's incorporating brand colors, custom images, or tailored content, the possibilities with Flow Notify are vast.

Beyond aesthetics, Flow Notify integrates seamlessly with WooCommerce, ensuring all transactional emails, from order confirmations to shipping alerts, are sent promptly and accurately. Moreover, the plugin provides valuable insights, tracking open rates, click-through rates, and other essential metrics to continuously optimize email performance. If you're aiming for an enhanced email notification experience that matches your brand's identity and provides actionable analytics, Flow Notify for WooCommerce is an excellent choice.

Tips to ensure your emails are always top-notch

Once you have all the plugins you need to automate your email marketing campaigns and manage email notifications better, all that’s left is to create your emails!

Let’s go over a few tips to ensure your emails are always up and running and are sending correctly. By following these tips, you can avoid the most common problems store owners run into with emails.

6 quick tips to send better WooCommerce emails

  • Send a test email. You always want to make sure your emails are delivered to the recipient. A great way to do this is by sending your team members a dummy or test order confirmation email. After that, they can confirm that the emails are being delivered properly and as intended.
  • Make sure emails are landing in the inbox. You also want to take note if your emails are landing in the inbox and not in the spam folder due to spam filters. This will prevent email providers from accidentally misplacing any emails from your WooCommerce store and ensure the recipient receives the email. In addition to this, you can also use an email with a different domain as your recipient address to ensure there’s no problem in sending the emails.
  • Test out payment gateways. Another important thing to check is the payment gateway functionality of your WooCommerce site. However, you need to make sure the payment gateways are working perfectly and your website supports them.
  • Enable transactional emails. It's important to enable transactional emails in WooCommerce. This will prevent emails from generating after a WooCommerce order is created on your store.
  • Purge your email list. Purge your email list regularly and only send emails to leads and customers that are interested. This also saves you time in chasing leads that are not actually interested in purchasing your product.
  • Make sure emails aren’t being blocked. Best practices suggest you should make sure your WordPress web host (hosting provider), plugins, or email servers are not blocking emails from being sent from your WooCommerce site.

Troubleshooting WooCommerce email setup problems

The most common problems come from your WooCommerce email setup. WordPress itself isn't great at sending emails. That's because it's a website platform rather than a platform for sending emails. Sure, it can send emails using the built-in PHP Mail function. However, this isn't ideal because it's not optimized for deliverability.

If you find that your emails aren't sending, then there are several steps you can take to troubleshoot this.

The first step is to improve your WooCommerce email setup by sending the emails through your actual email account rather than PHP Mail. With PHP Mail, WordPress is basically pretending that it's sending the emails from your address. However, the emails are actually coming directly from your WordPress site and not through your email account. Naturally, this makes them look less trustworthy and makes them more likely to get spammed.

It can be hard to tell whether an email has been spammed. Of course, the intended recipient can check their spam folder. However, that won't contain any emails which were spammed at the server level and never reached your mailbox.

To improve deliverability, you should use a third party email service like MailOptinMailgun, or a free plugin like WP Mail SMTP. Any of these will route your WordPress emails through your actual email address, making them much more deliverable.

Once you have improved your WooCommerce email setup in this way, re-test that the emails are sending reliable. If not, then it's time to troubleshoot further. For example, HubSpot have provided a useful guide on how to fix WordPress emails not sending.

Perfect your WooCommerce email notifications

Setting up and managing WooCommerce email notifications is essential if you’re looking to engage buyers and convert them into brand-loyal customers.

WooCommerce Multiple Email Recipients is the perfect plugin for sending email notifications to multiple people. It lets you add multiple recipient emails per customer and gives you the functionality to customize the default WooCommerce emails.

Ready to easily start setting up and managing WooCommerce email notifications on your WooCommerce site? Get WooCommerce Multiple Email Recipients today!

5 Best Free Plugins to Extend WordPress User Roles and Capabilities - Blog header

Are you looking to take control of your WordPress user roles and capabilities? If so, you're in luck! There are plenty of free WordPress user roles plugins available that can help you customize and extend the functionality of your user management system.

In this article, we'll explore the top five free WordPress user roles plugins that can help you improve your site's user permissions, security, and overall performance. Afterwards, we'll also look at how to control access to different parts of your WordPress site based on user role.

From granting permissions to managing access to sensitive content, these WordPress user roles plugins offer a wide range of features that can help take your WordPress site to the next level.

Limitations of the default WordPress user roles

WordPress user capabilities are a crucial aspect of any WordPress site, especially if there are multiple users involved. User roles determine what actions and tasks a user can perform on a site, such as creating or editing content, publishing posts, managing comments, and more.

By default, WordPress provides several roles, including administrator, editor, author, contributor, and subscriber, each with its set of new capabilities. I'm talking about these:
default user roles in WordPress

However, these default roles may not fit the needs of all WordPress sites, and it can be challenging to manage all user capabilities manually, especially as the site grows.

That's why there are many free WordPress user roles plugins available that can help extend and customize user capabilities, making it easier to manage user advanced access manager and permissions. In this article, we'll explore some of the best free WordPress user roles plugins available to improve your WordPress user capabilities, their features, and how they can benefit your site.

  • You'll learn what user roles in WordPress do and why you might need plugins to extend them.
  • We'll show you the best free WordPress user roles plugins that allow you to create new roles and change their permissions.
  • Then, as a bonus, we'll list a couple of premium plugins that let you control which user roles can access specific parts of your WordPress or WooCommerce site.

What user roles do and why you might need a WordPress user roles plugin

By default, WordPress comes with five user roles:

  • Subscriber
  • Contributor
  • Author
  • Editor
  • Administrator

Apart from these, popular plugins for SEO, e-commerce, or site translations tend to add additional roles for a Translator, Shop Manager, SEO Manager, SEO Editor, and more. But let's not get into that for now.

So, five main roles. Why does WordPress need this many? Aren't you good with whatever WordPress role manager your current user profile uses when logging in to the WordPress dashboard?

Yes, and no. Granted, if it's just you working on the site then you're mostly good with that main Administrator user role that was assigned to your account during installation.

However, when you invite a second person to help you with your content, then giving them another Administrator account might not be the best idea. By using any of the other user roles, you can control the areas of the site that you want to give that person access to.

  • For instance, if you just need someone to help you publish new posts, they don't need a user role higher than the Author.
  • Or, if you want someone to help you with your WooCommerce store, a good idea would be to give them the role of Shop Manager. This will give them access to everything that deals with your store, its products, and settings, but no option to edit other parts of the site.

I could go on with these examples, but you probably get the idea by now. WordPress role manager is very useful when there are multiple people working on the same site handling different tasks and responsibilities.

But here's a question: what happens if you want to create a new user role? Or, better yet, how to change the default access rights given to WordPress user roles?

5 best free WordPress user roles plugins

Here is our selection of the top plugins for adding and editing user roles, and WordPress permissions plugins for editing your site.

These plugins are not direct alternatives to one another. Each free version of the WordPress user roles plugin brings a unique set of features to the table. We have chosen the best one from each category. Together, they give you full control over adding and managing WordPress user roles. Mix and match them to add the exact features you need

Note: These plugins focus on the WordPress back end. They don't affect which parts of your public-facing website the user can see. For example, they won't restrict pages or posts to certain user roles. For front-end control, you can pair them with one of the premium version plugins mentioned later in this article.

User Role Editor

Best WordPress user roles plugin: User Role Editor

Great for:

  • creating new user roles
  • modifying the default user roles' permissions

The User Role Editor plugin is the most popular WordPress user roles plugin of them all. You can use it to do two main things:

  1. First, WordPress User Role Editor lets you browse through the current user roles on your site and the WordPress permissions plugins each of them has. For instance, a common problem for blogs that work with multiple authors is that Contributors can't upload images to accompany their posts. Using this plugin you can assign that capability to all Contributor accounts.
  2. Second, you can create completely new user roles with WordPress User Role Editor plugin as well. Then, you can assign specific capabilities to these new roles. For example, this is useful if you're creating a WordPress client portal and need to create a "Client" user role.

WooCommerce Wholesale Pro

WooCommerce Wholesale Pro sales page screenshot

Sometimes, you need a WordPress user role plugin for a specific purpose. When this happens, it's worth finding a plugin that meets this exact purpose. WooCommerce Wholesale Pro is a good example of this.

If you need to sell the products in your online store to certain customers for different pricing, then user roles are a good way to do this. However, simply creating custom user roles won't do the job. That's because you already need related functionality for your use case. For example, a wholesale store also needs the ability to charge different prices based on user role, allow people to register for your wholesale user role, charge role-based payment and shipping, and so on.

You can do all this and more with WooCommerce Wholesale Pro.

User Registration

Best WordPress user roles plugin: User Registration

Great for:

  • enabling front-facing user registration forms
  • assigning new users to specific user roles

It's easy to imagine multiple scenarios in which a site might need publicly available user registration forms. This plugin gives you exactly that.

It's easy to use, there's a drag-and-drop interface for form building, and there are even some templates to make your work faster.

Then, what this plugin also does is it allows you to assign these new users to a specific user role on your site. You can probably imagine the possibilities this creates when you pair it with User Role Editor or any of the other plugins on this list.

PublishPress Capabilities

PublishPress Capabilities

Great for:

  • creating new user roles
  • showing/hiding menu items based on user role
  • duplicate an existing user role

In simple terms, this is a good alternative to User Role Editor if you're not enjoying that plugin for whatever reason. PublishPress Capabilities is slightly less popular, but not any less functional.

You can create a new user role from scratch or duplicate an existing one with this WordPress user roles plugin. These newly created roles can then be assigned to individual sites or WordPress multisite networks.

But apart from that, one original feature that you'll find in this plugin is the ability to show/hide menu items based on the user role of the person viewing it. Again, this won't restrict any specific area of your site from the user, but only hide or show individual menu items.

Hide Admin Bar Based on User Roles

Hide Admin Bar Based on User Roles

Great for:

  • hiding the admin bar based on the user role

This is a great single-purpose plugin for anyone who wants to hide that pesky admin menu bar from the top of the screen for logged-in users.

Why you'd want to do that? Well, it's not very professional for normal users to see the WordPress admin bar at the top of your website, even if they have an account and are logged in. Normal users should be able to manage their accounts from the front end and never see the admin panel or bar.

This plugin lets you hide the bar unless the person viewing is an Administrator (or whatever user role you think is suitable).

Import and export users and customers

Import and export users and customers

Great for:

  • bulk-importing user accounts and assigning them to roles

By default, WordPress is pretty good at importing data from other WordPress sites. However, if you have a standard CSV file with a bunch of user data in it, then you might encounter some issues with your file manager.

This is where this aptly named plugin comes into play and offers a helping hand. It lets you take any CSV with user data, map it to corresponding WordPress user data points, and bring it all in through a simple UI.

The best part is that it will also assign those new users to specific user roles that you have on the site. This is particularly useful when importing customer data to WooCommerce.

Restrict access to your public-facing website based on WordPress user roles

The list so far has been about free WordPress user roles plugins. However, not everything can be done using just free plugins. Particularly, you can't restrict access to various areas of your front-end site effectively.

So, as a bonus, we want to show you some premium solutions that make a lot more things possible with WordPress role manager.

Chiefly, these plugins have been designed to restrict content based on the WordPress user role. They all work with the free plugins described above.

Password Protected Categories

The Password Protected Categories plugin lets you restrict whole categories on your site based on WordPress user role.

Great for:

  • Restricting pages, posts, and any custom post types based on user role.

There are hundreds of ways to run a simple membership site on WordPress. Most of these are pretty expensive. However, if you just need to restrict access to certain parts of your site, then our Password Protected Categories plugin handles the job more than well.

As the name suggests, this WordPress permissions plugin takes any post or page category and restricts access to it based on the visitor knowing the password or having a user account assigned to a specific role.

For instance, you can create a new WordPress user role using any of the free plugins above, call it Member or something similar, create a new category for your members-only content, and then use Password Protected Categories to pair your new user role and content category.

If you want to, you can even have a selected role in which individual users can access each category and its posts.

Pro tip: By default, WordPress doesn't let you create categories for pages. Use this free plugin to do it. You can then hide them based on user role with Password Protected Categories.

Add user role-based features to a WooCommerce store

Before we finish, let's look at some plugins that let you control a WooCommerce online store based on user role. For example, if you're using WooCommerce then you can restrict access to certain products based on user role, add role-based pricing, and even role-based quantity rules.

WooCommerce Protected Categories

Great for:

  • restricting sections of your WooCommerce store based on user role

This one works similarly to Password Protected Categories, but this time it's all about your WooCommerce store and products.

Why would you restrict access to parts of your WooCommerce store? - you're asking. There are a couple of use cases for this, but the most common one is when your store serves both B2C and B2B customers.

For example, the WooCommerce Protected Categories plugin lets you create a separate section in your store for your B2B product line and partners. Or, you can create VIP areas for your best customers.

The way this works is simple. First, you create a new product category and then a new user role called, say, B2B. Then, you can pair the two together.

Pro tip: If you want to hide the entire "shop" area of your site - the entire store - then use our WooCommerce Private Store plugin for that instead.

WooCommerce Wholesale Pro

Great for:

  • adding role-based pricing to WooCommerce

Adding a wholesale module to your WooCommerce store hasn't been the most straightforward task. The difficult thing about it is that you want your wholesale customers to be able to see the entire product catalog, just with different prices.

This is exactly what WooCommerce Wholesale Pro allows you to do. It lets you map custom product prices to new user roles.

An important detail about this plugin is that it also lets you create those new user roles, so you don't have to use any of the free WordPress user roles plugins listed above.

Also, you're not limited to any specific number of new user roles. If you so desire, you can create five, ten, or more wholesale user levels, each with its own pricing.

Then, you can set role-based visibility and choose which products are visible to the public vs wholesale users.

WooCommerce Quantity Manager

Great for:

  • adding role-based quantity rules to WooCommerce

Depending on the industry you operate in and the type of products you're selling, setting minimum as well as maximum product quantities and order values starts making a lot of sense.

For example, for any hand-made product, you might want to set maximum quantities. As a counter-example, no business card printing service will let you buy just one business card, so minimum quantities make a lot of sense there.

Overall, if you're in the kind of business that needs this, you're probably well aware of it by now. The WooCommerce Quantity Manager plugin gives you these features.

First, you can set allowed quantities per product or per category. Then, you can add user roles to the mix and allow some of your customers to order more/less.

This lets you protect your margins and make every order manageable for your casual customers, while also allowing your best customers to tailor their orders more.

ELEX WooCommerce Catalog Mode, Wholesale & Role-Based Pricing

Elex Wholesale Plugin

This robust plugin by ELEX is great for turning WooCommerce into a product catalog and restricting it based on user role. It empowers WooCommerce store owners with advanced features to manage their online shops more effectively. With this plugin, you can easily create a catalog mode for your store by hiding the ‘Add to Cart’ button, offering a seamless browsing experience to your customers without the option to purchase.

One of the key highlights of this plugin is its role-based pricing feature. You can assign different user roles to your customers, such as wholesalers or VIP customers, and provide them with exclusive pricing options. This allows you to offer personalized pricing based on customer segments, enhancing customer satisfaction and loyalty.

The plugin also enables you to set wholesale pricing rules and quantity-based discounts, giving you the flexibility to cater to different customer groups. Additionally, you can hide specific product prices or add custom messages for specific user roles, creating a tailored shopping experience.

With this plugin, you have complete control over your store's pricing strategy and customer experience. It empowers you to create a personalized and engaging shopping environment, catering to the unique needs of your diverse customer base.

Best practices for using WordPress user roles plugins

Using WordPress user roles plugins can help you improve the capabilities of your website. It can also enhance the user experience for your visitors. However, it's important to follow best practices when working with these plugins. This ensures that they are used effectively and efficiently. Here are some best practices for using a WordPress user roles plugin:

  1. Start with a plan: Before installing a WordPress user roles plugin, you need a clear plan of what you want to achieve. Consider the roles and permissions you need. As well as the access levels required, and the users who will be assigned these roles.
  2. Test on a staging site: Before making changes to your live site, it's a good idea to test the plugin on a staging site. This way, you can ensure that everything works as expected and avoid any potential issues or conflicts.
  3. Create new roles sparingly: While it's tempting to create new user roles for every possible scenario, it's important to keep it simple. Too many roles can lead to confusion and make it difficult to manage permissions effectively.
  4. Use role capabilities wisely: When creating new roles or editing existing user roles, make sure to assign the appropriate capabilities. Be careful not to assign too many capabilities to a role, as this can increase security risks.
  5. Regularly review and update user roles: As your website evolves and grows, it's important to regularly review your user roles and permissions. Do this to ensure they still meet your needs. Update roles as necessary and remove any unnecessary roles.
  6. Use a trusted plugin: Make sure to use a trusted WordPress user roles plugin that is actively maintained and regularly updated. This will help ensure compatibility with the latest version of WordPress. It also reduces the risk of security vulnerabilities.

So, which is the best WordPress user roles plugin?

Whether you need to create new user roles or restrict content based on those user roles, there are plenty of excellent plugins available.

You can:

  • Create new roles and change permissions with a free WordPress user roles plugin.
  • Install Password Protected Categories to restrict user access to parts of your website based on user role.
  • Alternatively, if you're using WooCommerce then check out the plugins for adding role-based features to your store.

Have you experimented with a WordPress user roles plugin? Let us know how they're performing for you.

How to create a Password Protected page using a plugin on WordPress (Complete Guide)

A password protected WordPress page lets you restrict access to content on your website. Discover the easy way to password protect any part of WordPress including whole groups of pages, categories, posts, and more.

A password protected WordPress page lets you restrict access to content on your website. This is perfect for anyone that wants to offer exclusive content to specific users only, or hide content from regular visitors.

While WordPress offers the basic facility to password protect a page, it has some major limitations. Most site owners need a more professional way to create hidden and password protected pages, posts and other content.

Fortunately, there's an easy solution. The best way to create a password protected WordPress page is by using the Password Protected Categories plugin. Keep reading this tutorial to learn how to use it to create any type of password protection for the content on your WordPress site.

How to password protect an individual WordPress page (and why you shouldn’t bother!)

First, let's look at how to password protect a page in WordPress without a plugin, and why it's a bad idea.

Creating a password protected WordPress page is actually pretty simple:

  1. Start by navigating to the page’s edit page screen.
  2. Click on the Visibility button then select Password Protected.
  3. Now enter a password and click on the Update button to continue.
Password protected WordPress page

Here’s how users will be able to enter a password and access the password protected WordPress page from the front-end:

Front-end password form

There are several problems with this approach:

  • It's time-consuming to set up because you have to password protect each WordPress page individually. There's no way to password protect multiple WordPress pages at once or an entire WordPress site, using a single password.
  • In addition to this, it is also not user-friendly for site visitors due to limitations in the way WordPress uses cookies. Your website visitors will have to enter the correct password for each page they access on your website, even if you’ve used the same password to protect multiple pages 🙀
  • Site visitors who don’t have the password can still see certain parts of content from the restricted page. It doesn’t fully hide the page from people who don’t have access. This looks unprofessional.
  • Unauthorized users will still be able to see restricted content in public areas of your WordPress site including sitemaps, search engines, widgets, and newsletters. As a result, this can cause poor SEO and lead to confusion. They will be able to partially see your page in SERPs but not actually visit them.
  • There's no way to customize the wording of the login form for password protect pages.

As you can see, password protecting individual WordPress pages isn't ideal. Luckily, there's a better way.

A better solution: Use the best WordPress password protected page plugin

The best way to create a WordPress password protected site or page is by using a plugin specifically designed to let you restrict content by using secure passwords.

Password Protected Categories is the perfect WordPress password protected page plugin. It offers an intuitive way of password protecting certain parts of your site while improving user experience.

Here's why it's better than password protecting individual pages:

  • It's quick and easy to set up because the password protection works at category level rather than per page.
  • Users enter a single password to unlock entire groups of pages - no need to enter passwords multiple times.
  • The Password Protected Categories plugin automatically hides protected pages from search engines and from real users who haven't entered the password.
  • You get a fully customizable login form.
  • If some of your users already have an account on your WordPress site, then they can bypass the password protection. For each password protected category, simply select the user roles or even specific users who should have automatic access.

The Password Protected Categories plugin works for any post type including WordPress pages, WooCommerce pages, and blog posts. It also offers an easy way to password protect any other custom post type on your WordPress site. It's mnot just for password protecting pages 🚀

This method is also great if you're building a membership site: you can password protect only your premium post categories, leaving you with the rest of your site public. This is a better option than using a membership plugin as it's so much simpler to set up.

Hide password protected pages and categories

The Password Protected Categories plugin offers a great way to hide password protected categories and all the pages within them from the public parts of your site. This way, people won’t even know the selected password protected WordPress pages exist unless you want them to.

Alternatively, you can leave the password protected pages visible on your public site. When people click on them, they will be promoted to enter the password. Unlike with pages that use the basic WordPress password protection, you can customize the login form. That way, you can add a clear message explaining that the page is password protected and what to do next. That way, you get the best of both worlds for people with and without the password.

No need to password protect pages individually

The password protected pages plugin offers an intuitive setup. All you need to do is set a password for any category of pages and the plugin will cleverly protect all the pages within that specific category.

This way, you save a lot of time password protecting multiple pages on your website.

Better for your users

The Password Protected Categories plugin also offers an easy login experience for people who have the password. You redirect users to an attractive login page where they can enter the password and instantly be redirected to the category of pages that matches the password.

Then, users can access all the pages in that specific category and subcategory, without having to re-enter any passwords. They can freely navigate the restricted content and jump through multiple pages without being distracted by a login form page over and over again.

Supports multiple passwords

You can also create multiple passwords and assign them to specific categories using the WordPress Password Protected Categories plugin.

Alternatively, create multiple passwords for the same group of pages. Give each password to a different user. This means that you can easily revoke (i.e. delete) a password for people who no longer need access.

User and role protection

Additionally, the plugin lets you restrict page categories to specific logged-in users only based on their user role or username. This is a great way to offer exclusive content or create a “members-only” area on your website.

The best way to use this is to give normal passwords for people who don't have their own user account. If you're giving access to anyone who does have an account, don't waste their time by giving them a separate password. Instead, just edit the category and give access to that user. They will automatically get access whenever they're logged in, while everyone else must enter the password.

For your own ease of use, we also recommend giving the Administrator user role access to your password protected categories. That way, you can view them without needing to enter the category password.

How to password protect WordPress pages and other content

Next, I’ll show you how to password protect WordPress pages easily in three simple steps. For this, you’ll need a WordPress site along with the Password Protected Categories plugin.

Additionally, if you want to protect pages then you’ll also need a plugin that allows your WordPress pages to be categorized. We’ll be using the free Easy Post Types and Fields WordPress plugin to create page categories.

Step 1: Install Password Protected Categories

Once you’ve created and added page categories to your WordPress website, install the Password Protected Categories plugin on your website.

Activate the plugin and follow the instructions in the setup wizard. Untick the Show Categories? checkbox to make sure unauthorized users don’t access the hidden page categories.

Step 2: Password protect WordPress pages

It’s very simple to password protect WordPress pages using the Password Protected Categories plugin.

First, you need to add categories to your pages because this isn't part of WordPress as it comes. (Skip this if you're password protecting other types of WordPress content which already have categories or custom taxonomies.) To do this:

  1. Install the free Easy Post Types and Fields plugin via Plugins → Add New.
  2. Skip the setup wizard and go to Post Types → Manage → Other Post Types.
  3. Click to add a new custom taxonomy to the 'Page' post type. Tick the 'Hierarchical' box and call the taxonomy whatever you like, such as 'Page Categories'.
WordPress page categories plugin

Once you've done that, navigate to PagesCategories (or whatever you called your page categories) and select the category you want to restrict access to.

add password to woocommerce protected categories

Hide the category by selecting the Password protected check field under the Visibility option. You can enter your password in the text field below the selected option and add multiple passwords using the (+) button. Optionally select any users or roles who should have access without needing to enter the password.

Once you’re done, press the Update button to save changes.

Step 3: Create a login form

Now, we want to create a central login page for all your password protected WordPress content.

Navigate to PagesAdd New to create a new login page and customize it however you want. Paste the [category_login] shortcode in the login page you just created and click on the Publish button to continue.

You can customize your login page using the Password Protected Categories plugin. Head on over to SettingsProtected Categories from the WordPress admin panel. Here, you can customize the button text, the title, the login form message, and the password label. Once you’re done click on the Save changes button to continue.

Users will be able to access your content by entering any of the passwords assigned to the specific page category. Here’s how the password form looks on the front-end of your WordPress site:

Password form preview front-end

Once the user enters their passwords, they will be able to access all pages or all restricted content which use that password.

FAQ

Now we know how to password protect WordPress pages and other types of content, let's go through some common questions.

How do I password protect my entire WordPress site?

In this article, we have focussed on making specific areas of a WordPress website private. If you're wondering "How do I make my WordPress website private?" then that requires a slightly different solution.

To password protect an entire WordPress site, you can use Password Protected Categories and put all your content within private categories. Alternatively, check out our article on 5 ways to password protect an entire WordPress site.

How do I password protect a WordPress directory?

Some people want to password protect what they refer to as directories on their site. If you're talking about a directory on the front end, then this is basically the same as a category of custom taxonomy. As a result, you can do it with the Password Protected Categories plugin which works with any type of category or taxonomy.

How secure is my WordPress site with password protection?

Password protection is not the most secure way of restricting access to a WordPress site. That's because passwords only offer a single layer of security and there's no 2-Factor Authentication (2FA). In addition, passwords can easily be shared because they're not linked to user accounts.

I only recommend using password protection to protect content that you want to hide from public view, but which is not particularly sensitive. For example, a password protected portfolio normally needs to be restricted but isn't very confidential.

For more confidential website content, it's better to use the 'Role' or 'User' options in Password Protected Categories. These integrate with WordPress user accounts which are much more secure.

Is it possible to password protect parts of a WordPress page?

The Password Protected Categories plugin only lets you restrict access to enter categories and their pages or posts. If you wanted to protect parts of a page then you'd need a plugin which comes with a shortcode to restrict access to specific content. For example, you can do this with Advanced Access Manager (see their tutorial about this).

Password protect WooCommerce stores, products or categories

If you have a WooCommerce store, you might need to password protect your entire store, an individual product, or specific product categories. Just like password protecting a standard WordPress website, it's easy with the right plugin:

  • To password protect an entire WooCommerce store, I recommend the WooCommerce Private Store plugin. This only takes a few minutes to set up and is very easy to use. You can lock your store using password protection, or automatically unlock it for specific logged in users or roles.
  • Alternatively, you can use the WooCommerce Protected Categories plugin to restrict access to specific areas within your eCommerce store. This is just like the Password Protected Categories plugin featured earlier in this article, but is purpose-built for WooCommerce products 🛒

Where to get the WordPress password protected page plugin

WordPress doesn’t offer much native functionality to password protect pages. This can cause users to still see parts of your page on search engine results pages and on your WordPress site. It's much better to use the Password Protected Categories plugin to lock down entire areas of your store.

The plugin is super-flexible and only takes a few minutes to set up. It comes with a 30-day money back guarantee, so what are you waiting for? Start password protecting WordPress today 💪

Stock Management on your WooCommerce website. Complete Guide to managing your inventory

Want to keep your customers happy? Make sure your WooCommerce stock status is always updated and provide clear messaging about out of stock and discontinued products!

Managing your store's inventory can be a daunting task, especially if you deal with customized or built-to-order items or face stock issues. It is crucial to set appropriate expectations with customers regarding their orders. Clear displaying stock availability and lead times will ensure smooth business operations. In this tutorial, we will guide you through the process of managing inventory and adding WooCommerce stock status to your store.

We will discuss how to display stock quantity and other information on your online store. We will also explore ways to showcase stock statuses to provide your customers with clear and accurate information. To do this, we’ll learn how to use the WooCommerce Lead Time plugin to display product availability and waiting times.

Moreover, we will delve into another often-overlooked topic: Managing discontinued products using the WooCommerce Discontinued Products plugin. We will discuss how this plugin can help you remove products that are no longer available or relevant from your e-commerce platform without losing any valuable data or SEO benefit. 

With our step-by-step guide, you can effortlessly manage your inventory settings and ensure that your customers have a positive shopping experience.

What is stock management?

In a nutshell, WooCommerce stock management covers every aspect of a business’s inventory management system including ordering, storing, tracking, controlling, and stock reports. It applies to every item a business uses to produce its products or services – from raw materials to finished goods.

Stock management is all about managing the products your business plans on selling. It also involves keeping a record of changes to enable stock management (or inventory) over time.

Why is stock management important?

As a store owner, you already know that inventory is a major asset that represents tied-up capital. Managing stock effectively enables businesses to free up that capital.

Efficient stock control requires smart store managers to have a solid understanding of the mix of different kinds of stock and acknowledge the demands on that stock. This helps keep a reasonable stock level thereby balancing the need for surplus supplies with the need to reduce tied-up capital.

Managing stock efficiently also helps you provide the best customer service by ensuring you have the products your customers want. In other words, it allows you to achieve supply and demand balancing. It also helps minimize loss due to excess inventory (high product level) of items that don’t sell well.

Proper WooCommerce stock management also aids in forecasting product needs and ordering accurate quantities of products. On the flip side, poor stock management can affect your business in different ways. For starters, you can easily lose sales if customers can’t buy the items they need because of low stock threshold issues.

As well as managing stock WooCommerce, you need an effective way to communicate stock information to customers. Keep reading to learn the best way to do this in your WooCommerce store.

How to manage stock in WooCommerce

There are plenty of common scenarios where store managers need to show the WooCommerce stock status on the front end:

  • Out of stock visibility of products.
  • To show the lead time between order and delivery.
  • For limited batches of products or products that are time-bound.

The WooCommerce plugin offers some stock management features out of the box. To use these features, you have to enable the WooCommerce Manage stock option. You can do this by heading over to WooCommerce SettingsProductsInventory from the admin panel.

WooCommerce enable stock

From the same screen, you can also enable stock notifications and set low-stock and out of stock thresholds for products. It also gives you the option to select a Stock display format.

Once you've enabled WooCommerce stock management, you can do the following for each product/variation:

  • Choose a WooCommerce stock status of either In Stock, Out of Stock products, or On Backorder (with or without an option to notify the customer of the backorder status).
  • Set the exact number of products in stock. When customers buy the product, WooCommerce will reduce the number in stock automatically. It will then alert you of low stock levels via email, and change the product to Out of Stock status when it runs out.

This covers the basics of WooCommerce manage stock using the default WooCommerce stock statuses. However, WooCommerce’s stock management features are pretty limited, especially when it comes to communicating stock information to customers. You might also want to create custom WooCommerce stock statuses, such as a status for Discontinued products. Keep reading to learn how to do all this.

How to display WooCommerce stock status and other information

WooCommerce only displays the stock status on the single product page for each item. This isn't ideal because:

  • The customer only finds out about out-of-stock items AFTER they click on it. They're likely to give up and look elsewhere, instead of returning to the shop page to click on a different product.
  • They have no idea how long the product will take to arrive. Some products have longer lead times, for example, if they are made-to-order or bespoke. WooCommerce doesn't provide any information about this.

The solution is to display WooCommerce stock status and other stock-related information on your main shop pages. You can easily do this with the WooCommerce Lead Time plugin.

WooCommerce Lead Time lets you:

  • Display the lead time and WooCommerce stock status directly on the WooCommerce shop and category pages. Customers can see this vital information before they click on each product.
  • Show a clear message about when the customer can expect to receive each item.

It’s the perfect solution for selling custom, made-to-order, or non-stock products and to give customers the correct information before they make purchase orders.

WooCommerce Lead Time is incredibly lightweight and works with whatever theme you’re already using on your online store. It gives you complete control over the WooCommerce stock status. As a result, you can increase transparency with your customers.

You also get access to highly-rated customer support which can help you every step of the way.

Here’s what you need to do to display the WooCommerce stock status and other information in your store:

Step #1: Get the WooCommerce Lead Time plugin

Get the WooCommerce Lead Time plugin if you haven’t done so already. You’ll receive the plugin files and license key in a confirmation email.

Log into your WordPress website and install and activate the plugin. Go to WooCommerce SettingsProductsLead time from the admin panel. Enter your license key and click the Save changes button to continue.

Step #2: Show WooCommerce stock status and lead times in your store

You can use the WooCommerce Lead Time plugin to show stock status information and lead times in prominent places in your e-commerce store. This includes the shop page, category pages, product pages, cart pages, and checkout pages. You can also set it up to show WooCommerce lead times in order detail emails.

By default, it’ll look something like this:

Display product lead time WooCommerce shop page

As you can see, WooCommerce Lead Time can display both the product stock status and lead time on the shop page and category pages. This way, customers can see which products are in stock before they click on them.

Doing this helps you enhance the shopping experience on your online store. Customers no longer have to click through to each product to find out if the product is available for purchase. With the WooCommerce Lead Time plugin, they can quickly see the product stock status at a glance when they’re browsing the shop page or category pages.

Alternative method 1: Display WooCommerce stock status in a product table

Another way to show WooCommerce lead times on the shop page or on category pages is by using the WooCommerce Product Table plugin. It lets you list products anywhere on your website. All you have to do is add a stock and lead_time column to the table:

WooCommerce Lead Time Product Table Integration

Other columns you can display include SKUs, images, price, and add-to-cart buttons.

Alternative method 2: Display WooCommerce stock status in a quick view lightbox

A third way to display the WooCommerce stock status and lead time is by using the WooCommmerce Quick View Pro plugin. It works by adding quick-view buttons on your shop and category pages. Customers can view product information – including the lead time – in a quick view lightbox:

WooCommerce Lead Time screenshot with quick view plugin

WooCommerce Lead Time lets you display the lead time on the cart and checkout pages. However, you can also use WooCommerce Fast Cart if you want to shorten the purchase flow. By doing this, you can display the lead time in a pop-up cart.

Step #3: Set the processing time

Using WooCommerce Lead Time, you can set the processing time globally or per category, simple product, or variation (variable products).

WooCommerce Lead Time plugin settings

You can set the processing time globally by going to WooCommerce SettingsProductsLead time and entering the lead time in the Global lead time field.

WooCommerce category lead time plugin

To set the processing time on a product category basis, go to ProductsCategories and choose either Static (enter static lead time text) or Dynamic (calculate the processing time dynamically) using the dropdown from the Lead time field.

Set individual product lead times

WooCommerce Lead Time also lets you set the processing time for individual products (and variations). Open the product you want to set a processing time for in the Edit Product screen. Scroll down to the Product data section and click on the Inventory tab. From here, you can set the lead time for the product. You can also do this for variable products.

Step #4: Customize the lead time wording and text color

One of the best features of the WooCommerce Lead Time plugin is that it lets you customize the lead time wording and text color. This means that you can tweak it to get the exact look and feel you want.

For example, you might consider changing the custom status wording to something like:

  • Available on
  • Ready to despatch in
  • Handling time
  • Waiting time
  • Made to order

To change the text color, go to the plugin’s settings page (WooCommerce SettingsProductsLead time) and use the Lead time text color option to select a new color.

Managing discontinued products

Before we close, there’s another important area of WooCommerce stock management that store owners should be aware of.

When a product reaches the end of its natural lifecycle and will not be available for purchase again, it’s a discontinued product.

WooCommerce itself doesn’t offer a way to mark discontinued products. However, you can easily do this with Barn2’s WooCommerce Discontinued Products plugin. It adds a Discontinued custom stock status to WooCommerce. This makes it easy to mark products and variations as discontinued, without ruining SEO or marking them incorrectly as in-stock, on backorder, or out-of-stock status.

WooCommerce discontinued products plugin preview

What is the WooCommerce Discontinued Products plugin?

WooCommerce Discontinued Products is a plugin that allows users to manage and display products that are no longer available for purchase on their online store. This plugin is useful for businesses that have a large inventory of products and regularly retire old items.

By using the WooCommerce Discontinued Products plugin, businesses can remove discontinued items from their active inventory levels but still keep them visible to customers who may be searching for them. This feature can help prevent frustration for customers who may be searching for a specific item and unable to find it on the website.

Furthermore, the plugin allows for customization of the message displayed to customers who may come across discontinued products. This message can provide information about the reason for the product's discontinuation, offer alternative product suggestions, or encourage customers to sign up for email notifications if the product becomes available again in the future.

WooCommerce Discontinued Products is compatible with the other WooCommerce inventory management plugins featured in this article. For example, you can display the discontinued product message in the product table and quick view lightbox.

The easy way to provide stock information to customers

Having a WordPress plugin that helps you improve communication around WooCommerce stock status is essential for many reasons:

  • Saves time spent on repetitive tasks such as entering the same lead time for all products in a specific category.
  • Gives you data to help you better forecast stock.
  • Improves efficiency and reduces the chance of human error.
  • Prevents lost sales by helping you communicate more effectively with customers about the stock numbers.

In this guide, you've learned how to use the standard WooCommerce inventory settings to manage your stock. You're also learned how to improve communication with customers using the WooCommerce Lead Time plugin. This adds all the extras that you need for effective communication about your inventory status. For example, you can show stock statuses and lead times prominently in your store, set processing times, and customize the wording to best fit the types of products you sell.

Get the WooCommerce Lead Time plugin today!

How to set up a floating cart on your WooCommerce website: Complete Guide

Do you want to reduce the cart abandonment rate in your WordPress store? You can easily achieve this by adding a WooCommerce floating cart.

According to a study by Baymard Institute, 18% of online shoppers who abandon a cart do so because the checkout process is too complicated. The same study reveals that by optimizing your site's checkout process, you can increase conversions by as much as 35.62%.

In this post, we'll show you how to improve your store's checkout experience by adding a WooCommerce floating cart. We'll be using the WooCommerce Fast Cart plugin to do this. This method doesn't require any code and you can build your first floating cart in a few minutes.

Let's dive in!

You also have the option to watch the accompanying video tutorial here:

What is a floating cart and why should you use one?

A floating cart is a quick panel that appears whenever a buyer adds a product to their cart. It works like a mini-checkout cart that allows the customer to add or remove cart items and also change the quantity of each item without leaving the product or shop page. You can display your WooCommerce floating cart either as a popup or a sidebar.

Here are some of the ways you and your customers can benefit from a floating cart:

  • Your customers don't need to go to a separate checkout page.
  • You can push the shopper to buy more by recommending related products in the sidebar.
  • It improves your store's shopping experience and makes the checkout process faster by reducing the number of steps involved.
  • Your customers can check cart details anytime and adjust item quantities anywhere in your store.

In the end, a WooCommerce floating cart helps to improve your eCommerce site in different ways. For starters, your customers will enjoy a better shopping experience. As a result, you also get to record higher conversion rates and lower cart abandonment rates.

Now that we know what a WooCommerce floating cart is and its benefits, let's show you how to set it up.

How to set up a WooCommerce floating cart

The easiest way to add a floating cart to your store is to use a dedicated WooCommerce plugin.

If you want to offer your store visitors the best user experience possible, we recommend using a WordPress plugin like WooCommerce Fast Cart. This method not only adds a simple floating cart to your store, but the plugin also offers additional checkout optimization features.

Let's give you a quick overview of the WooCommerce Fast Cart plugin and what it has to offer.

What is WooCommerce Fast Cart?

WooCommerce Fast Cart is the best fully-featured plugin for speeding up your store's checkout process. The plugin allows your customer to launch the cart automatically from anywhere within your store.

With WooCommerce Fast Cart, your checkout options are fully customizable. Unlike other WooCommerce checkout plugins, this tool doesn't just add a simple floating cart widget.  Here are some of the other features the plugin offers:

  • Add the floating cart either as a sidebar or centered popup.
  • Preview orders, apply coupon codes and make changes to cart items.
  • Integrate WooCommerce's product recommendation feature to boost your average order value.

Using WooCommerce Fast Cart, you can either add a floating cart that redirects you to a separate checkout page or enable checkout directly from the sidebar. We'll show you how to do both below.

Adding a floating cart with a separate checkout page

Ready to create your first WooCommerce floating cart? You can do this by following these 3 easy steps. Or alternatively, watch us setting it up in this video:

Step 1: Install and activate WooCommerce Fast Cart

To start building your WooCommerce floating cart, first grab your copy of the WooCommerce Fast Cart plugin here.

Once you've gotten your WooCommerce Fast Cart license, you can now download the plugin as a ZIP file. You'll also receive an email with your license key. You'll use this key to activate the plugin later within your WordPress dashboard.

Next, it's time to upload the plugin to WordPress.

  1. Log into your WordPress dashboard. Then navigate to Plugins → Add New → Upload Plugin.
  2. Select the ZIP file you downloaded after getting your copy of the plugin and click Install Now. Once the plugin is installed, click Activate Plugin.
  3. The next step is to activate the plugin's license. To do this, go to WooCommerce → Settings → Fast Cart, and enter your license key from the email. Then click Activate.

Congratulations! Your copy of the WooCommerce Fast Cart plugin is now ready for use.

Now it's time to customize your WooCommerce floating cart.

Step 2: Customize your WooCommerce floating cart

To customize your floating cart, go to WooCommerce → Settings → Fast Cart and scroll down to the Content tab.

Woocommerce fast cart customization options

Each section allows you to customize your cart in different ways:

  • Content Here, you can choose the floating cart's layout (sidebar or centered popup), the elements to add to it (product images, prices, etc.), or enable auto-open. This displays the floating cart every time a buyer adds a product to the cart. You can also allow customers to check out within the fast cart by enabling fast checkout. Since we want the buyer to go to a separate checkout page, we'll disable fast checkout.
  • Cart icon In this section, you can choose to display a small floating cart icon either at the top, center, or bottom right corner of the page. Shoppers can then click this icon to see the full sidebar.
  • Replace pages This option replaces the default cart page with the floating cart.
  • Design You can also use hex codes to set the colors of different elements of the floating cart like the icon, text, and background.

When you're done, click Save changes.

Step 3: Test your new floating cart

The last step is to ensure that all your new floating cart settings are working properly. Here's how to do that:

  1. Go to the store's frontend by clicking Visit Store in the top left corner of your WordPress dashboard.
  2. On your shop page, select any product and click Add to cart. The floating cart should appear immediately. Test different features like adding an item or applying a coupon code and click Checkout.

You should be redirected to a separate checkout page.

Adding a floating cart with fast checkout

You can also use WooCommerce Fast Cart to add a floating cart that allows the customer to check out without going to a separate checkout page. To do this, go to WooCommerce → Settings → Fast Cart and check the 'Allow fast checkout' box.

Allow fast checkout in WooCommerce floating cart within WooCommerce Fast cart plugin settings

Now the buyer can easily complete the check process right within the WooCommerce floating cart.

Other tips and tools for optimizing your store's shopping experience

For an even faster checkout experience, you can use WooCommerce Fast Cart to add a direct "Buy It Now" option to your store. To do this, check the 'Direct checkout' box on the plugin's settings page.

Add buy it now option to WooCommerce store

Now once a buyer adds a product to the cart, they'll be redirected to checkout immediately. They'll also be able to see all the items in the cart.

Finally, let's take a look at 3 other WooCommerce plugins you should also try.

WooCommerce Quick View Pro

The WooCommerce Quick View Pro plugin adds a Quick view button to your WooCommerce products. This allows your customers to select from multiple buying options in a popup without going to the individual product page.

WooCommerce quick view pro in action

WooCommerce Product Table

If you own a WooCommerce wholesale store, then you should be using the WooCommerce Product Table plugin. It allows you to list your products in an organized and flexible way. This way, your customers can apply different filters, select product variations, and add multiple products to the cart quickly.

WooCommerce product table plugin in action

WooCommerce Restaurant Ordering

Another WooCommerce plugin we recommend is WooCommerce Restaurant Ordering. This plugin is ideal for restaurants and other made-to-order websites where customers can select products from different categories like 'Starters' and 'Deserts', all on the same page. Combined with the WooCommerce Fast Cart, your customers can order food in the fastest way possible.

WooCommerce Restaurant ordering in action

In general, delivering the best shopping experience in a professional-looking WooCommerce store requires some A/B testing. The only way to know what's best for conversion and customer satisfaction is to try out different colors, sizes, and positions for your floating cart.

Where to get the plugins

Optimizing your WooCommerce store for sales requires a lot of effort. In this post, we demonstrated how to use WooCommerce Fast Cart to create a floating cart that allows customers to add and edit products in their cart without leaving the product page.

We also considered WooCommerce Quick View Pro, WooCommerce Product Table, and WooCommerce Restaurant Ordering. These plugins make it easy for buyers to choose from multiple buying options and add multiple products to their cart, all from one page.

Are you ready to add a WooCommerce floating cart to your store? Get started with the WooCommerce Fast Cart plugin today.

WordPress document management

If you have documents you want to share with your audience, customers, or employees, then implementing a WordPress document management system is the way to go. While this might sound like you need a team of developers, you’re in for a treat. Adding a WordPress document library to your website has never been easier. All you need is a WordPress document management plugin.

In this article, we’re going to take a closer look at how you can use WordPress for document management. Plus, we’ll walk you through how to do this with the WordPress document management plugin, Document Library Pro.

WordPress document management

A good file management system is hard to come by these days, which is why the best WordPress document management plugin needs the following to hit it out of the ballpark:

  • Help you manage your documents outright in your WordPress dashboard area.
  • Display the documents on the front end for your customers.
  • Have an easy way to search and find the documents.

The Document Library Pro plugin checks all of those marks. Not only that, but it will give you the flexibility you’re looking for to make it quick and easy for your customers to find the documents they need. Especially if you have a high number of documents on hand.

What does a WordPress document management plugin need?

WordPress document library

The best document management systems have a few things in common.

Easy and flexible to use

A good document management plugin makes it very easy to add documents. There are various methods of adding a document, depending on the type. With the Document Library Pro plugin, you have the flexibility to choose which method is the most effective for you.

Here are the ways you can add documents to your library:

  • Manually upload a single file.
  • Do a bulk import load (many files).
  • Drag and drop a file.
  • Select files from your Media Library.

Separate backend section

It’s easy to get lost in the WordPress admin area, especially if you have a lot of plugins installed, or custom enhancements.

You want your document library to be easy to view and manage, as well as have it separated from your other items in the WordPress Media Library. There’s nothing more frustrating than having to look for your documents and wasting time doing so.

Search function capability

Your customers are used to Googling all day long and expect their searches to be just as smooth on all other websites they land on.

With the Document Library Pro plugin, you’ll automatically have your documents displayed in a searchable library on the front end of your website. Giving your customers the experience they’re looking for.

Multimedia support

The reality is that everyone consumes content differently. Depending on your documents, or who your audience is, you want to be able to upload different file types successfully. Whether that’s a PDF, presentation, image, audio, video, etc.

The Document Library Pro plugin will add and store your documents in WordPress and then display them in a searchable document management system.

Let’s see how it does this in action.

How to add document management and display to your WordPress site

Once you have your document management system set up and customized, all you need to do is maintain it.

But before we get to the maintenance portion, let’s go through the steps to add and display your documents on your WordPress site. Read the written instructions below, or watch this video:

Step 1: Install Document Library Pro

First, download the Document Library Pro plugin from the Barn2 website.

Once you’ve purchased it, you need to take the following steps:

  1. Go to Plugins → Add New → Upload Plugin.
  2. Choose the zip file you downloaded, upload, and then click Activate.
  3. Go to the newly visible Documents → Settings and enter your license key.

With the document management plugin now installed, we can move on to setting up your document management in WordPress.

Step 2: Decide how you want your document management system to look

You probably have an idea of what you want your document management system to look like. This is where we’re going to set up that look and feel for you.

Since you’re already in the Documents area, go ahead and click on the ‘Document libraries’ tab to start the personalization. There are over 50 options, so the document management system is completely customizable.

Document management system structure:

Layout - The most important decision is whether you want to display the documents in a grid or table layout. Choose grid if you want to make each document really prominent. Alternatively, choose table if you have a large number of documents and need the document management system to be easily searchable.

Folders - If you prefer your document management system to be structured in folders, instead of being displayed as a single list, go ahead and check this box. You’ll get one folder for each category you assign in your document management system.

Columns - Similar to a spreadsheet, you can assign the columns you want your audience to see. Examples of columns are document name, description, published date, file type, and download link. You can rename the columns at any time, should you want to.

WordPress document management

Document management system links:

  • Link style - For your download link column, you can assign it a button, a text link, or a file type icon depending on your personal preference.
  • Link text - In fact, the download link column doesn’t have to be a download. You can change the text to something else such as ‘View’ or ‘Read’ if that makes more sense for your document.
  • Clickable columns - Here you have the ability to assign each document its own individual page, whenever someone clicks on its link. If you don’t want to have an individual page for each document, then make sure this option is set to ‘none’.

Document preview - Enable a preview option for your audience to view the document online.

Search box - If you have a high number of documents in your document management system, you’ll want people to have an easy way to find what they’re looking for. Enable this option to add a keyword search box.

Document management system extras (table layout only):

Lazy load - Do you have more than about 20 documents in each table on your website? If so, enable the lazy load option to ensure a faster loading time.

Search filters - If you create categories, tags, or a custom taxonomy for your documents, you’ll want to be able to filter through them (go to Documents → Categories to create, edit, and delete categories, and Documents → Tags to create, edit, and delete tags). Add filter dropdowns to help your audience find the documents they’re searching for more easily.

Design - The document management plugin integrates directly with your theme and will fit in automatically on your website. If you do want to restyle it, you can do so in the design settings.

wordpress document library settings

Now that you’ve configured your WordPress document management system, and saved your changes, you can start adding documents to it.

Step 3: Add your documents

Before we add a document, let’s first define what a document means. A document in your library can be any of the following:

  • A (downloadable) file that’s uploaded in your WordPress Media Library section. This can be any file format you choose, such as PDF, image, or PowerPoint.
  • A (downloadable) file that you have on an external platform such as Dropbox or Google Drive.
  • A resource that’s readily available for reading directly on your website. It doesn’t have to be downloaded.
  • A resource that’s embedded directly on your webpage.
  • A link to a webpage (on your website, or a different one).

As mentioned previously, there are several ways to add a document.

Manually

Similar to adding a page or a post in WordPress, you can now add a document in this fashion.

Here are the steps to do so:

  1. Go to Documents → Add New.
  2. Add the name, description, and other relevant information you want to display.
    create document wordpress
  3. In the main content area, you can add the full document, write a description, or leave it blank.
  4. In the ‘Document Link’ section, choose one of these options:
    1. File Upload - Upload a file for your audience to download.
    2. Custom URL - Add the URL of the document’s location.
    3. None - Choose this if you’re embedding the document into the main content area instead of having it as a clickable link.
      upload document wordpress
  5. Click Publish to add the document to your document management system.

Drag and drop

If you have many files you want to add to the document management system at once, then you can use the drag and drop upload. Here’s how to do that.

  1. Go to Documents → Import.
  2. Choose the files you want to add from your desktop or folder.
  3. Drag and drop the files straight onto the page.
  4. Go to the ‘Documents’ section in your admin area to view them.
import documents wordpress

Bulk import

Add all your data and compile it into a CSV file to upload it to WordPress. This is useful if you have a large number of documents you want to add automatically. Here’s how to do that.

  1. Use a spreadsheet program such as Excel to add all of the information into a CSV file. (Download a sample CSV file).
  2. Go to Documents → Import.
  3. Follow the instructions on the screen to upload your CSV file. You can map your columns from your CSV file to the fields in the document management system to connect them.
csv import documents wordpress

Select from Media Library

If you’ve previously uploaded your documents to your WordPress Media Library, then you can select and add them in seconds. Here’s how to do that.

  1. In your admin area, go to the ‘Media’ section.
  2. Switch to the list view if you’re on the grid view (click the icons on the top left to switch).
  3. Select all the files you want to add to your document management system.
  4. Select ‘Add to document library’ from the bulk actions dropdown list.
  5. A link will appear to view your documents. Click on it.

All these methods support any file type (PDF, JPG, PNG, DOCx, etc).

bulk document management wordpress

Now that you’ve added all the documents to your WordPress document management system, you need to manage them.

Step 4: Easy WordPress document management

Now that your WordPress document management system is live, it’s important to manage and maintain it on a consistent basis. The Document Library Pro plugin makes WordPress document management a breeze to accomplish.

Given that your document management system lives on its own, separate from your WordPress Media Library, you can manage your documents in the back-end of your website easily. This is where you’ll be able to find and filter your documents before you make any changes.

There are several things you can do to manage your documents properly. Here are some best practices.

Updating a document - If you need to replace a document, go to the ‘Edit Document’ page (just like you’d edit any other WordPress page/post) and click on ‘Replace File’ on the top right-hand side of the screen. Follow the same steps as you did when you added a file to replace it.

If you make frequent changes to your documents, you might be better off overwriting the information. If that’s the case, then you’ll need to download and install the free Enable Media Replace WordPress plugin. This plugin also ensures that you don’t have duplicates on hand as it will overwrite the older version with the newer one (without changing the URL or breaking the link).

Displaying the version/modified date - For up-to-date information, add the latest version number to the document name. This way it will appear in the ‘title’ column on your WordPress document management system. You can also add/display a ‘date_modified’ column to your document to show the date when you last updated/saved it.

Update the categories/tags - If you’ve created categories or tags, keep track of them as the list grows bigger. Make sure the structure and hierarchy are still relevant as time goes by. Keep it organized and clean so that it makes sense for the documents you have available.

Now that you’ve added and managed your documents properly, let’s take a peek at what they look like on the front end of your website.

Step 5: View your documents

When you installed the Document Library Pro plugin, a page was automatically created and titled ‘Document Library’. That’s the page we’ve been tweaking, personalizing, and adding documents to. Let’s see what it looks like now.

  • Go to ‘Pages’ in your WordPress admin area.
  • Find the page ‘Document Library’.
  • Click on ‘View’.

This is your document library page where your documents are listed, according to the settings you chose in the ‘Documents’ section. As a reminder, this is what your audience sees, as it’s on the front-end of your website.

document library example wordpress

Or if you're using the grid layout then it might look like this:

Grid layout document library tiles

Here you’ll find the categories, filters, columns, and document links you chose to display. Depending on your preferences, you can now see if you want to make any changes to the layout or design of your document library.

If you do want to make tweaks to it, go back to your WordPress admin area, to the Documents → Settings section, and play with the options.

Lastly, if you want to make your document management system visible on your website’s menu, go to Appearance → Menus and add the ‘Document Library’ link to the navigation menu.

Now that you’ve added, managed, and viewed your documents with the Document Library Pro plugin, you’re officially done with the setup.

If you’re interested in learning about advanced settings and up-leveling your document management system for easier WordPress document management, then here are some extra bonus tips.

WordPress document management bonus tips

To take your WordPress document management system to the next level, here are some tips to do so.

Make your document management system private

If you want your document management system to be private or hidden (or parts of it), there are several things you can do to make that happen.

  • Create a private site for the document management system.
  • Password protect your document management system.
  • Restrict your document management system to certain users.

Let’s explore some of these options in more detail.

Create a private document management system

If you want to have a standalone document management system website that’s hidden from the world, you can make it completely private. Only people with the password can access the website. To password protect an entire website, you’ll have to either ask your hosting company if they have .htaccess protection or install a Password Protected plugin on your WordPress site.

With either option, people will have to enter a password to access your site as a whole.

Password protect your document management system

You have a few options to explore. You can:

  • Hide your document management system with the Password Protected Categories WordPress plugin.
  • Choose which documents you want to make private (and which ones are public).
  • Show different documents to different people.

Each one of these options can be achieved by password-protected one or more of your designated categories within your WordPress document management system. It’s only with a password that a user can unlock a category and view the documents.

Restrict your document management system to certain users

If you want maximum security on your documents, then this option might be more suitable for you. By restricting your document management system, you can hide all of your documents, just a few, or show different documents to each user.

You’re going to have to create a separate user account for each individual you want to give access to the document management system. The Password Protected Categories plugin allows you to restrict the categories to specific user roles (or individual ones if you want).

Update documents without replacing the title

If you want to replace a document, there are two ways to manage that without having to replace the title.

  • You can click on the ‘Replace File’ link and upload a new version of the document in the ‘Edit Document’ area
  • You can use the Enable Media Replace plugin to replace the original file in your Media Library with an updated version.

Track your document management system interactions

If you’re interested in tracking how your audience interacts with your documents, you can use Google Analytics to do that. With the Document Library Pro plugin, you can set up Google Analytics to track how your document downloads.

Automatically expire documents to save on manual management

To reduce the amount of time you spend managing your document management system, you can set an expiration date on your documents so that they get automatically removed.

While this is not a feature of the Document Library Pro plugin, you can achieve this with the free Post Expiration Date plugin.

Get to grips with WordPress document management

Having a WordPress document management system can help make your website more organized, efficient, and impactful for your audience.

With the Document Library Pro plugin, you can make this come to life with a few simple clicks.

WooCommerce Buy It Now Plugin

By default, WooCommerce stores are built around a relatively slow purchase process. By using a WooCommerce buy now plugin, you can cut minutes off the purchase time for every customer. This will make a huge difference to your conversion rate and bottom line.

When you use WooCommerce as it comes, the customer journey is spread across multiple pages. Customers visit a separate page for each product, choose options, and add the product to their cart. When they’re done, they progress to a cart page to review their order. And, finally, they reach the checkout page to enter their shipping and billing information.

As you can imagine, such a long process will inevitably lose some customers along the way. This hurts your conversion rate, reducing your sales and revenue.

Fortunately, there's a better way. In this article, I’ll show you how to add WooCommerce buy now buttons to your store with a plugin called WooCommerce Fast Cart. 'Buy It Now' speeds up the customer journey, helping to boost your conversion rate. I'll also share some tips on how to speed up shopping even more.

You can also watch this video, which shows you how to add WooCommerce buy now from start to finish:

How does WooCommerce Buy Now work?

The WooCommerce Fast Cart plugin adds a ‘Buy now’ option to WooCommerce. Basically, it opens the checkout in a pop-up on the same page as soon as you add a product to the cart. Customers can either continue shopping or complete their purchase straight away.

Here’s how it works:

  1. The customer starts by adding a product to their cart.
  2. The checkout automatically opens in a pop-up window. It’ll either be on the right-hand side of the page or in the center.
  3. Existing customers who are logged into their accounts will see their address and billing information already filled out in the form. So, they simply need to click the Complete button to complete their order and buy now. If you’re using a payment gateway that allows customers to save their credit card details then customers will be able to Buy Now without re-entering payment information.
  4. Guest users can log in to their accounts and have their information populated automatically. Or, they can enter it straight into the pop-up and complete the WooCommerce Buy Now process.

WooCommerce Buy It Now with PayPal Checkout

If you prefer, you can show the cart contents in the pop-up instead of the checkout. All you have to do is install the PayPal Checkout plugin and it will display a PayPal Checkout button in the pop-up.

WooCommerce mini cart preview

That way, customers can Buy It Now with PayPal instead of using the WooCommerce checkout.

How can WooCommerce Buy Now improve my sales?

Speeding up the purchase process is incredibly important. In fact, according to the Baymard Institute, 18% of US online shoppers have abandoned an order solely due to a “too long or complicated checkout process”.

With the WooCommerce Fast Cart plugin, you can speed up your store's purchase process and deliver a good user experience to shoppers. This makes them more likely to complete their order, without getting lost, fed up or abandoning their cart.

Tutorial: How to add Buy It Now to your store

Next, I'll explain how you can set up the WooCommerce Fast Cart plugin to let customers Buy Now from your online store.

Start by getting the WooCommerce Fast Cart plugin if you haven’t done so already. You’ll receive a license key in the confirmation email.

Fast Cart license key

Install the plugin on your WordPress website and activate it. Next, head over to WooCommerce Extensions from the admin panel to activate the license key and start using the plugin.

WooCommerce Fast Cart settings page

Once that’s done, here’s what you need to do to add WooCommerce Buy Now buttons to your store:

  1. Enable the floating cart icon by ticking the checkbox next to the Floating cart icon option. You can also set the position of the WooCommerce floating cart icon using the Position option.
  2. Next, scroll down to the Auto open section to decide when to open the buy now buttons pop-up. You can set it to auto-open whenever products are added.
  3. The WooCommerce Fast Cart plugin lets you choose the layout of the checkout pop-up. You can select either Side cart or Centered popup.
  4. To let customers check out in the fast cart pop-up, tick the Allow fast checkout checkbox. You can also choose to show or hide the Direct checkout option.
  5. The WooCommerce Fast Cart plugin also lets you choose what to show in the checkout pop-up. You can choose to include product images, subtotals, prices, quantity pickers, delete buttons, coupons, 'Keep Shopping' button and cross-sells.
  6. Finally, you can design and style the checkout pop-up to match your theme and brand colors. And, once you’re done configuring the plugin settings, click the Save changes button to continue.

Changing the 'Add to Cart' button text

So far, we've added a mechanism to trigger the checkout process upon clicking the Add to Cart button. But the text on the button is still displayed as 'Add to Cart'. Let's see how you can change this to 'Buy Now', 'Book Now', or any other custom CTA text.

Add to cart to buy now

For this, you'll need our WooCommerce Custom Add to Cart Button plugin. You can get this plugin from the WordPress repository for free and install and activate it on your website.

Once you have activated the plugin, here's how you can change the Add to Cart button text.

  1. In the WP admin dashboard, go to Appearance → Customize. This will load the WordPress live customizer.
  2. Go to WooCommerce → Add to Cart buttons and change the Add to Cart button text with your custom text. Here, I'm changing it to Buy Now.
  3. You can also enable/disable the shopping cart icon in the buttons to make them look more appealing using the checkbox below.
  4. After making the required changes, hit the Publish button.
buy now button text custom

Let customers find and add products to the cart more quickly

So far, we’ve talked about how to display a WooCommerce buy now option after customers add products to the cart. However, out of the box, WooCommerce still doesn’t make it easy for customers to find and add products in the first place.

You can speed up the early parts of the purchasing process and grow your sales even further. The best way to do this is by allowing customers to find products, select options, and add to the cart without having to visit a separate page for each product.

I recommend the following WooCommerce plugins for this – you can use them alone, or together for best results:

WooCommerce Product Table

The WooCommerce Product Table plugin is perfect for letting customers ‘Buy It Now’ with multiple products at once.

The ‘Buy It Now’ feature makes it quicker for customers to complete their purchases. However, a downside can be that they only buy one product at a time. This is bad for your average order value.

If you sell lots of products, you can easily get around this problem by using the WooCommerce Product Table plugin. The plugin lists products in a one-page order form layout:

product table buy now cta text

I recommend configuring the WooCommerce Product Table plugin to display multi-select checkboxes so that customers can set quantities, choose variations, and tick multiple products before adding them all to the cart at once.

WooCommerce buy now checkout

WooCommerce Fast Cart then takes over and allows customers to Buy It Now.

WooCommerce Quick View Pro

The WooCommerce Quick View Pro plugin provides another way of adding products to the cart without having to leave the page. It displays a quick view lightbox for each product. Customers can view more information about each product and add it to their cart instead of having to visit the single product page.

Quick view buy now

This is a simple and neat way of cutting an extra page out of the buying journey.

Quick view lightbox and popup

You can use whichever plugin you’d like to speed up adding products to the cart. Once the customer adds the products they’d like to purchase to their cart, the WooCommerce Fast Cart plugin takes over and allows customers to Buy It Now.

Where to get the plugins

WooCommerce is fantastic, but doesn't always make things easy for the customer. You can easily fine-tune the customer journey by speeding up each stage of the process:

  1. Use Product Table and/or Quick View Pro to make it easier for customers to find products and add them to the cart, all from one page.
  2. Use WooCommerce Fast Cart to add WooCommerce buy now buttons to your online store. It lets customers skip the cart page and fill out the checkout form from a pop-up. They remain on the same page throughout the process.
  3. Use WooCommerce Custom Add To Cart Button plugin to change the Add to Cart button text with any custom text.

That way, customers can quickly buy multiple products and place their orders in the fewest number of steps.

Ready to add WooCommerce buy now buttons to your store? Get the WooCommerce Fast Cart plugin today.

WooCommerce variation prices plugin

If a product has variations with different prices then WooCommerce always displays the price as a range. This could be losing you sales. That's why you need the WooCommerce Variation Prices plugin.

Imagine that a product has variations that are priced between $10 and $25. WooCommerce will display the price as $10.00 – $25.00 throughout your store. The problem is that this often isn’t the best way to sell your products and can put customers off, resulting in lost sales.

Keep reading to discover the easy way to take control over how variation prices are displayed in your store. You'll learn how to list all variation prices separately, replace the price range with a "From" or "To" price, or even create your custom variation price format.

What's the best way to set different prices for product variations in WooCommerce?

Out of the box, if a product has variations that have different prices then WooCommerce will always display the price as a range. There's absolutely nothing you can do to change this, short of writing custom PHP code. It doesn't matter that displaying a price range might not be the best way to attract customers - that's the only option.

Fortunately, you can easily fix this by installing the WooCommerce Variation Prices plugin. This lets you replace the default variation price range with an alternate price format of your choosing.

You can choose to display the minimum variation price only, maximum variation price only, list all variation prices, or choose a custom format. Here's a list of all the different variation price formats that you can choose from:

  • Price range e.g. $50 - $100.
  • Starting price (long) e.g. From $50.
  • Starting price (short) e.g. $50+.
  • Maximum price e.g. Up to $100.
  • List all variation prices at once.
  • Hide the price at the top of the product page until a variation is selected.
  • Create your own custom variation price display format, with whatever wording you choose. As part of this, you can also change the price range separator from a dash to anything else, such as colon or other symbol.

As you can see, this variation price plugin for WooCommerce gives online store owners complete flexibility in how to display variable prices. You can even hide the price for variable products on the front-end. It also has extras such as automatically updating the main product price when the customer selects a variation.

Step-by-step: How to set up variable prices in WooCommerce

In this tutorial, I'm going to show you exactly how to change how your variable product prices are displayed. The new price format will be used wherever WooCommerce normally displays the default price range. This includes on your main Shop page, category pages, related products, and on individual product pages.

1. Set up the WooCommerce Variation Prices plugin

To start using WooCommerce Variation Prices straight away, watch the video at the start of this article. Alternatively, follow the step-by-step instructions below:

  1. Get the WooCommerce Variation Prices plugin. You’ll receive the plugin files and license key in a confirmation email. Install the plugin on your WordPress website and activate it.
  2. Once that’s done, the plugin setup wizard will open automatically. Activate your license key on the first page.
  3. Next, you can start changing the format for your variation prices. You can do this in the setup wizard, or do it later on the settings page at WooCommerce → Settings → Products → Variation prices.

2. Set the price display format

Use the Options dropdown to select a price format. The available options include:

  • Price range
  • Starting price (short)
  • Starting price (long)
  • Maximum price
  • List all variation prices
  • Hide the price until a variation is selected
  • Custom

If you choose the Price range option, you'll see the Price range separator field.

WooCommerce Variation Prices range separator

Here, you can enter a character to use as the price range separator. By default, this is set to a hyphen/dash character.

And, if you choose the Custom option, you'll see a Custom format field.

Custom variable product price format in WooCommerce

You can add any text you'd like to display here. It supports %min% and %max% tags. For example, from %min% to %max% + VAT would display the price as: "from $50 to $100 + VAT".

3. Choose product types

The option lets you choose the products types you want to apply the variation price format to.

Grouped product variation price format

You can choose to apply it to variable products, grouped products, or both.

4. Show selected variation price

Normally, the price range at the top of the WooCommerce product page remains visible even after the customer selects a variation. That's pretty limited, so you can use the WooCommerce Variation Prices plugin to change this.

When the Show selected variation price option is enabled, the main price of the product page is updated to show the price of the selected variation. This is much more user-friendly than always showing the low and high prices.

5. Bonus: Change the variation price format in the WordPress admin

So far, we've only looked at how to change the variation price format in the front end of your e-commerce store. You can also choose to show the modified variation price formats in the WordPress admin dashboard. This option is enabled by default, but you can disable it if you prefer.

Custom format preview in admin view

When is it a good idea to change the variation price format?

To help you decide whether you need the WooCommerce Variation Prices plugin, let’s take a look at some use case scenarios. These are examples of products that can benefit from displaying variation prices in a different type of price format:

Show the lowest variation price instead of the range

Online courses and other subscription products that have plenty of add-on option fields might want to show the lowest price (the base cost) only on the front-end. This is especially useful for anyone that has add-ons that significantly increase the cost of the base product.

For example, if the online course costs $99 and you give customers several add-ons such as:

  • A one-on-one session for $39 per month.
  • Access to the Discord community for $9.99 per month.

Then you wouldn’t want to display the online course’s price in a range like $99 – $147.99. That’s a huge difference. Potential learners might be put off by the highest price thinking they can’t afford the online course.

Using a WooCommerce variation prices plugin, you can instead use wording like ‘Starting at $99’ or ‘Starts from $99’.

Show the highest variation price instead of the range

Restaurants might want to display the highest price instead of the range for each item. This is particularly useful for pizzerias that sell single slices, half pies, and full pies as options. This way, the customer won’t be led to believe that a full pizza pie costs $5 when that’s the price of a single slice.

In this sort of scenario, you’d be better of displaying the prices using a separator like ‘$5 / $11.99 / $23’ to display the prices of single slices, half pies, and full pies.

Sell variations by weight

Stores that sell products by weight might want to list all variation prices or choose a custom format depending on the product. For example, meat shops that sell meat in pre-packaged variations might want to display the cost of each variation.

You can list prices on the front-end:

  • 500 grams - $5.40
  • 1 kilogram - $10.20
  • 1.5 kilogram - $15.99
  • 2.0 kilograms - $20.00

You can list the prices of all variations on the single product page.

List all variation prices WooCommerce

This is particularly useful if you want to sell product variations at different prices or offer a discount on specific variations.

Display the maximum price

Some stores might want to display the maximum price because the lowest variation price might be the price of a sample rather than the actual, full-size product. In this scenario, only the highest price matters.

For example, bakeries that sell cookies by the dozen might want to display the price of a full dozen instead of a price range that shows the price of one cookie and a dozen cookies. You could show the price as ‘Up to $25’ indicating that lower price options are also available.

Hide the WooCommerce variation price display

Other store owners want to hide or remove the WooCommerce variation price display from the product page. For example, maybe you want to hide the variation price range when customers first visit the product page. The price of the selected variation then appears when they choose a variation.

WooCommerce variable price FAQs

What's a WooCommerce variable product?

So far in this article, I've assumed you already know what is a product variation. Sorry about that!

In case you don't already know, WooCommerce comes with a choice of product types. One of these is called 'Variable product'. It allows you to create two or more options for customers to choose from.

WooCommerce product variations are useful for any type of product that is sold with a defined list of choices. For example, a t-shirt might be sold in a range of sizes and colors - so you would create a variation for each combination.

What’s wrong with the way WooCommerce normally displays variation prices?

As I mentioned earlier, WooCommerce displays product variation prices in a range that lists the lowest and the highest price. Here’s what’s wrong with this:

Showing the highest possible price

The problem with showing a range that includes the highest possible price is that it can be bad for buyer psychology. This is because you’re drawing attention to the highest possible price.

As a result, it can lose you sales and reduce your conversion rate – a disaster for any store owner!

Think of it this way: if the top of the range is above budget, the customer is likely to leave your store. Unless they select a variation with a lower price, they’ll never know which options are within their budget.

The solution is to use the WooCommerce Variation Prices plugin to change the variation price format into something more buyer-friendly.

Select a variation to see the actual price

WooCommerce requires customers to select a variation to see the actual price. If you sell products that have lots of variations, customers might be clicking around for a long time to find one with a price they’re happy with.

The solution is to use WooCommerce Variation Prices to list all variation prices at once.

Not suitable for all types of products

The default way WooCommerce displays variable product prices may simply not fit with the nature of the products you sell. For example, the lowest or highest price may be the norm and you only want to display this. Or, you might sell products by weight and need to add a ‘per KG’ price or something similar.

In this case, you’re better off using the WooCommerce Variation Prices plugin to create a custom price format that meets your exact requirements.

How many variations are allowed in WooCommerce?

WooCommerce works with unlimited numbers of variations. Once you get above a certain number of variations, they are loaded using AJAX to ensure fast load times regardless of the number.

However, I find that variations can be a pain to work with if you have a lot per product. That's because to create variations, you need to add your product attributes first (e.g. size and color). Next, you create a separate variation for every possible combination of attributes, and add a price, image, stock level etc. for each one. The number of variations quickly multiplies up exponentially if you have lots of attributes and variations.

In some cases, it's easier to use the WooCommerce Product Options option instead of variations. This provides an alternative way of adding options to products, and is much simpler than working with variations. It's also more flexible because instead of just displaying the options as dropdowns, you can choose from a wide range of styles such as checkboxes, file upload fields and clickable image buttons.

How to set different prices for product variations in WooCommerce?

When you create a variation for a WooCommerce product, it will have its own price field. Use this to add a different price for each product variation.

If you have lots of variations, then consider using the WooCommerce Bulk Variations plugin to bulk-select variations and set the price in bulk. For example, you can select all products with a 'Large' size attribute and set the price for all the large variations at once.

Next steps: Take your WooCommerce variation pricing to the next level

WooCommerce Variation Prices is perfect for store owners that don’t want to display variable product prices in the default range. It lets you choose from different options including displaying the minimum (or maximum) price only, listing all variation prices, and choosing a custom format.

Like all Barn2 plugins, WooCommerce Variation Prices comes with a full 30-day money back guarantee. This lets you try it risk-free on your store and get a refund if you're not happy for any reason.

This super-simple plugin only takes a few minutes to set up. Install it on your WordPress site and follow the simple instructions in the setup wizard to improve the way variable product prices are displayed in your store. It's a simple but important change that will change how customers perceive your pricing, helping to generate more sales for you 🔥