Did you know that if you use Easy Digital Downloads to sell to EU customers, then you must meet EU VAT rules - even if you're not based in the EU. And you can't comply with EU law using the tax settings that come with EDD - you need a separate plugin for that.

In this complete guide to EU VAT for EDD stores, I'll explain the legislation and the easy way for you to comply. I'll provide full step-by-step instructions on how any Easy Digital Downloads store can meet EU VAT law. And the good news is, it's surprisingly easy!

What is the EU VAT law and how does it affect my Easy Digital Downloads store?

Ask yourself these questions:

If you've answered 'Yes' to all these questions, keep reading because you're legally required to meet EU VAT law in your Easy Digital Downloads store.

What is EU VAT and who has to collect it?

European Union value added tax (more commonly known as EU VAT, or IVA in certain countries) is a tax that is added onto goods and services that are sold within the EU. It is paid by the customer when they make the purchase. The seller is responsible for collecting the tax and paying it to the correct authorities.

The law changed on 1st January 2015, forcing companies worldwide - including those outside of the EU - to handle EU VAT:

  • Before 1st January 2015 - If a company sells digital products to a consumer in an EU country, then the "place of supply" was the country where the seller is based - not the consumer.
  • After 1st January 2015 - If a company sells digital products to a consumer in an EU country, then the "place of supply" was the country where the consumer is based - not the seller.

As a result, the new law forces all sellers of digital products to collect and handle VAT at the consumers' local rate. So if you're outside Germany and sell a computer game to a consumer in Germany, then you need to charge German VAT to that consumer and pay it to the German tax authorities.

I know it sounds crazy that a company in - for example - America has to collect German VAT. However, that's the law.

Quaderno explain it very nicely in their guide.

Are B2B sales subject to EU VAT?

You only need to charge EU VAT when selling to consumers in EU countries. It's not required for business-to-business (B2B) transactions.

When an EU business with a valid VAT number buys from you, the VAT can be zero-rated - i.e. you don't have to charge them VAT.

However, you can't just take their word for it that they're a business. You actually need to validate their VAT number to confirm that they're a VAT-registered company, and store this information so that you can prove it later. Or if they're a small business without a VAT number, then you need to request and store some other sort of proof (e.g. a link to the customer’s business website or other commercial documents).

Even if you see yourself a a B2B supplier, in practice you probably sell to some EU customers who don't have a VAT number. As a result, your Easy Digital Downloads store must be able to handle EU VAT. Keep reading to learn how.

What about UK VAT?

The UK has now left the EU, but they have adopted the same legislation into UK law. This means that if you sell digital products to consumers in the UK then you must charge them UK VAT, wherever your company is based.

The Easy Digital Downloads EU VAT plugin fully supports UK VAT, which makes things easy for you. You can learn more about UK VAT here.

Easy Digital Downloads EU VAT MOSS plugin

Here's a summary of your legal obligations - whether or not your company is based in the UK:

  • Register for EU VAT You must register for a EU VAT number so that you can submit the quarterly tax returns and make payments.
  • Collect EU VAT Your Easy Digital Downloads store must check whether each EU sale is B2B or B2C, and charge the customer's local rate of EU VAT for B2C sales; and zero rate the VAT for B2B sales.
  • Provide valid VAT receipts Provide your customers with VAT invoices containing:
    • Your business’ name and address.
    • Your business’ VAT number.
    • Invoice date.
    • Invoice number.
    • Buyer’s name and address.
    • Buyer’s VAT number.
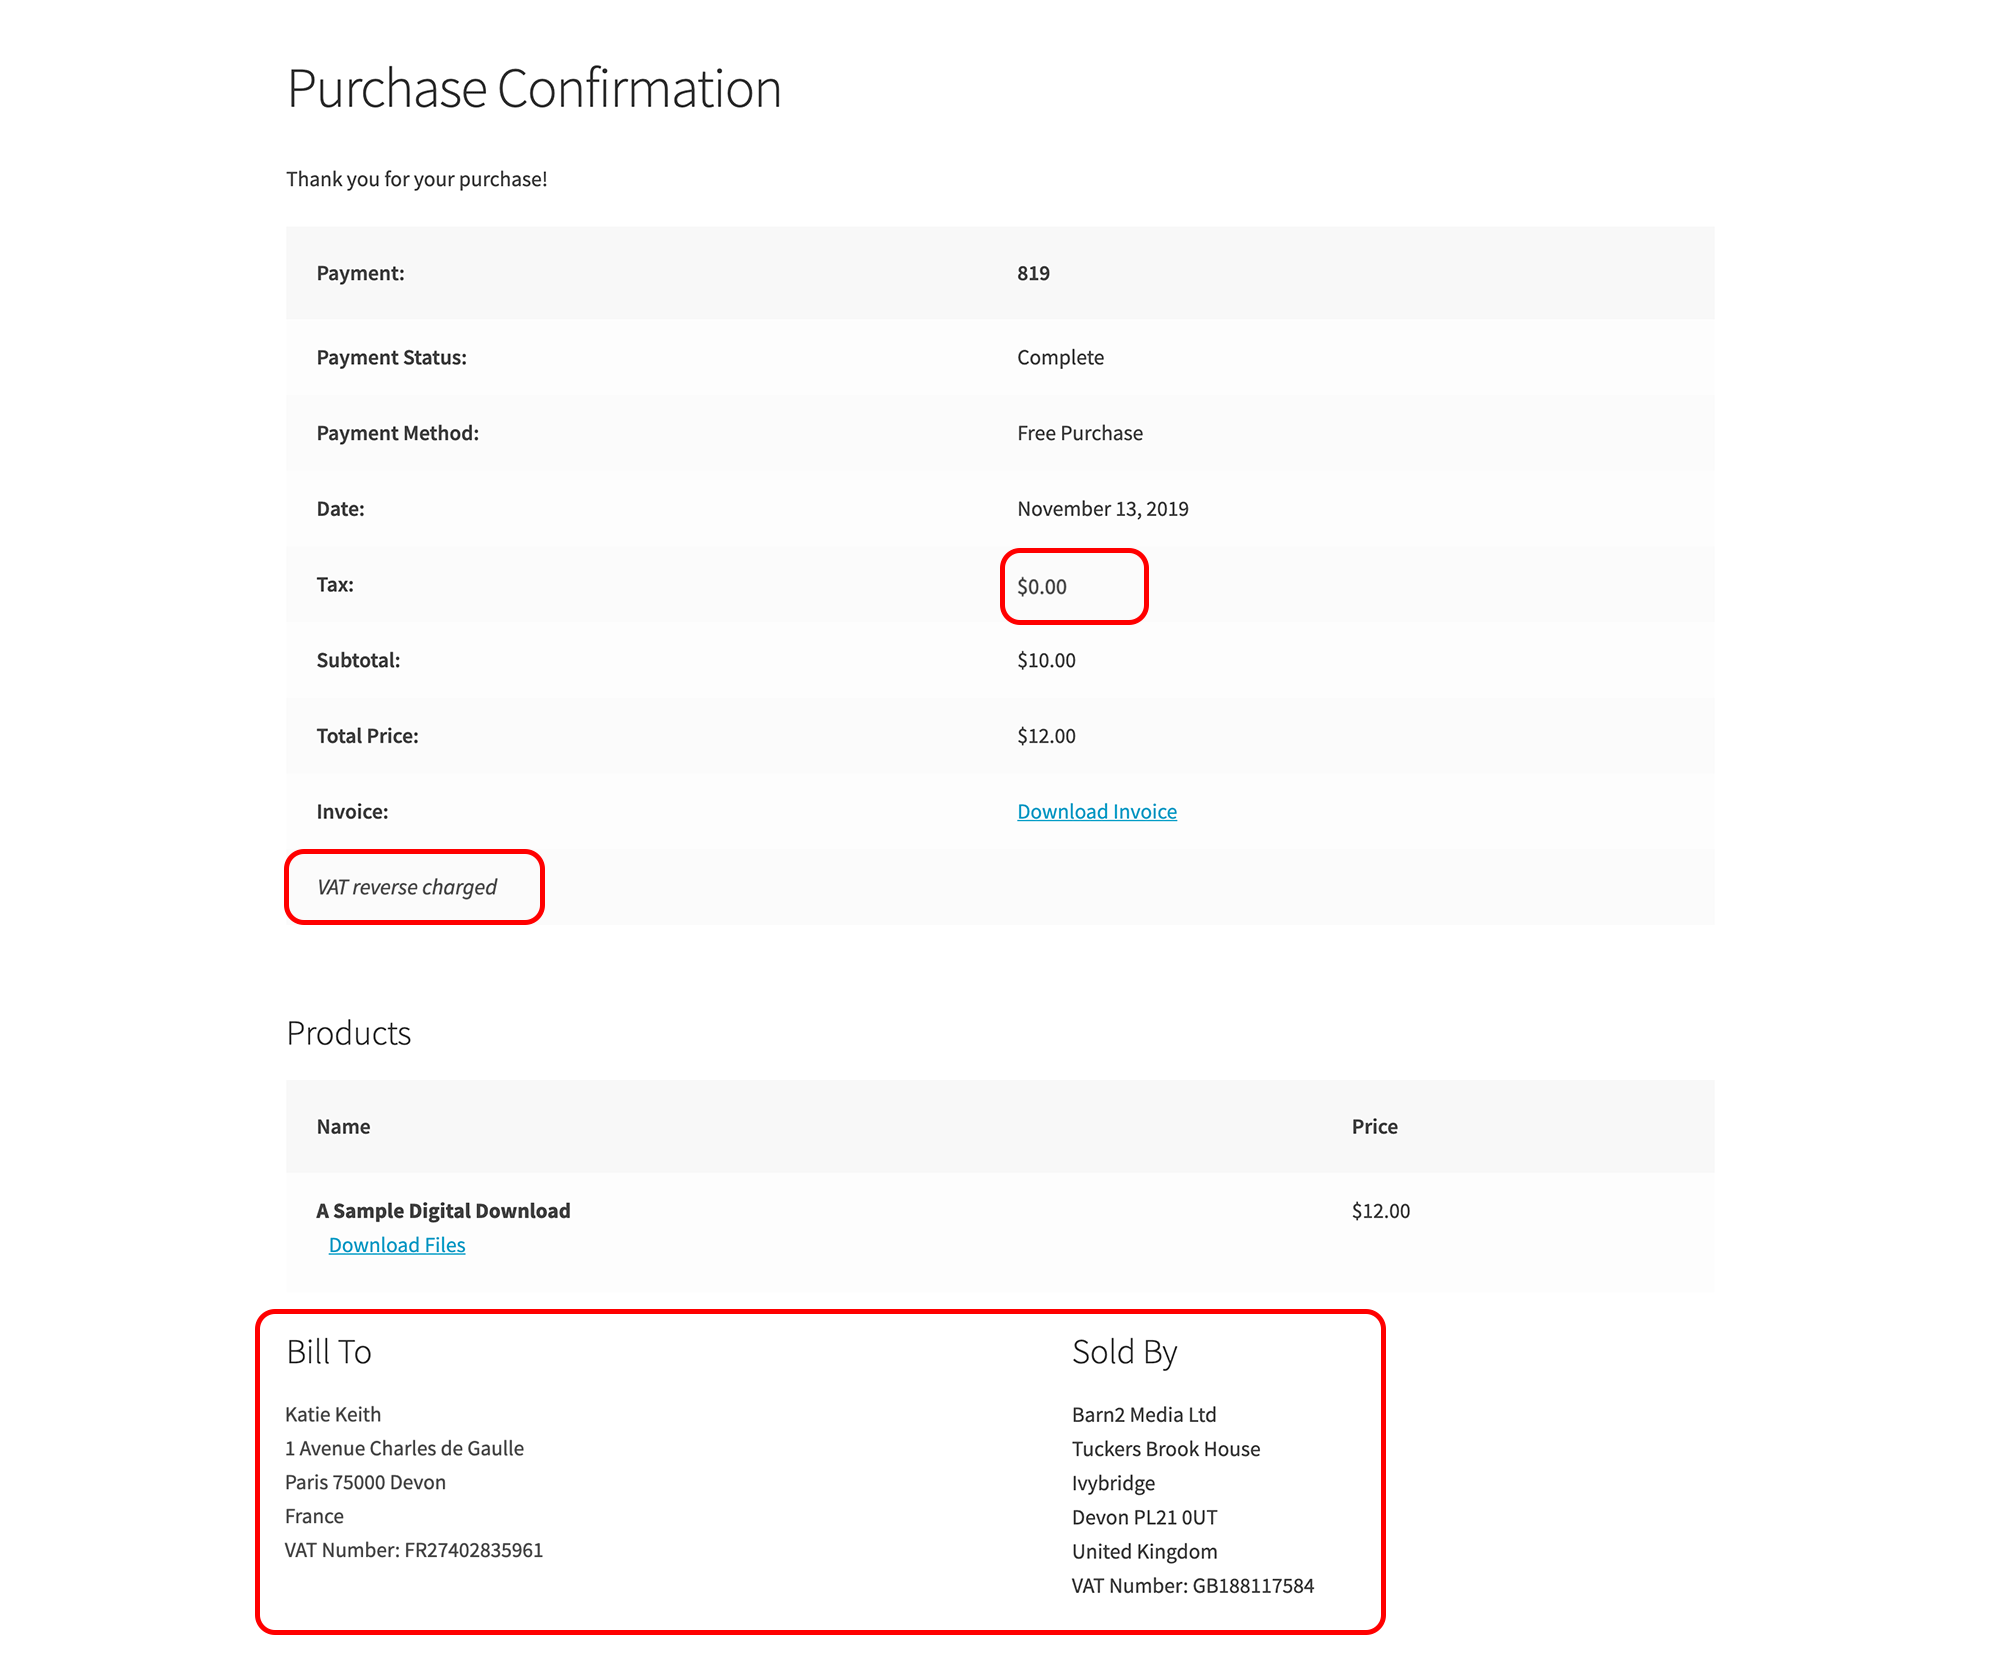
    • Rate of VAT applied. For reverse charged B2B sales, you should include the text "EU VAT reverse charged".
    • Amount of VAT charged.
    • Total price including VAT.
    • Store the invoices for 5 years.
  • Store evidence about your customers' location
    • You must store 2 pieces of evidence (or 1 piece of third party evidence for EU companies with under €100,000/year in cross-border sales of digital goods to the EU) to confirm the customer's location. While EU legislation lists various acceptable forms of evidence, the most realistic for an Easy Digital Downloads store are the customer's billing address and IP address.
    • Store this location evidence for 10 years.
  • Submit quarterly tax returns Every 3 months, you must submit a tax return showing the EU VAT you collected in the previous quarter, and pay the correct amount of tax.

This all sounds like a nightmare!

Of course, all of this sounds like a huge burden for any small business! Fortunately, there are two steps that you can take to make EU VAT less burdensome for your company:

  1. Use the best Easy Digital Downloads EU VAT plugin to handle the collection of VAT for your online sales automatically. We built this plugin to make it as easy as possible for any EDD store to meet European VAT law.
  2. Register for a service that lets you file a single quarterly tax return for all your EU sales, and make a single payment for all the EU VAT you have collected. This is much easier than having to register for VAT with each individual EU country.

Together, these two steps combine to make your Easy Digital Downloads store compliant with EU VAT legislation. It won't take up much of your time, freeing you up to focus on the most important task of growing your EDD store's sales. Keep reading to learn how.

If you don't use Easy Digital Downloads, then check out our guide on How to add a VAT number field to the WooCommerce checkout instead.

Common excuses to avoid meeting EU VAT law

A lot of e-commerce companies - particularly those outside of the EU - choose to stick their heads in the stand and pretend the EU VAT law doesn't apply to them. These are the most common excuses, and why they don't work!

Excuse #1 - My company is based outside of the EU

Unfortunately this isn't relevant. If your Easy Digital Downloads store sells to consumers in the EU, then you MUST charge them EU VAT/IVA. Don't be confused by the €10,000 annual sales threshold that applies to EU businesses. Businesses outside the EU must collect EU VAT for ALL their sales to European consumers, with no minimum threshold.

Excuse #2 - I only make B2B sales to the EU

While it's correct that you only have to charge EU VAT on B2C sales, you can't argue that your Easy Digital Downloads store is exempt because all your products are aimed at businesses. That's because both registered companies AND self-employed individuals make business-related purposes - and self-employed individuals in the EU have to pay EU VAT. 

You can only get out of charging VAT to EU customers if you have collected evidence that they are a registered business. This means that your Easy Digital Downloads checkout needs a way to check whether each customer is a business, and decide whether to charge VAT accordingly. 

The easiest way to do this is to add a VAT field to the EDD checkout, integrated with an official database of VAT numbers. The new Easy Digital Downloads EU VAT plugin (coming soon!) will do this automatically, so there's no excuse not to comply!

Excuse #3 - I'm in the UK and.... well... Brexit

The UK has now left the EU. UK companies selling digital products still have to meet EU VAT law. This is because the legislation applies to all companies who sell to EU countries - it doesn't matter whether your company is based in the EU. As a result, Brexit won't change the obligations for Easy Digital Downloads stores in the UK.

Excuse #4 - Nothing will happen if I ignore EU VAT

Regardless of which country you're in, there are potential penalties if you fail to meet your EU VAT obligations. This can include:

  • Financial penalties and fines
  • Years of backdated payments to cover the VAT you should have paid
  • Your seller account being shut down on marketplaces
  • Investigation by tax authorities

These consequences can be crippling for any e-commerce business. As a result, it's best to take simple steps to comply with EU VAT law, and collect the VAT from your customers whenever you sell to the EU - instead of having to cover the cost yourself in fines later on.

Why has it always been so difficult for EDD stores to comply with EU VAT?

We've been running Easy Digital Downloads on the Barn2 site ever since we started selling WordPress plugins. As a result, we've been on the journey to seeing the introduction of the new EU VAT law in 2015, right through trying different ways to implement it.

Until now, there were no good options for collecting EU VAT in Easy Digital Downloads. Straight out of the box, the built-in EDD tax settings don't have the required features to meet EU law. There is no official EDD extension for EU VAT. The only options were:

  • A free WordPress EU VAT plugin that is no longer supported and had poor ratings.
  • A premium plugin that hasn't been updated since 2015.
  • A premium plugin that isn't presented very professionally and when we sent an enquiry to the developer, their response was extremely rude and offensive! (As the owner of a WordPress plugin company, I feel particularly strongly about this because we work so hard to provide positive, helpful support to our own customers.)
  • A SAAS solution that integrates with Easy Digital Downloads, but costs $49-149 per month and has fewer than 20 EDD users. It also has more features than we need. (For example, it comes with complete reporting on EU VAT sales, which most people don't need because you can easily get the same information by exporting from EDD and/or an accounting system such as Xero.) You're tied in long-term because your tax evidence is stored on their servers and legally must be stored for 10 years. The total cost works out at $5,880-$17,880 per decade!

As a WordPress plugin company, we were perfectly placed to develop a better - and cheaper - solution. We got to work, and built our Easy Digital Downloads EU VAT plugin. As well as using it on our own Easy Digital Downloads store, we're releasing it to the public to help other EDD users to meet their EU VAT requirements.

The solution: The ultimate Easy Digital Downloads EU VAT plugin

Easy Digital Downloads EU VAT plugin

We've built the Easy Digital Downloads EU VAT plugin as the solution for all EDD stores who need to comply with European VAT law. This easy-to-use plugin will work straight out of the box, and comes with everything you need.

How it works

The Easy Digital Downloads EU VAT plugin is designed for any WordPress site that uses Easy Digital Downloads. It works like this:

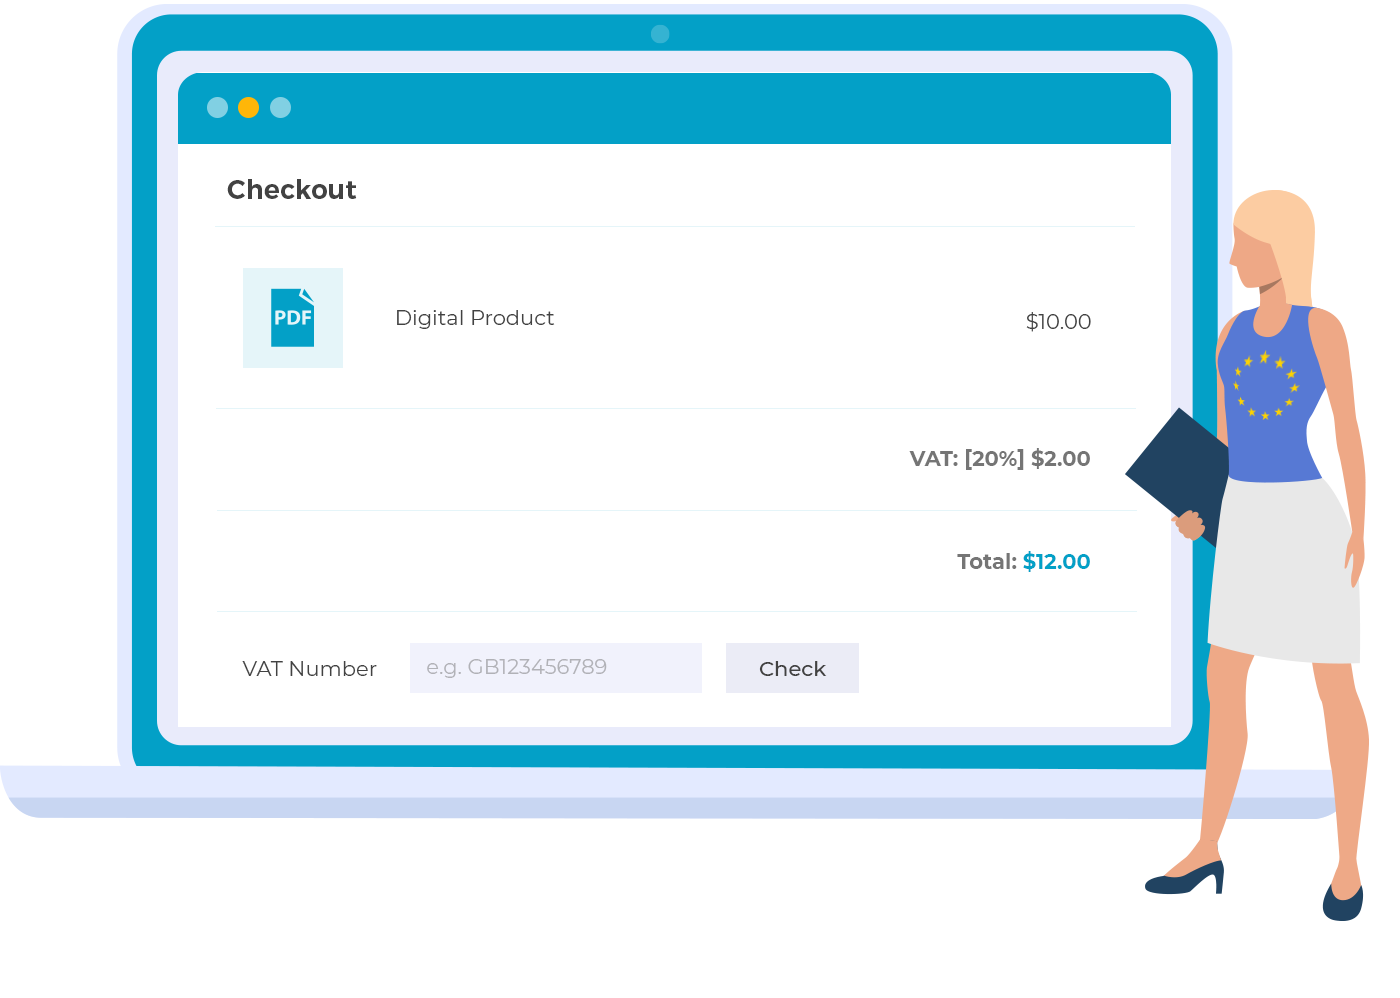
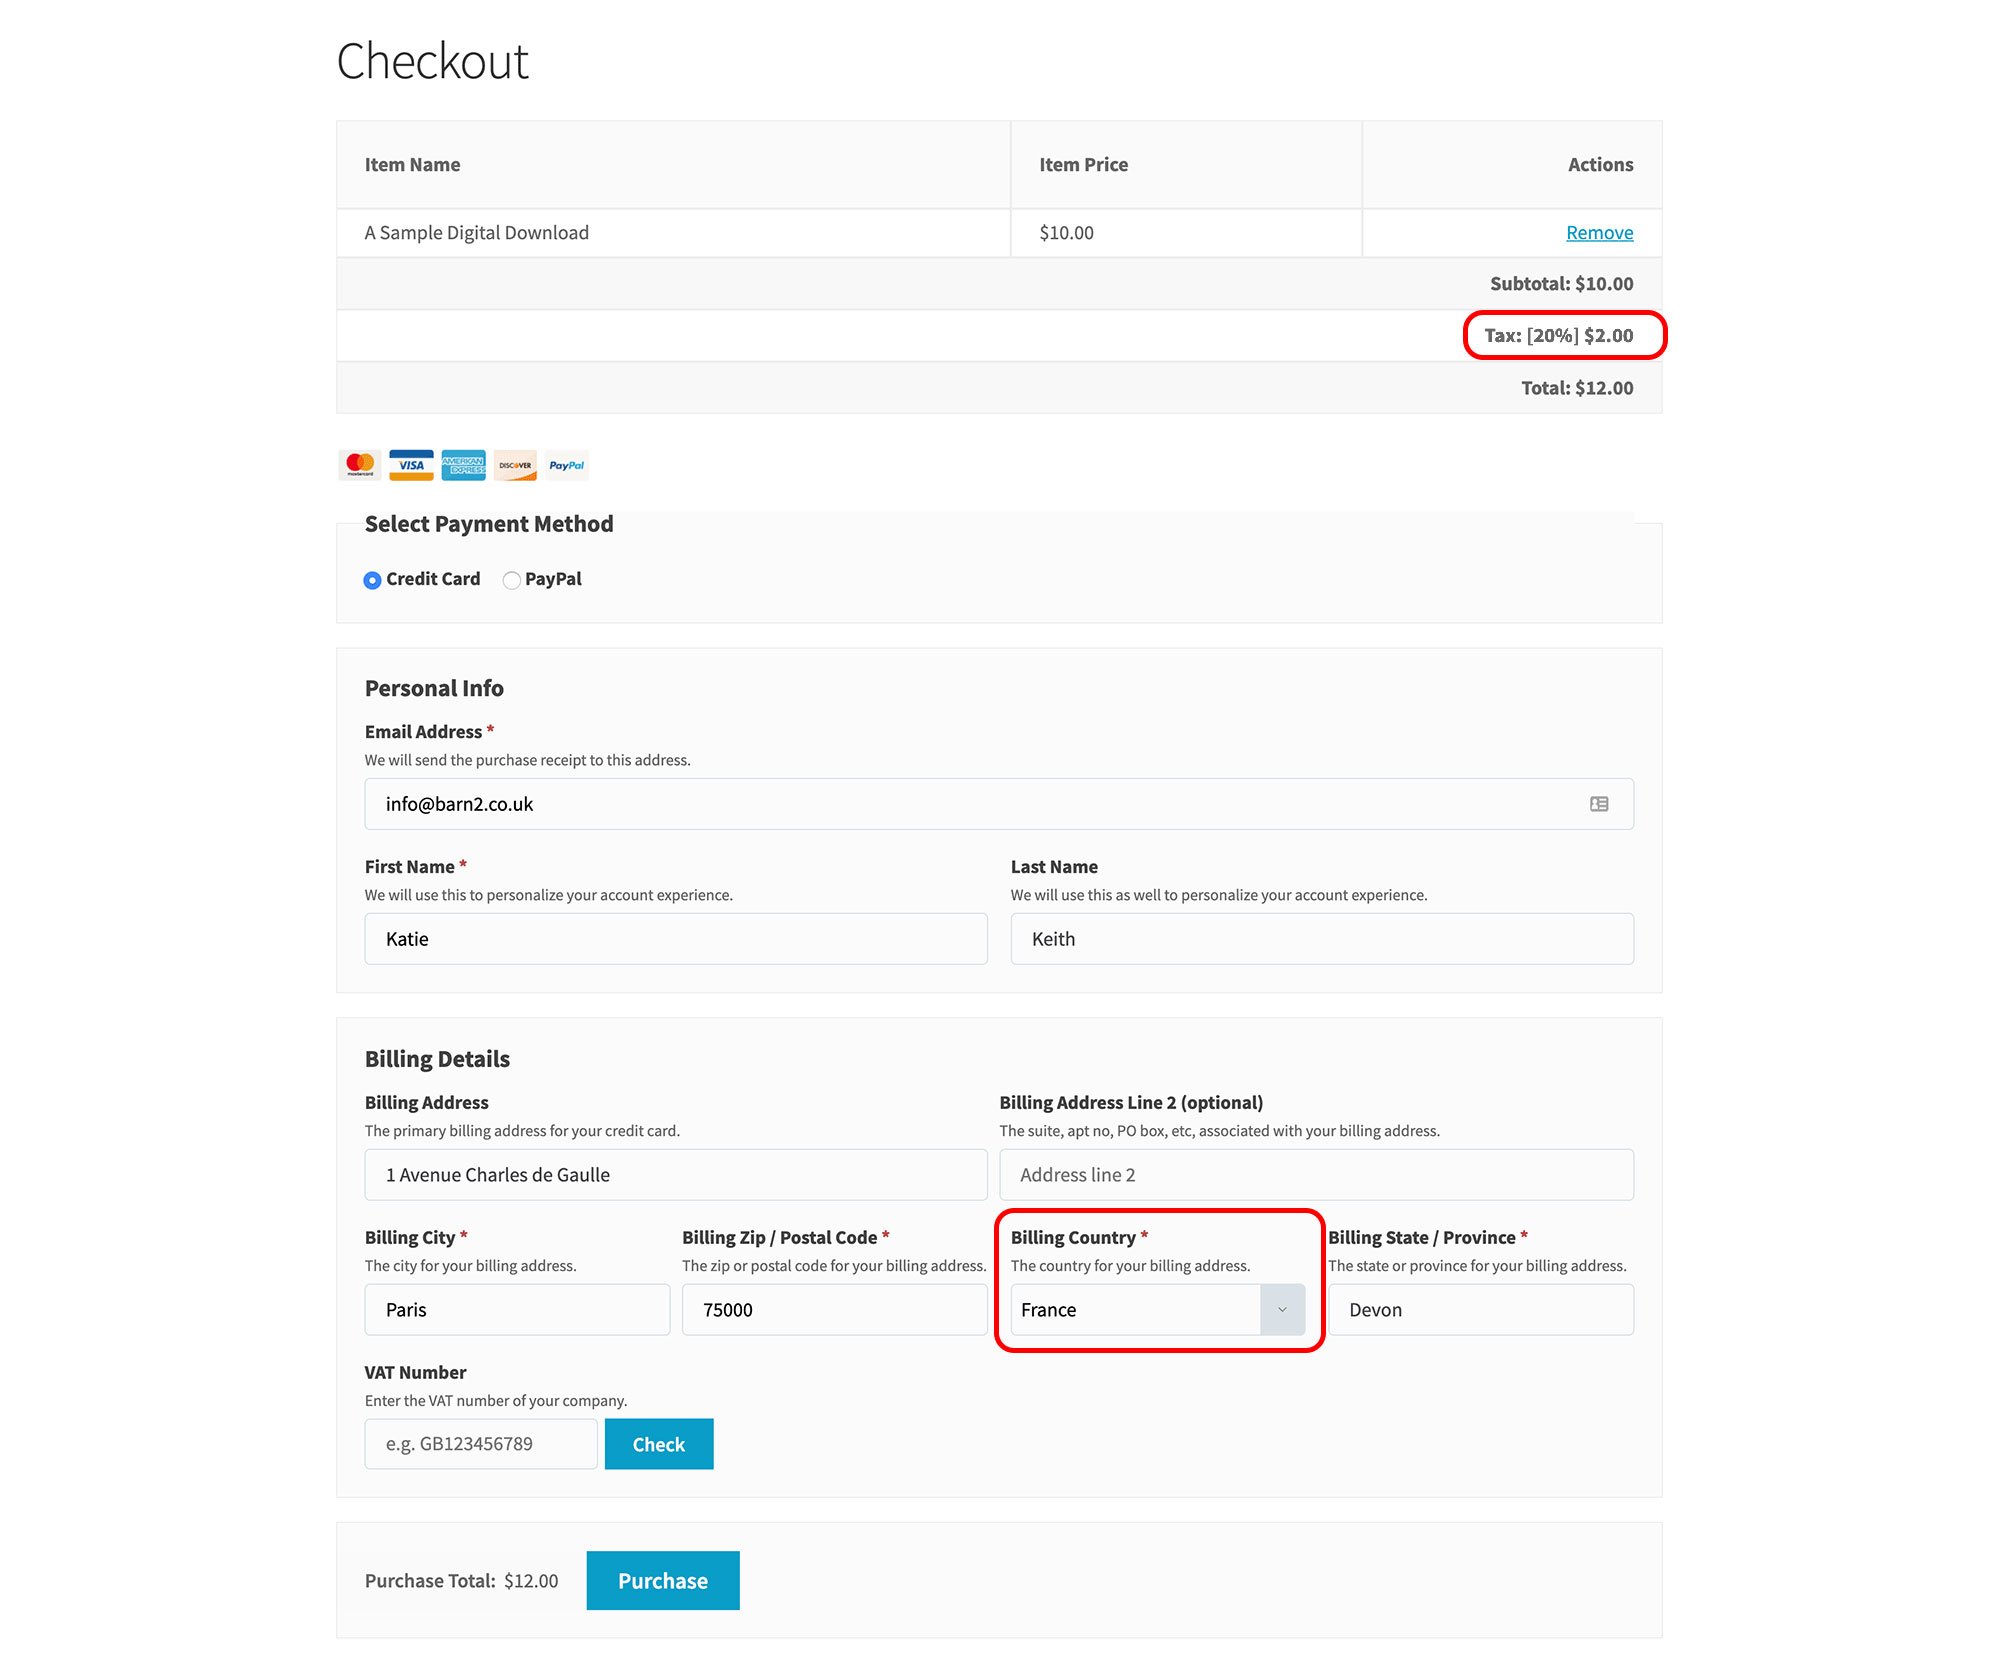
  1. Charges the correct VAT to EU customers When the customer selects their country on the EDD checkout, the correct VAT is charged. If you have set the tax rate for each EU country in the Easy Digital Downloads settings then this is used; otherwise it will use the EU tax rates built into the plugin. This ensures that the customer is always charged the correct rate, regardless of their location.
  2. Removes the VAT for registered EU businesses The plugin adds a VAT number field to the Easy Digital Downloads checkout, which only appears for customers in EU countries. VAT-registered EU companies can enter their VAT number. The number is checked against the official VIES VAT register, and if it is valid then no VAT is charged on the sale.
  3. Collates customer location evidence It also adds a 'VAT Details' section to the payment screen in Easy Digital Downloads, so that the store owner can quickly check the evidence that was used for the VAT calculations. You can also export this evidence if you are ever audited.
  4. Provides legally valid tax receipts Converts the EDD purchase details screen into a full tax receipt with all the required information, and adds merge tags so that you can use the 'Purchase Receipt' email as a tax receipt too. If you're using the PDF Invoices extension then it adds extra information to this too.
  5. Easy VAT reporting Adds an EU VAT report to the Exports page in Easy Digital Downloads. You can use this to export all the data you need for your quarterly MOSS VAT returns.

The plugin builds on the features that are already built into Easy Digital Downloads to create complete solution to European VAT. Its in-depth documentation covers everything you need to manage EU VAT in Easy Digital Downloads, including:

  • How to provide legally valid VAT invoices to customers.
  • How you can export the EU VAT collected for your accounting software and quarterly tax returns.
  • Where to find the legally required pieces of evidence about each customers' location.
  • Further advice on how to make sure your company complies with EU VAT legislation.

Step-by-step - How to make your EDD store compliant with EU VAT

It's surprisingly easy to make your Easy Digital Downloads store meet EU VAT law. To comply, simply follow this two-step process:

  1. Register for EU VAT.
  2. Set up the Easy Digital Downloads EU VAT plugin.

1. Register for EU VAT

Since you'll be collecting EU VAT from consumers in EU states who buy your products, you need to be registered with a tax authority in the EU. You can either register for VAT in each EU country where you make sales, or register for Mini-One-Stop-Shop (MOSS).

MOSS is a centralized VAT scheme that enables you to submit a quarterly single tax return and make a single payment to cover the entire EU. Your online tax return will declare all the EU VAT you have collected, and you will then make a single payment which the MOSS service will then distribute to the relevant EU member states on your behalf.

Needless to say, nearly all companies running Easy Digital Downloads are better off registering for MOSS! It's free, and will save you a ton of time and paperwork.

How to register for MOSS

  • Union Scheme If your company is based in the EU, or has any establishments (e.g. an office) in an EU country, then you should register for MOSS with your local tax authority (for example, UK companies apply to MOSS via HMRC, which handles UK tax).
  • Non-Union Scheme Non-EU companies can choose to register for VAT with the tax authority for any EU member state. For English speaking companies, the Republic of Ireland is usually a good option because there's no language barrier and they have a good online system.

How to register for UK VAT

In addition to MOSS, you will need to register for UK VAT. This is because the UK has now left the EU, and is no longer part of the MOSS scheme - but non-UK companies must still charge UK tax to customers in the UK.

2. Set up the EDD EU VAT plugin (in 2 minutes!)

Now you're registered to start collecting EU VAT, it's time to add the necessary features to your Easy Digital Downloads store:

  1. Get the Easy Digital Downloads EU VAT plugin.
  2. Install the plugin on your WordPress website.

How much VAT to charge

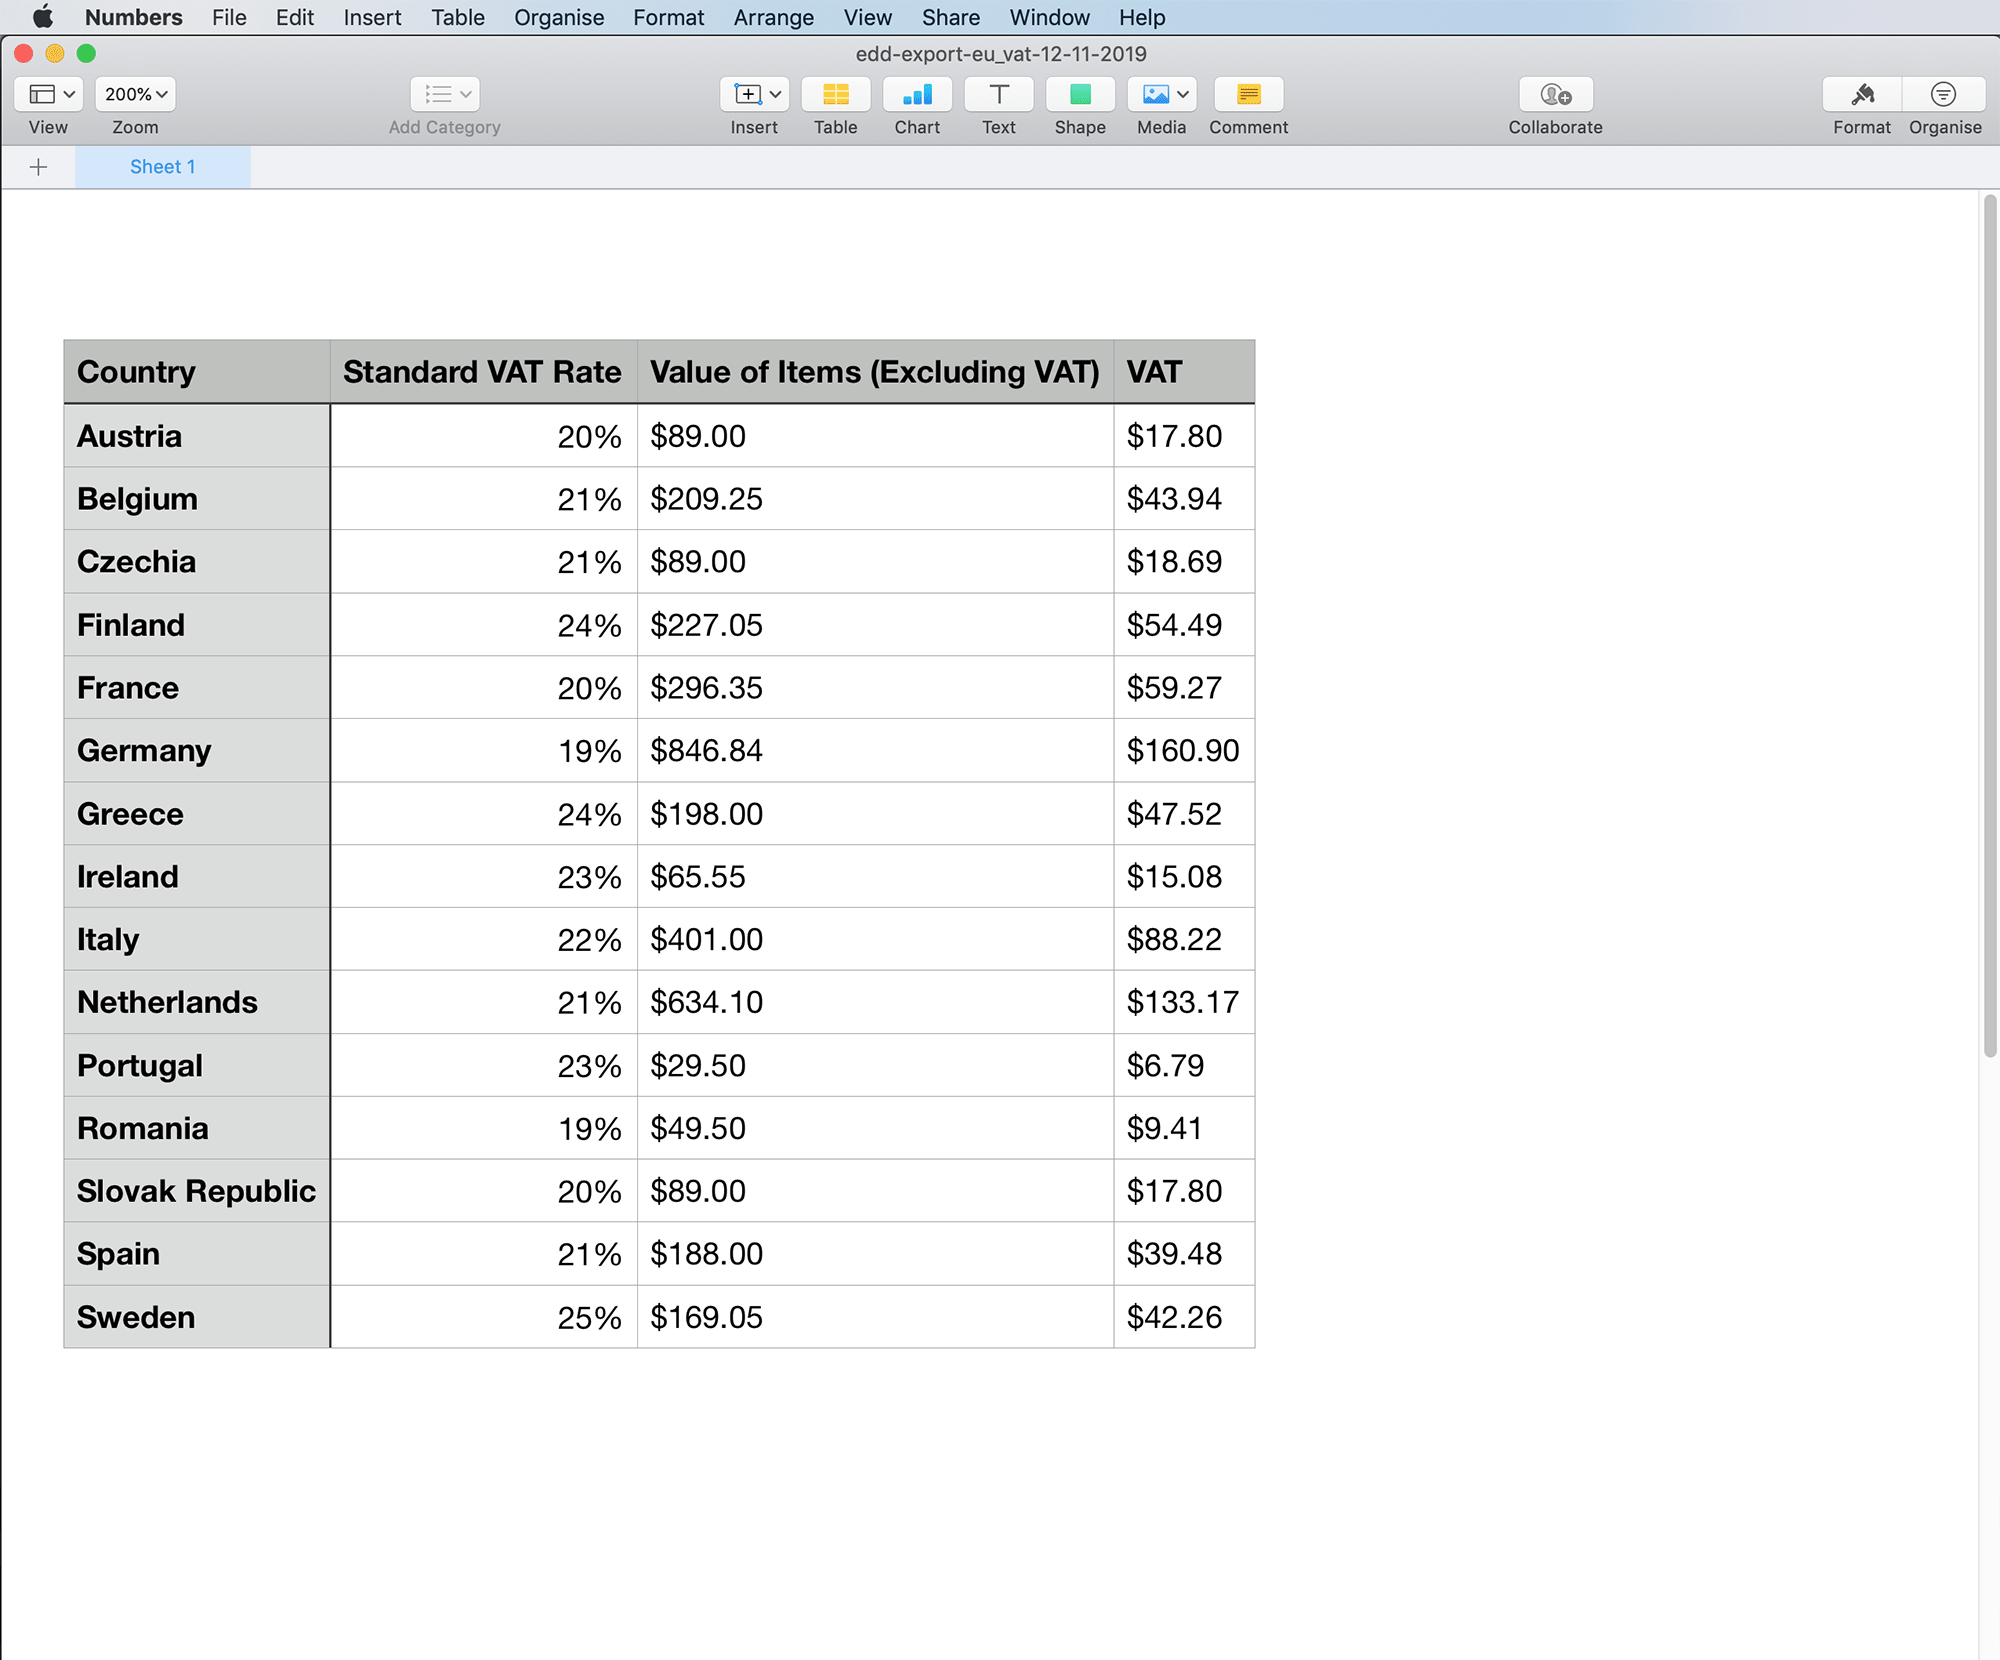
Each EU country is free to choose its own rate of VAT. As a result, your EU VAT-compliant Easy Digital Downloads store must charge the correct tax rate to consumers in each EU country.

Fortunately, the Easy Digital Download EU VAT plugin makes this easy. It comes complete with the correct standard VAT rate for each EU country, and we'll regularly release updates whenever any of the rates change.

When you install the plugin, the current standard VAT rate will be charged to customers in each EU member state. You can override these rates in the general Easy Digital Downloads settings under Downloads → Settings → Taxes. For example, you might want to do this if you're selling products that allow you to charge a reduced rate, or if you have any other reason for not charging the standard VAT rate. This gives you complete flexibility over the tax rates.

VAT receipts and invoices

Easy Digital Download EU VAT integrates seamlessly with the payment receipt that comes with Easy Digital Downloads, EDD email, and the PDF invoice plugin. This gives you several options for providing EU customers with VAT receipts that they can use for accounting and tax purposes:

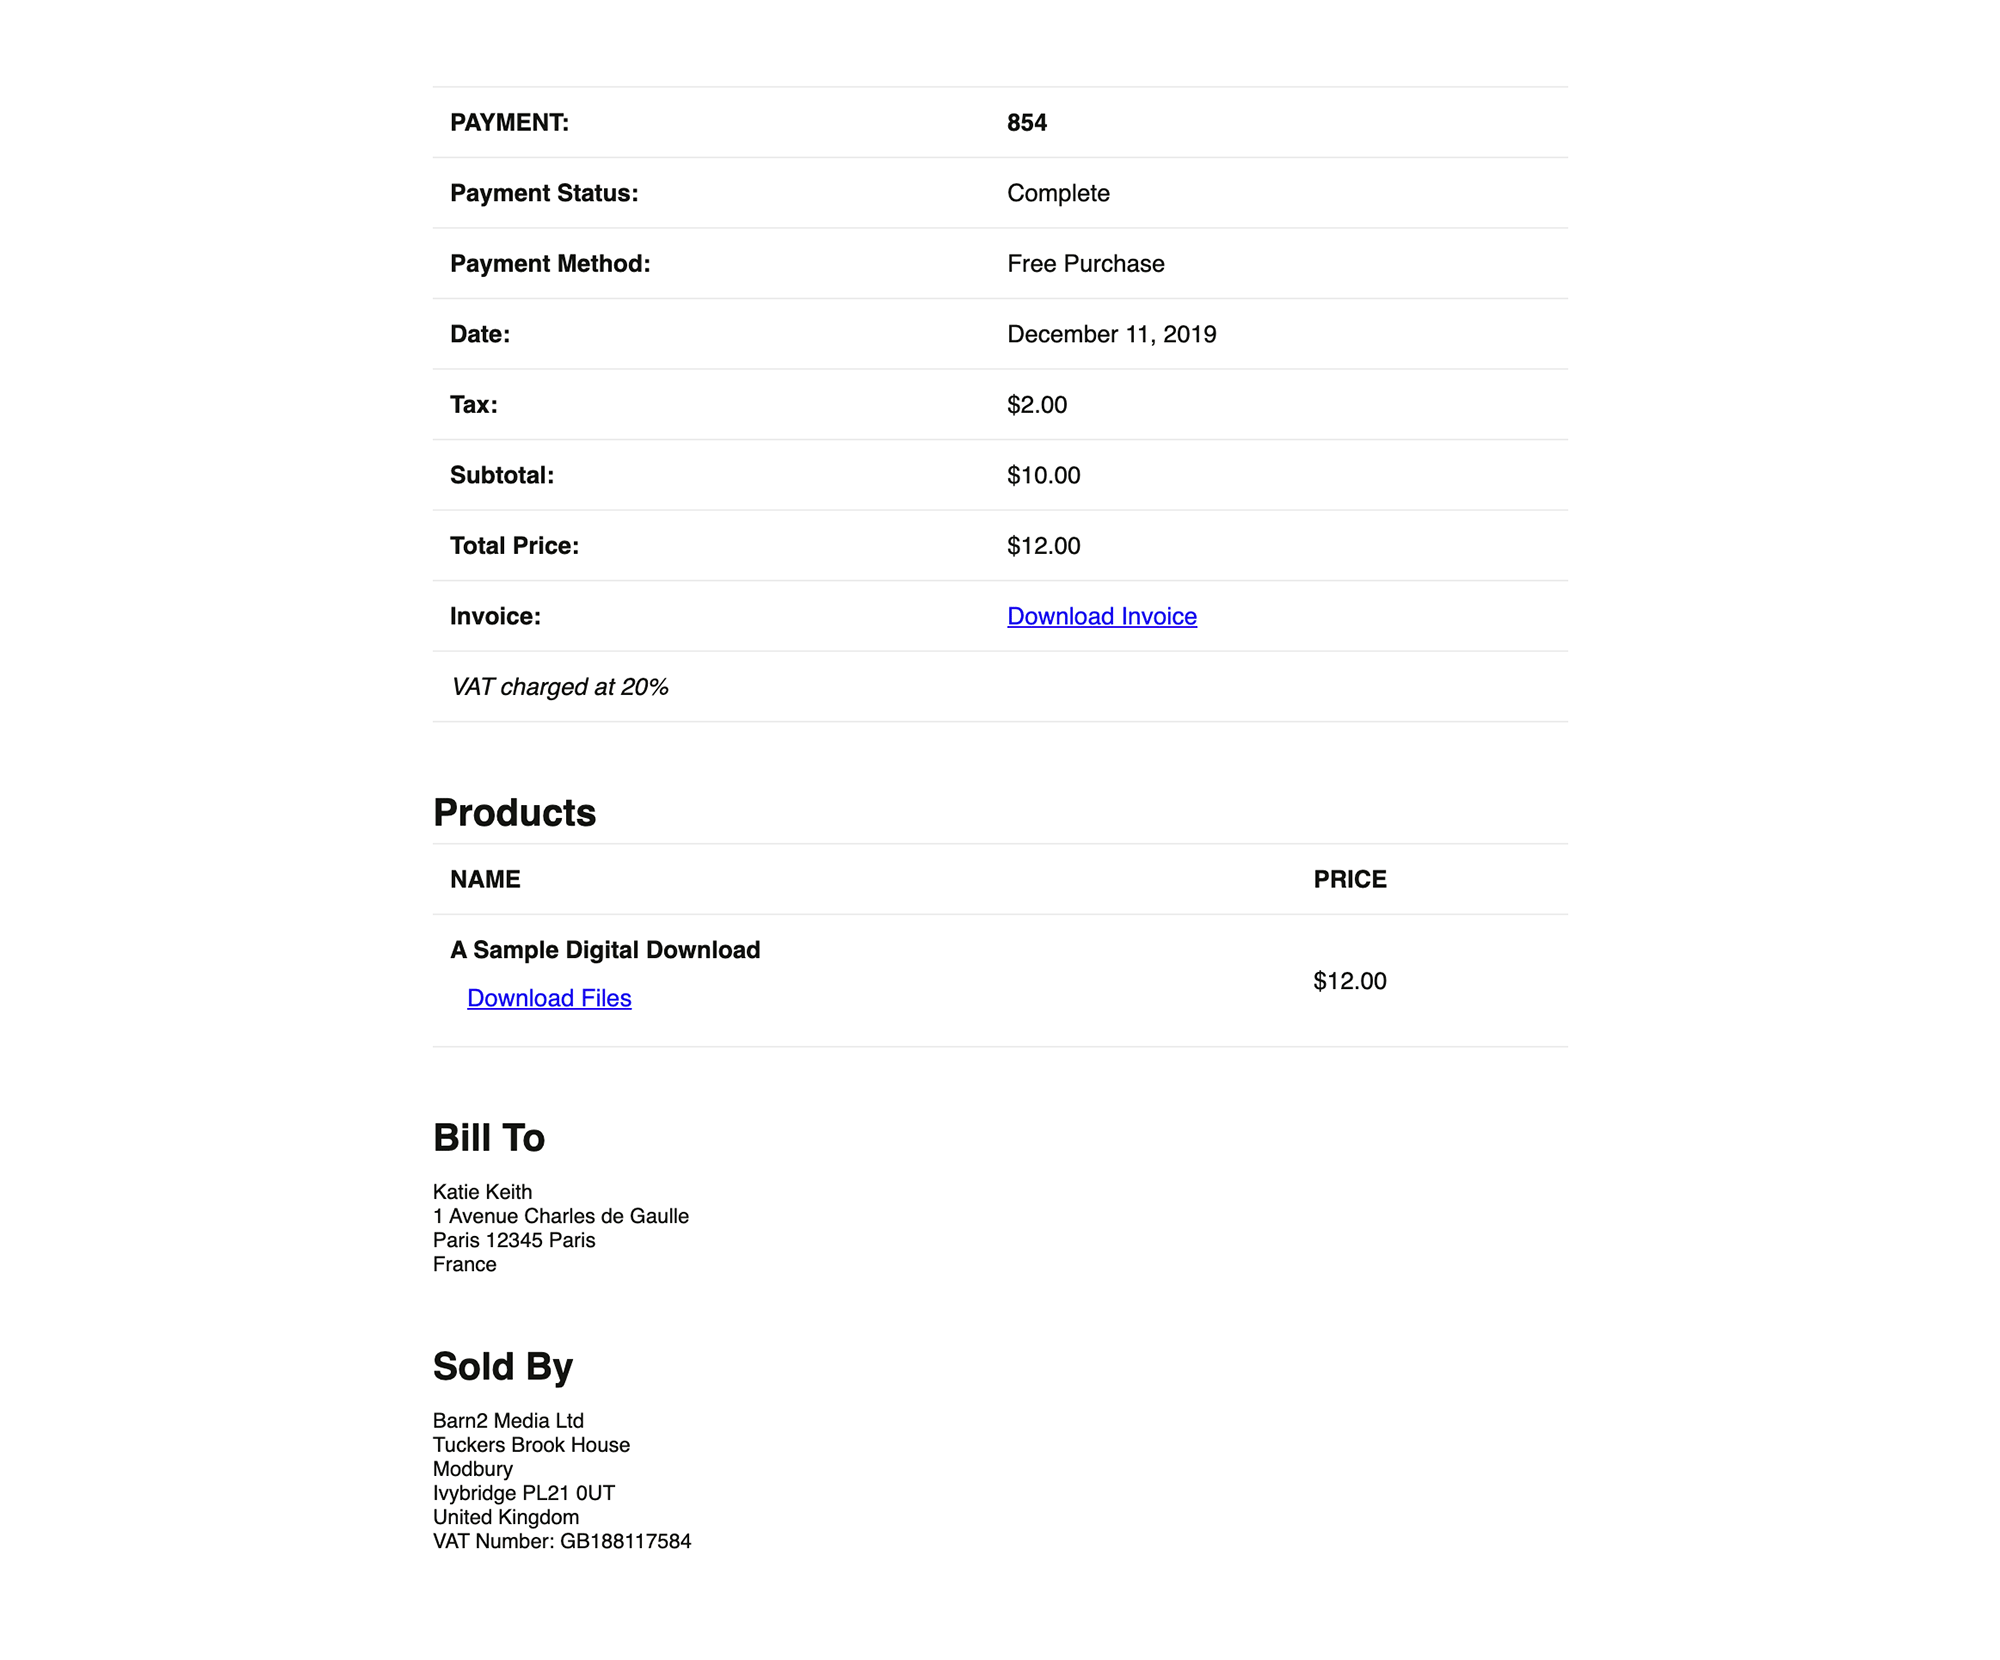
Order confirmation and customer account page

EDD EU VAT plugin screenshot payment confirmation page with tax charged

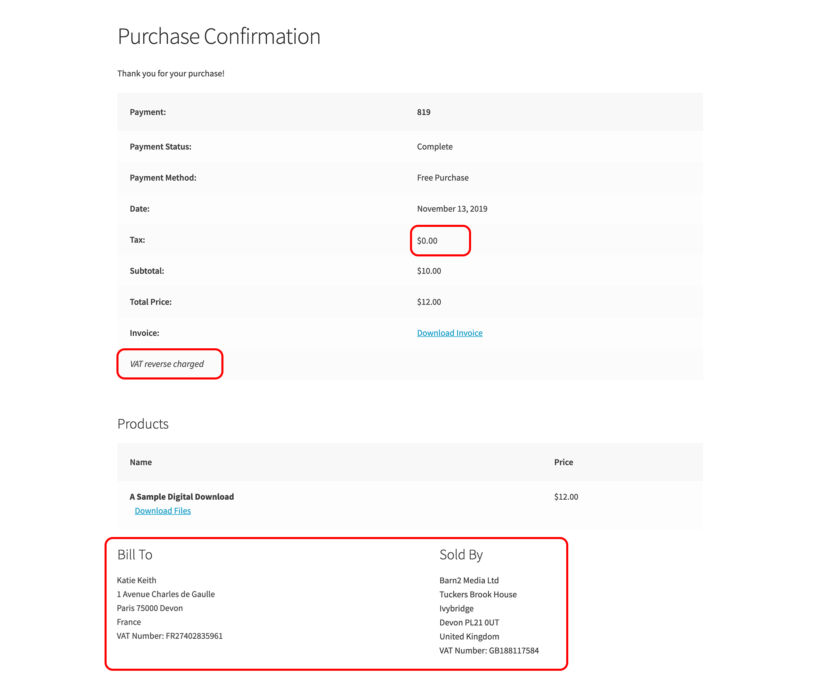
Logged in customers can access the Easy Digital Downloads Account page and view tax information for their orders. This is available by clicking the 'View Details and Downloads' link alongside any order. They all see this information on the confirmation page which loads as soon as they complete their order in Easy Digital Downloads.

The Easy Digital Download EU VAT plugin extends the EDD order confirmation and payment details pages to include all the information that is required by EU VAT law. This means that if you don't use any invoice plugins on your Easy Digital Downloads store, your customers can use this as their tax invoice.

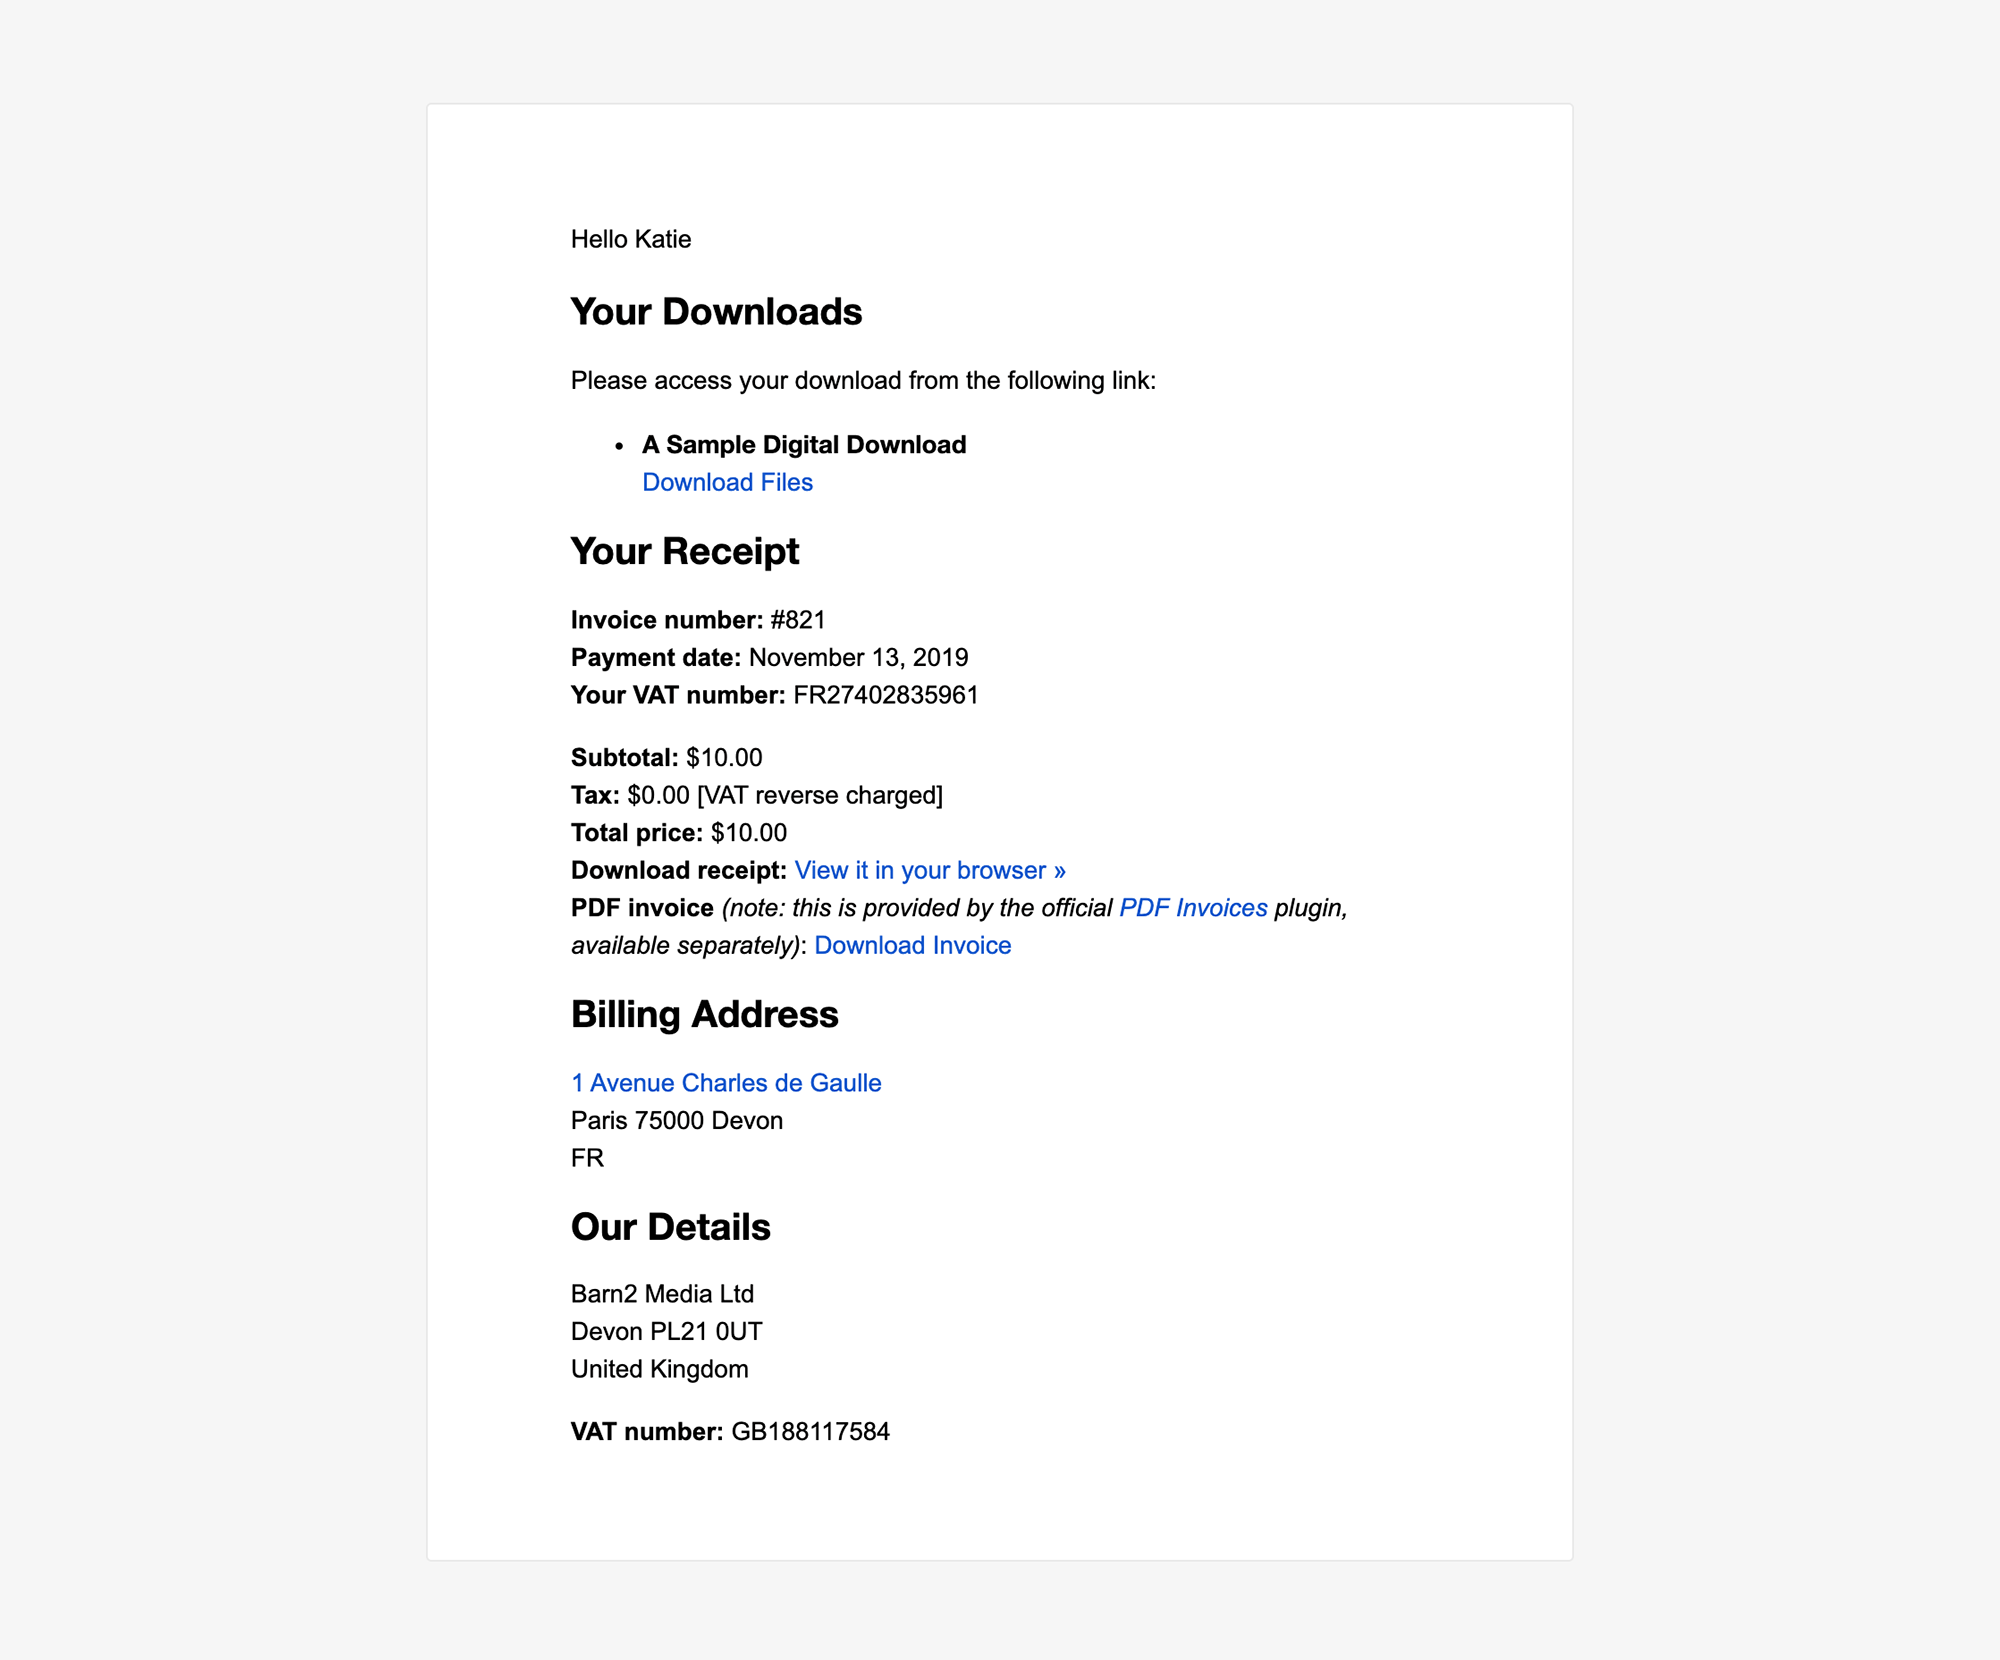
Showing EU VAT in the EDD payment receipt email

EDD European VAT WordPress plugin screenshot email receipt

Easy Digital Downloads sends a payment receipt to each customer after purchase. You can manage this via Downloads → Settings → Emails → Purchase Receipts.

The Easy Digital Downloads EU VAT plugin comes with merge tags that you can use to add the required tax information to this email.

Alternatively, if you're using the Per Product Emails EDD extension to send a different email for each product (as we do for sending personalised setup information for our WordPress plugins), then you can add these merge tags and manage the emails under Downloads → Per Product Emails.

Either way, you can add payment and tax information to the EDD payment receipt email using the built-in email merge tags. Mix and match them to create the perfect email receipt.

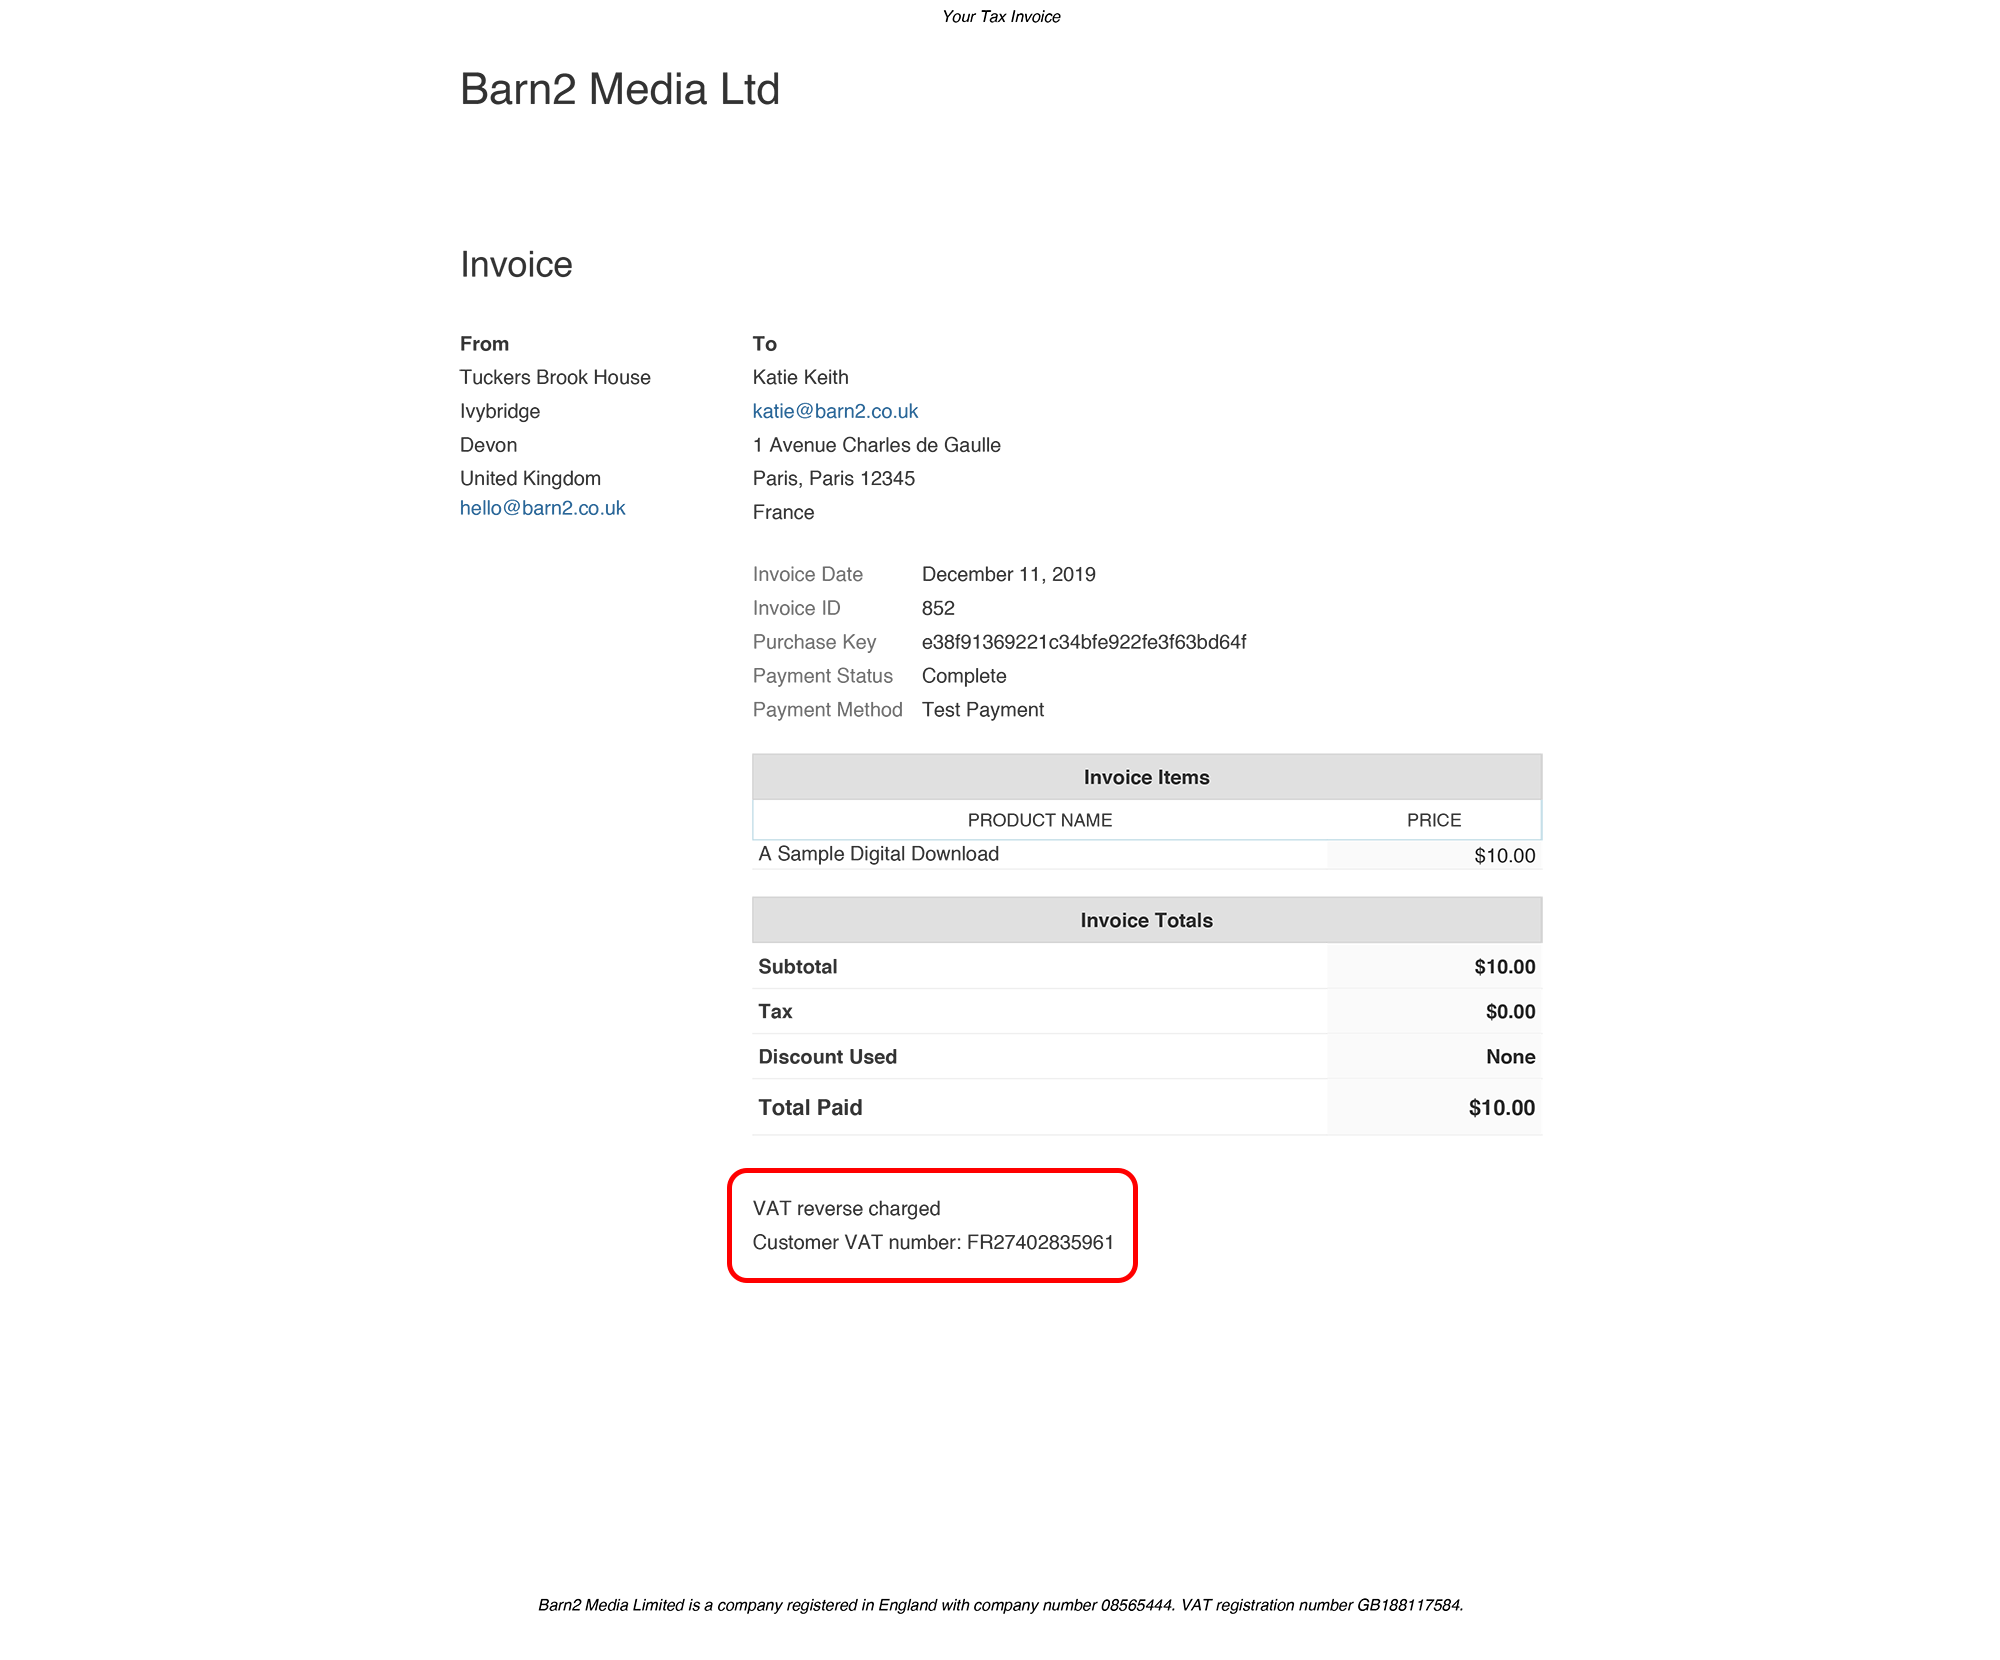
Attach a PDF Invoice to the EDD order confirmation email

Easy Digital Downloads PDF Invoices with EU tax
Example of a PDF Invoice with EU VAT information
Easy Digital Downloads' PDF Invoices plugin is the most sophisticated way to provide your customers with VAT invoices. We have integrated the Easy Digital Downloads EU VAT plugin with PDF invoices to add the legally required information to the invoice.

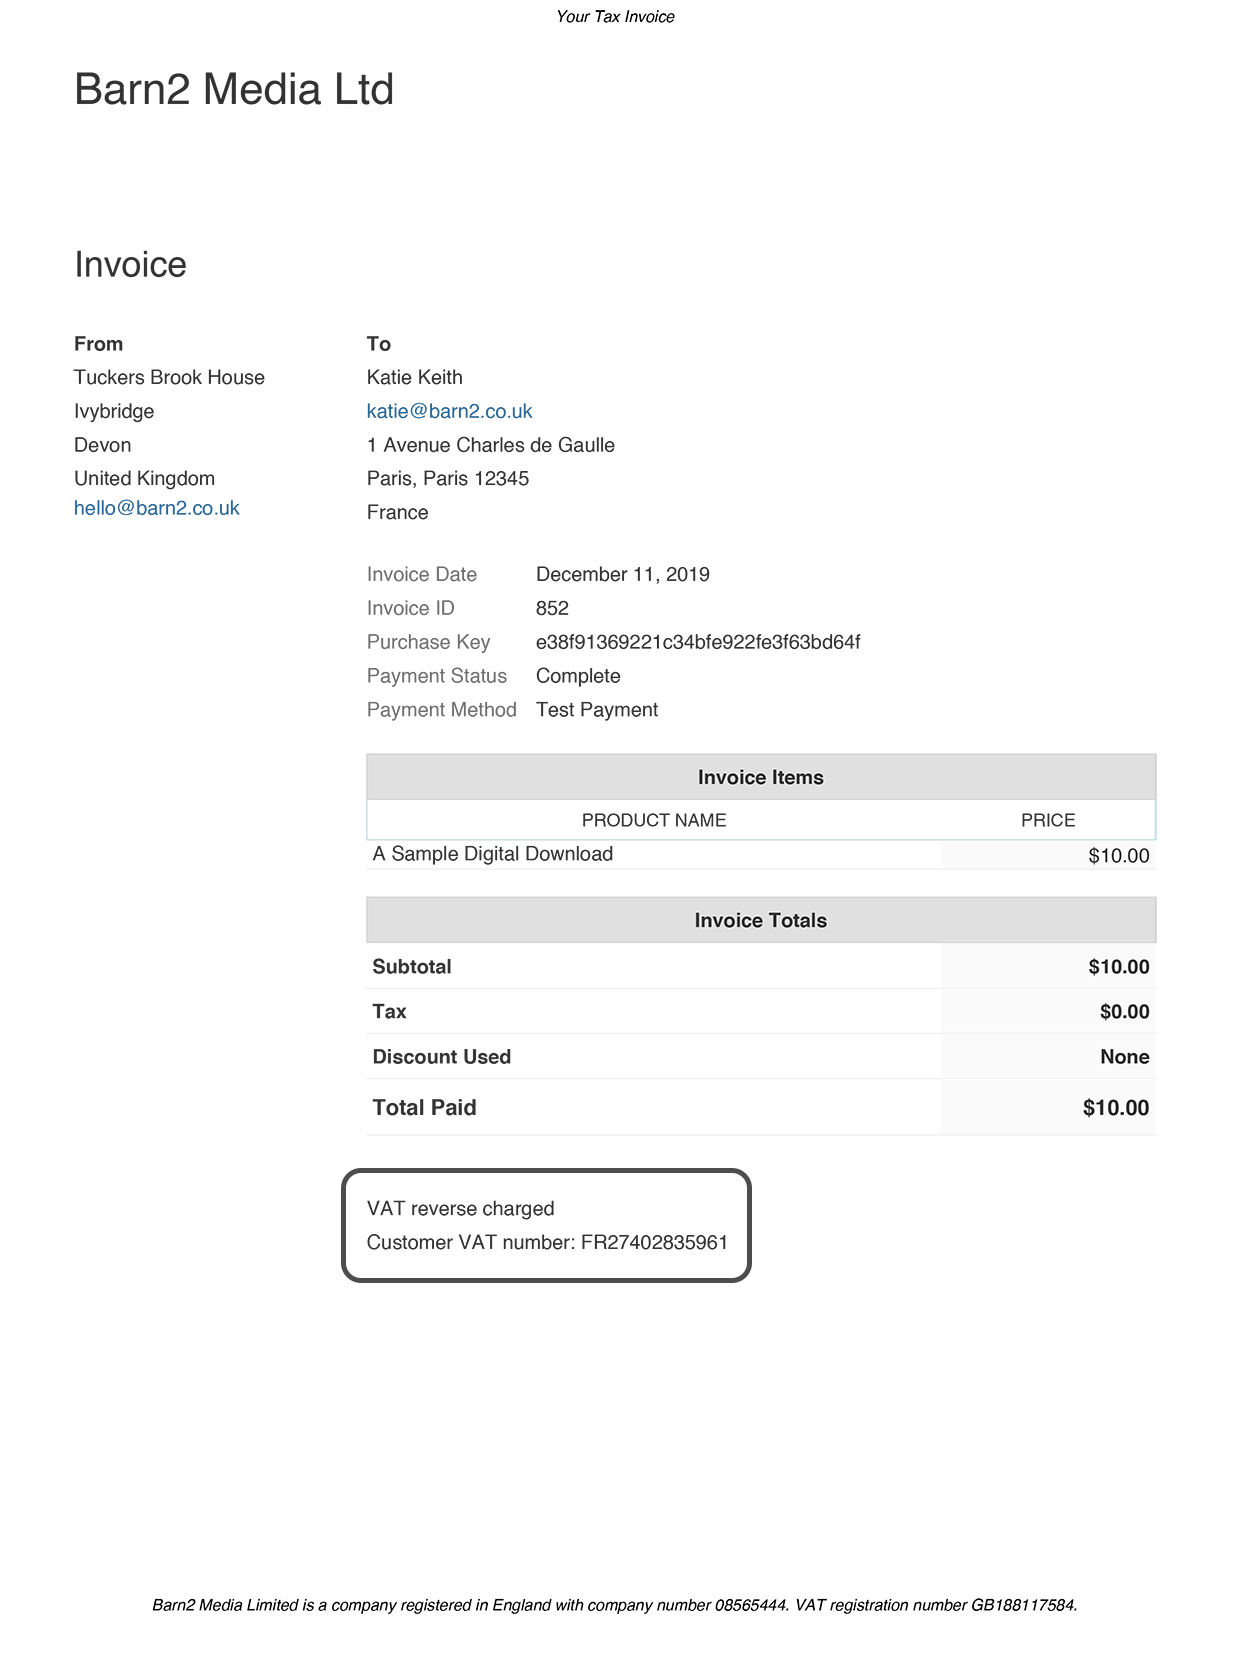
As well as allowing customers to generate PDF invoices from the Account page, it comes with a merge tag that you can use to add a 'Download Invoice' link to your customer emails.

We use this plugin on the Barn2 site, and find that it's the easiest way to provide tax information. Customers can download their EU VAT invoice directly from the order email receipt. This is more convenient than having to log into their account and download it from there. It also saves them having to contact us to request a tax invoice.

Store your invoices for 5 years

EU law states that you must store your VAT invoices for a minimum of 5 years. Since you use Easy Digital Downloads, this is taken care of automatically. The invoices will remain available for you to download for as long as you continue using EDD.

Storing evidence of your customers' location

As we saw earlier, you're required to collect of evidence to confirm which country each of your customers are in. You have to store this for 10 years.

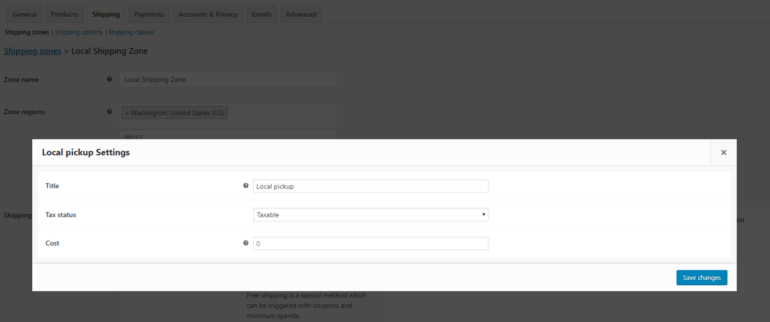
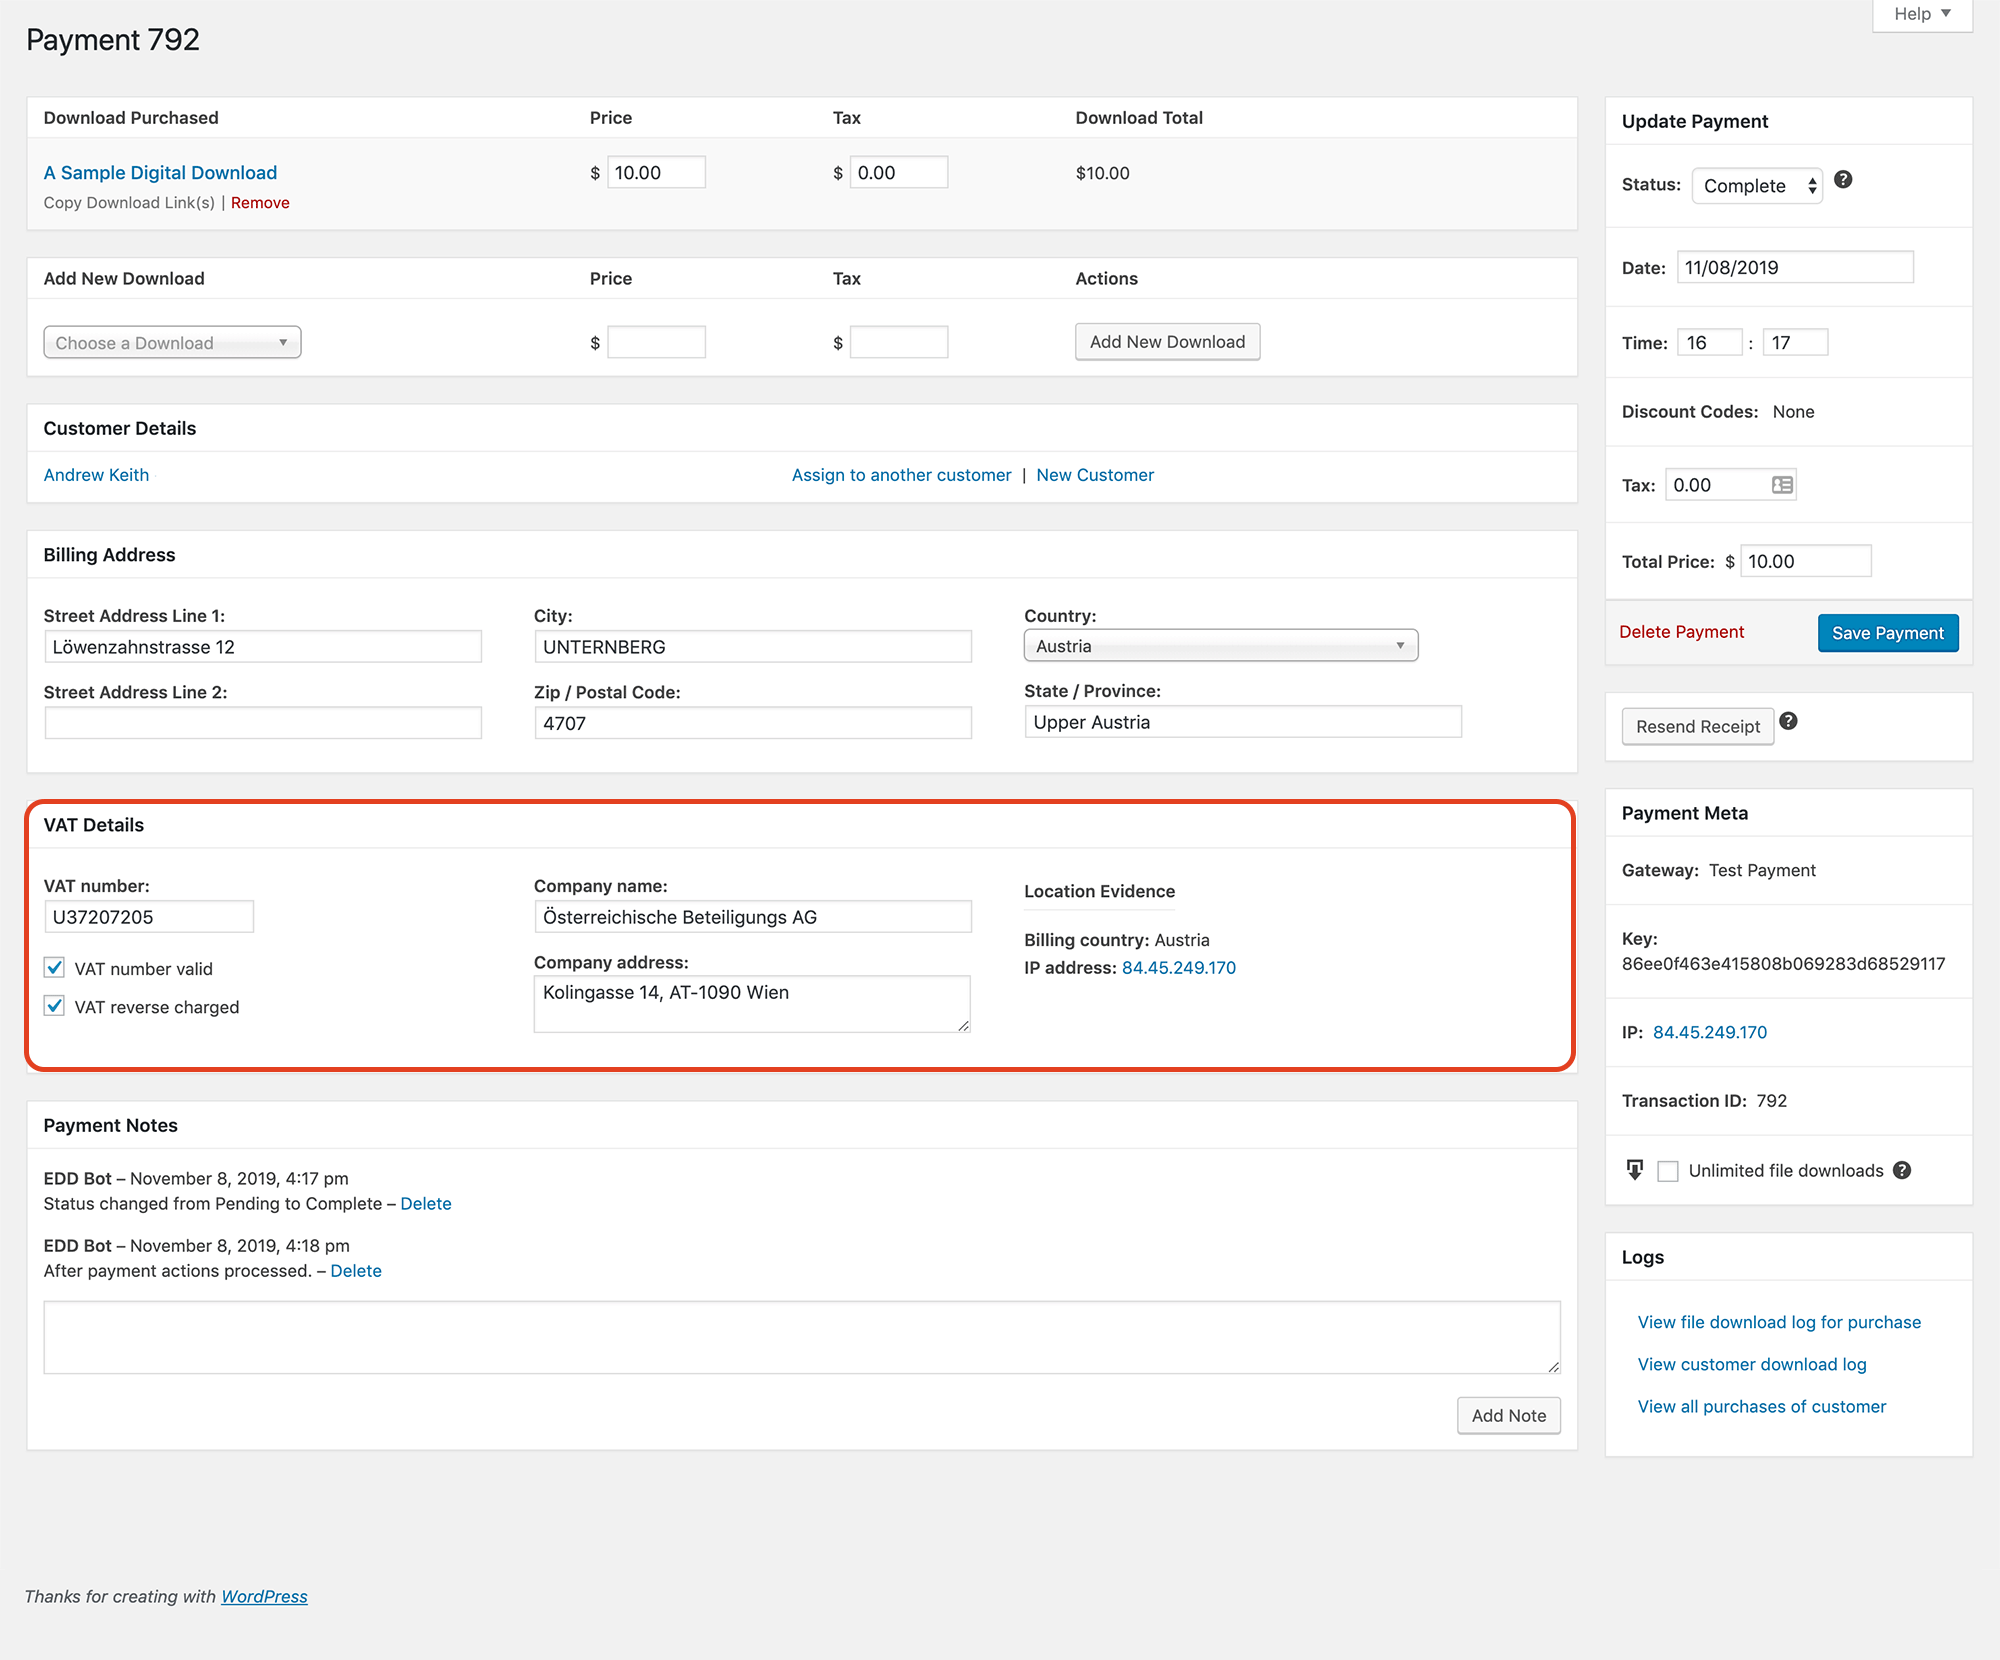
Again, the good news is that this is all handled for you! The Easy Digital Downloads EU VAT plugin collates all the customer location evidence and stores it in a single location, making it easy for you to find. When you install the plugin, you'll see a 'VAT Details' section on the screen for each payment in your store:
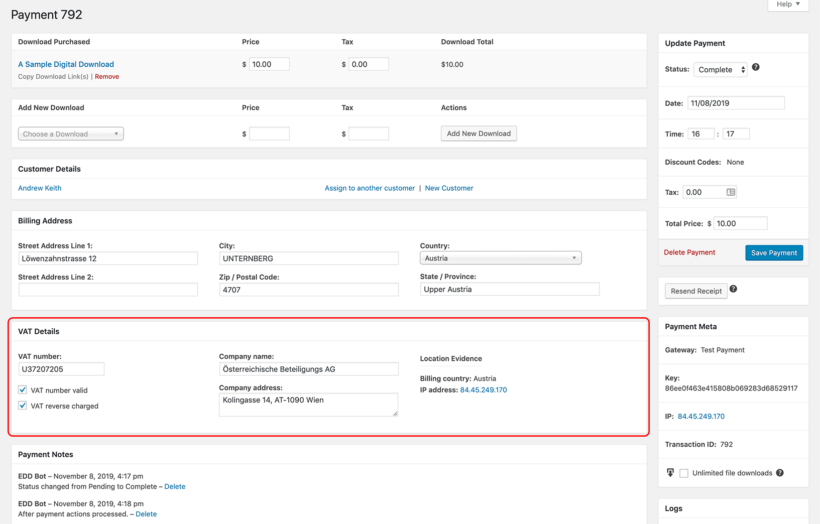
Easy Digital Downloads VAT Details Evidence

This displays:

  • Evidence 1 - Customer billing address Easy Digital Downloads stores the customer's billing address, which is entered on the checkout page.
  • Evidence 2 - Customer IP address Easy Digital Downloads collects the customer's IP address and stores it in the WordPress database. You can click on this in the 'VAT Details' section to see which country the IP address relates to.

Additional evidence

Most Easy Digital Downloads sites store additional evidence of the customer's location too. For example, your payment processor (e.g. Stripe or PayPal) might collect their own information, such as IP address, country code, and bank location. Each of these can count as additional pieces of evidence.

As an EDD store owner, you should look at all the evidence that is collected. Make sure that you have the correct amount of non-contradictory evidence to confirm your customers' locations. Remember - the more evidence, the better!

So long as you keep your Easy Digital Downloads store online, this evidence will always be available for you to access and report on.

How to report on customer location data

Easy Digital Downloads comes pre-built with an export facility, which you can use to download reports continuing your customer location evidence. For example, you might need to do this if you are ever audited by the tax authorities:

  1. In the WordPress admin, go to Downloads > Reports > Export. 
  2. Use the 'Export Payment History' tool to download all the payment records for the period you wish to report on.
  3. This will download a CSV file to your computer.
  4. Use any spreadsheet software such as Excel, Numbers or Google Sheets to edit the CSV file:
    1. Simplify the spreadsheet by deleting any columns you don't need.
    2. Find the Tax and Country columns and sort by them as required.

EU law states that the location data for each customer must be "non-contradictory". This means that both records of the customer's country should match. Normally, the records will match but there are occasions where this may not happen. For example, if the customer buys while they're abroad on holiday, then their IP address won't match their billing address country.

I recommend that you create a process to check the reports periodically. If you ever discover records that don't match, then you should contact the customer. Ask them to resolve the discrepancy between the two pieces of information. (More advice on this here.)

How to send quarterly EU VAT returns

Once your EDD store is up and running with the Easy Digital Downloads EU VAT plugin, you can sit back and relax until it's time to file your first EU VAT return.

Tax return deadlines

You must submit a EU VAT tax return and make a payment by:

  • Q1 - 20 April - covers the first quarter ending 31 March
  • Q2 - 20 July - covers the second quarter ending 30 June
  • Q3 - 20 October - covers the third quarter ending 30 September
  • Q4 - 20 January - covers the fourth quarter ending 31 December

Most EU tax authorities will email you shortly before the deadline, but I also recommend setting a reminder to make sure you don't forget!

Where to get the information

There are several ways to get the information for your quarterly MOSS return. The simplest is to use the EU tax report that comes with the Easy Digital Downloads EU VAT plugin. This lets you export details of all the EU tax collected during a specific period, divided by country.

Export EU VAT collected from Easy Digital Downloads report

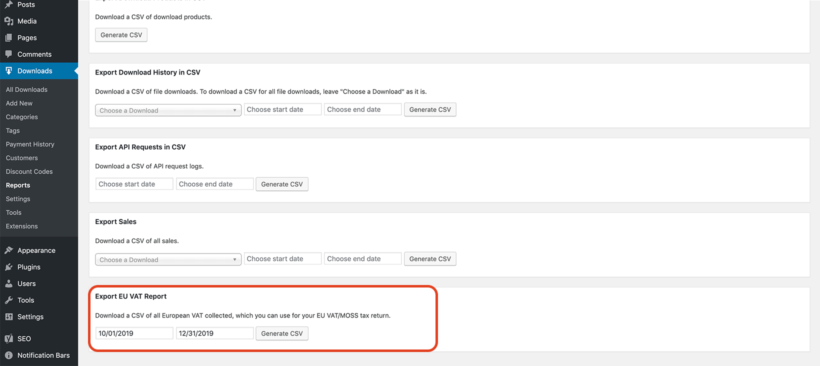
The report exactly matches the data you need to provide for your MOSS tax return, making it as easy as possible for you.

Alternatively, if you use an online accounting system such as Xero, QuickBooks or Sage, then the accounting system can generate and submit your MOSS returns at the click of a button. First, you need to get the data into your accounting system. You can either export your sales from Easy Digital Downloads and then import them to your accounting system, or you can integrate your accounting system with EDD to import the data automatically.

Submitting the tax return

Log into the online system for whichever tax authority you registered for VAT with. For example, if you registered for MOSS in the Republic of Ireland then you should log into their online system.

The exact process depends on the country. Find the link to submit a MOSS VAT return, and follow the online instructions.

Making a payment

After submitting the MOSS return, you'll see the total amount of tax owed on the final page. You'll probably receive an email too. There will be instructions on how to make the payment, so use these to send the money.

At Barn2, we pay our EU VAT by making a bank transfer to the MOSS bank account. MOSS then distributes this to all the EU countries that we collected tax for. This is normally over 20 different countries, so the single payment saves us a lot of time!

What if I don't collect any EU VAT one quarter?

You must submit a tax return even if you didn't collect any EU VAT that quarter. When you create a MOSS return in the online reporting system, you'll see a tick box. Use this to confirm whether or not you made any taxable sales to EU countries in the previous quarter. If you didn't collect any VAT during that period, simply declare this and submit the return.

Where to get the plugin

The Easy Digital Downloads EU VAT plugin is available on our website. Get it today and start meeting European tax rules - the easy way!

WooCommerce dispatch time plugin

Since building WooCommerce Lead Time - the first ever WordPress plugin to show product dispatch times on the product page - we've been researching how different eCommerce stores display this information. We're sharing this with you so that you can show product dispatch times on your own WooCommerce site.

Keep reading for a sneak peek at how some high profile sites are displaying dispatch times. This can be a fantastic way to get inspiration for your own site!

1. Etsy handmade and personalised products

Etsy's expected dispatch time for products

Etsy brings together independent sellers and craftspeople from all over the world. The items are typically handmade or made to order, so Etsy displays a dispatch time on the product page. This provides clear information on how long the customer can expect to wait for their order.

Etsy show the estimated dispatch time alongside the other product information, close to the add to basket button. They use the wording 'Ready for dispatch in...', which is generic enough to work for the wide range of products on Etsy.

If you sell a wide range of e-commerce products on your WordPress site, then this wording could work for you too.

2. Made.com non-stock furniture

Ecommerce product lead time on Made.com

Furniture store Made.com sells furniture with varying lead times. They display the dispatch time immediately above the add to basket button on the product page. This makes it clear how long the customer should expect to wait, so they can make an informed decision on whether to place an order.

3. Personalized products on Amazon

Amazon personalized product with dispatch time

Amazon sells just about everything under the sun, including personalized products with longer lead times. Marketplace sellers can choose to display lead times on their products.

The extra information appears with the stock status, making it clear that there is a processing time on top of the delivery time. Wording such as "Usually takes between 1 and 2 days to create" reassures the customer that the product is genuinely personalized to order, while letting them know the expected dispatch time.

Add dispatch times to your own WooCommerce products!

I hope these examples provide some new ideas on displaying WooCommerce dispatch times for your own products! To add the same information to your own site, get the WooCommerce Lead Time plugin today.

As an online store owner, there are many reasons why you might want to add charitable donations to your e-commerce checkout page. It helps you support a worthy cause and motivates customers to donate a fraction of their cart value. One way to do this is by using a WooCommerce donation plugin.

In this article, we’ll show you:

  • How you can add charitable donations to your online store using a WooCommerce donation plugin.
  • An easy way to list a range of donation products or options for customers to choose from.
  • How you can add donations to your checkout page using WooCommerce extensions.
  • How to let people choose between a selection of donation products before directing them to the checkout.

Let’s put everything into context before we begin.

Why you might want to offer charitable donation options to your customers

Did you know that it’s easier to find donations in retail verticals as compared to other spaces? This is mostly due to the fact that, at checkout, customers have their card or cash out and are ready to pay for their order. According to a recent survey, 71 percent of consumers said that they had made donations to charities at the register.

Another reason for adding donations to your checkout is that people prefer to do business with companies that give back to society and feel positive about them. According to a study, 65 percent of customers remembered the last retail business that asked them for donations, whereas 60 percent said that the experience made them feel positive about the retailer.

It’s easy to see that customers favor businesses that collect donations for a worthy cause and associate more trust with those brands. This is precisely why charity websites, as well as e-commerce stores wanting to make a difference, should encourage customers to make a donation at checkout.

This is incredibly easy to do with a WooCommerce donation plugin. Another reason for using a WooCommerce donation plugin to accept donations at checkout is that it can serve other purposes too. For example, it can also be used to enable a restaurant’s ordering system to take tips online or by service-based businesses that need a way to implement Buy me a cup of coffee!.

3 ways to offer charitable donation options

WooCommerce charity donation plugin

There are 3 main ways to offer charitable donation options through your website:

  1. Percentage of your order valueThis is calculated by taking a percentage of the customer’s order value. For example, 2% or 5% of their total purchase. This is a great option for store owners that want to donate a portion of their sales to charity.
  2. Fixed sum This involves asking customers to donate a fixed amount (for example $5 or $2.99) or in multiples of a base amount (for example $5, $10, $15, etc…) regardless of their order value.
  3. Offer a choice of donation productsAlternatively, you can list a range of donation options in a table before the customer visits the checkout page.

Of course, if you're a charity website, you might consider taking things a step further and accepting recurring donations. Now that we’ve discussed the importance of offering charitable donation options to your customers, let's talk about how you can let customers choose which charity they’d like to support.

How to select a charity to collect donations for

As an online store owner, you might want to gather donations for multiple charities or non-profit organizations. This way, you can give your customers the option to select which charity they’d like to donate to. Letting customers donate to a charity of their choice can help you gather more donations and make customers more likely to leave a donation at checkout.

To do this, you’ll need to set up drop-down options on the checkout page that let customers pick a charity of their choice. You’ll also have to keep track of how many donations were collected for each charity. For example, Charity A got $250 at the end of the month, Charity B got $150, and Charity C got $125. This will be done in the back-end though some WooCommerce donation plugins let you display progress bars on your site’s front-end, as well.

Best way to encourage customers to donate

While there are many ways you can ask for donations from paying customers, we recommend that you follow tried-and-tested methods when speaking to prospective donors. This is because customers who leave a donation will only be able to interact with your website unlike a real-life scenario where you can talk to them face-to-face.

Here are some of the best practices for encouraging customers to donate to charities:

  • Share the impact of donations You need to let people know how their donations will make a difference. For instance, sponsoring children’s education, building a community center, or feeding the homeless. In simple words, let them know where their money will go.
  • Use social proof Social proofing is all about everyone does it, you should too!. When people see other customers making donations to a worthy cause, they’re motivated to do the same.
  • Give customers control over donation amount You should let your customers choose how much they’d like to donate. Some customers might want to donate $5 while others might want to donate $1.99 – every little bit helps!

Now that we have a better understanding of why you might want to accept donations from customers at checkout, let’s take a closer look at how you’d go about doing this in WordPress.

How to add charitable donations to your checkout page

It’s easy for customers to make donations when they’ve reached the checkout page since they already have their card (or alternative payment option) ready to go. It’s often easy for them to make a relatively small donation compared to their cart value. For example, if they purchase products that add up to $22.99, they might leave a donation of $2 without hesitation.

Another benefit of adding a donation option to your checkout page is that you don't need to create a new donation button. Instead, customers can pay for their order and donate to a charity in one go.

It’s worth mentioning, however, that you should make charitable donations an opt-in option. In other words, customers who want to donate should be able to do so by ticking a checkbox or entering the donation amount. And the rest of them can proceed to complete checkout without having to opt-out manually. They shouldn’t have to untick a checkbox as that would negatively affect their shopping experience.

GiveWP: The best WordPress donations plugin

GiveWP is a free WooCommerce donation plugin that makes it easy for WordPress site owners to accept donations regardless of whether they’re using WooCommerce or not.

GiveWP WooCommerce donation plugin

This WooCommerce donation plugin is designed to help WordPress users easily create donation forms. You can quickly add fundraising campaigns to your e-commerce site as stand-alone web pages, display donation forms in your theme’s sidebar as widgets, or embed them using a shortcode.

GiveWP offers several options to customize the donation form templates along with extensive documentation to help you personalize the look and feel of your website. You can use GiveWP forms as widgets or add them to the checkout page. The plugin also lets you accept recurring donations from customers.

How to use GiveWP with WooCommerce

You can use the Donation Upsells for WooCommerce add-on to use the GiveWP plugin with your WooCommerce-based online store. This way, you can add donation options to your WooCommerce checkout (or cart) based on your GiveWP forms and form options.

One of the key benefits of using this add-on is that all payments made during the checkout process will be processed with the WooCommerce payment gateway you’ve enabled. In addition to this, the donation details you gather through your donation form will be saved in your GiveWP donation records in the back-end for reporting and donor management purposes.

The plugin delivers a seamless donation experience to your customers. When they click to view their shopping cart, they'll see a donation option directly under the products they've added to cart. This way, they can select which charity they'd like to donate to and select a donation amount. This will depend on how you've configured the plugin.

Here's an example of a website using the Donation Upsells for WooCommerce add-on to accept charitable donations at checkout:

Endless Hair Extensions example

Notice how customers can choose which charity they'd like to donate to and enter their donation amount. Customers can also choose to donate to multiple charities in one go.

Donate to multiple charities

How to use GiveWP without WooCommerce

You can use the GiveWP plugin to accept donations even if your website doesn’t use WooCommerce. This is especially useful for online store owners that:

  • Use other e-commerce plugins (like Easy Digital Downloads) for selling products, or
  • Website owners that don’t use a WooCommerce plugin at all but would like to be able to accept charitable donations.

GiveWP offers several payment gateways right out of the box. These include PayPal Standard and Stripe in addition to offline donation options.

Let customers make a donation on the product page

WooCommerce charity donation choose amount

The WooCommerce Product Options extension lets you set up donations in a way that lets customers decide how much they’d like to donate. In other words, instead of setting a fixed donation amount, you can let customers donate as much as they’d like.

It also gives you the option to configure donation amounts in multiples of $10, $20, and $50. This is in addition to a name your price option which simply allows customers to enter their own donation amount. 

This perhaps the easiest way to accept donations at the checkout page. It gives you the option to:

  • Suggest a price.
  • Enforce a minimum acceptable donation amount.
  • Let customers decide how much they'd like to donate.

How to sell a choice of donation products before the checkout

WooCommerce charity donation plugin

So far, we've talked about how to let customers to make a donation at the checkout. But what if you want to give customers a choice of donation options?

For example, maybe you offer a choice of charities or projects to donate to. Maybe you sell charity gifts, such as 'Send a Cow' or 'Pay to immunise a child'. If so, then it's best to create a quick order form listing all the donation options before taking customers to the checkout page.

You can easily do this with the WooCommerce Product Table plugin. This handy plugin takes your donation products and lists them in an interactive table with search box and filters. Customers can quickly find and select the projects or charities they want to donate to, and then add them to the cart. They can then check out as usual and pay for the donation products along with any other products in their cart.

How to set it up

It's easy to list donation products with WooCommerce Product Table:

  1. Install the plugin on your WordPress site. (Make sure you install the free WooCommerce plugin too.)
  2. Go to Products → Add New and add all your donation products. Use 'Simple Products' for donations that don't come with any options; or 'Variable Products' if you're offering a choice. For example, if you're selling a 'Choose Your Donation' product then use variations to list the available donation amounts.
  3. Go to the WooCommerce Product Table settings page (WooCommerce → Settings → Products → Product Tables). Enter the license key from your order confirmation email, and choose your options. To sell charity donation products, we recommend the following options:
    • Choose columns that will give people the information they need to know. For example, an image illustrating what the donation will be used for, the name, the price, and add to cart column.
    • Choose the add to cart 'checkbox' style. This lets people quickly select multiple donation options and add them to the cart together. This encourages them to donate more.
    • If you've created any variable donation products, then select the 'Dropdown' variation option.
    • If you have a long list of donations, use filters to help people to find projects they care about more easily.
  4. Create a new page and add the shortcode [product_table]. This will list all your products in a table. If you've created a specific category for your charity donation products then use the category option to list those products only.

Where to get the plugins

Customers are more willing to buy from companies who support charities. The easier you make it for them to leave a donation, the more likely they’ll be to do so!

We explained how you can collect donations for charities at the checkout using a WooCommerce donation plugin like:

Are you thinking of using a donations plugin? Will you let customers enter their own donation amount or set a fixed donation amount? Let us know by commenting below.

WooCommerce product lead times WordPress plugin

If you're displaying WooCommerce product lead times in your store, it's important to adapt it to your specific needs.

While the WooCommerce Lead Time WordPress plugin has 'lead time' in its title, that doesn't mean that you have to use these exact words on your site!

The purpose of the plugin is to tell customers how long they'll be waiting before the product is sent. There are many possible ways to do this, depending on what types of products you sell, and the setup of your business.

Alternative ways to describe WooCommerce product lead times

Here are some examples of popular alternatives to 'lead time', with advice on when to use each one:

Available on

Use this for non-stock products, for example if you are awaiting an order from the supplier. This is a good option for products that are normally in stock, where you have chosen to display the lead time text for out of stock or backorder products only. When the product goes out of stock, you can add the date when it will become available again. This tells the customer when to come back and place their order, resulting in more sales for you!

Ready for despatch in

Popular with websites selling handmade or made to measure products like Etsy, this wording is good for products that need some manual work to get them ready to send.

Handling time

Consider using this wording if you're showing WooCommerce product lead times for items that require some sort of handling or processing to get them ready for sending.

For example, you might use this for custom hampers or gift boxes which you compile based on the customer's selections.

Processing time

This text has a similar meaning to 'Handling time', but sounds slightly more formal because it removes the human element that is implied by 'Handling time'.

Made to order

You guessed it! This wording is good for made to order products. It indicates the reason for having to wait, which helps the customer to understand and reassures them that the product is worth waiting for.

You could also use 'Handmade' or 'Built to order'. They're both good alternatives for showing WooCommerce product lead times for this type of item.

Waiting time

This indicates how long the customer will be waiting before the product is dispatched.

Personally, I find it slightly negative. Customers don't want to view themselves as waiting! As a result, I would suggest choosing something that positively indicates when the product will be sent, rather than how long the customer must wait. However, it might work for some scenarios.

Delivery time

You can also use WooCommerce Lead Time to indicate predicted delivery times on the product page.

For example, you might add a note saying 'Standard delivery times' or 'Delivery time: 2 weeks'. Customers get frustrated at having to add products to the cart just to find out the delivery time, so showing it in the lead time field is an excellent solution.

Lead time

Of course, sometimes 'Lead time' is the best wording. Use it for non-stock products where there will be a wait before it becomes available to despatch. For example, this might include made to order products.

Are you managing stock?

When you choose your lead time label, remember that a stock message might be displayed next to it.

If you're actively managing stock for a particular product, then the stock text 'In stock', 'Out of stock' or 'On backorder' will appear before your lead time text. This might affect how you choose to word the lead time message.

How to set it up

Before we close, here's a quick video tutorial on how to display lead times for your WooCommerce products:

Where to get the WooCommerce Product Lead Times plugin

If you haven't started displaying WooCommerce product lead times in your store yet, then get the plugin today. You can set it up in minutes. Customers will instantly be able to make a more informed decision based on your lead times.

Unlocking personalized pricing: A guide to customer-specific pricing in WooCommerce

WooCommerce customer-specific pricing is a powerful strategy where you charge unique pricing to specific users in your online store. Discover the easy way to set it up - no technical knowledge needed!

In the bustling world of e-commerce, where every click counts and customer loyalty is paramount, businesses are constantly seeking innovative ways to enhance user experiences. Customer-specific pricing is a strategy that can significantly impact sales and customer satisfaction. Imagine tailoring your product prices to individual shoppers, offering personalized discounts and creating a sense of exclusivity - all while boosting your bottom line. It’s not just a dream; it’s a powerful reality 🔥

Keep reading to discover how to add WooCommerce customer-specific pricing to your store. We'll do it using Discount Manager, an easy-to-use WooCommerce plugin that makes it easy to add and display flexible pricing rules for specific users.

What is WooCommerce customer-specific pricing?

As online retailers, we’ve all faced the dilemma: How do we cater to diverse customer needs without compromising profitability? Traditional pricing models treat everyone the same. However, in reality, each customer brings a unique set of preferences, behaviors, and purchasing power. A first-time buyer may need an extra nudge, while a loyal VIP deserves special treatment. And what about those high-volume wholesale clients who keep our revenue flowing?

It's ideal for any website that wants to charge different amounts to different types of customer. For example, WooCommerce wholesale stores often need to charge different amounts to retail and wholesale user roles, or even different amounts to each wholesale customer.

WooCommerce Discount Manager - the best customer-specific pricing plugin

WooCommerce customer specific pricing plugin

Now you know why customer-specific pricing is so important, I'll tell you how to achieve it in your own store.

The best user-specific pricing plugin is WooCommerce Discount Manager. This powerful plugin lets you add simple or advanced pricing rules to WooCommerce.

You can choose from a choice of 6 discount types, each with plenty of options:

  • Select which products and categories the pricing will apply to.
  • Set the start and end dates for the special pricing, or run it permanently.
  • And most importantly - select which individual user accounts and/or user roles the pricing will apply to.

Unlike other WooCommerce customer-specific pricing plugins, Discount Manager actually lets you display unique information to each individual user. This helps to create a truly personalized user experience, boosting customer loyalty.

Next, I'll tell you how to set up user-specific pricing with the WooCommerce Discount Manager plugin.

How to charge different prices per customer in WooCommerce

To learn how to implement customer-specific pricing, either watch the video or follow the step-by-step written tutorial below:

Step 1: Install WooCommerce Discount Manager

  1. First, buy WooCommerce Discount Manager and download the plugin zip file to your computer.
  2. Go to Plugins → Add New in the WordPress admin and install and activate the plugin.
  3. The plugin setup wizard will open automatically. Use it to activate the license key from your order confirmation email.

Now the plugin is installed on your WooCommerce site, it's time to set up customer-specific pricing.

2. Create customer specific pricing rules

  1. Go to Marketing → Discounts and click the 'Add Discount' button.
  2. Choose the type of discount that you'd like to create for the user. There are several to choose from, each of which has a helpful explanation and examples. For example, you can choose a simple percentage pricing change, discounts based on the quantity ordered, and so on. All of these work with customer-specific pricing, so choose whichever one best fits the type of pricing rule you require.
    WooCommerce Discount Manager add discount type
  3. Next, fill in the information about how the customer-specific discount should work. This includes adding a name for the pricing rule, choosing how the user-based price will work, and selecting which products and categories it will be used on. The exact options depend on which type of discount you're creating.
  4. In the 'Applies to' section, select the individual user accounts or/roles that should receive the special pricing. For example, in the below screenshot I have selected a user called Ben. You can select as many users as you like, or entire user roles in order to give the same customer-specific prices to multiple people.
    Create WooCommerce user specific pricing
  5. In the 'Availability' section, you can optionally set dates when the customer-specific discount will run. For example, to give a personalized discount to Shanaz during her birthday month, you would select the start and end of that month.
  6. If you'd like to display a notice on the product page, then fill in the 'Product page content' and choose a location for it to appear:
    Display customer specific pricing message in product page content
  7. If required, you can also add a 'Cart notice' which will appear on the cart page for all users who the pricing rule applies to.
  8. Save the discount.
  9. Repeat the above steps for each customer-specific discount that you wish to create. There's a 'Duplicate' option for each discount to save you time. Simply copy an existing discount and change the details for the next user as needed.

Pro tip for setting customer specific prices for groups

When we talk about WooCommerce customer-specific pricing, it's easy to assume that you should create a separate pricing rule for each individual user. Before you do this, think about whether that's the most efficient way to charge different prices per product for each user.

For example, if you have several users who you want to give the same special pricing, then here are some easier ways to achieve the same result:

If you do this, then you should word the product page content and cart notice in a generic way that applies to all users who receive the group discount. For example, don't mention their individual names in it like I did in my screenshot above!

What sort of WooCommerce sites need user-specific pricing?

At first glance, charging different prices to specific users sounds a bit strange and unfair. However, personalized pricing is actually common practice in the eCommerce world.

Here are some examples of where a WooCommerce shop might need customer-specific pricing:

Loyal VIP customers

Give preferential rates to top-tier customers who consistently make high value purchases. Offer them a personalized discount or a custom price for specific products. For instance:

  • SuperVIP Jane gets 15% discount on all items.
  • Platinum customer Mark receives a fixed price of $50 for a premium product.

High-volume buyers

Recognize users who consistently order in bulk. Tailor pricing based on their historical order quantities. For example:

  • Wholesale partner Alex orders 100 units of a product regularly, so they get a 10% discount.
  • Bulk buyer Sarah purchases 500 units, earning a 20% discount.

Early adopters or beta testers

When launching a new product or feature, offer special pricing to users who participate in testing or provide valuable feedback. These users might receive a unique discount code or reduced price on all orders. This might be a permanent personalized discount, or it might be for a fixed period such as 6 months.

Referral program participants

Encourage users to refer others by offering personalized discounts. For instance:

  • Refer-a-friend Lisa receives a 10% discount for referring new customers.
  • Ambassador Mike gets a fixed price on a specific product for promoting your brand.

Birthday discounts

Celebrate users' birthdays by sending them a personalized coupon code. For example:

  • Birthday Girl Shanaz receives a 25% discount during her birthday month.

Customer-specific products

If you sell user-specific products, such as branded items to a school or sports team, then you might need customer-specific pricing too.

Behavior-driven discounts

Monitor user behavior (e.g., time spent on site, items viewed) and offer personalized discounts. For instance:

  • Frequent browser Alex gets a 5% discount after browsing specific products extensively.

Start charging different pricing per user today 🚀

As you can see, user-specific pricing is a powerful way to reward your best customers while making your eCommerce store more profitable. Discount Manager is the best WooCommerce customer-specific pricing plugin because it has everything you need to tailor your product pricing per user:

  • Choice of 6 flexible discount types.
  • Select which individual user accounts and roles each pricing rule applies to.
  • Display customer-specific information on the front end.
  • No-risk 30-day money back guarantee.
  • Detailed documentation, plus access to expert support.

Ever wondered how to turn off a WooCommerce store? There are many scenarios where online store owners might need to temporarily disable WooCommerce. For example, around the holiday season, due to a staff shortage, or simply because the products they sell aren’t available or on backorder.

In such cases, it’s a good idea to have a simple way to temporarily deactivate WooCommerce and let customers know when it’ll open up again. Ideally, you’d want to be able to use a plugin to do this instead of disabling your entire WooCommerce store or messing around with code. For example, a WordPress maintenance mode plugin takes your whole site offline - bad idea! Just disable WooCommerce while leaving the rest of your WordPress site live.

WooCommerce Private Store to disable WooCommerce demo

By using the right plugin to disable WooCommerce, you can automatically hide all the links to your shop pages. The best part is that you won’t even have to edit any content or re-configure menus and widgets.

With this in mind, in this article, we’ll explain three different ways to temporarily disable WooCommerce. We’ll cover how to:

  • Temporarily remove your entire WooCommerce store from your public-facing website. This is often referred to as "WooCommerce temporarily disable shop".
  • Hide specific categories only from your ecommerce store or disable the WooCommerce Shop page.
  • Temporarily hide the checkout page with a WooCommerce disable checkout plugin.

Along the way, we’ll also explain which solution is best for different scenarios.

3 ways to temporarily disable WooCommerce shop

Before we jump into the tutorial, let’s take a step back and quickly learn about the two options for temporarily disabling a WooCommerce shop.

Method #1: Use WooCommerce Private Store to temporarily disable WooCommerce

The first method involves using the WooCommerce Private Store plugin to temporarily disable or hide your WooCommerce store. It's perfect for anyone searching for how to turn off a WooCommerce store or disable the shop.

Using Private Store as a WooCommerce temporarily disable shop plugin is particularly useful for ecommerce store owners who:

  • Are sick or on leave. For example, a WooCommerce store vacation plugin is useful around the holiday season, for maternity leave, or travelling. When you finish the Woo store vacation, just make it public again!
  • Need to temporarily close the store because they’ve run out of inventory or if products are on backorder.
  • Are short on staff and can’t complete customer orders on time.

Simply put, this is the best method for anyone wanting to know how to turn off WooCommerce store. Once you’ve installed the WooCommerce Private Store plugin to your WordPress site and followed the tutorial, it’ll hide your entire store from your public-facing website. It will disable the WooCommerce shop page and all your other store pages such as the products, categories, and so on.

If visitors try to access your online store either by going to it directly or searching for it on Google, they'll be redirected to a different page depending on how you configure the plugin's WooCommerce settings page.

WooCommerce Private Store demo store login page

That said, you’ll still be able to access it (from the front-end and the back-end) by entering a password. As well as the password protect option, you can unlock your hidden store for logged in users or roles. This is a great option for online store owners that would like to temporarily disable the WooCommerce shop for regular customers but would like wholesale buyers to be able to make purchases. For example, it's perfect as a WooCommerce store vacation plugin.

Method #2: Use WooCommerce Protected Categories to hide specific categories and their products

The WooCommerce Protected Categories plugin lets you hide one (or more) categories within your online store. In other words, instead of disabling your entire WooCommerce shop, you can simply disable specific categories and all the products within those categories.

This is a practical option for online store owners who:

  • Are running out of stock on certain product categories but would like to be able to continue selling other products.
  • Are restocking a particular category of products and need to temporarily disable those category pages from their public-facing website.
  • Have decided to pause the production of a category of products.
  • Wish to make certain product categories private and available only to select members/users.

WooCommerce Protected Categories to disable WooCommerce demo

With the WooCommerce Protected Categories plugin, you’re able to protect specific categories in three different ways:

  • Password protection.
  • Making them available to certain user roles.
  • Allowing specific users to access them.

This way, you can disable specific categories from your WooCommerce store while still making them available to certain users. Make them public again on your chosen end date.

Method #3: WooCommerce disable checkout

The other two methods focus on disabling the entire WooCommerce store or a complete category. Alternatively, you might want to disable checkout options or turn off ordering for specific products.

A WooCommerce disable checkout plugin is useful for ecommerce business owners who: 

  • Have run out of stock or paused production of certain products but would like to be able to nudge customers to buy other products. 
  • Are facing a problem with a merchant or logistics and want to pause orders temporarily.

While you can disable checkout using code, it can easily get tricky and cause your site to break. Another way you could technically disable checkout for individual products is by using the External / Affiliate Product option available in default WooCommerce. This feature was built to enable store owners to showcase products on their site that customers will have to purchase on a different site. For instance, you can promote an Amazon product on your website but to purchase the product customers have to go to the Amazon product page. 

While this feature can be modified to allow you to disable the checkout page, that’s not what it was created for. It could also easily break your product variations which would require troubleshooting. That's why a WooCommerce disable checkout plugin isn't necessarily the best solution.

The best way to temporarily disable checkout or turn off orders for a product is to:

  1. Hide the price of the product, which in turn removes the add to cart button
  2. Mark the product out of stock

A better option: Display lead times and allow backorders

The problem with disabling ordering for specific products is that - by definition - no one can buy them! It’s better for business if you continue accepting orders for products that will come back in stock. The important thing is to clearly communicate with your customers so that they know there will be a wait.

You can easily achieve this by setting the stock status of the product to ‘On backorder’, and showcasing lead times. You won’t have to say no to sales!

How to temporarily disable a WooCommerce shop using plugins

Depending on whether you activate WooCommerce Private Store or WooCommerce Protected Categories to your online shop, some or all of your WooCommerce pages will immediately disappear from your public-facing website. Keep in mind that the rest of your WordPress site (your homepage, blog pages, galleries, etc.) will remain public.

In addition to this, your WooCommerce store will remain accessible to administrators and store managers from the WordPress admin area. They will also be able to access the store from the front-end as usual by entering the password or logging into a user account – depending on how you decide to set up the plugin.

The key benefit of using either WooCommerce Private Store or WooCommerce Protected Categories is that they simply hide all the links to your shop pages. This includes the main shop page, category pages, and single product pages. This way, you won’t have to edit any content on your site or mess around with menus and widgets. It’s the easiest way to WooCommerce temporarily disable shop.

Method #1: How to turn off WooCommerce store with the Private Store plugin

Once you have WooCommerce Private Store set up, it will automatically hide all WooCommerce-created pages from your store. This includes the account page, shopping cart links, checkout pages, main shop page, and product pages.

Assuming you already have an ecommerce store, here’s how to temporarily disable WooCommerce shop:

WooCommerce Private Store

  1. Get the WooCommerce Private Store plugin. Download the plugin files and copy the license key from the order confirmation page or the email notification receipt.
  2. Log in to your WordPress admin panel and head over to Plugins → Add New.
  3. Click the Upload button and look for the plugin files you downloaded.
  4. Install and activate the WooCommerce Private Store plugin to your WordPress website.
  5. Navigate to WooCommerce → Settings → Private Store and paste your license key.
  6. From the same screen, you can configure other plugin settings, as well. For example, you can:
    1. Set a Store Password if you’d like to let administrators and store managers access it from the front end.
    2. Set a Login Redirect URL to redirect users to another page (such as your homepage) if they try to access a store page.
  7. Click the Save Changes button at the bottom of the screen to proceed.

That’s it! Your entire WooCommerce shop should be hidden.

To take things further, you can place your login form somewhere on your WordPress website. For example, on a dedicated login page or in a sidebar widget. All you have to do is paste the shortcode: [store_login] on the page or sidebar. This will automatically generate a login form based on the WooCommerce Private Store settings page. This way, administrators and store managers can easily access the shop from the front end while it's temporarily disabled.

WooCommerce Private Store to disable WooCommerce demo

It's an easy way to close your WordPress store until you're ready to start selling again. It basically lets you disable the WooCommerce shop page.

Method #2: How to use WooCommerce Protected Categories to hide specific categories and their products

Once you’ve installed and activated the WooCommerce Protected Categories plugin, it’ll give you the option to hide specific categories from your WooCommerce store. It also hides all of the sub-categories and products that fall under those categories.

Here’s what you need to do to temporarily deactivate or disable specific WooCommerce categories:

WooCommerce Protected Categories

  1. Get the WooCommerce Protected Categories plugin. Copy the license key from the order confirmation page or the email notification.
  2. Log in to your WordPress dashboard and head over to Plugins → Add New.
  3. Click the Upload button and look for the plugin files on your computer.
  4. Install and activate the WooCommerce Protected Categories plugin to your WordPress website.
  5. Navigate to WooCommerce → Settings → Products → Protected categories and paste your license key.
  6. Click the Save Changes button at the bottom of the screen to proceed.
  7. Go to Products → Categories from the admin panel.
  8. From the Product categories screen, you can:
    1. Edit an existing category that you’d like to temporarily disable from your WooCommerce shop. Alternatively, you can create a new category, as well.
    2. Scroll down to the Visibility section and select the Protected option or the Private option depending on your preferences.
  9. Click the Add new category button to proceed.

That’s all there is to it! The category (and all subcategories and products that fall under it) should be temporarily disabled.

WooCommerce Protected Categories to disable WooCommerce demo

You can repeat these steps to hide as many categories as you’d like.

Method #3: How to hide checkout page by turning off orders

To turn off orders and essentially disable checkout, you’ll need to remove the price of the product. 

Default WooCommerce doesn’t give you the option to hide product prices. You could use code to hide the prices of specific products, categories, etc.  However, that comes at the risk of breaking your site as it involves editing and adding code snippets to crucial website components like your child theme, functions.php file etc. 

That’s why we recommend using a plugin. Our in-depth tutorial to hide WooCommerce product prices explores multiple ways to hide prices including:

  1. Hide prices from logged out users using WooCommerce Wholesale Pro
  2. Showcase product in table format (without prices) using WooCommerce Product Table
  3. Show a quick view of products without prices using WooCommerce Quick View

Once you’re hidden the price of your product,  you can also mark it out of stock. For this you can follow these steps:

  • Open the WordPress Dashboard, and go to the product you want to mark out of stock. 
  • Navigate to the ‘Product data’ section and click on “Inventory”
  • Here you can change the “Stock Status” to ‘Out of stock'.
  • Make sure to click on ‘Update’ once done. The product is now marked out of stock! 

Hiding the product price and marking it as “out of stock” is not the only way to deal with products that are out of stock. If you are in the middle of restocking products then showing lead time is a better idea as it’ll help you make a sale if customers decide to place a backorder. 

Products out of stock? Don't disable your store - show lead times instead!

Show expected availability date out of stock product WooCommerce

In the previous sections, we assumed that disabling your WooCommerce store is the best way forward. However, it's worth thinking about whether there are any alternatives to hiding it completely. This depends on why you want to disable WooCommerce.

Some people decide to temporarily close their online store due to stock availability. For example, if your products are out of stock or you have lead time issues, then you might want to take them offline until the products are ready to despatch again.

If this is your reason for disabling WooCommerce, then there's a better option. Taking your store offline can affect your SEO because your shop pages aren't consistently available to search engines. It can also lead to missed opportunities because potential customers can't find your products.

How to add product lead times

As an alternative, you can use the WooCommerce Lead Time plugin to show when the products will be ready for dispatch.

This handy plugin lets you set a global lead time that will appear on all your product pages, or show lead times on specific products. This is much better than disabling ordering for out of stock products.

You can choose which stock statuses to show lead times for. For example, you could show lead times for 'Out of stock' or 'On backorder' products only, instead of taking them offline. This way, you can stop orders in WooCommerce temporarily.

You can also choose what text to display alongside your lead times (e.g. 'Waiting time', 'Available on 1st July', etc.). The plugin even has a dynamic lead time feature where you select the date when the product will be available, and the remaining waiting time is automatically displayed on the website.

If you're tempted to disable WooCommerce because of lead time issues, then it might be better to keep your store online and display the expected lead times instead. That way, customers (and search engines) can still see your store, while making an informed decision on whether to wait. This also enables you to accept backorders!

If you need to disable WooCommerce for any other reasons, then you're probably better off using the other methods discussed above.

Where to get the plugin

Traditionally, the only way to disable WooCommerce was to either deactivate the WooCommerce plugin from your WordPress website or mess around with your functions.php file. However, if you want to know how to temporarily disable WooCommerce shop, we recommend using a plugin.

More specifically:

It’s worth mentioning that both WooCommerce Private Store and WooCommerce Protected Categories are compatible so you can use both plugins together, as well. Both plugins allow you to configure WooCommerce to stop orders.

Do you have any questions on how to temporarily disable WooCommerce? We’re happy to help so let us know in the comments section below.

Shipping is an essential part of most e-commerce businesses. The right shipping options can affect whether customers complete their purchase, or abandon their cart and shop elsewhere.

If you’re running a WooCommerce online store, then there are many shipping options available - right out of the box. You can configure WooCommerce shipping zones, shipping methods, shipping options, and shipping classes.

With this in mind, in this article, we’ll explain how you can configure WooCommerce shipping settings for your own online store. We’ll also introduce you to some advanced options that further improve the customer’s shopping experience.

You'll learn how to:

Let's get started!

What you need to know about WooCommerce shipping

WooCommerce is a powerful e-commerce plugin for WordPress that comes with several shipping options and settings out of the box. Before we jump into explaining how you can configure these settings and offer shipping through your online store, let's take a step back and see what each option means.

  • Shipping zones are the geographical areas that carriers ship products to. Generally speaking, these range from Zone 1 to Zone 8 (for shipments in the United States) and can also be defined by a region (for example Northern Ireland). This allows carriers to measure distance in groupings of zip codes (rather than miles) from where the package will be shipped from.
  • You need to assign shipping methods to each shipping zone you create. This lets customers know how you'll ship their order to them. Out of the box, WooCommerce lets you choose from one of three shipping methods i.e. flat rate, free shipping, local pickup.
  • The shipping options settings page in WooCommerce lets you configure general shipping settings related to calculations and shipping destinations. From here, you can choose to show (or hide) the built-in shipping calculator or decide to hide shipping costs until customers enter their address.
  • Online stores that sell products of various sizes (e.g. furniture stores that sell sofas, table lamps, ottomans, and carpets) might need to group similar-sized products together. This way, they can charge a higher shipping rate for larger products and a lower rate (or free shipping) for smaller products. WooCommerce's shipping classes options lets store owners create shipping classes and charge different rates for different shipping classes.

In addition to this, there's so much more you can do with WooCommerce to make it easier for customers to understand how you handle and charge for shipping. For example, you can use the WooCommerce Lead Time plugin to display an estimated shipping time for each product – more on this later.

WooCommerce shipping zones

Log into your WordPress website and navigate to WooCommerce → SettingsShipping to get started.

The first screen you’ll see shows a quick overview of the WooCommerce shipping zones your online store ships to. The first thing you need to do is add a shipping zone. For those unfamiliar, a shipping zone is a geographical region where you ship. This could mean a continent (such as South America) or a specific country (for example, Brazil).

WooCommerce shipping zones settings

Click the Add shipping zone button to get started. Give the new zone a name and choose the regions that fall under this shipping zone. You’ll also be able to restrict the region to specific postal codes by clicking the Limit to specific ZIP/postcodes link, which is useful if you’re looking to offer local pickup or local delivery.

Add a new shipping zone

When you’re done, click the Save changes button to proceed.

WooCommerce shipping methods

Now that you’ve created a shipping zone, the next step is to add and configure the shipping methods. From the same screen (i.e. WooCommerce → SettingsShipping → Shipping zones) click the Add shipping method button under the Shipping methods option to get started. You'll see a pop-up window with shipping methods to select from.

Add a new shipping method

WooCommerce comes with three shipping methods out of the box. These are:

  • Flat rateThis is a useful option for e-commerce sites that need to ship products to different shipping zones. For example, if you sell wholesale products through WooCommerce, you might need to charge customers in higher shipping zones more for getting their orders to them versus customers that are closer to your warehouse or fulfillment center.
  • Free shippingIf you sell subscription boxes or mix and match products locally, you might want to offer free shipping. This shipping method is also suitable for online store owners that bake the cost of shipping into their products to entice customers with Free shipping! messages.
  • Local pickupIf you're building a WooCommerce restaurant online ordering system, you might want to offer a local pickup option for people wishing to collect their meals from the restaurant.

Note: In some cases, you might need to offer a combination of shipping methods. For example, following our restaurant example, you might also set shipping zones to charge different delivery costs based on the customer's distance from the restaurant.

Once you've selected a shipping method, click the blue Add shipping method button to proceed.

You can add each shipping method more than once, which enables you to offer customers more options. The only problem is that your customers will be able to view all the shipping methods you create from their shopping cart. The cart contents will only affect the shipping prices that customers see. One way to refine this is by sorting through available shipping methods. You can do this by dragging and dropping the shipping methods into place. This way, you can decide the order in which customers see them.

Flat rate

The flat rate shipping method lets you charge a fixed shipping rate. Here are the available options to you for configuring its settings:

Set flat rate shipping options

  • Method title. Choose which payment method customers will see.
  • Tax status. Choose if the shipping method is taxable or non-taxable.
  • Cost. Fill in the cost of shipping the entire order. You can also use [qty] and [fee] parameters to charge custom shipping rates.

For example, you could add 5 + (1* [qty]) - [cost] which is $5 plus $1 for each product in the shopping cart. Or 10 + [fee percent = “5” min_fee = “2” max_fee = “5”] - [cost] which is $10 plus 5% of the total order, but no less than $2 and not greater than $5.

Free shipping

This is a special shipping method that can be triggered with coupons and minimum spend thresholds. By going into its settings, you can add in a custom title and set the free shipping condition. You can choose to set Free shipping requires... to:

Set free shipping options
  • N/A. Use this if you’re looking to offer free shipping to all of your customers.
  • A valid free shipping coupon. Create a coupon that enables customers to get free shipping. You can create coupons by navigating to WooCommerce → Coupons from the dashboard.
  • A minimum order amount. Enter the number of money customers would have to spend to receive free shipping.
  • A minimum order amount OR a coupon
  • A minimum order amount AND a coupon

Bear in mind that customers can use coupons even if the minimum order for free shipping has been set.

Local pickup

You can use this shipping method to let customers pick up orders themselves. You can add a custom title, set the tax status, and add in an optional additional cost for local pickup.

Set local pickup options

WooCommerce shipping options

From here you’ll be able to configure the general options related to shipping.

Configure front-end shipping options

The main options you need to configure are:

  • Enable the shipping calculator on the cart page Make sure this checkbox is ticked if you want to enable customers to calculate shipping costs based on shipping zones. (However, remember that customers actually need to see shipping costs before adding products to the cart. We'll talk about this in the next section.)
  • Hide shipping costs until an address is entered Tick this option if you want customers to view the shipping cost only after the order summary is generated.
  • Shipping destination Choose which address for the default shipping address. You can choose the customer's shipping address or the billing address as default. Alternatively, you can force all orders to ship to the customer's billing address.

Display shipping options on the product page

In the previous section, you learned how to enable a shipping calculator on the cart and/or checkout page. That's what you can do with WooCommerce as it comes. However, it doesn't actually reflect the needs of your customers, who need to know the shipping options before deciding whether to add products to their cart.

You can solve this problem by installing the WooCommerce Shipping Calculator plugin:

This useful plugin adds a shipping calculator to the location of your choice on the product page.

Having a shipping calculator on the WooCommerce product page is much better for user experience than hiding this information until customers get to the checkout. It completely eliminates the problem of customers abandoning their cart due to unexpected shipping costs. Customers can see the options where they need them and make an informed decision.

A product page shipping calculator also helps to avoid disappointment for customers in locations you don't ship to. That's because they can see that you don't ship to them before committing to buying the product.

WooCommerce shipping classes

Shipping classes are especially useful for online store owners who sell products of various sizes. Shipping classes can be used to group similar types of products. In addition to this, you can also configure some shipping methods (such as flat rate shipping) to provide different rates to different shipping classes.

WooCommerce shipping classes screen

Click on the Add shipping class button to get started. Next, enter the Shipping class name, Slug, and Description.

Add a new shipping class

Now that you’ve created the shipping classes, the next step is to assign shipping classes to products.

Assigning shipping classes to products

To assign shipping classes that you’ve created to products, navigate to Products → All Products and open the product you'd like to assign a shipping class to in the edit product screen. Next, scroll down to the Product data section and click on the Shipping tab.

Assign products to shipping classes

From here, you can set the Shipping class option to one of the shipping classes you created. Click the Update button to proceed.

Note: If you sell variations of the same product, you'll be able to assign separate shipping classes to each variation. You can do this by heading over to Variations from the Product data section.

Add shipping classes to product variations

Assigning shipping classes to products in bulk

You can also set the shipping class for multiple products all at once.

Navigate to Products → All Products and select all of the products you'd like to assign to the same shipping class. From the Bulk Actions dropdown, choose Edit and click on the Apply button.

Bulk assign products to a shipping class

Set the Shipping class value (under Product data) to whichever shipping class you'd like to assign. Finally, click the Update button to proceed.

Setting shipping class costs for flat rate shipping

Once you've added some shipping classes, you'll see a Shipping class costs section under Flat rate settings. It should look something like this:

Advanced flat rate shipping settings with shipping classes

From here, you can configure:

  • Shipping class costsThere is a separate field reserved to add in a shipping cost for each shipping class. You can enter an additional cost here for specific shipping classes.
  • No shipping class costOnly use this in case you’re using Per class calculation (we’ll talk about that next).
  • Calculation type When you’re calculating the shipping cost for shipping classes, you can go with one of two options:
    • Per class. The cost of shipping will be the total costs for each shipping class added up.
    • Per order. Of all the products in the shopping cart, the most expensive shipping class will be applied.

3 plugins for advanced WooCommerce shipping

There are several plugins and extensions out there that let you control your shipping options. Here, we'll dig deeper into three of the most popular (and most useful!) offerings.

WooCommerce Lead Time

WooCommerce Lead Time Plugin

Out of the box, WooCommerce doesn't let you add an estimated shipping time for individual products. This is important as it lets customers know when they can expect to receive their order or when it will be available for purchasing.

Thankfully, with WooCommerce Lead Time, you can display the estimated number of days it will take to restock a product in your inventory. This allows customers to make an informed buying decision and can make a big difference to conversion rates.

WooCommerce lead time displayed on the front-end

This is especially useful for online stores that:

  • Sell made-to-order products or handmade goods
  • Sell products that have long lead times or waiting times (like furniture)
  • Don't always have all items in stock or for products that are out of stock

Buy Plugin

WooCommerce Shipping

WooCommerce Shipping (powered by Jetpack) is a free extension that lets you add discounted shipping rates and print shipping labels directly from the WordPress dashboard. You can use this extension to print discounted USPS shipping labels. If you need a way to access additional carriers (including DHL, UPS, FedEx, and USPS), consider using Shippo instead. This is the easiest (and most cost-effective) way to print labels.

Buy Plugin

Table rate shipping plugins

Many online stores sell products of variable sizes and weights. For this reason, flat rate shipping isn’t always the best possible solution for them. They need a different (more advanced) way to calculate shipping costs. This is where a Table Rate Product Shipping plugin comes in. This WordPress plugin by YITH offers a convenient way for store owners to create and set rules for calculating advanced shipping costs.

Rules can be set based on:

  • Weight
  • Number of items
  • Number of items by class
  • Price
Table Rate Shipping settings screen

This gives store owners the flexibility to create rules like:

  • If the weight of all the products adds up to be anywhere between 1 lbs and 5 lbs, $15 will be added to the shipping cost.
  • If the order contains more than 5 products, add $10 to the total shipping cost.

Buy Plugin

Conclusion

Setting up WooCommerce shipping for your e-commerce website is a great way to enhance your offering while remaining profitable. All you have to do is configure options for shipping zones, set shipping methods and classes, and assign products to the right classes.

Once you've set up the default WooCommerce shipping options, you can install the best plugins to supercharge shipping in your store:

Do you have any questions on how to set up WooCommerce shipping for your online store? We're happy to help, so let us know in the comments section below!

WordPress client portal plugin

As a business owner, if you offer services to multiple clients then a client or WordPress customer portal will help you better manage your business. You’ll be able to share files and documents with clients, distribute downloads, post news and updates, and much more. All of this is possible with a WordPress client portal plugin.

In this article, we’ll show you how to create a private WordPress client portal by using the Password Protected Categories plugin to simplify client management. You'll also learn how to create a searchable, filterable table layout to help clients to find information more easily.

Before we begin, let’s quickly take a look at why you might need to create a secure client portal on your WordPress site.

What is a WordPress client portal and why do you need one?

Preview of individual client logging in

A WordPress client portal is a private area on a WordPress website that only authorized clients can see.

To enter the secure client area, clients will visit your WordPress website and click on a link to a "Client login" page. Here, they will either enter a simple password (ideal if they don't have a user account on your website), or log into their account. Either way, they will be redirected to the WordPress portal where they can access exclusive information.

Having a private WordPress client portal (or WordPress customer portal) is a great way to enhance your service offering.

What are client portals used for?

Client portals are an excellent way to provide exclusive information for your clients, without having to send it to them manually via email. For example, you might use a WordPress portal for:

  • Sharing project information with all your clients, such as policy documents and questionnaires.
  • Providing private documents to individual clients, such as information specific to their project. With this type of client portal, different clients see different information.
  • Sharing information for potential clients, such as a private portfolio of your previous work.

Let's look at some popular use cases in more detail.

Use case 1 - Design and consultancy services

If you offer design services and consultancy, you could set up two different areas in your WordPress client portal: one for your graphic design clients and another for clients who are interested in design consultancy. This way, you could share all design-related news, updates, information, and downloadable resources with your graphic design clients and all consultancy-related updates and resources (such as Google Docs or Google Sheets) with your design consultancy clients.

Alternatively, if you’re a design agency that creates custom logos for businesses, you’d want to set up multiple private pages area for individual clients. In this way, you can create a separate client area for each one of your clients and share downloadable resources, files, and PSDs with them. This also makes it easy for your clients to access deliverables and resources and improves project management.

Use case 2 - Photography client portal

WooCommerce photography website with client login plugin

Most professional photographers need to upload photos to individual clients after a photo shoot. The client can then view their photos from a private and secure area - and possibly select photos and order them online.

You can do this with a WordPress client portal plugin. For photographers, the exact method depends on whether you want to sell photos online:

  • Upload photos for clients to view only If you're uploading photos for viewing purposes only, then continue reading this tutorial. We'll provide step-by-step instructions on how to create a secure portal for each client in WordPress.
  • Upload photos for clients to buy online Alternatively if you want clients to pay (using PayPal, Stripe, and other payment option) for and order photos on your WordPress website, then you can do this too. Instead of reading the rest of this tutorial, use our complete guide to creating a WooCommerce photography website.

Introducing the best WordPress client portal plugin

Now you've learned what is a WordPress portal and why you need one, I'll tell you about the best plugin for adding one to your site.

Password Protected Categories is a WordPress client portal plugin that lets you create secure, hidden WP customer areas within your website.

Create client-only categories

True to its name, Password Protected Categories creates client-only content in the form of categories. This gives you a huge amount of flexibility because WordPress uses categories in many different ways.

For example, you might create:

  • Client-only post categories, for example to create a private blog within the client portal. This is a good way to share company news and updates with all your clients at once.
  • Confidential documents or information for each client. To do this, you might create a "Clients" custom post type in the WordPress admin (which you can easily do with the free Easy Post Types and Fields plugin) and structure it into a separate category for each client. You would then use these categories to share your private client documents, updates and information.
  • Private portfolios, if you want to share confidential information about previous projects that you're not allowed to publish on your public website.

2 easy ways for clients to unlock the secure portal

When creating a WordPress client portal, website owners often get stuck because some clients have user account on your site, and others don't. Fortunately, the Password Protected Categories solves this problem.

It does this by providing two different ways to access the secure client portal:

  • Password protection - Allow clients to unlock the portal by entering a simple password. This might be a shared password that you give to multiple clients, or it might be a different password per client. Either way, clients can access the hidden content without needing an actual user account on your WordPress website.
  • Individual user account protection - Alternatively, maybe you want to create a proper user account for each client. If so, then you can automatically unlock the client portal for each client when they log into their user account. The Password Protected Categories plugin lets you restrict categories within your WordPress to specific users or roles. Use role protection for areas of the client portal which contain information for multiple clients; or user protection for information that is unique to a specific client.

Incredibly easy to use

As you can see, the Password Protected Categories plugin has everything you need to create a secure WordPress client portal. It's perfect whether you're sharing the same information with all your clients, or sharing unique information with each person.

But the best thing about this client portal WordPress plugin is how simple it is to use. When creating a customer portal, website owners often install a full membership plugin and get stuck because they're so complex. Password Protected Categories is different because you simply create one or more categories and restrict access to them. You don't need to worry about creating a paywall, hierarchical membership levels, or anything else that would cause you a headache 😊

How to create a private WordPress client portal in 3 steps

Password Protected Categories make it easy to create a secure, private client portal WordPress. To create your own WordPress portal, follow these steps:

Step #1: Install and activate Password Protected Categories

Get the Password Protected Categories plugin and install it on your website. You’ll receive a license key along with the plugin’s zipped file in an email. Once the client portal WordPress plugin is installed on your site, click the Activate button.

Install WordPress client portal plugin

Next, head over to SettingsProtected Categories from the admin panel and enter the license key. Click the Save Changes button at the bottom of the screen to proceed.

You can also configure the plugin’s settings from this screen. For example, you can change the title, contact form message, password label, placeholder, and button text for your password protected category login form.

Step #2: Create categories and sub-categories for different types of clients or individual clients

First, you need to make two decisions about how to structure your WordPress client portal.

Decision 1 - One or multiple client areas?

The first thing you need to do is determine whether you’ll be:

  • Building a WordPress client portal where all clients can access the same information, or
  • Creating a private client area for specific types of clients, or
  • Creating a private client area for individual clients.

The process is the same for each approach. The only difference is how you’ll go about structuring and naming the categories and assigning passwords.

Regardless of which approach you go with, your clients will be able to access the appropriate area of the client portal WordPress with a password. Essentially, you can make shared or individual client areas as complex or as simple as you’d like without compromising on user experience.

Decision 2 - Posts, pages, or custom post type?

The Password Protected Categories client portal plugin works by restricting access to any type of category in WordPress. As a result, you can create your own portal using any content type.

The choices are:

  • WordPress posts - The simplest option is to create one or more hidden categories under the 'Posts' section of the WP admin. You'll add each piece of content to the client portal as a 'post' - for example, if you're adding resources then each one will be a separate post. The hidden client portal categories can run alongside your public blog
  • WordPress pages - If you'd rather use normal pages for the client portal content, then that's fine too. To do this, you need to enable categories for your pages and then you can create hidden password protected categories for your client portal.
  • Custom post type - Perhaps you'd like a dedicated area for adding information to the client portal. To do this, you can create a custom post type. For example, if you create a custom post type called 'Client Resources' then a 'Client Resources' section will appear on the left-hand side of the WordPress Dashboard.  You can then structure it into one or more password protected categories for your WordPress client portal.

How to set it up

Head over to Posts → Categories from the WordPress admin panel to create a parent category. (Or if you're using pages or a custom post type, then go to the appropriate Categories page instead.)

Next, add a category name and slug.

For example, if you wanted to create a private area for specific types of clients, you might call it Graphic Design Client Portal.

Create a WordPress customer portal area of your website

Alternatively, if you wanted to create a private client area for individual clients, you might call it Logos for ACME or something similar.

Client portal WordPress plugin screenshot

Once that’s done, scroll down to the Visibility section and select the Password protected or 'Users' option. This depends on whether you want each client to simply log in with a password, or for each person to have their own user account.

For password protected client categories, type a password. You can also choose to create multiple passwords. This way, you can give different clients different passwords to access the same client area. This makes your client area more secure and allows you to revoke a specific clients access without affecting other clients.

For user protected client categories, select which user(s) should have access.

Next, click the Add New Category button to proceed.

Create a WordPress client portal

If you want to create a WP client portal where all clients can access the same information, then you can skip to the next step. Or if you want to show different resources to different clients, then repeat these steps. Create parent categories for the different types of clients you work with or for individual clients – depending on your specific requirements.

Create sub-categories

Now that you’ve created the main parent category, you can create as many sub-categories as you’d like to organize the resources to share with clients and set the parent category to Graphic Design Client Portal. This will help you keep things organized and enhance project management.

Creating sub-category in WordPress portal plugin

For example, if you need to share files, documents, templates, and resources with specific types of clients, you could create the following sub-categories: Files and Documents, Templates, and Downloadable Resources.

And if you wanted to make contracts, logo PSD files, and proposal requests available to individual clients, you could create sub-categories for each to keep things organized in the back end for each client.

Examples of parent categories and sub-categories

You don’t need to change the visibility settings for sub-categories as they will already be protected. In other words, they’ll only be visible to clients who have entered access to the parent category.

Step #3: Set up a centralized login page

To make it easy for clients to log in and view the relevant client area, we’ll create a centralized client login page. This only applies to password protected categories. If you've restricted the categories to each client's user account then you can use any type of WordPress login form, such as the one that comes with your theme or WordPress itself.

Head over to SettingsProtected Categories and make sure the box next to the Show Categories? option is unchecked.

WordPress client portal visibility options

Next, go to PagesAdd New to create a new client login page. You can name it something like Client Portal Login. In the text editor, enter the shortcode [category_login]. Click the Publish button to proceed.

If you preview the page on your site’s front end, you’ll be able to see the centralized and custom login page. It should look something like this:

WordPress client portal login page

So, when a specific type of client (such as a Graphic Design Client) uses the password permissions you’ve assigned them to log in to the client area, they’ll only be able to see resources that are relevant to them:

Preview of specific type of client logging in

Similarly, if you created private client areas for each client you work with, they’d be able to log in from the client area and access the resources that are relevant to them:

WordPress client portal front end login

That's it! You can pair with your best client portal with additional WordPress plugins and add-ons to leverage advanced functionality. For example, you could set up systems for invoicing, file uploads, and file-sharing or set up a fully white-label login page. You can also create a WordPress portal in the same way.

Step #4 - Add information to the client area

Once you've set up the overall structure of the WordPress client portal, it's time to start adding information to it!

Bonus tip - List your client portal in a searchable table

As you can see in the screenshots above, the default layout for your secure WordPress client portal will have a blog-style format. The posts are listed in reverse date order, just like a blog.

If you'll be adding lots of information to the client area, then you might prefer a more structured and interactive layout. That's where Posts Table Pro comes in:

Tabbed interface within a WordPress client portal

The Posts Table Pro plugin takes the contents of your WordPress portal categories and dynamically lists them in a searchable table with filters. As well as the instant AJAX search box, you can add dropdown filters above the table. It provides a much easier way for clients to quickly find the information they need.

Get Posts Table Pro

What else can the client portal plugin do?

You can also create different areas within the WordPress client portal for different groups of client. For example, if you offer training services, you could create different categories based on their level of proficiency: Beginner, Intermediate, and Advanced, each with different passwords.

In this way, clients who are beginners will only have access to Beginner resources and material. Whereas proficient clients would have access to Advanced training resources.

It's incredibly simple - both for you and your clients - because you don't need to create separate user accounts for each client. Instead, just give them a password and they can access the portal straight away. (Tip: You can add as many passwords as you like. So you can either give out shared passwords or create a unique password or user account for each client.)

Now that we have a good understanding of why you might need to create a secure WordPress client portal, let’s step through a quick tutorial on how to do this in WordPress using the Password Protected Categories plugin.

Where to get the plugin

Whether you’d like to create your own client portal area for the different types of clients you work with or a separate client area for individual clients, Password Protected Categories make it possible. The best part is that the plugin is incredibly flexible and intuitive which means you can tweak it to fit your specific needs and requirements. This is a great way to streamline back-end client management.

Do you have any questions about creating a private, secure WordPress client portal? Are you thinking of a different implementation than the one covered in the tutorial? Let us know by commenting below!

If you enroll students in courses or programs – whether that’s through an educational institute, school, university, tuition, or private classes – you probably maintain a student database such as a Microsoft Access database, Microsoft Excel, or Google Sheets. It might contain basic information about your students, such as their names, contact information, and the courses they’re enrolled in.

You might consider displaying this information on your site’s front end to make it easily accessible to students, parents, and staff members - either publicly or within a password-protected private area. One way to do this is by using the Posts Table Pro plugin to create a simple student database.

Preview of student database created using Posts Table Pro and Gravity Forms

In this post, we’ll explain why you need a student database plugin and how to choose the right one for your needs. We’ll also walk you through a step-by-step tutorial on how to create a student database on your WordPress site that:

  • Displays all student profiles on a single page in a neat and organized table layout.
  • Lets users look up students using built-in search, sort, and filter options.
  • Enable admin staff to update student information directly from the front-end of your site.

Let’s get started!

Why you need a WordPress student database plugin

Every school, college, and university needs to create a database of all their students. This directory typically contains student names, student ID, email, photo, date of birth, year of graduation, and department. Creating a physical record of all your students is useful for administration purposes and so is storing that information digitally on your website.

An online student database is convenient, can’t be misplaced, and can easily be updated. For WordPress users, the best way to create one is by using a WordPress student database plugin that offers these features:

  • A simple and easy way to add individual students and list them in one place.
  • Option to add as many additional fields as you need.
  • Searching and/or filtering functionality to enable users to quickly find what they’re looking for.

Once you have a student database in place, you can use it as a data system or a student information system for better school management.

Introducing Posts Table Pro

Fortunately, finding the best WordPress student database plugin isn’t as difficult as it may seem. Our Posts Table Pro plugin is a robust solution that meets all of the requirements mentioned above. More specifically, it lets you create a searchable and sortable student database that can be modified to fit your particular needs and then displayed on the front end of your WordPress site.

You’ll be able to include as much information as you want in your student records using a customizable shortcode, easily organize everything, and enable users to quickly find the student they’re looking for. Plus, by purchasing this plugin you’ll get expert support in case you need help getting started.

Key features on offer with Posts Table Pro:

  • Supports custom post types, fields, and taxonomies, which are perfect for creating a student custom post type with extra fields to save information about each student.
  • It offers easy-to-use search and sort features making it easy for users to find a specific student in the database.
  • Option to embed media files that you can use to display photos of students in the database on your site’s front end.
  • It offers several customization options for modifying the look and feel of your WordPress student database in any way you like!

How to create a student database using Gravity Forms and Posts Table Pro

In this tutorial, we’ll show you how to create a functional front-end student database in WordPress. You can read it from start to finish or jump to the specific steps you need:

  1. Use Gravity Forms to create a submission form
  2. Store the student information as a custom post type in WordPress
  3. Display the student database in a table on the front-end of your website

Step #1: Use Gravity Forms to create a submission form (optional)

Note: This step is optional. If you're happy adding students directly in the WordPress admin, then you can skip to Step 2

The first thing you need to do is use Gravity Forms to create a submission form that new students can use to upload their information.

Log in to your WordPress website and navigate to FormsNew Form from the admin panel.

Add a new student using Gravity Forms

In the Create a New Form pop-up, enter the form’s title and a brief description. Click the Create Form button to proceed.

Next, we’ll add relevant fields to the submission form depending on the type of educational institute you’re creating the student database for.

For example, if you’re creating a student database of high school students, you might consider asking for the student’s name, date of birth, locker number, class section, student attendance, school district, and teacher name. However, if you’re creating one for university students, you might instead ask for the student’s name, contact information, department, and year of graduation. And if you have a global student body, you could include information about the student's city (New York or Toronto) and country (the United States or Canada). This should give you a window into some of the student attributes you can include in your student database.

Here are some of the most common form fields to help you get started with a step in the right direction:

  • First and last name
  • Email
  • Student ID
  • Date of birth
  • Year of graduation
  • Student photo

First name, last name, and email address

For First and Last Name, add the Name field from Advanced Fields.

Gravity Forms form builder name and email fields

Similarly, for Email, use the Email field (under Advanced Fields).

Student ID

For student IDs simply add a Number Field (under Standard Fields) if you assign numeric student IDs. However, if your student IDs are alphanumeric, you’ll have to use a Single Line Text field instead. For alphanumeric student IDs, you can also choose to add an Input Mask.

Gravity Forms form builder single line text field

Date of birth and graduation year

For Date of Birth, add a Date field from Advanced Fields. Rename the field to Date of Birth and change the date format to yyyy/mm/dd.

Gravity Forms form builder date field

For the Graduation Year field, you can create Radio Buttons (under Standard Fields) instead of a date picker.

Gravity Forms form builder radio buttons field

Student photo

For Student photos, use the File Upload field (under Advanced Fields). Here’s what you need to do:

  • Change the Field Label to Student Photo.
  • Type jpeg, jpg, and png in the Allowed file extensions option. This will restrict users from uploading other image formats.
  • Enter a Maximum File Size value (such as 5MB or 10MB).

Gravity Forms form builder file upload field

Once you’ve created the submission form, click the Update button to proceed. Your submission form might look something like this:

Gravity Forms submission form preview

Step #2: Store the student information as a custom post type in WordPress

In Step #1, we showed you how to create a submission form using the Gravity Forms plugin that students can use to submit their information. Once a student fills out the submission form, you’ll receive this information via email and it will also be stored in the WordPress database.

In this step, you’ll learn how to create a custom post type and store the information you collect from students directly in custom posts on your WordPress website. This way, you won’t have to manually enter the data into your site.

Note: We don’t recommend storing user-submitted data as regular WordPress posts because it will quickly clutter up your entire website. Instead, we suggest that you create a dedicated custom post type for storing student data. Since we want to create a student database from user-submitted data, we can create a ‘Students’ custom post type. This way, you’ll be able to organize student data separately from other site content.

To create a custom post type that works seamlessly with the Gravity Forms plugin, we recommend using the free Gravity Forms + Custom Post Types plugin. Here are the steps you need to follow to create a custom post type and integrate it with your Gravity Forms submission form:

  1. Install the Gravity Forms + Custom Post Types plugin to your WordPress website and activate it.
  2. If you haven’t already created a custom post type, use the free Easy Post Types and Fields plugin to do this. For complete instructions, check out this step-by-step tutorial on how to create a custom post type then come back here to continue this tutorial.
  3. Finally, you need to map your form fields to the custom post type using the instructions provided on the plugin’s page under the FAQ section (How to map a form to a custom post type).

Or if you don't need a way to submit students from the front end, then you don't need to bother with Gravity Forms. Instead, just go to Students → Add New in the WordPress admin and add the students from there.

Step #3: Display the student database in a table on the front end of your website

By now, you should have a submission form that’s linked to a custom post type on your WordPress website. In other words, whenever a student fills out the form and submits their entry, the student data should automatically be populated into your WordPress site as a custom post.

Next, you’ll learn how to display the user-submitted custom posts on your site’s front end in a dynamic and organized table layout. We’ll use the Posts Table Pro plugin to do this.

Install Posts Table Pro to your WordPress website

If you haven’t done so already, get the Posts Table Pro plugin and install it on your WordPress website. You’ll receive the plugin files and license key in a confirmation email. Then follow the steps below:

  1. Download the plugin from the link provided in your order confirmation email. This will save a zip file to your computer.
  2. Go to your WordPress admin dashboard, then navigate to Plugins → Add New → Upload Plugin.
  3. Click the 'Choose File' button and select the posts-table-pro.zip file you downloaded earlier.
  4. Once the file has finished uploading, click the 'Activate' button to enable the plugin.
  5. The Posts Table Pro setup wizard will automatically open.

Create your database and set the post type option

When you first install the Posts Table Pro plugin, you will be guided through a setup wizard that walks you through the steps of creating your first table. If you need to create additional tables, you can access the 'Add New' option in the Post Tables section of your WordPress admin. Regardless of the method you choose, the plugin provides clear instructions for each stage of the table creation process.

The setup wizard will then guide you in a step-by-step process to create your first table.

  1. To get started with creating a table, give it a name and select the post type you want to display. If you don't have a content type yet, you can create one using the Easy Post Types and Fields plugin.
  2. Choose the posts or pages you want to include in the table. You can select from posts, pages, and custom post types (e.g. student). The options available will depend on the post type you selected earlier. For instance, custom taxonomies will be listed for post types with them.
  3. Customize your table by choosing which columns to display and in what order. To add a new column, select the column type from the dropdown menu and click "Add". For example, you can display the following information in our student database:
    • Student photo
    • Student ID
    • First name
    • Last name
    • Email
    • Date of birth
    • Graduation year

    You can also reorder columns by dragging and dropping the sort icon or column heading.

  4. Add filters to your table to help users narrow down their selections. You can add as many as you like If you want to collect additional information from students such as their ...
    • Department (Department of Education or Department of Information Technology) or
    • Majors (Small Business Sales Management or Corporate Finance)
    Posts Table Pro student database with extra fields
  5. Improve the table's performance by enabling lazy loading, which allows it to handle hundreds or thousands of items without slowing down.
  6. Choose how to sort the table, including the default sorting option and the sort direction.
  7. Once you've finished creating your table, the setup wizard will provide instructions for inserting it onto your site.

Check out our step-by-step guide to creating tables with Post Table Pro!

Create a page to display the student database

Finally, we’ll create a page where we want to display the student database. Head over to PagesAdd New from the WordPress admin panel. Give your page a suitable title, such as the student database.

There are two easy ways to display the finished table on your site:

  • You can either use the 'Post Table' block in the Gutenberg editor or
  • Copy the shortcode from the table builder and paste it anywhere on your site. This gives you the flexibility to place the table on any page regardless of its content.

You can learn more about how to use custom fields with Posts Table Pro here!

Preview

Your student database should look something like this:

Posts Table Pro student database

Can students edit entries after submitting them?

Unfortunately, Gravity Forms doesn’t give users the option to let students edit entries or other information after they’ve submitted them through the submission form. However, you can make edits using Editus – a WordPress front-end editor plugin.

To achieve this, the students would have to click through to the single student profile page on your site. This is necessary because they can’t make changes to entries from within the Posts Table Pro table itself. However, they will be able to edit the content on the single post page as necessary.

Can I display Gravity Forms entries on the front-end without creating a custom post type?

The Posts Table Pro lets you display posts or custom post types in a table layout on your site’s front-end. Since form submissions are stored in a separate database field by Gravity Forms, you can’t list entries directly in a table layout using Posts Table Pro. The information needs to be stored as a post or custom post type.

This is why you’ll need to follow the instructions provided in the tutorial section above if you want to automatically store the information as a custom post type and then display these entries on the front-end in a table layout.

Can I import students in bulk?

Absolutely. You can mass-import students into the database using any WordPress import plugin such as WP All Import. This saves having to add each student individually, either via a front end form or the WordPress admin.

Create a private student database

Finally, let's talk about how you hide your WordPress student database and make it secure. Some student directories are available to the public, and that's fine. However, others need to be hidden from public view.

The easiest way to protect your student database is to password protect the page where you're listing all the students. You can easily do this by setting the page to 'Password protected' and giving the password to your students and staff.

Password Protect Page WordPress

Conclusion

The Posts Table Pro plugin offers several useful features for private or public schools (elementary schools through high schools), non-profit educational institutes, colleges, and universities to create a searchable and filterable student database. By following the step-by-step instructions provided in this article, you’ll be able to create an all-in-one flexible student database (or student management system) that can easily be searched, sorted, and filtered directly from the front-end. In addition to this, you won't have to worry about creating student accounts or giving students access to your site's back-end.

What are some of the different fields you’re looking to display in your front-end student database? Let us know by commenting below!