Discover the easy way to embed, stream and sell videos on your WooCommerce store. We'll do it with the best WooCommerce video gallery plugins.
Are you looking for a way to showcase or sell videos on your WooCommerce store? There are several ways that you can use videos on your store:
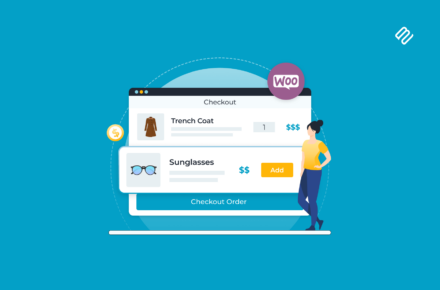
Creating a WooCommerce video gallery - Display preview or promo videos on your main shop pages to grab visitors' attention. This is a great way to boost sales of any type of product, whether you're selling videos or something else such as clothing.
Selling videos with WooCommerce - You can also use WooCommerce to sell actual video products, which customers can then download or watch online.
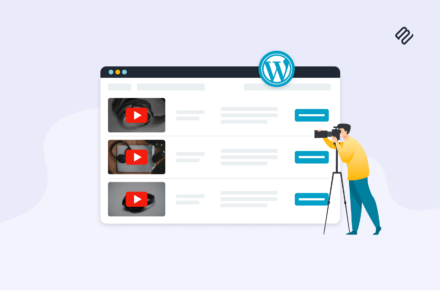
An example of a WooCommerce video gallery
Keep reading to learn how to use WooCommerce video gallery plugin to display videos on your shop pages, as well as how to sell videos in WooCommerce. Customers will be able to watch a video preview for each product without leaving the page, and add the product to their cart right from the same gallery.
I'll also provide some tips on other ways to display video in WooCommerce, such as in a "Quick view" product lightbox, or in a dedicated "Video" tab on the product page.
How to create a WooCommerce video gallery
Why WooCommerce Product Table makes a great video gallery plugin
WooCommerce Product Table lets you display allor someof your WooCommerce products as a flexible grid/table. You can control exactly what information displays in your table including add to cart buttons and - you guessed it - product videos.
The advantage of a table view is that your customers can watch videos for multiple products on one page - there's no need for them to keep going to the individual product page. You can do this by adding embedded video players directly to the product table on the shop page. This is ideal for WooCommerce video streaming, as customers can view the video directly on. your website.
Similarly, your shoppers will also be able to select variations and add products to their carts right from the video gallery - again, no multiple tabs or page reloads required. Whether you're selling videos with WooCommerce or just want to use video to promote other types of product, it's a more convenient approach for visitors.
Below, we'll show you how to set up this WooCommerce videos plugin. After that, I'll show you some extra ways to display video in WooCommerce, and also how to sell video products.
Step 1: Add video to WooCommerce products
To get started, you need to add an embedded preview video to the individual products that you want to display with WooCommerce Product Table. This is how customers will stream the video online.
The process is the same whether you're selling videos with WooCommerce or just adding video to a regular product. You do have some choices for where and how you add the video, though.
First off - how.
The easiest way is to just embed a video player from YouTube or Vimeo. If you don't want YouTube branding, you can pay for one of Vimeo's unbranded plans, or a service like Swarmify. This can seamlessly import and serve YouTube video but with an unbranded player.
Finally, you can always use the self-hosted WordPress video player shortcode, though there are some good reasons not to.
Now, the where.
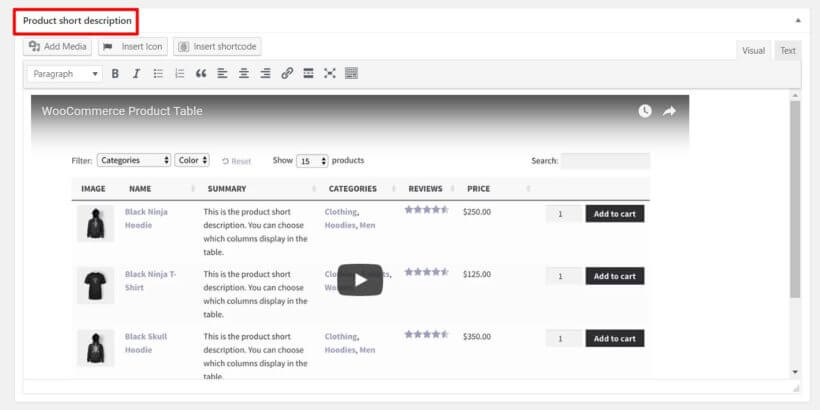
If you're not already using the Product short description field, that's the easiest spot to add your video. In fact, that's what we'll do for this example. All you need to do is embed your video in the text editor using normal WordPress oEmbed functionality. This is incredibly easy - simply paste the URL of your video from YouTube, Vimeo or similar.
But if you're already using the short description field for something else, you can also create a custom field to embed your videos using a free plugin such as Advanced Custom Fields.
Finally, add videos to all the products you want to display with the WooCommerce video gallery plugin.
Step 2: Create a product table for your WooCommerce video gallery
Install the plugin and then go to WooCommerce → Settings → Products → Product tables.
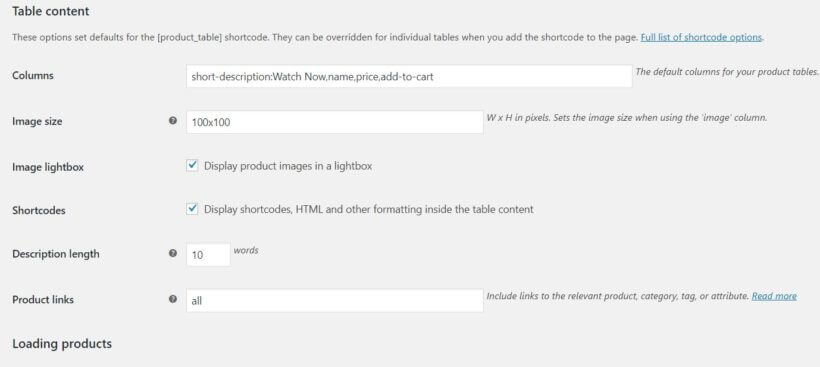
While you should look at all the plugin's settings to see what interests you, if you want to create a WooCommerce video gallery, we definitely recommend that you configure these settings as a minimum:
Columns - Make sure to include the summary or the custom field that you added to hold your video. And if you're planning to add quick view to your video gallery, then you should also add a quick_view column. Learn more about columns.
Add to cart column - Configure how you want your add to cart button to function, including variations.
Lazy load - If you have lots of products with WooCommerce videos, you might want to enable lazy loading for performance reasons.
Shortcodes - Make sure to check this box so that your embedded WooCommerce video players load properly.
This page sets the plugin's defaults. You can also always override those defaults, or add additional options, by directly using shortcode parameters.
Step 3: Add the video gallery to WooCommerce
Now, you just need to choose where in your store the WooCommerce video gallery will appear. There are two ways to approach this:
Tick the relevant boxes on the plugin settings page to show the product table layout on your main shop and category pages.
Use the [product_table] shortcode to add WooCommerce video streaming galleries to other pages.
For example, if you have a category called "video" then you can target it like so:
[product_table category="video"]
But if you only added video to a few products, you could also directly target them by post ID, tag, or lots of other conditions.
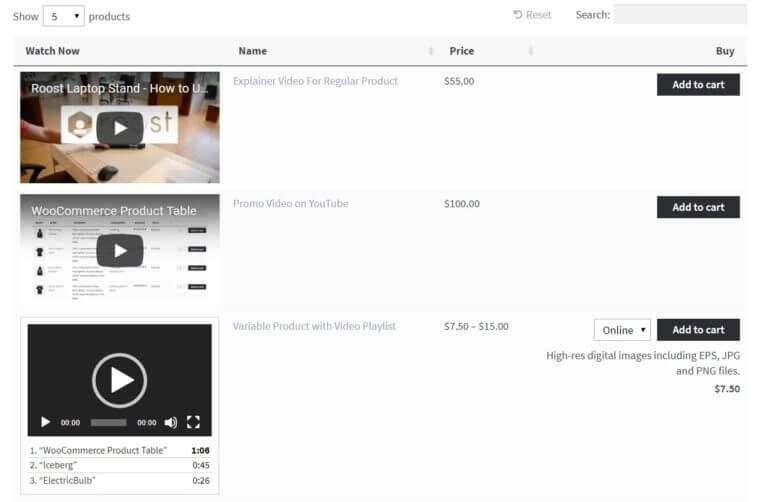
Once you have set up the video gallery in WooCommerce, it will look something like this:
Can I embed video playlists?
If you want to show more than one video per product, then you can embed entire video playlists into the WooCommerce video gallery. You can easily do this using the video playlist shortcode that comes with WordPress itself.
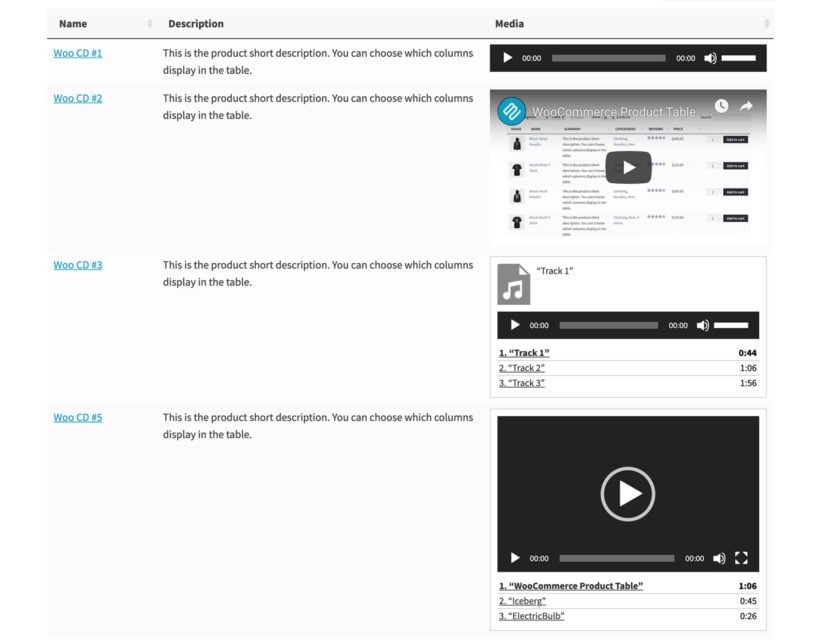
WooCommerce audio and video gallery containing an audio file, a single video, an audio playlist, and a video playlist
Use the following instructions to add a video playlist to any of the fields you're displaying in the product table:
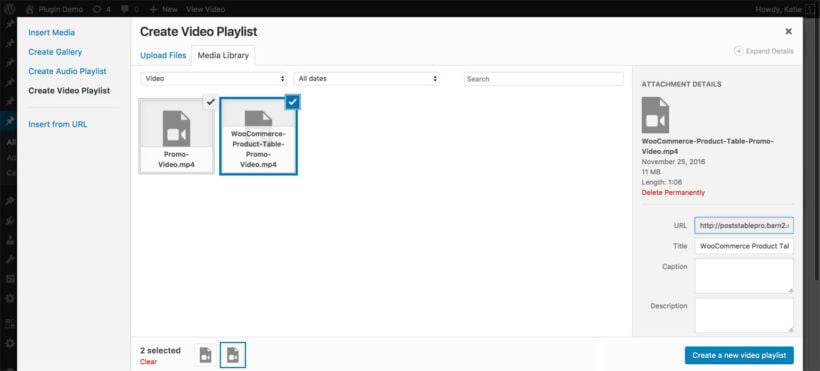
Click the 'Add Media' button.
Choose the 'Create Video Playlist' button on the left.
Upload and select the videos you wish to include in the playlist.
Click the 'Create a new video playlist' button on the bottom right.
On the next screen, add any captions for each video and change the settings as required.
Creating video playlists in Gutenberg
At the time of writing, the above instructions only work if you're using the classic WordPress editor and not Gutenberg. Hopefully Gutenberg will add a video playlist button in future. In the meantime, you can create video playlists by adding the following shortcode to a Gutenberg 'Shortcode' block:
Replace the ID's with the actual ID of each video you wish to include in the playlist. You can find these by going to the 'Media' section of the WordPress admin, clicking on a video, and looking at the URL at the top of your browser tab. For example, if the URL ends /wp-admin/upload.php?item=12345 then you need to add the ID 12345 to the shortcode.
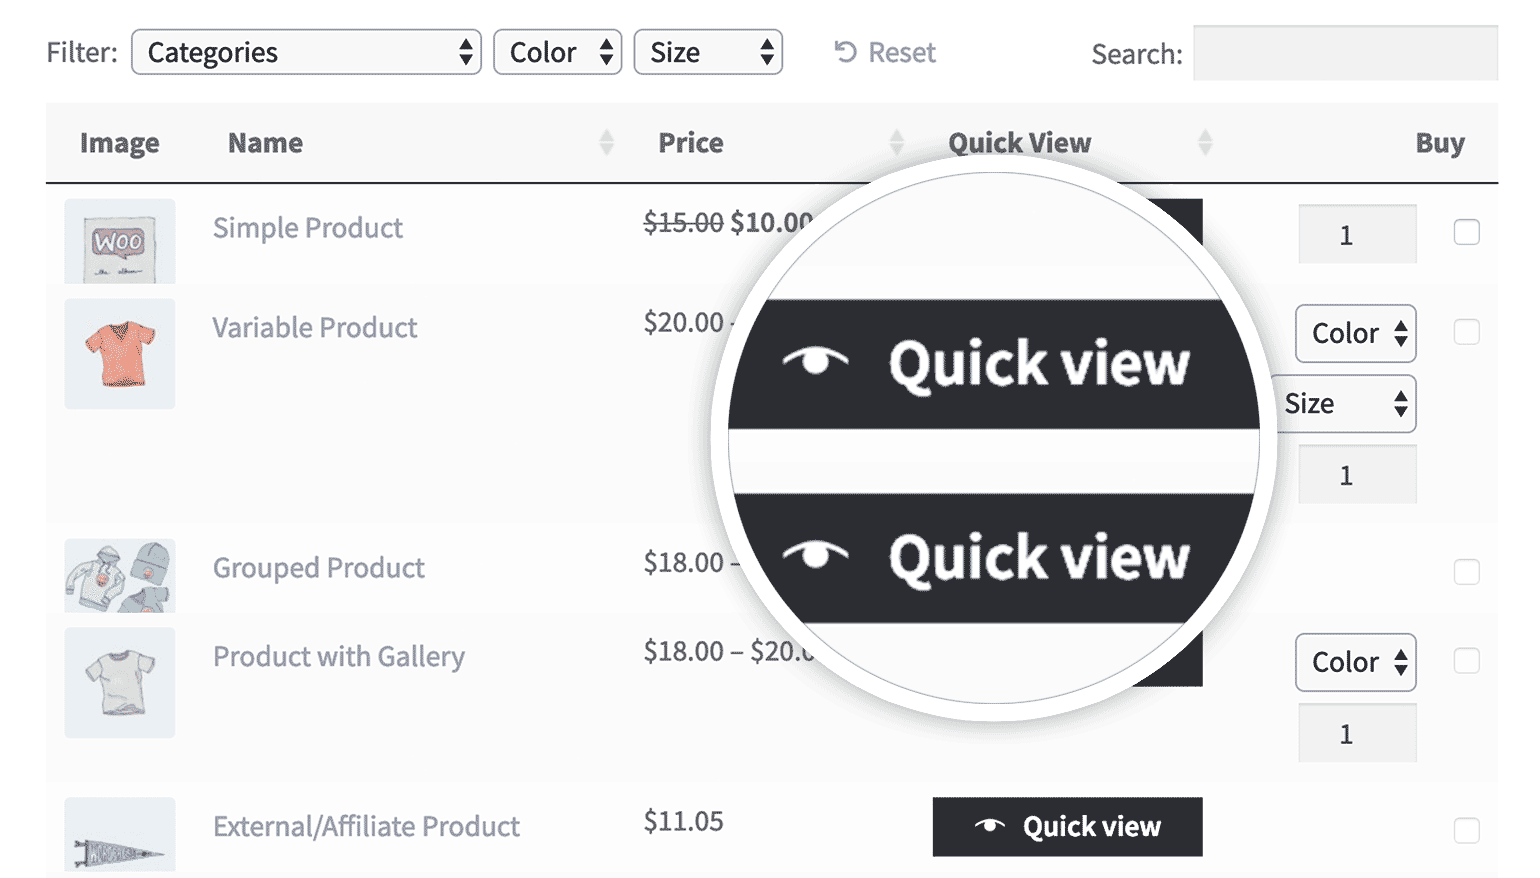
Add WooCommerce videos to a quick view lightbox
So far, you've learned how to create a WooCommerce video gallery with embedded video players in the main product list. You can use the widths option in WooCommerce Product Table to choose how much space the video player column takes up. However, videos inevitably require a fair amount of vertical space. If you want to list products in a more compact way, then it might be better to show the videos in a quick view lightbox for each product:
Using WooCommerce quick view is better than just adding video players to the single product page. That's because you don't want to take customers to a separate page for each product - that slows things down and takes them away from the main product list. By watching sample WooCommerce videos and adding to the cart from a quick view lightbox, the customer remains on the same page. This stops them from getting lost and encourages them to add multiple products to the cart.
Go to WooCommerce → Settings → Products → Quick view, enter your license key and choose your quick view settings. Make sure you enable the short description, as this is where you've added the video players. You can choose whether or not to show other sections such as the product images or add to cart buttons.
Add quick_view to the list of columns on the Product Table settings page (WooCommerce → Settings → Products → Product tables).
And that's it!
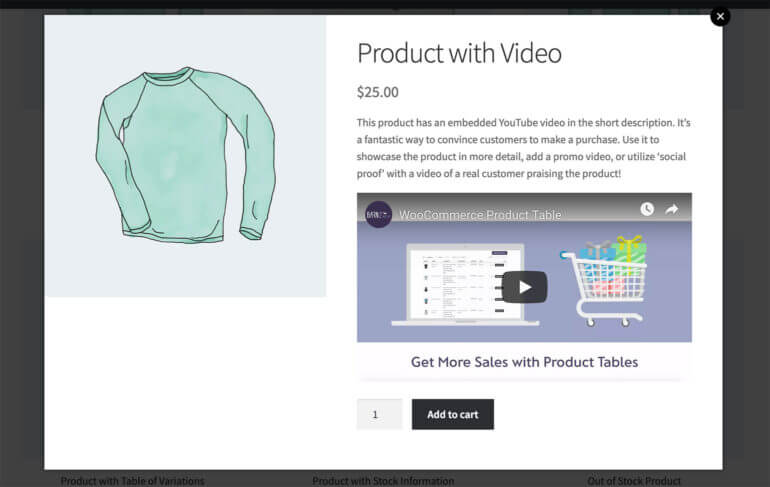
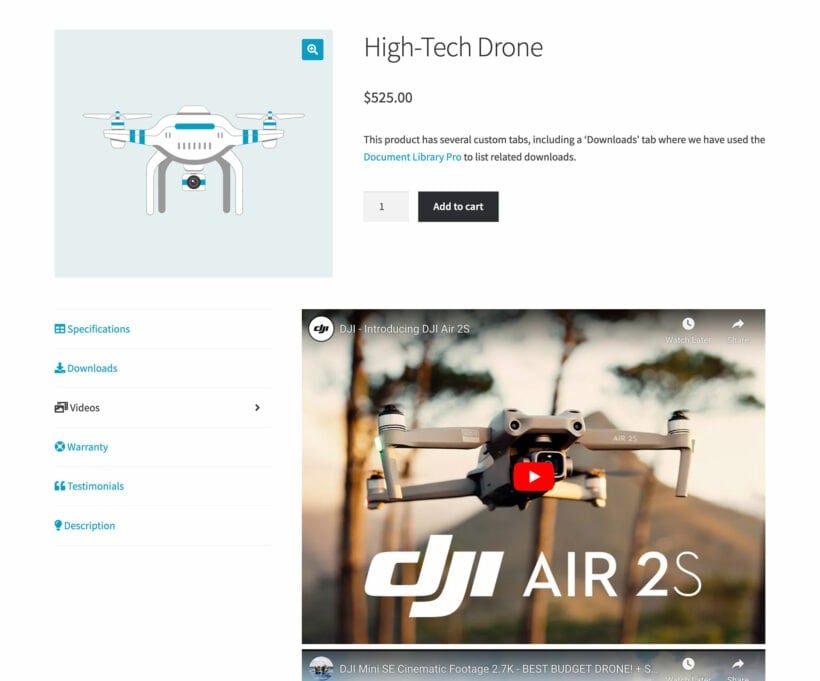
Add a video tab to the product page
And finally, let's think about where else you can display video on the WooCommerce product page. One way to do this is to add a dedicated 'Videos' tab, which allows you to display video without cluttering up the page layout. You can do this with the WooCommerce Product Tabs plugin, which lets you add extra tabs to the product page.
How to stream videos on WooCommerce
We have already touched on WooCommerce video streaming, but I want to make sure it's totally clear before we move on.
Steaming videos involves allowing people to actually watch the video on your website. They don't download it - they watch it in an embedded video player embedded on the website.
This means that you can use several of the methods that we already discussed to enable video streaming:
When you embed videos directly in a product table, then visitors can stream them from your main shop pages.
Whichever method(s) you choose, it's very straightforward to add video streaming to WooCommerce. Just host the videos on any streaming service such as Vimeo or YouTube, and paste the URL wherever you want them to appear on your WordPress site.
How to sell videos on WooCommerce
Above, you learned how to create a customizable WooCommerce video gallery. However, what if you're specifically looking to sell videos on WooCommerce?
In that case, the same basic steps apply for creating the video gallery, but you'll want to go about creating your WooCommerce products a little differently.
That is, in the example above you learned how to display videos in a gallery as a way to showcase a product. Now, you're going to learn how to make the video the product itself.
Can you sell videos on WooCommerce?
Most people think of WooCommerce in terms of selling physical products that are shipped to the user. However, it's equally well-suited for selling virtual or downloadable products.
This means that you can sell videos on WooCommerce whether you're selling physical videos to post, or virtual videos to stream online or download.
Types of video you can sell with WooCommerce
You can use WooCommerce to sell absolutely any type of video. This includes:
All video genres - fiction, nonfiction, films, movies, educational video.
Any type of video - animations, commentary, drone footage, behind-the-scenes event coverage, how-to video tutorials, interviews, presentations, promotional product videos, stock footage, motion graphics and presets, After Effects project files, Apple Motion or Cinema 4D templates, Flash elements files, video overlays and textured, Premiere Pro templates, social media video templates, video effects and transitions.
All video file types - MP4, WEBM, AVI, QuickTime, WAV, and many more.
Whatever sort of video you want to sell online, keep reading to discover the best way to do it.
Setup instructions
The basic steps to sell video in WooCommerce are as follows. I'll be focussing on selling videos for streaming online or downloading, but you can also sell physical videos to post to the customer:
Upload the video file somewhere accessible.
Mark products as Virtual and Downloadable.
Add video file to WooCommerce product.
Let's go through them in detail…
Step 1. Upload video file somewhere accessible
To get started, you'll need to upload the video file itself to a place where visitors will be able to download it.
For a small file, you can just upload it straight to your server via your WordPress Media Library.
However, if you have larger files, or if you're planning to have a ton of downloads, a better option is to use a dedicated storage service like Amazon S3 or DigitalOcean Spaces. These services are affordable, reliable, and lower the burden on your site's server.
Step 2: Create a virtual, downloadable product
Next, create a new WooCommerce video product:
Go to Products → Add New.
Add the product title - this will usually be the WooCommerce video name.
Type a main description of the video. This will help with the SEO of the video product page by being crawled by search engines.
Choose any categories or tags for the video. Customers will be able to filter by these to find specific videos.
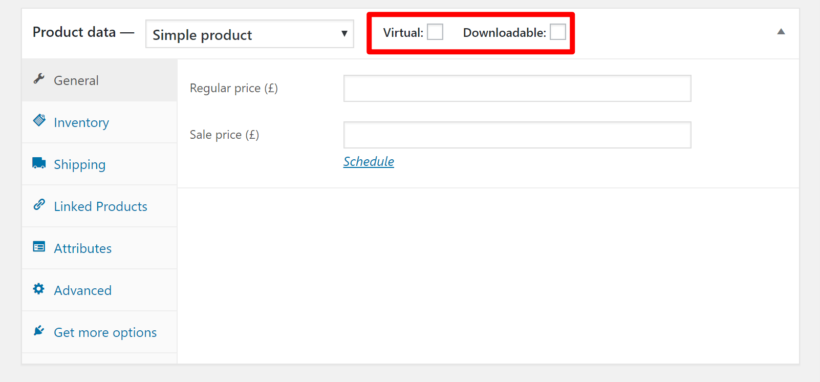
In the 'Product data' section, make sure to check the boxes for Virtual and Downloadable:
Step 3: Add download or streaming link
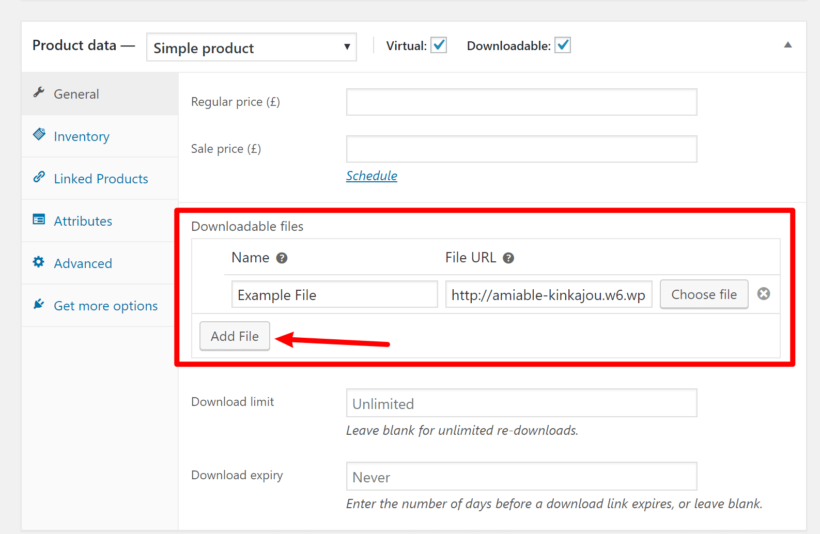
After you tick the 'Downloadable' box in Step 5 (above), you should see a new Downloadable files section appear in the General tab of your WooCommerce video product.
If you want customers to download the video they bought, then fill this in as follows:
Click the Add File button and insert the download link for where the video is saved. As we discussed in Step 1, this might be in the WordPress Media Library or it might be on a third party video host like Vimeo.
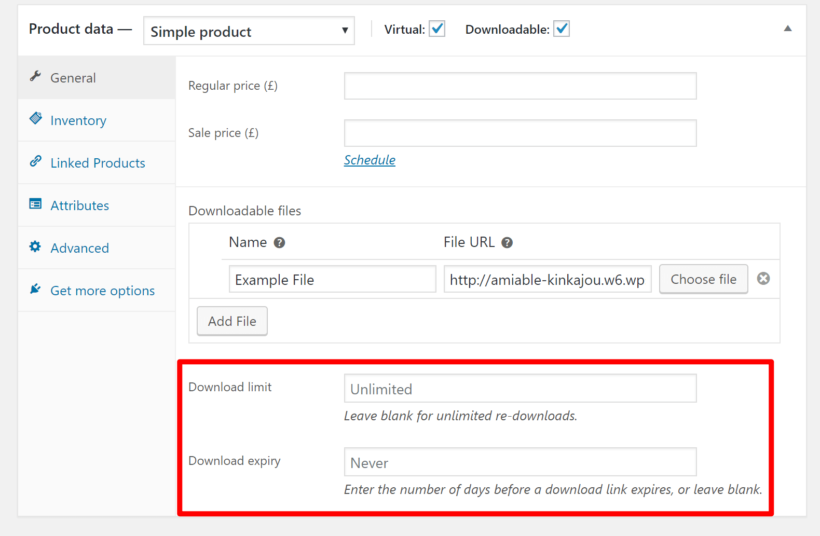
Add a download limit and expiry date if required.
Alternatively, you can allow people to stream the video online instead of downloading it. To do that, simply enter the URL of wherever they can stream the video. This might be a hidden page on your WooCommerce site containing the embedded video. It might also be a link to a third party video hosting site such as Vimeo.
Once you're finished, Publish the video product as you normally would.
Step 4: Add custom fields to WooCommerce video products (optional)
When you're selling video online, there might be extra fields of product data that you need to display about each video. For example, perhaps your WooCommerce video gallery needs fields for resolution, video length etc.
You can easily add custom fields using a free plugin like Advanced Custom Fields or Easy Post Types and Fields. Simply use your chosen plugin to add as many fields as you like to the 'Products' post type. You can then use WooCommerce Product Table to display them as extra columns in the video gallery.
What happens when customers purchase a video product?
When someone purchases the video from your WooCommerce store, they receive an email containing a unique link to download the video file.
For best results, combine this method for selling videos with the earlier section of this tutorial on how to create a WooCommerce video product gallery. That way, customers can watch the embedded video preview directly on your shop pages, and then purchase the full video.
What about piracy?
With the example above, even people who didn't purchase a video would still technically be able to download it if someone shared the link with them.
Now, digital piracy is something you're never going to stop, so a lot of store owners will just live with that and focus on finding more paying customers.
But if you are concerned and want to at least make it harder for people to share the download links, you can use the Download limit and Download expiry options to limit access:
Just be aware that these restrictions might frustrate some legitimate customers who want to download a file multiple times or in the future.
Go build your WooCommerce video gallery!
And that's it - you just added a user-friendly WooCommerce video gallery to your store. You also learned how to sell video online in WooCommerce, either for download or streaming.
Not only can visitors browse videos for multiple products without leaving the page they're on. They can also add products right to their carts for a smooth, friction-free checkout process.
The WooCommerce Product Table plugin makes it easy to add video to your shop pages. Get it today and start promoting your products with video:
Have any other questions about how to use a WooCommerce video gallery plugin? Leave us a comment!
It's so easy to embed video in WordPress these days, but it's not so easy to create a video gallery listing all your videos in a grid – unless you use the right plugin. This article will teach you how to create a responsive WordPress video gallery - the easy way.
Keep reading to learn how to use the Document Library Pro plugin to create a searchable WordPress video gallery. While it isn't just for videos, it is one of the best WordPress video plugins around. It makes it easy to add a video grid or video portfolio to your website.
You'll learn how to add videos to your gallery using 3 different methods:
Embedding a video that is hosted elsewhere into WordPress, for example, YouTube videos or Vimeo videos.
Directly uploading video to your WordPress website.
Creating a video playlist.
We'll also look at the many different options and functionality for setting up your WordPress video gallery. You can choose what information to display about your videos, how to size them, how many WordPress tutorial videos to display on each page of the gallery, and more.
Your WordPress video gallery will be fully responsive and will resize to fit different screen sizes and mobile devices.
At the end of this step-by-step tutorial, you'll know how to create a professional-looking video gallery for your WordPress site. Your visitors will be able to watch videos directly within the WordPress video gallery, as well as search and filter to easily find their ideal videos.
Why Document Library Pro is the best WordPress video gallery plugin
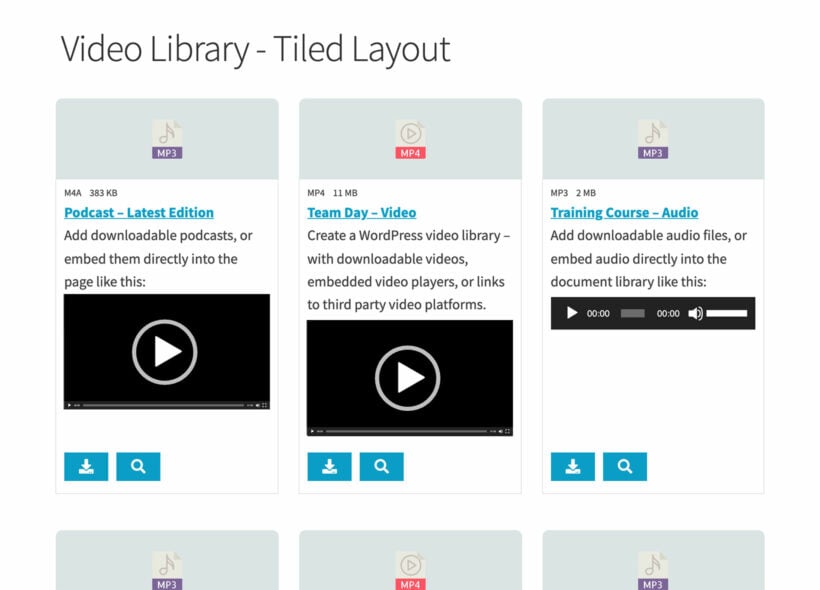
Document Library Pro creates a WordPress video gallery in a choice of gallery layouts. The table layout lists each video on its own row of a searchable, filterable table. The grid layout displays each video within a tile, similar to Netflix.
You can use this WordPress video gallery plugin to embed any type of video into your WordPress site. This includes:
Any video hosting service YouTube, Vimeo, Dailymotion, Animoto, Blip, Cloudup, CollectHumor, Facebook videos, Flickr videos, TED talks, VideoPress, etc.
Types of video Long videos, short video snippets, promotional video, product demonstrations/reviews/unboxings, stock footage, educational videos, event coverage, how-to video tutorials, interviews, presentations, video commentary, vlogs, webinars.
All video genres Animations, behind-the-scenes footage, drone footage, movies, and films, non-fiction videos.
The videos in the gallery will autoplay in an online video player, directly on the video gallery page. You can also display videos on a separate WordPress page for each video, or allow users to click through to watch on video platforms like YouTube or Vimeo.
This WordPress video gallery plugin also lets users search, sort, and filter the gallery from the front end. As a result, visitors can quickly find the video(s) they’re looking for.
You can list all your videos in a single gallery, or you can list different videos on different pages on your WordPress site. It's super flexible and with over 50 options, it's the perfect WordPress video gallery plugin. The all-in-one plugin also provides a user-friendly player interface that lets you add SEO-optimized video galleries quickly.
Create your responsive WordPress video gallery
1. Install the video gallery plugin
The first step to creating your WordPress video gallery is to install the Document Library Pro plugin. You need this in order to add WordPress tutorial videos and display them in a video gallery online. It will work on any WordPress website and any theme.
After installing the plugin, go to the settings page and enter the license key from your 'Getting Started' email. Next, go to the 'Document Libraries' tab and choose how you want your video galleries to look. Pay particular attention to these options:
Columns - There are lots of available columns. As a minimum, I recommend these for a WordPress video gallery: title, content:Watch Online. The title column will display the video name, and the content column will show the embedded video player. You can see that I added :Watch Online after the name of the content column. This will appear as the column header, so change this to anything you like. If you want people to be able to download videos - or click through to watch them like a YouTube video gallery - then add a link column too.
Clickable columns - If you want people to be able to click on the name of a video to watch it on a separate page, then leave this as it is. Add none to disable these links and keep people on the main WordPress video gallery page.
Shortcodes - Enable this option. This is essential in order for the main WordPress video gallery page to display embedded video players.
Filters - Choose 'Custom' and add doc_categories and/or doc_tags, depending on how you're planning to structure the video gallery. This will add a categories filter dropdown and/or a tags filter dropdown above the video gallery. It's a quick way for people to find specific types of video, for example by genre or year.
Lazy load - Enable this if you're listing lots of videos in the gallery. It loads each page of videos one at a time, which improves page load times.
2. Add videos to the gallery
Now the overall structure of your WordPress video gallery is in place, it's time to start adding videos and/or video playlists.
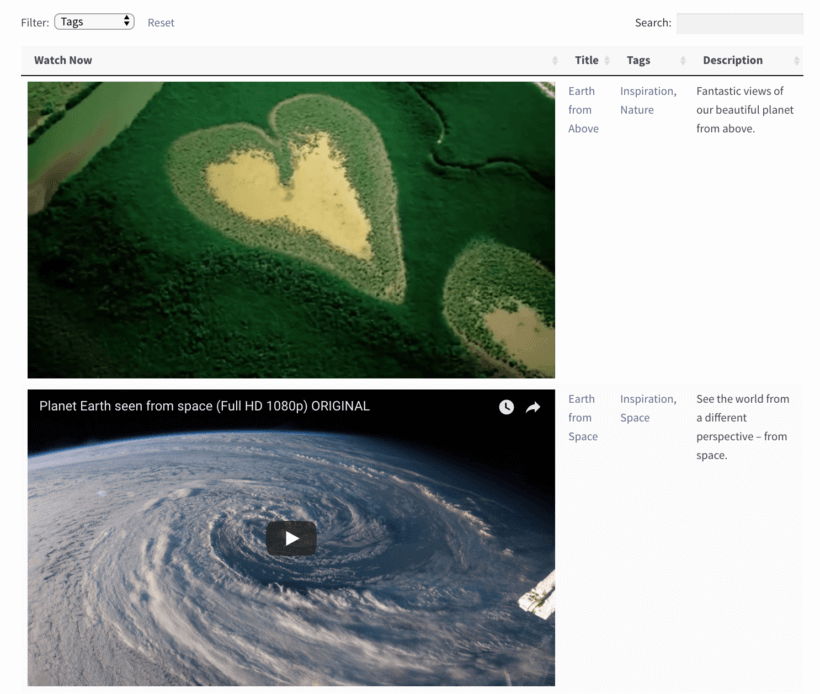
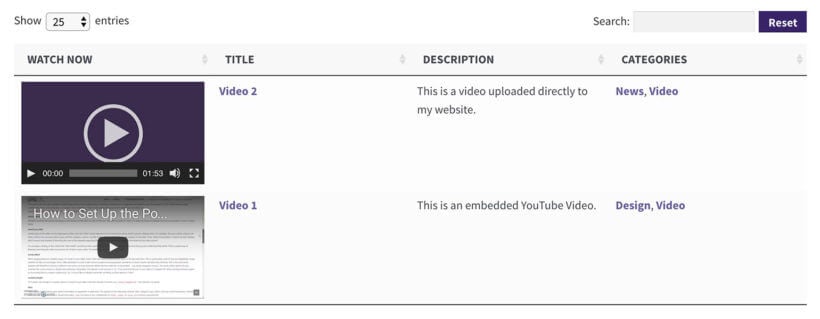
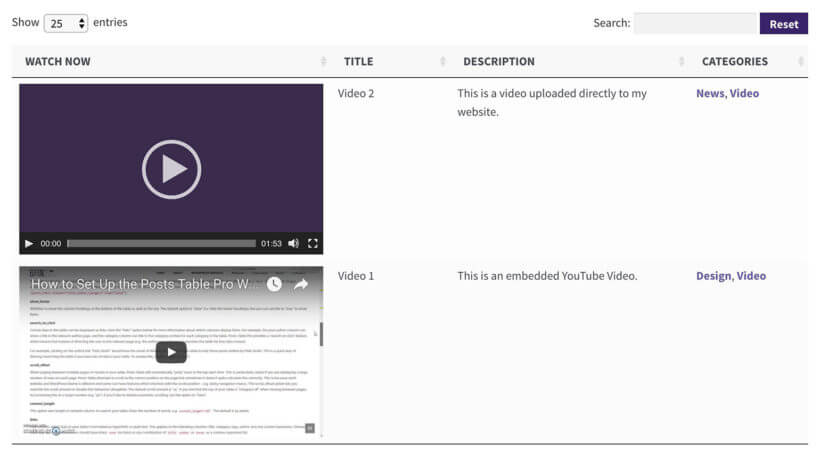
If you want individual videos to appear in their own row of your WordPress gallery as below, then you'll need to add each one as a separate 'Document' post. You can do this in the 'Documents' section of the WordPress admin.
A WordPress video gallery with 1 video per row
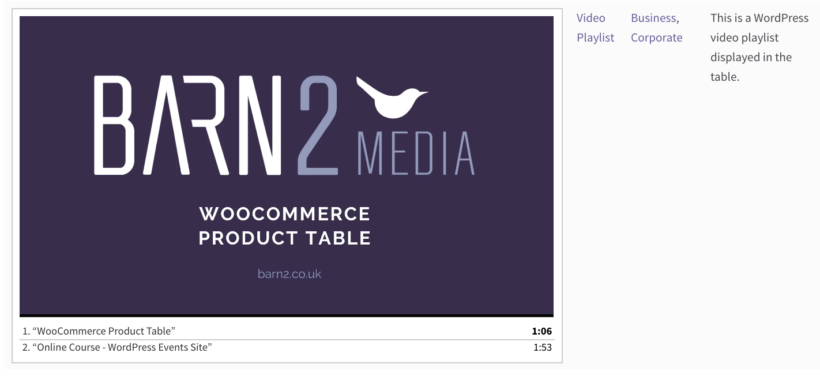
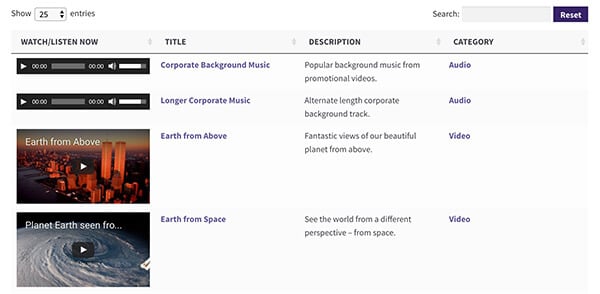
If, however, you're planning to create video playlists then you'll need a separate Document post for each playlist, but not each video:
A video playlist in a WordPress video gallery
Note that you'll be able to include a combination of individual videos and playlists in your WordPress video gallery. For each 'Document', add either one or more videos. I'll tell you how to do this next.
Adding your videos
Use these steps to add each video or playlist to the gallery:
Go to Documents→ Add New in the WordPress admin.
Add a title for the video, plus any other information such as categories, tags, or an excerpt (which is useful for adding a short video description or summary).
Next, embed your video in the main content area using one of the following 3 methods:
Method 1 - Embed a video from YouTube or Vimeo
The most reliable way to add a video to your WordPress video gallery is to first host it on a third-party video platform. YouTube and Vimeo are the most popular, but you can embed from any of the video services in this list. (It's fine to use other video platforms too or use self-hosted videos, but instead of just pasting the URL, you need to get the embed code and paste it into the 'Text' view on the Add/Edit Document screen.)
Using a specialist video host is a great choice because:
It will save space on your web hosting account.
Dedicated video hosts automatically create multiple versions of your videos behind the scenes. This means that your videos will play for more people, whatever technology or device they're using to access your website. You don't have to worry about writing any fancy code to check the user's device or serve alternate versions of your videos - it all happens automatically.
You get lots of extra features from specialist video hosts such as view counters, social sharing, annotations, mobile-friendly cards, monetization through advertising, etc.
If you use a public video website such as YouTube then people can also find your videos directly via the host. This will help to increase your traffic. If you'd rather your WordPress video gallery not be publicly available on the hosting site, then I'd recommend Vimeo. Vimeo has more privacy settings and you can protect Vimeo videos so they can only be viewed on your domain.
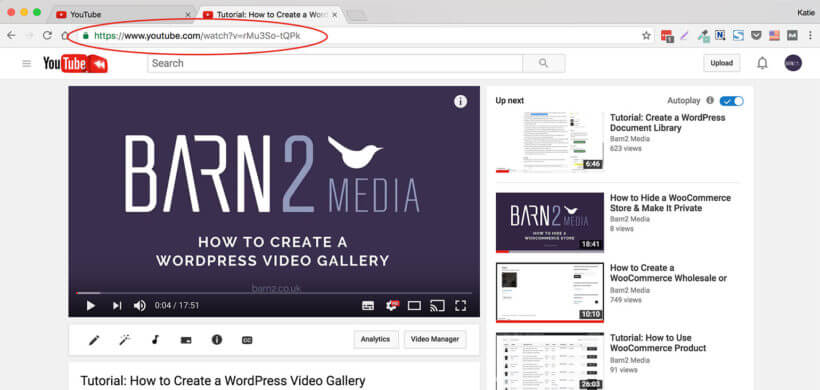
If you're embedding WordPress tutorial videos from one of the files in this list, you just need to embed the URL of your video directly into the post. To do this, view your video on YouTube, Vimeo, social media platform, or whichever site you're using, and copy the URL from the address bar at the top of your browser. To help you find the video URL, I've circled it in the screenshot below:
Then, simply paste the URL into the content area of your WordPress post. WordPress will instantly convert it into an embedded video player.
Method 2 - Upload the video directly to the media library
If you prefer, you can host videos directly on your WordPress website and embed the media files:
Click the Add Media button above the WordPress toolbar and upload your video file (e.g. MP4 or MOV).
Select the video in the WordPress media library.
Make sure the Attachment Display Settings section is set to Embedded Media Player and click Insert into post.
Again, WordPress will automatically embed a watchable video into your post.
Method 3 - Create a video playlist
Finally, you can add entire video playlists to your WordPress gallery. These have to be hosted in the WordPress media library.
Click Add Media above the WordPress toolbar.
Click the Create Video Playlist option on the left. Note, this option will only appear if you already have video files in your media library. Upload some videos to WordPress if not.
Tick all the videos you want to include in the WordPress video gallery playlist.
Click the Create a new video playlist on the right.
On the next screen, add the caption that should appear for each video. Tick the boxes to indicate whether to show the video list and images in the playlist. Then click Insert video playlist.
WordPress will embed the playlist directly into your page or post.
Where will the video players appear on my website?
Whichever method you use to add your videos and playlists, they will appear in 2 locations in your WordPress video gallery:
On the main video gallery page, within the 'content' section. (As we saw above, you can rename this column to anything you like.)
If you haven't disabled the clickable columns, then people can also click the video name to access a separate page for each video or playlist. The embedded video player will appear on this page. https://barn2.com/kb/dlp-column-widths/
3. Display your WordPress video gallery
Now all your videos are ready to go, you're ready to display your WordPress video gallery! The good news is that most of this has already been done for you. All you need to do is check it, make any tweaks, and add a link to your website menu so that people can find the video gallery page.
You can also create additional video galleries if you need more than one.
Viewing the video gallery page
Click on the 'Pages' link on the left of the WordPress admin, and you'll see all your pages listed. One of these is called 'Document Library' and contains your WordPress video gallery. Rename this to something specific to videos, such as 'Video Library'.
Now view the page. You will see all your videos listed in a searchable table or grid with whichever settings you chose in Step 1.
Go back to the settings page and make any changes to tailor the video gallery to your requirements. You may also want to edit the WordPress video gallery page directly and add some options to the shortcode which has been added to the page. For example, there's a shortcode option that lets you change the column widths. I'll provide more information on customization options for the video sizes next.
Changing the size of each video
If you are using the table view then the best way to customize the size of your embedded video players is to adjust the column widths. The videos will automatically adjust to fit the available space.
By default, the Document Library Pro WordPress video gallery plugin sets the column widths automatically based on the content of each column. But for a WordPress video gallery, you might want to make the video player column wider so that people can see your videos more easily.
To customize the column widths in the video grid, you need to add width="" to the shortcode. Between the quotation marks, you can add a number for each column to represent the percentage of the table each column will occupy. Note the numbers must add up to 100% and be separated by commas. In the example below, the 4 columns will take up 40%, 15%, 30%, and 15% of the table, respectively:
(Note: In this shortcode, I have set the columns option to show you that the number of columns matches the number of widths. However, it's easier to set the columns on the WordPress gallery plugin settings page.)
The first column (content) gets 40% of the table width – the biggest width to give more space for the embedded video player. The second column (title) gets 15% as the video titles don't need much space. The third column (excerpt) is slightly wider to allow for more text. The final column (category) is also quite narrow.
Play around with the widths in your own video gallery to get the column sizes working as you want them.
Creating multiple video galleries
By default, all your videos are listed in one new gallery. If you prefer, then you can list different videos like WordPress training videos on different parts of your site.
You can add a video gallery to any post or page on your WordPress website, or even within a text widget.
Go to the page/post/widget where you want to add the gallery. In the main content area, add the following shortcode:
[doc_library doc_category="music"]
This will list all videos from the 'music' category. Edit the shortcode to include whichever category of videos you want to list in the gallery like WordPress training videos. You can then add as many shortcodes as you want, wherever you want.
Other uses for Document Library Pro
The great thing about using Document Library Pro as your WordPress video gallery plugin is that it's not just for videos. You can get even better value for money by using it for other purposes elsewhere on your site. For example:
To use it for multiple purposes, go to Documents → Categories and create categories for each use case. For example, you might have a 'Video' category with various sub-categories for your video genres, and a 'Documents' category with sub-categories for your document types. You can then use the [doc_library category="videos"] shortcode lists different types of resources in different places on your site.
Once you've installed this WordPress video gallery plugin, you can use it as many times as you like. Be creative and get more for your money by using Document Library Pro in different ways!
Create a WooCommerce video gallery
A WooCommerce video store powered by the WooCommerce Product Table plugin
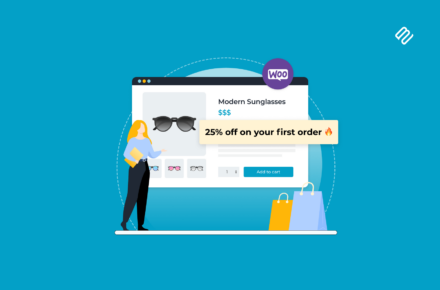
It is also possible to create a WooCommerce video gallery for an eCommerce site. Each video would be a 'product' and would be listed in a table with a preview of the video. People can watch the preview and then click a 'Buy' button to purchase the video - either as a digital download or a physical DVD.
To do this, you need to use our other plugin - WooCommerce Product Table. It has similar features to Document Library Pro but works with the free WooCommerce plugin so that you can actually sell your WordPress training videos online.
Create your WordPress video gallery today
Now that you know how to create a fully featured, fully responsive WordPress video gallery, it's time to get creative. To get started, download the Document Library Pro plugin.
100% flexible.
List any type of video.
Quick 10-minute setup.
Expert support and documentation.
Free 14-day trial - love it or you pay nothing!
Follow the steps in this tutorial to set up your WordPress video gallery in no time at all. Don't forget it's simple to make the exact video gallery you want, so have a play around and check out the knowledge base for even more ideas.
We've been busy improving all our WordPress plugins. Here's a roundup of the new features now available in Posts Table Pro, our popular tables in WordPress plugin.
These new developments are very exciting and let you create tables in WordPress in new ways that weren't possible before. The amazing thing about Posts Table Pro is that it has so many possible uses. Previously, it was popular for various types of tables in WordPress such as website indexes and tables of contents, publications lists or document libraries and WordPress member directories (or other types of directory). The new features make it ideal for many more types of tables such as table-based WordPress video galleries, event listings, audio libraries and playlists.
Play audio tracks directly from a WordPress table
We've added support for audio files embedded using the built-in WordPress audio embed shortcode. This means that your tables in WordPress can include actual audio players which can be listened to directly in the table. People can listen to your audio tracks directly from the WordPress table, without having to click through to the single post/page. This lets you create a table of audio listings, for example for a musician or band website.
To add an audio file to display to a table in WordPress, upload your file to the page or post using the Add Media button. You can add it to the main content or the excerpt. WordPress will automatically create a shortcode to embed the audio player into your page or post. You can then tell the table plugin to render the shortcode in the table by adding shortcodes="true" (see knowledge base).
You can see a table in WordPress with audio embeds in action on our new Audio and Video Gallery demo page.
Watch video directly from the tables in WordPress
As with audio tracks, the Posts Table Pro plugin now supports embedded WordPress video. Your visitors can watch videos directly from your tables in WordPress, without having to click to a separate page or third party site.
There are 2 ways to add videos which can be displayed in the WordPress table:
Type the URL of the video from YouTube, Vimeo or similar and WordPress will automatically embed it into your page/post and display in your table
Either way, you can set up Posts Table Pro to display videos in your tables in WordPress by adding shortcodes="true" (see knowledge base).
You can see a WordPress table with embedded video in action on our new Audio and Video Gallery demo page.
Watch & listen to playlists in a WordPress table
As well as individual audio and video files, you can use WordPress' embedded audio and video playlists to display whole playlists in the table. This is perfect for video websites and featuring CD's with track listings. Your visitors can listen to entire playlists or a specific track directly from your tables in WordPress.
New filters above the table
We've had many requests for this feature so we're pleased to announce that you can now add search filters (dropdown lists) above your tables in WordPress. These let you filter by category, tag, author name or custom taxonomy (depending on which columns you have included).
Simply add filters=true to your shortcode to enable the filters above the table. You can see these WordPress table filters in action on the main plugin demo.
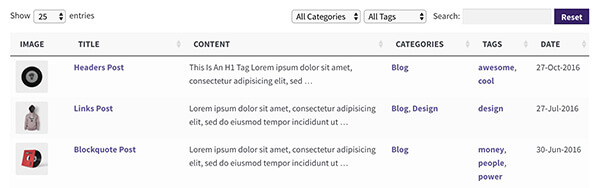
We've also added a reset button next to the search box which clears the current search and resets the drop-down filters for the table.
More control over your WordPress table elements
There are also new options that let you control the elements that appear above the below the table in WordPress. This lets you change the positioning of the 'Show X entries' section, the search box, the 'Showing X of X entries' text and the pagination buttons.
You can choose whether to show or hide these, or to display them above or below the table.
Display shortcodes in your tables in WordPress
There's now an option to display content generated by shortcodes in your WordPress table, in either the content or the excerpt column.
We've also fixed more bugs and made other minor improvements. As always, if you have any feedback or suggestions on how the Posts Table Pro plugin could help you create even better tables in WordPress, please get in touch.
That's all for now! We hope you like the new version of Posts Table Pro. If you haven't bought the plugin yet, it's available here. And if you like it enough to recommend, earn 30% commission for doing so as a Barn2 Media affiliate!


 Keep reading to learn how to use the