How to set up pre orders for products in your WooCommerce store

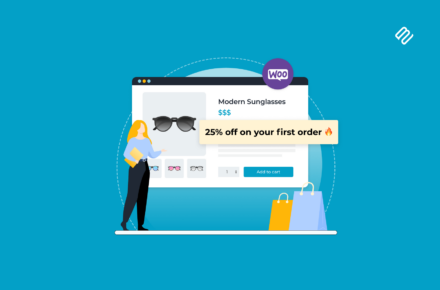
Are you looking for a way to set up WooCommerce pre order for your upcoming product launch? Keep reading to learn how (and why) setting up pre orders on your WooCommerce store will spark interest among your clients, help you validate your product idea, and streamline your inventory process.

When it comes to launching new products, the vast majority of stores get it wrong. Most businesses either don't inform customers about new items, add a waitlist plugin, or only notify them when the product is released. However, if you can get more sales by accepting orders before the launch, while clearly letting clients know when the new product will be delivered.

You can use WooCommerce pre orders to promote interest in new items. It will help you evaluate demand and collect cash before manufacturing. This way, you can decide how many items to make on your first production run and get cash upfront.

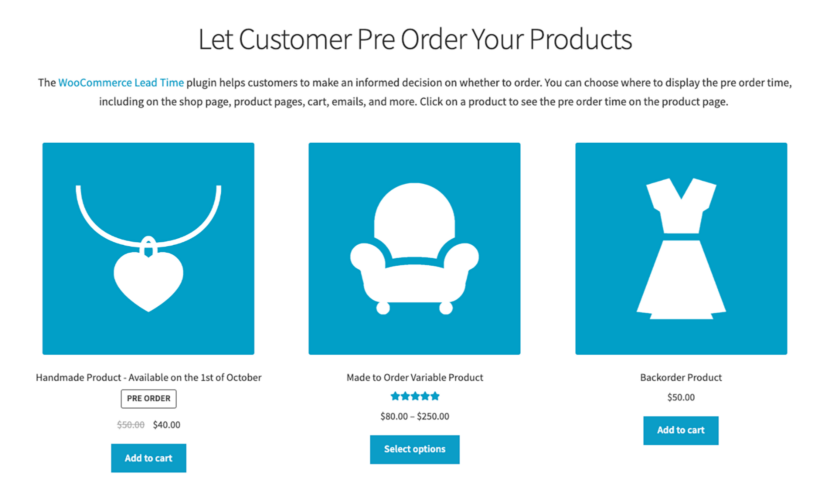
In this article, we will show you how to set up pre orders on WooCommerce and present you with the best solution to do it - WooCommerce Lead Time. This plugin allows you to easily add a pre order time to a single product page. It will keep them informed of the exact release date. As a result, customers can buy your product before it is launched.

How can your WooCommerce store benefit from WooCommerce pre order?

It doesn't matter how many views, followers, and email subscribers you have. Nothing validates a concept like having someone place a purchase for your goods in advance. Some of the most significant incentives you can have come from a consumer paying you money for your concept or product before it is fully developed.

WooCommerce pre ordering involves providing customers with the choice to pre order things that haven't yet been released. When done correctly, it can assist you in the following ways:

  • With actual sales, build momentum before the product's debut.
  • Analyze the current market demand for a certain product or service.
  • Engage existing consumers and assist in acquiring new ones.
  • If you state that you will only release a certain quantity, you will create urgency.
  • Streamlines the configuration and follow-up stages of the WooCommerce pre ordering>

Why should you include WooCommerce pre order option?

WooCommerce pre ordering is an effective sales tactic that helps businesses convert leads to clients, improve client relationships, and upgrade the customer experience. Presales require time and effort to implement well. But they can significantly benefit a company's sales efforts. By prioritizing communication and focusing your sales on including pre ordering, you can achieve your business objectives way faster.

WooCommerce pre orders are also important because they help customers understand how a product or service can meet their specific business needs. Companies can guarantee clients receive the greatest and most accurate information. All thanks to improved communication at the start of the sales process. Preordering is particularly vital for businesses since it helps them to properly grasp their customers' goals and offer the greatest viable solutions for their specific needs. As a result, the sales experience is typically more tailored, with relevant solutions, streamlined procedures, and meaningful delivery.

How about physical products?

When it comes to physical products, implementing WooCommerce pre order techniques in your business can help you estimate the exact amount of products to manufacture. In this way, you won’t end up with too many or too few items.  Meeting your demand perfectly will decrease your inventory and keep costs low simultaneously.

Best plugin for Woocommerce pre orders - WooCommerce Lead Time

Even if you are a developer, putting up pre orders on your WooCommerce site without a specific pre orders plugin is challenging. Adding custom code to your theme and altering the default WooCommerce templates will be necessary. However, this way, there is a significant chances of mistakes in terms of setup, sales, and fulfilment of pre orders.

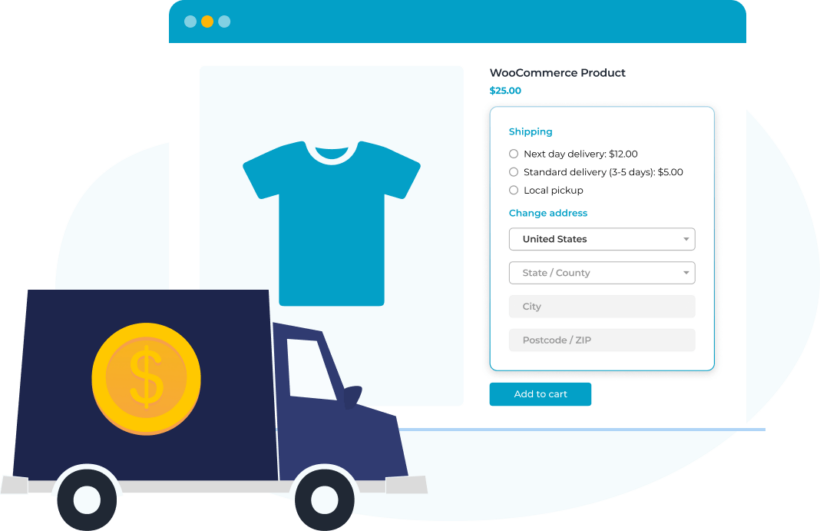
In the case of a standard WooCommerce setup, WooCommerce comes with the ability to indicate goods as in stock, out of stock, or on backorder. It does not, however, allow you to enter a lead time for out-of-stock or new items.

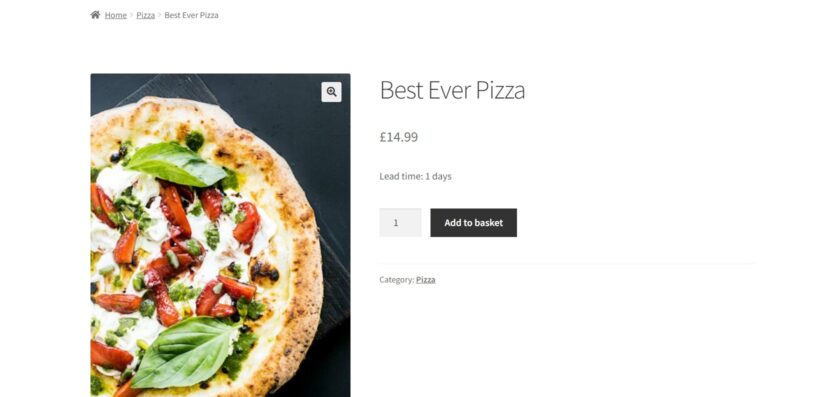
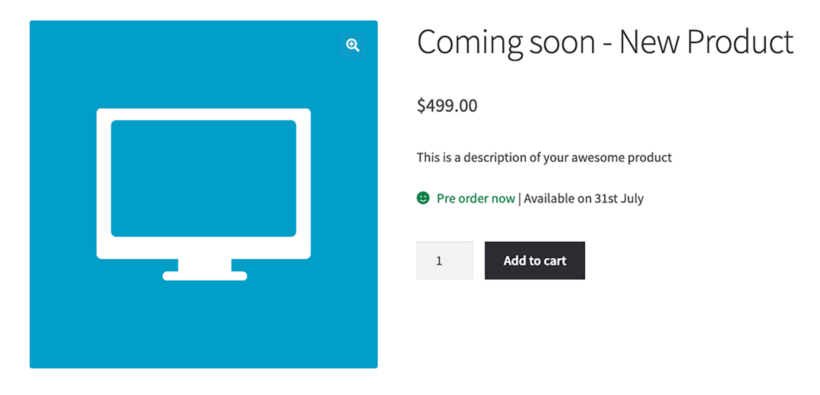
This information should ideally be shown on the single product page so that buyers can make an educated decision about pre ordering the product. Even though preordering usually means a longer wait time for the product, it also offers a bunch of benefits, such as discounts or bundles for the buyers. Ideally, you want this information to be obvious to the customer at the moment of purchase.

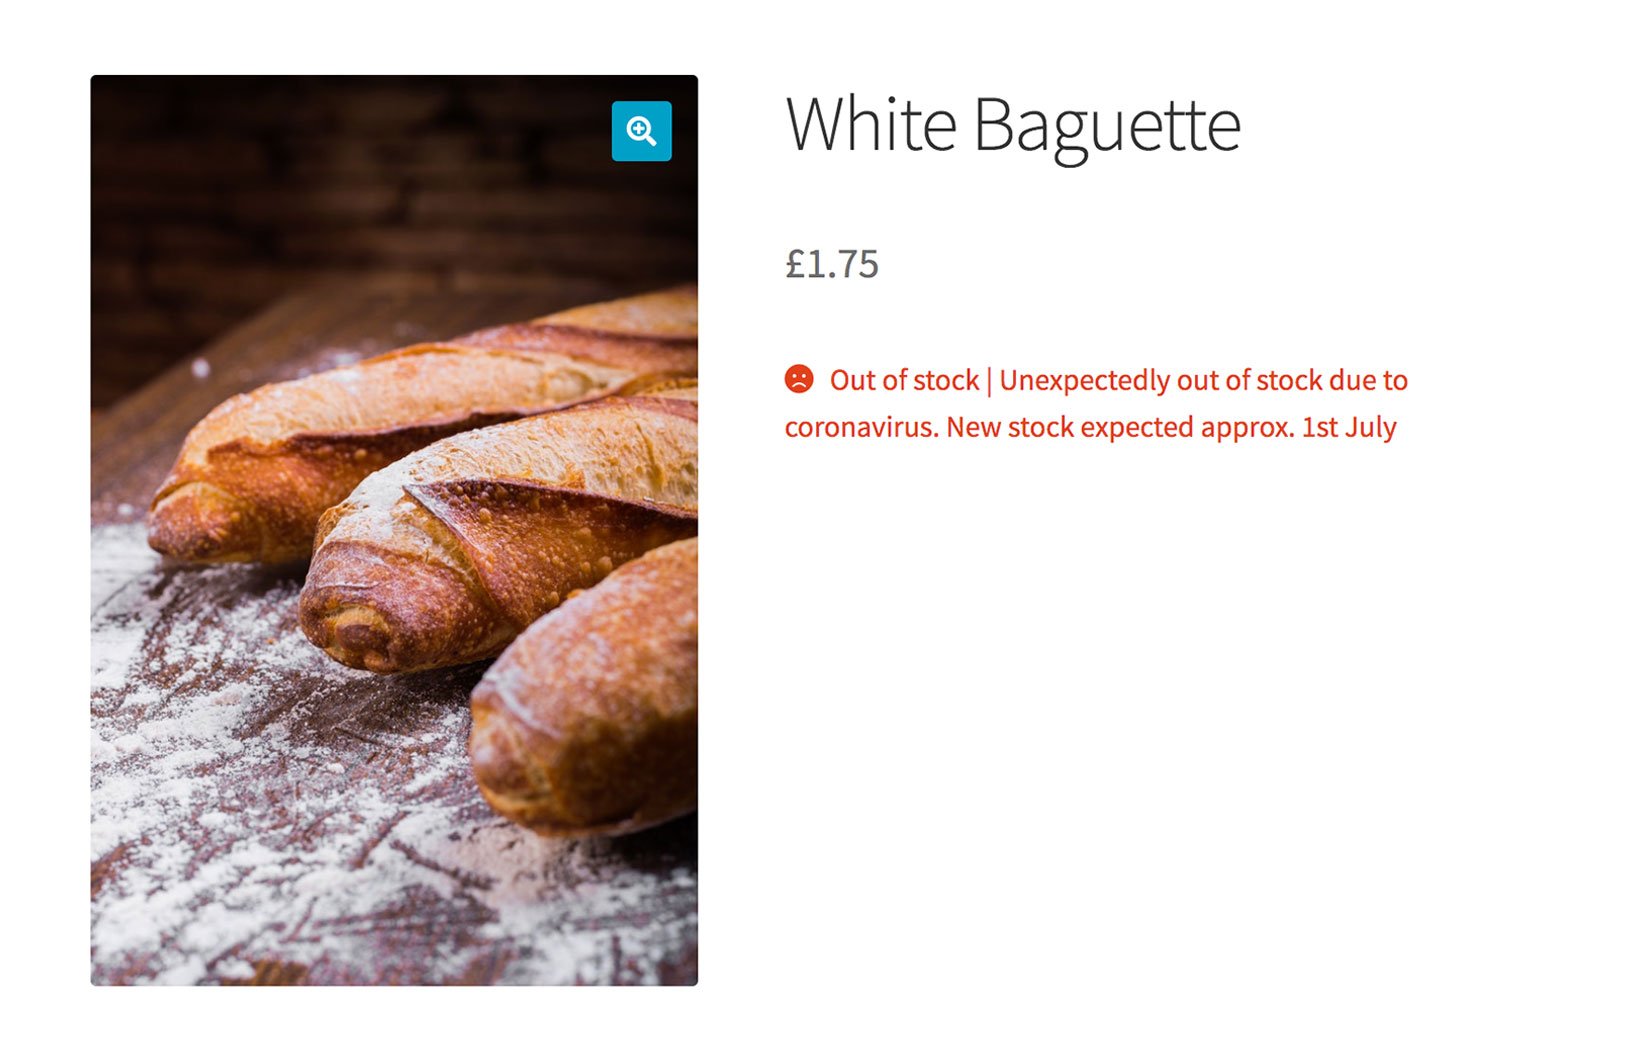
Currently, the default WooCommerce product classifications (in stock, out of stock, or on backorder) are not a good fit for preordering with a defined lunch date. Setting your new product as “out of stock” will make your customers leave your store empty-handed and go search for Google alternatives.

Our solution - WooCommerce Lead Time

WooCommerce Lead Time is the only WordPress plugin that displays pre order times on the product page, facilitating your WooCommerce product launches. The plugin streamlines the WooCommerce pre order process and eliminates the possibility of human mistakes in collecting payment information, maintaining pre order inventories, and fulfilling orders.

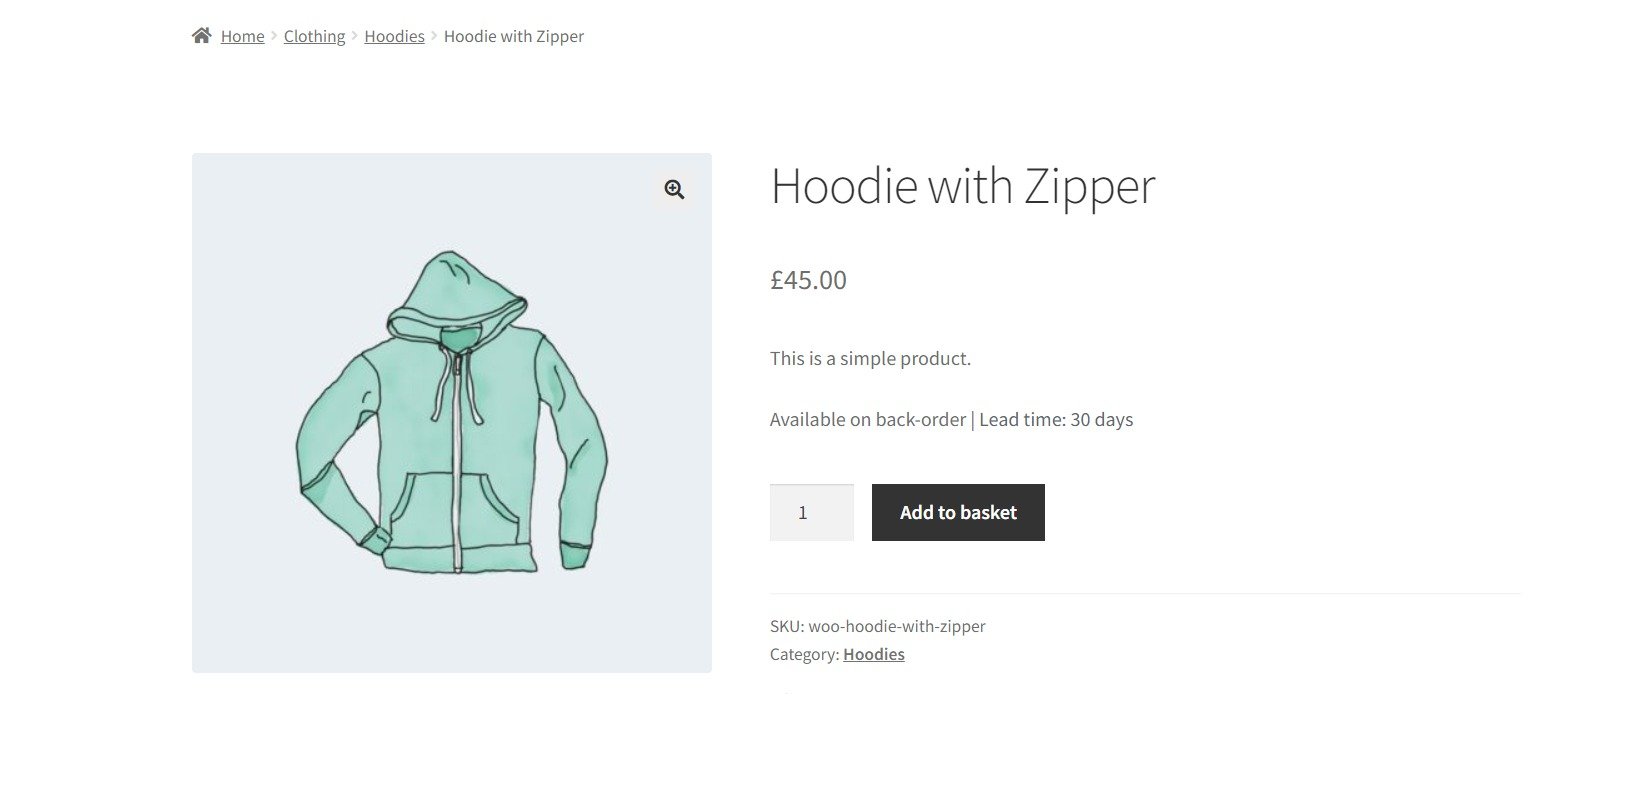
Instead of marking the product as Out of Stock until it is available, you can make it available for pre order straight away (e.g. using the backorder status) and clearly display the launch date or the number of days until the launch. WooCommerce will mark the pre-orders as 'Processing' in the WordPress admin until the product is launched. At that point you can remove the pre order wording and 'Complete' the orders.

WooCommerce Lead Time enables you to:

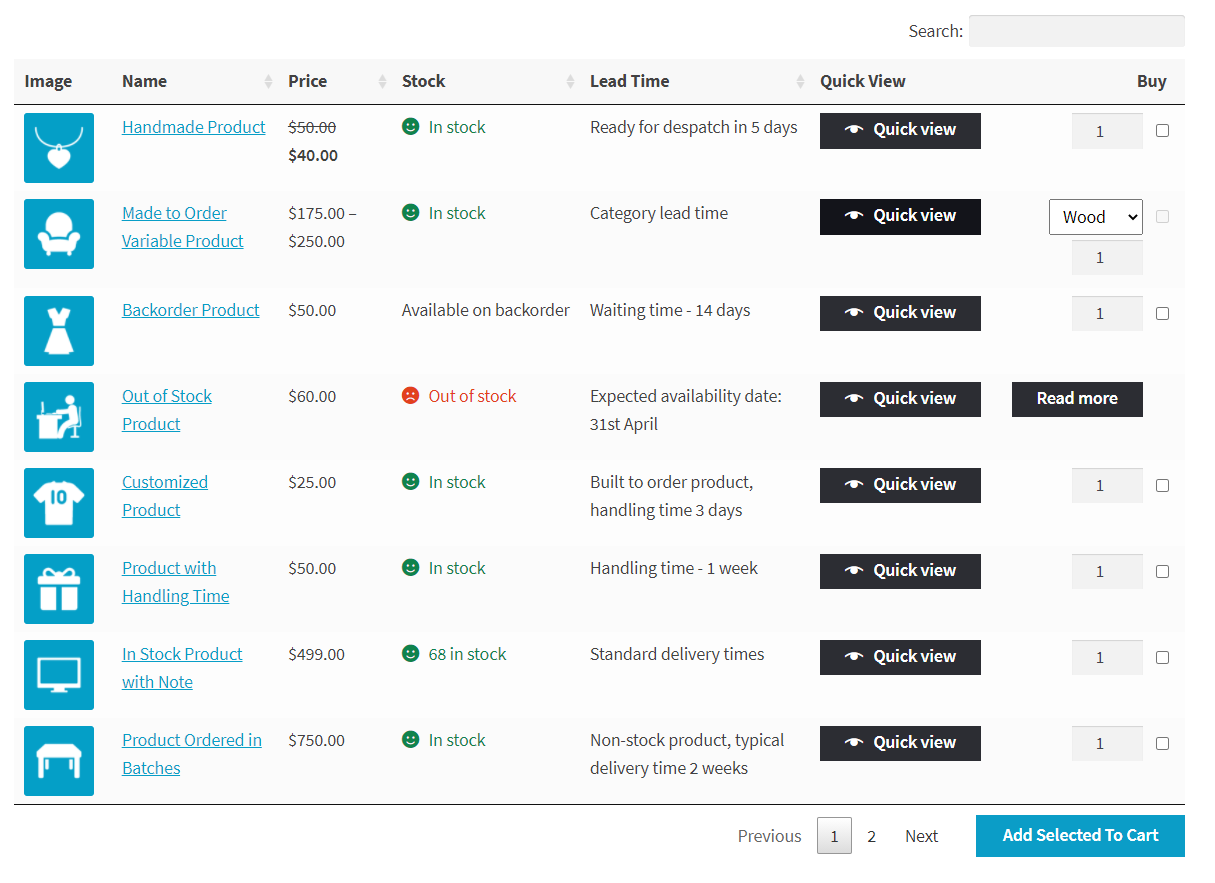
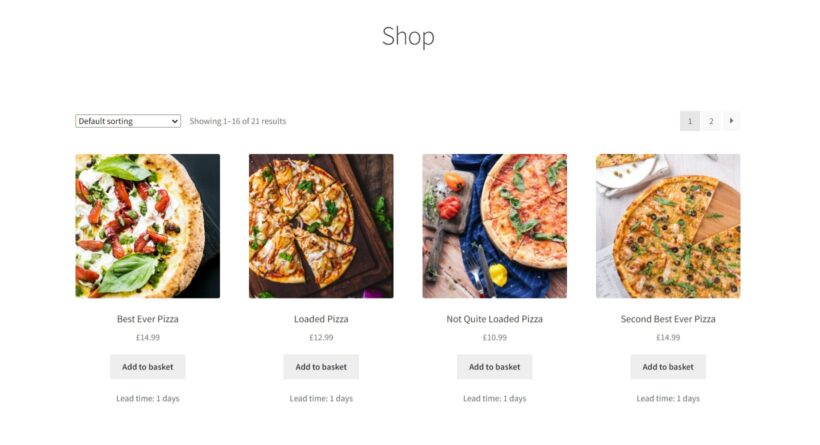
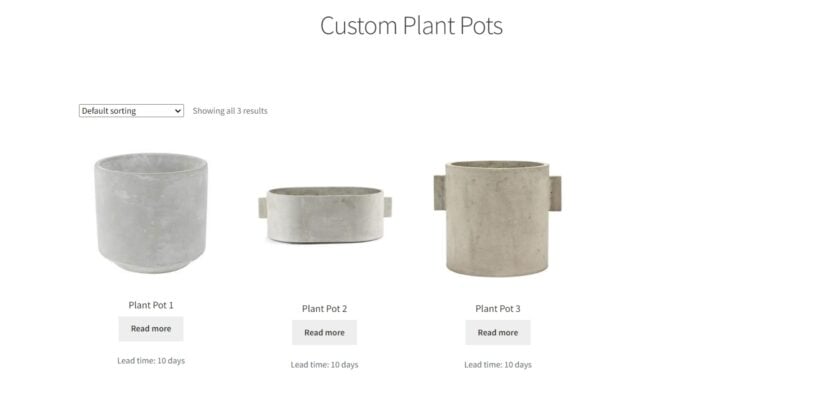
  • Show the WooCommerce stock status and lead time right on the shop and category pages. Customers may view this important information before clicking on any product.
  • Display a clear indication of when each item will be available to the buyer.

WooCommerce Lead Time is ideal for selling new not-available-yet-to-the-public items, as well as providing customers with accurate information before they make a purchase. The plugin is extremely light and works with any theme you already have on your online store.

It allows you to have total control over the stock state of WooCommerce and customise it depending on your launch dates. You will also get access to top-rated customer care, which will assist you at every step of the journey.

Before you set up WooCommerce pre order with WooCommerce Lead Time

Before you set up WooCommerce Lead Time on your online store, there are a few things you should think about:

  • When (day and time) will you begin taking online pre orders?
  • How long should your presale last?>
  • Will you offer some additional bonuses for customers who order during preordering phase?
  • When will the product be available for purchase and shipping?
  • Which payment gateways are you going to use?

Your customers will be charged upfront, so you will receive advance revenue during the pre-ordering period. We also suggest planning a bigger marketing campaign for your new item preordering to build momentum for your product launch and achieve the best results.

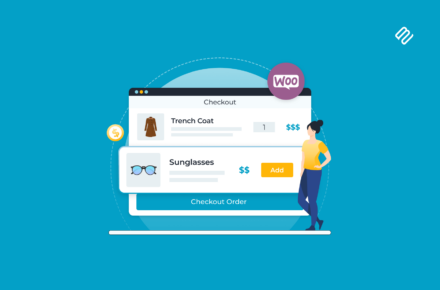
How to set up WooCommerce pre orders for your product

#Step 1: Get the WooCommerce Lead Time plugin

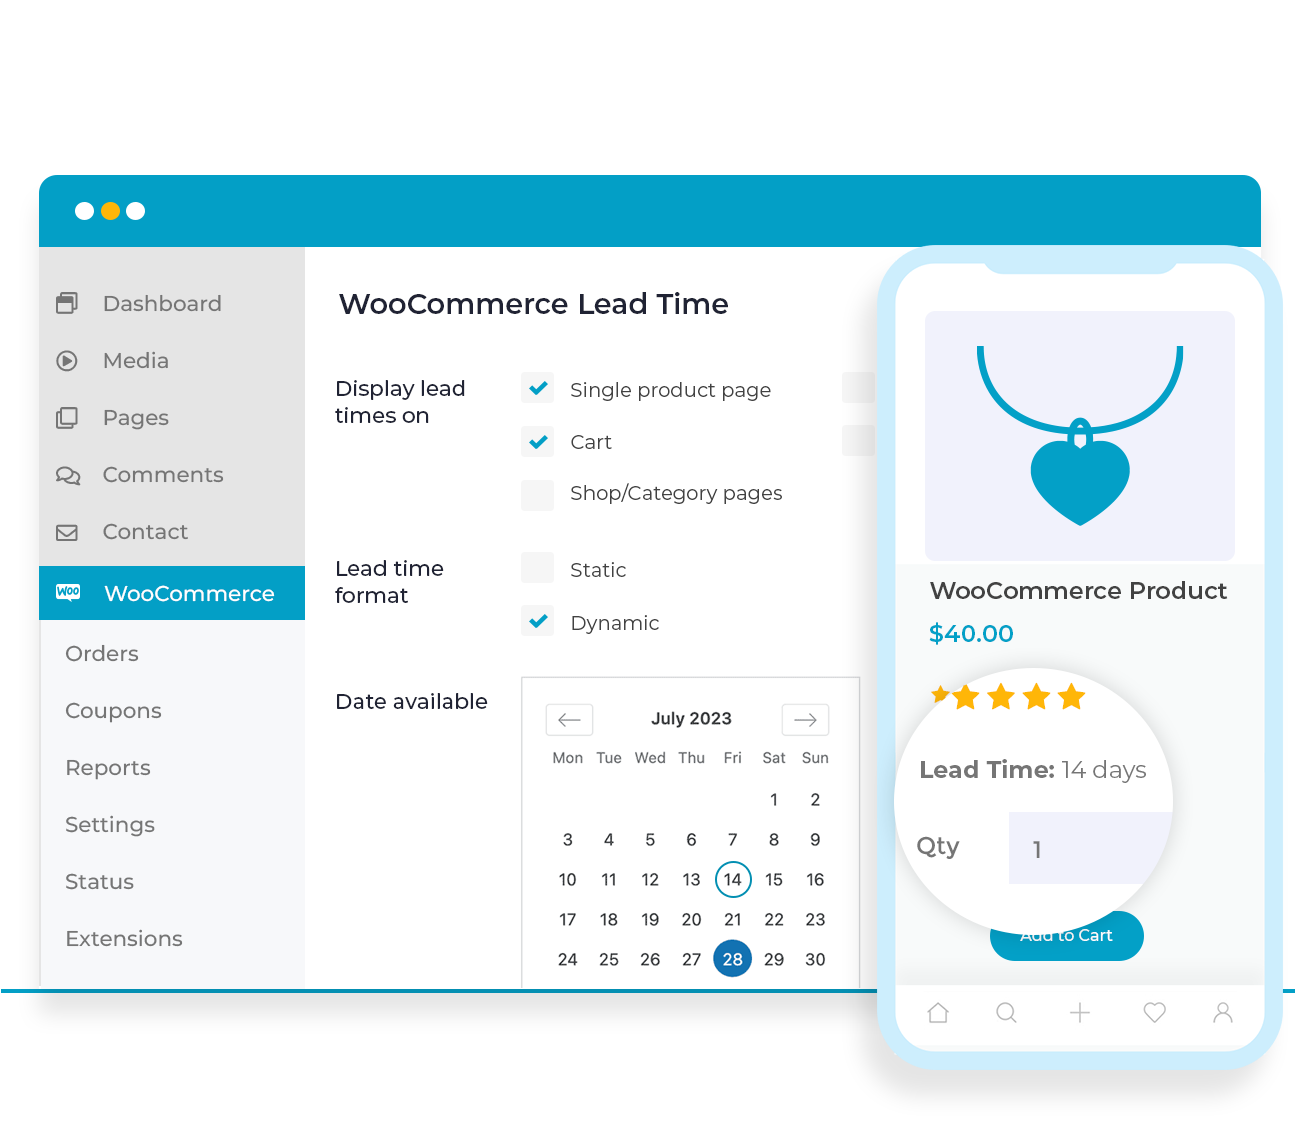
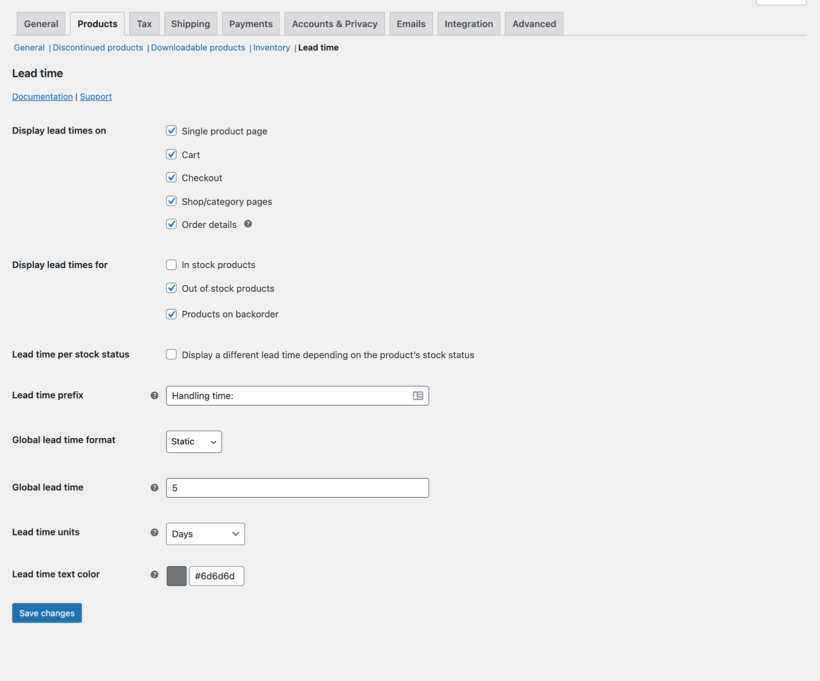
If you haven't already, install the WooCommerce Lead Time plugin. In a confirmation email, you will receive the plugin files and license key. Install and activate the plugin on your WordPress website. From the admin panel, navigate to WooCommerce → Settings → Products → Lead time.

The setup wizard will launch on activation of the plugin. It will take you through the main settings for displaying pre-order information.

Step #2: Show WooCommerce pre order status and lead times in your store

You may use the WooCommerce Lead Time plugin to display pre order status and lead times in prominent locations throughout your e-commerce business. It will display the product launch date on the cart, checkout and in the customer emails, so your customers will be very clear about when they will receive it.

However, we do suggest further highlighting your preorders by creating a special “New” or “Limited availability” category for them in your store.

Step #3: Set the WooCommerce pre order time

Depending on your launch and the number of products you want to include in your presale, you may set the processing time for WooCommerce Lead Time for the category of items, simple products, or variable products.

By going to WooCommerce → Settings → Products → Lead time  and entering the lead time in the Global lead time field, you can set the processing time globally

WooCommerce pre order
[/image_border]

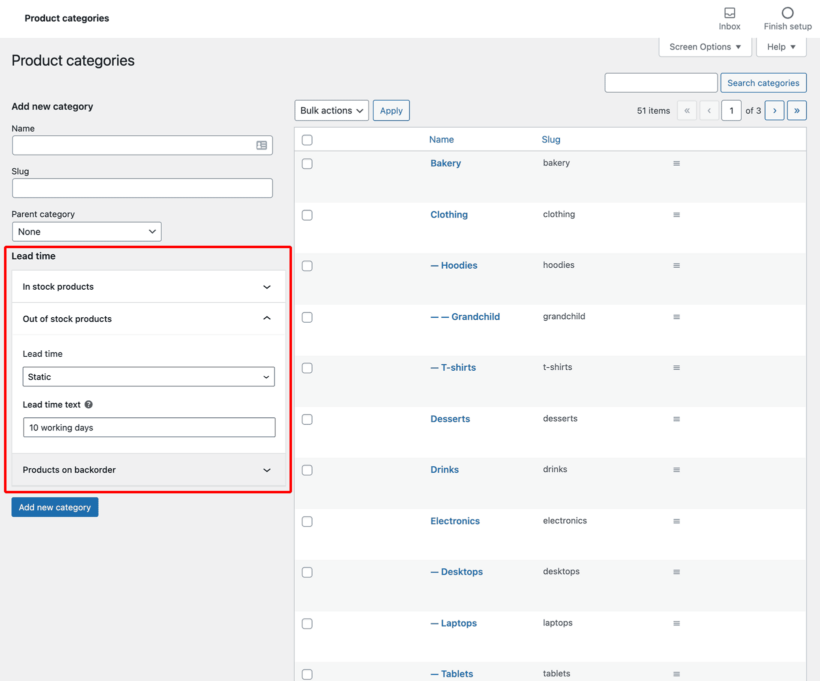
To define the processing time for a certain product category, go to Products → Categories and select either Static (input static lead time text) or Dynamic (compute the processing time dynamically) from the Lead time selection.

WooCommerce pre order

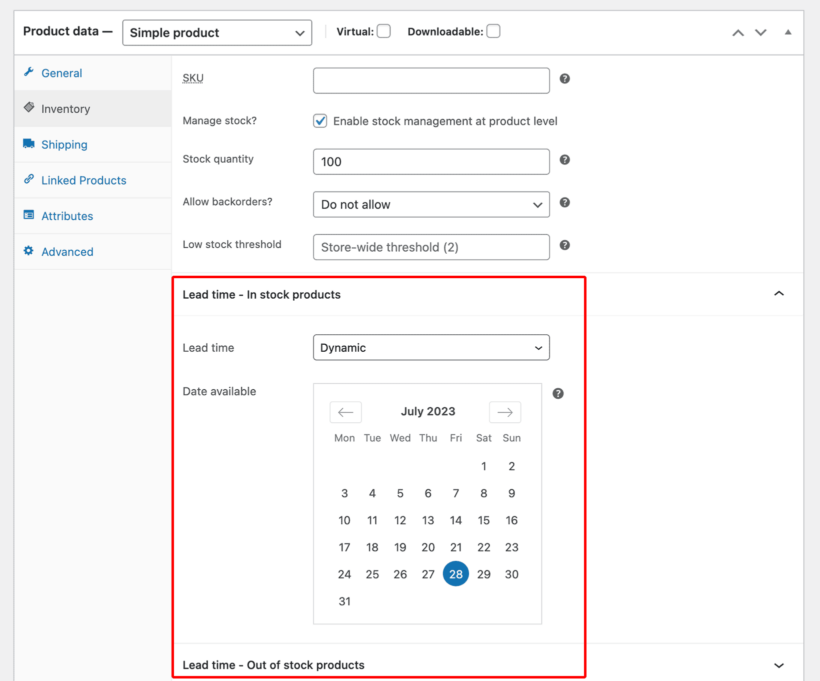
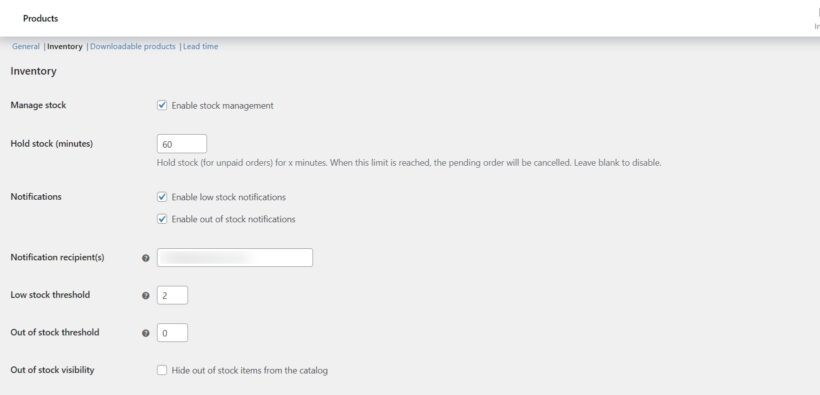
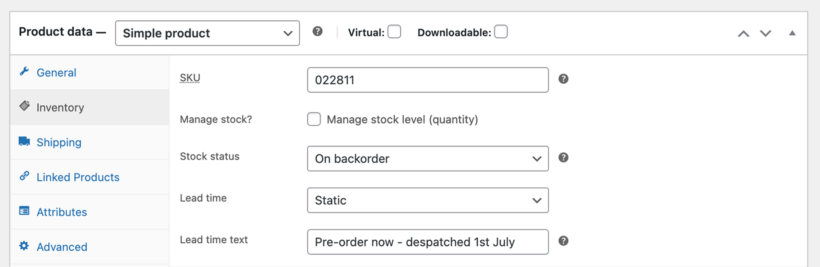
You can also adjust the processing time for specific goods with WooCommerce Lead Time (and variations). On the Edit Product page, choose the product for which you want to establish a pre order time. Scroll down to the Product information section and select the Inventory tab. You may set the product's pre order time from here. This is also applicable to variable products.

Step #4: Customize the pre order text and color

One of the most useful aspects of the WooCommerce Lead Time plugin is the ability to change the text and text color. This means you can fine-tune it to achieve the exact look and feel you desire when displaying pre order products.

For instance, you might change the custom status phrase to something like:

  • Preorder ends in X days
  • Available in X days
  • Waiting time:
  • Coming soon
  • Dropping in X days

To change the text color, go to the plugin's settings page (WooCommerce → Settings → Products → Lead time) and pick a new color from the Lead time text color option.

Managing pre orders in WooCommerce

WooCommerce Lead Time makes it easy to manage your WooCommerce preorders. Once a customer purchases the product, the order is saved as "Processing", and the only thing you need to do is to mark them as "Complete" when you finally launch.

You can then despatch the product once you close your pre-order period and manufacture the needed amount.

As the payments are processed straight away, you won't need to worry about any complicated multi-step payment process or delayed payments.

Using WooCommerce Lead Time with other plugins

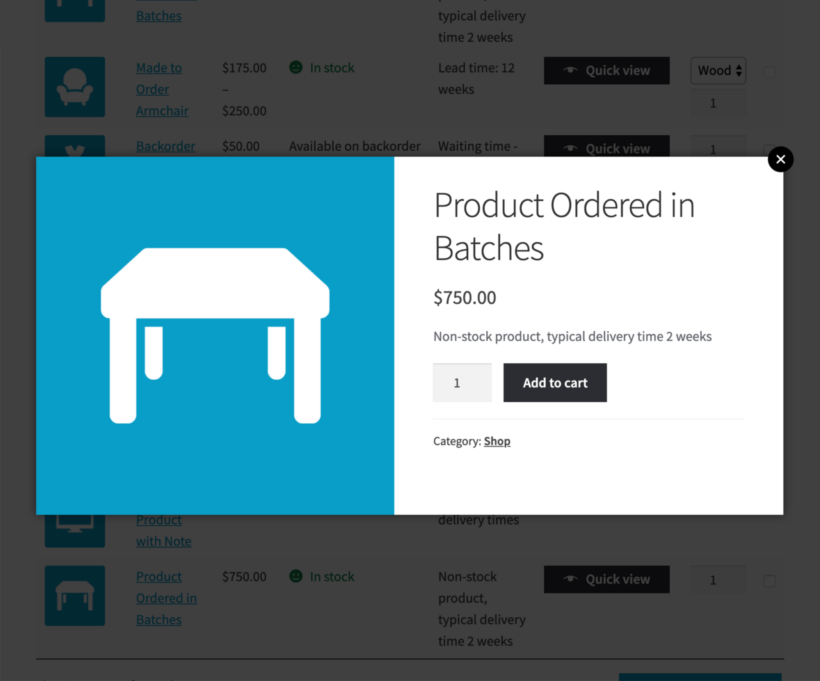
Customers should ideally be informed of the product lead time on the product information page. You may, however, utilize the plugin to display the lead time on your main store pages. When used with other plugins such Quick View Pro, you may display lead times in a quick view lightbox. This is particularly useful if you run a presale for multiple items in your store. This way, customers can see more information about the item they want to purchase without the need to leave the store, which increases the chances of conversion.

WooCommerce Lead Time with Quick View Pro (below)

WooCommerce pre order

Another plugin to consider for your WooCommerce pre orders is YITH WooCommerce Waiting List. This plugin displays an 'add to waiting list' button for items that are not yet available. When consumers add themselves to the waitlist, they receive an email as soon as the product is released. Everything is automated.

WooCommerce pre order

This is a good option if you don’t want to collect money before the release date of your new item. By using WooCommerce Lead Time and YITH WooCommerce Waiting List together, you can inform your customers about the lead time of your new product. And collect their email addresses at the same time.

Set Up WooCommerce Pre Orders for Products in Your Store Today

The WooCommerce Lead Time plugin may benefit your online store in various ways. It supports you in the marketing of your products or services by creating momentum before the product launch. It is also an excellent strategy to enhance income. Not only that, but also it helps your business with the technical and logistical management of the inventory on the back end.

A high-quality WooCommerce pre order plugin for your online shop allows you to manage the complexity of presales properly. Allowing customers to pre order things can help you generate income upfront for the manufacturing. It will also boost the likelihood of future product success.

WooCommerce Lead Time is the only WordPress plugin that displays lead times on the product page. It makes it easier to highlight the release date of your WooCommerce products. This plugin allows you to clearly communicate with customers when a product will be released. So that, they can order straight away (i.e. pre order) while knowing how long they will be waiting.

Ready to launch a WooCommerce pre ordering campaign? Get the WooCommerce Lead Time plugin right away!

WooCommerce Lead Time is the first and only WordPress plugin to provide estimated delivery timeframes for products. With this handy extension for WooCommerce, you can let your customers know what to expect.

Today we’re reflecting on why it’s so important to show lead times for your WooCommerce products. We’ll be looking at the website of one of our WooCommerce Lead Time plugin customers to see just how much of a difference it makes.

Before making an online purchase, most consumers will look to see if:

  • There is sufficient inventory.
  • When they can expect their order to arrive.
  • Date and/or time of expected delivery.
  • Shipping options that can be used.

This is a pivotal point in the buyer's journey and a crucial factor in determining whether or not they complete a purchase.

By using the lightweight WooCommerce Lead Time plugin, you can show your customers the approximate timeframe until an out-of-stock item is back in stock. Customers can quickly gauge whether they should place an order now or hold off.

One of the biggest causes of abandoned carts in WooCommerce is customers adding items to their cart just to check the delivery timescales. Having the product lead time shown on individual product pages helps shoppers decide whether or not to purchase the item before they even get to the checkout page.

Why should I show lead times for my WooCommerce products?

The term "lead time" refers to the time it takes to complete an online purchase, from when the order is placed until it is fulfilled. Time is counted from the moment an order is placed until it is delivered to the customer's door.

WooCommerce allows you to specify whether an item is available, sold out, or on backorder. However, you cannot specify an additional waiting period for products that have slow lead times or are temporarily unavailable. If you offer products that are built to order and have long lead times, it's crucial to let buyers know when the product will be ready rather than simply announcing that it's out of stock or on backorder. This will save your customers from becoming frustrated.

You can use WooCommerce shipping plugins to give shipping estimates. However, this doesn’t include the time that it actually takes you to despatch the order. Unexpected delays will inevitably lead to complaints and lost business. Customers will appreciate knowing how long it will be before receiving their orders if you include an estimated lead time on the product pages.

Imagine, for instance, an online shop selling handmade clothing that requires a lead time of six weeks to complete the order. Customers need to see this preparation or processing time information. They are then free to choose whether or not the proposed schedule suits their needs.

Lead times for out of stock products

If you just mark products as “Out of stock” then potential buyers will generally abandon their purchases on your site and look for alternatives on Google.

Showing lead times is therefore essential for products which are temporarily out of stock. It gives them the option to either place an order immediately or wait until the product is back in stock.

WooCommerce Lead Time

Or even better, you can allow backorders of out of stock products, and display a clear lead time message so that customers know there will be a wait. This is the best option because you still get the order, while clearly communicating the timescale and managing customer expectation.

It is a smart move to provide customers with information regarding backorders for products that you do not have in stock at the moment. This lets customers know when the product will be replenished in your inventory. As a result, you should provide your WooCommerce consumers the choice of continuing to place their order and having the product sent to them when it is back in stock. This is better than waiting until the product is once again available for purchase because there’s no chance that the customer will buy from a competitor instead. After all, they have already committed to your product by placing an order.

backorder and lead time

Using WooCommerce Lead Time with other plugins

There's a bonus for you as the shop owner when you use WooCommerce's lead time feature with the Delivery Slots plugin. These two plugins work hand in hand, so that customers can pick a delivery date and time which is after the product lead time has elapsed.

Ideally, the product lead time should be communicated to customers on the product details page. However, you can also use the plugin to show the lead time on your main store pages. And if you use it with other plugins like WooCommerce Product Table or Quick View Pro then you can show lead times in the product table or quick view lightbox.

Lead time column
Using WooCommerce Lead Time with the Product Table and Quick View plugins

Benefits of displaying product lead times

As we have seen, if your shop sells products that aren't constantly in stock, WooCommerce Lead Time is the perfect plugin for you. This may be the case if the item is custom-made for the customer or if the business simply does not have it in stock at all times.

Key advantages of showing processing times for WooCommerce items include:

Enhances the satisfaction of the product's target audience

The lead time can be displayed to improve customer service and streamline the buying process for customers. In addition, it improves consumer confidence by reducing their anxiety over WooCommerce backorders and fostering an atmosphere of openness and honesty.

Customers are able to make educated choices

If you run out of a product but know it will be back in stock shortly, you may still let your consumers know when they can expect it. The consumer can then determine if the proposed delivery date is acceptable.

Customers and customer service representatives save time

Additionally, showing the expected time on the product page prevents your customer service professionals from wasting time manually confirming the lead time for certain goods. Customers won't have to wait for an answer from your support team because they can see for themselves when the product will be sent.

It is possible to enhance conversion rates, shorten the time it takes to complete a purchase, and lessen the number of times customers abandon their carts by making product lead times readily available on the site.

What types of website need to show lead times?

If you sell handmade or custom order goods

Let's imagine you own an online shop where customers may purchase products that have been handcrafted or manufactured to order. An anticipated waiting period may be listed for the purchase of certain items.

You can simply show the lead time for each product on the front-end of your site with the WooCommerce Lead Time plugin, with different wording depending on the product's current stock status. This is possible because of the plugin's flexibility.

Retail establishments that do not always have all goods in stock

Certain stores do not keep all of their merchandise in stock and instead place orders at predetermined intervals. Additionally, it is essential to bear in mind that the order dates may be different for each product. In most cases, the anticipated order dates are affected by factors such as the location of the supplier and the processing durations.

Items that are currently unavailable to purchase

Out of stock product with lead time

Demand for a product will always be subject to various ups and downs. When a popular product has lots of orders, you may need a method to inform customers when it will be restocked again. For instance, maybe you sell t-shirts and are sold out of a certain SKU. When this happens, you'll want to let your consumers know when you will re-stock the item so they can plan accordingly.

On the individual product page, you may display a straightforward notification that reads "Out of stock | Available: [Date]" if you use WooCommerce Lead Time.

Real-life case study

Here’s a short case study about Omnifoto.nl – Masters of Light, an e-commerce store that uses the Woocommerce Lead Time plugin.

Omnifoto sell different filters for the camera lens. With the installation of the Lead Time Plugin, the main Shop page now displays the stock status of each item. It also shows whether items can be backordered, so customers can get this information without having to visit the individual product pages.

As a result, Omnifoto’s customers can now make quick and better decisions in purchasing their desired products.

For example, at one point the Haida M10-II Filter Holder Kit 67mm product was temporarily out of stock. An estimated re-stock time was shown on the page. The store owner entered the restock date in the WordPress admin. As a result, the WooCommerce Lead Time plugin automatically showed the number of days until this date. Customers can quickly order the item as soon as it is re-stocked.

This is a good tool to use, especially for those who sell in bulk before restocking. This lets the customers know how soon their desired products will be available for order.

According to the website’s owner (Jans from Omniphoto):

I did a search on the net to try and find a plugin that would show if an item is in stock directly on the shop and category pages. Before, a customer has to click on an item to find out when it is available. I now use your plugin to be able to add a notification about the expected delivery time/date of an out of stock product.

How can you use Lead Time to boost sales?

Now you may wonder how you will add the lead time to your products once you have installed the plugin. Here is an easy guide.

You can use the lead time plugin settings page or setup wizard to choose the following options:

  • Determine which stock levels to show the lead time notes for. For instance, you might only wish to advertise waiting times for items once they have been sold out or placed on back-order. To do this, simply disable the lead time for "In stock" goods.”
  • Show a prefix before the lead time. This gives you complete freedom because you can put whatever label you want. For example, this might be "lead time," "handling time," "available on," "processing time," "ready for dispatch in," etc.. You can insert whatever symbol you choose between the prefix and the lead time. Alternatively, leave either field blank if you prefer.
  • Add a global lead time. If you choose to select a global lead time, it will be shown on every product page. If you have the same waiting time for each item in your business, then you should use this option. Alternatively, lead the global lead time blank and instead add lead times for each individual product. You an also add a global lead time and then override it with a unique handling time for each item.
  • Choose the font color for the lead time. The color of the text for the lead time is a generic dark gray by default. You are free to replace this with anything you'd like. You could, for instance, make it match as the primary body font in your theme. Or you might make it more noticeable by using red or green text.

Setting lead times per product or category

In addition to the general parameters, you can customize each product or category’s lead times. This provides you with an even higher degree of control.

When you are on the ‘Edit Product’ screen, scroll down to the ‘Product Data’ section, then select the Inventory tab. Adjust the Lead time to meet your needs, e.g. adding the order's estimated handling time. Alternatively, it could be the date when the product will be available again.

Product level lead time WooCommerce

Let's say that you set the lead time prefix to "Waiting time:" and the lead time to "3 months". Buyers will receive a notification that reads "Waiting time: 3 months" on the single product page.

If you have chosen to allow the option to manage the product's stock, the waiting time notice will show on the same line as the text describing the stock availability after the option has been activated. It might say something like, "On back-order | Waiting time: 3 months", for instance.

In short

If you run an online store, installing the WooCommerce Lead Time plugin will allow you to do the following:

  • Show customers how long they will have to wait before they decide whether to purchase.
  • Develop a trusting relationship with your consumers, raise your level of openness, and assist them in making educated purchase decisions.
  • Enhance the shopping experience that your online store provides for your customers.
  • Allow customers to make an informed decision. This helps ordering items that are either temporarily out of stock or need to be assembled before despatch.

If your store would benefit from product lead times, then install the plugin today:

The Best WooCommerce Inventory Management Plugins

Are you manually managing products in your WooCommerce inventory? If so, then you’ll benefit from having a solid WooCommerce inventory management system. Not only will it make it easier for you to manage your store in real-time, but it can have a positive impact on your bottom line.

The truth is that having a solid inventory management system can save you a lot of time and energy. Energy that can be redirected to other areas of your business. As an online store owner, that should be music to your ears!

pizza lead time woocommerce

At this moment, there’s a global strain on the supply chain ecosystem, impacting businesses at the inventory level. It’s important, now more than ever, to set the right expectations with your customers when it comes to the availability of your products.

This article will highlight the different WooCommerce Inventory Management plugins available to you. As well as show you how you can manage and enhance your inventory process with them.

Why do you need better inventory management?

If you’re handling your current inventory within the standard WooCommerce out-of-the-box package, you might run into some limitations. With the right WooCommerce inventory management system in place, you’ll gain some of the following benefits.

Save time spent on repetitive tasks

With a WooCommerce inventory management system, you can easily edit in bulk. This will shave hours off having to make changes and edit thousands of products manually.

You’ll be able to change your product’s prices (plus its variations) and add discounts in just a few clicks. Save yourself the repetitiveness and the countless product page visits!

Improved shopping experience

With a complete inventory management system, you can give your customers visibility of their favorite product’s stock status. They’ll have an easier time making a purchasing decision when they know exactly when their product will land at their front door. You’ll take the guesswork away and reduce their need to contact you for more information.

Restaurant lead time woocommerce

Reduced losses from bad inventory control

If you’re managing your inventory manually, you have a higher chance of making mistakes. A single mistake can snowball and create a huge dilemma for your store. If a stock level wasn’t set properly, it might take you hours to fix on top of it being a costly mistake.

Forecast and regulate inventory requirements

With an inventory management system, you can easily forecast your stock level so that you know exactly when you need to contact your vendors to make orders. You’ll have a better handle on your inventory requirements and foresee any challenges coming ahead of time.

What are the default options available for inventory management in WooCommerce?

Since we’re going to compare different plugins (and their features) to help you better manage your inventory. It’s probably a good idea to take a look at what your current default options are. You can then decide if you want/need the additional functionalities for your WooCommerce inventory.

From your WordPress dashboard, go to WooCommerce > Settings > Products > Inventory to see the default settings.

inventory management woocommerce

Here you can see all your available options for better inventory control. You can:

  • Set up notifications.
  • Manage pending orders.
  • Set up stock status options (out-of-stock, low stock, back-ordered).
  • Set up expectations for order deliveries.

You’ll notice that the WooCommerce inventory doesn’t allow you, for example, to add a lead time for back-ordered products.

If you’re looking for such functionality, it’s best to use a WooCommerce inventory management plugin.

Which are the top inventory management plugins and which is the best?

As with any other plugin, there are countless options out there on the market. How do you know which one is the best fit for your WooCommerce inventory needs? We’re here to help you with that!

Here are the top WooCommerce inventory management plugins we recommend

WooCommerce Lead Time

The WooCommerce Lead Time plugin is designed specifically to give your customers the vital information they need before they make a purchase from you.

You can display the stock status and lead time for all your products globally or at the category/product level. You can choose to show the lead time for in-stock, out-of-stock, or back-ordered items with this plugin.

Here are some of its other features:

  • Full control over setting your lead times (static and dynamic).
  • Automatic lead time calculations.
  • Customize the lead time text on a product.
  • Works with product tables.

Pricing: Starts at $49/yr

Setary

Setary

Setary has a unique approach to WooCommerce inventory management because it's not a WordPress plugin. Instead, it's a spreadsheet-style bulk product editor outside of your WordPress site. That's great because you can manage your inventory in bulk without weighing down your site.

As well as managing stock in bulk, you can update all your other product data with Setary. This includes bulk editing prices, product names, categories, SKU's, and more.

WooCommerce Out of Stock! Manager

WooCommerce Out of Stock! Manager

WooCommerce Out of Stock! Manager will let you add threshold rules for your stock levels, with additional custom warnings so you’re alerted when a certain product stock falls below your assigned threshold. If you have a team managing the store, you can add them to be alerted of the warning.

Here are some of its other features:

  • First glance dashboard for better inventory overview and management.
  • Compatible with WPML.
  • Ability to customize the text on out-of-stock product pages.
  • Email notifications when your stock level is low.

Price: $16

ATUM

ATUM

ATUM is a free inventory management plugin that provides you with all the information you need at first glance to make decisions. It comes with an integrated dashboard so you can see the number of products you have in store, their prices, and so much more. You’ll have full control of your WooCommerce inventory which you can manage directly from the dashboard.

Here are some of its other features:

  • Advanced search capability with auto-fill.
  • Compatible with WPML.
  • Can make bulk product changes.
  • Export your inventory in PDF format.

Pricing: Free

Smart Manager for WooCommerce

Smart Manager for WooCommerce

The Smart Manager plugin for WooCommerce is an inventory management plugin that lets you edit your products, orders, variations, and coupons in bulk with just one click. You can also control your online store’s stock level in an easy-to-use spreadsheet-like system for a more seamless and efficient process.

The pro version of this plugin gives you the additional functionality of batch updating, duplication of records, and the ability to edit multiple inline records in one click.

Here are some of its other features:

  • Advanced search capability.
  • Preview your images.
  • Sticky header for data management.
  • Export all your posts in CSV format.
  • Infinite scrolling.

Pricing: Free Version (Pro $149/yr)

For maximum impact, we recommend you combine the WooCommerce Lead Time plugin with one of the other plugins mentioned above. This is because they offer different features and provide you with a complete WooCommerce inventory management solution.

How to use WooCommerce Lead Time to provide better inventory information to customers

The WooCommerce Lead Time plugin is the only plugin that allows you to easily display the lead time for a product so that your customers know when it will ship.

There’s nothing more important to a customer than knowing exactly when to expect delivery. Having a clear indication of that on your product page might be the deciding factor for their purchase.

The WooCommerce Lead Time plugin is the perfect solution for the following scenarios

If your online store houses some of the following types of products, then the WooCommerce Lead Time plugin is what you’re looking for.

Custom, made-to-order products

If you sell made-to-order, custom, or handmade products, then it’s useful for your customers to know exactly how long it will be until their product is ready. They might click away from your store for another alternative if they see an out-of-stock sign, as that would be the default option with your standard WooCommerce inventory options.

custom product lead time woocommerce

Show them the lead time on product, checkout, and category pages. You can set the processing time globally or at the product/variation/category level for a more specific target. You also don’t have to use the words “Lead Time” as you can customize to your business’s needs.

Non-stock products

If you have products that are non-stock items because you don’t keep track of their quantities, then you can skip setting the quantity level but still have them show up as available in the store for customers to purchase.

Out-of-stock products

For out-of-stock products, you’ll be able to display a message immediately when your product sells out. You can arrange for a separate lead time option for products that are in-stock, out-of-stock, or back-ordered as they all have different requirements.

To provide your customers with the best possible experience, let’s set up your WooCommerce inventory management system.

Installing and using the WooCommerce Lead Time plugin for your inventory management needs

You can get the plugin from the Barn2 website and then download the files to your computer.

Here are the steps you need to take to get started.

  1. Go to your WordPress Dashboard → Plugins → Add New → Upload Plugin.
  2. Select the files from your computer and click on Install.
  3. Now that you’ve uploaded them, click on Activate.
  4. Go to WooCommerce → Settings → Products → Lead Time so you can input your license key (should be in your email confirmation).
  5. Click on Save Changes.

Let’s go to the plugin’s page now to add and display the lead times for your products.

Add Lead Times to your products

First, you need to decide where you want to display your lead times.

Go to the Products tab at the top of the screen, and then click on the ‘Lead Time’ link right below the tabs. You’ll see the following options.

  • Single product page
  • Cart
  • Checkout
  • Order details

You can select the specific product areas where you want a lead time text to be shown.

Display lead times on

Next, let’s go through the various stock status options.

Display lead times for types of products

Keep in mind that if you only check one of these, then the lead time will only show for products associated with that selection. So, if you check ‘out-of-stock products’ only, then only products that are out-of-stock will display the lead time.

  • In-stock products
  • Out-of-stock products
  • Product on backorder
  • Discontinued products
Display lead times for

If you want to keep it simple, you can show the same lead time for each product regardless of its stock status. If you want more control, then you can set a lead time per stock status. You can do this by checking the ‘Display a different lead time depending on the product’s stock status’ box.

By doing so, you’ll get more options to set a different global lead time for each stock status. Additionally, for each stock status you’ve enabled, you can set the lead time at the category, product, and product variation level.

Global lead time settings

If you want to have the same lead time shown on all your product pages, then you can set that up here in the global lead time field on the same Products tab and ‘Lead Time’ section. If you want to set the lead time for each individual product, then you can leave the global lead time field blank.

Global lead time

You can override the global lead time (if you set one) with a different one for specific products. In any case, if there’s no lead time set at the category-level or at the product-level, then the global lead time will take precedence.

Global lead time format

You have the option to choose between a dynamic lead time or a fixed text one. Here are the differences between each option.

Dynamic lead time

For this option, open up the calendar and select the date when your products will be coming in. The lead time will be automatically calculated for you and displayed on the product pages you selected to have a lead time shown. Your customers will see the number of days or weeks until they can expect the product.

As an FYI, this should be used only if you’ve ordered stock for all of your products and they’re coming in on the same day.

Static lead time

Here you set a fixed and exact text, such as ‘7 days’ for the product pages you’ve selected to show a lead time on. This is a good option if all your products have the same lead time.
You’re also able to override the global lead time format for specific products or categories should you choose to.

If you set the global lead time for ‘7 days’, you can also set up a dynamic lead time for an individual product if you know what day it’s coming in.

Customize the lead time display

There are two customizations you can make related to the display of the lead time. One is for the wording of the lead time and one for the text color. For example, if you don’t want it to say ‘Lead time’, but you’d rather have it show ‘Waiting time’ then you can make that change in the ‘Lead time prefix’ field.

Lead time design WooCommerce

You can also change the lead time text color so it matches with your brand or theme color. Simply change the ‘Lead time text color’ hex code.

Additional lead time options to consider

The WooCommerce Lead Time plugin has more to offer. With the newest feature in place, you can actually set lead times at the category and product/product variation level.

Category level lead time

If you want to add a lead time at the category level, here’s what you do.

Go to your WordPress dashboard → Products → Categories.

Category lead time WooCommerce

In this area, you can choose ‘Static’ or ‘Dynamic’ under the ‘Lead Time’ field. The difference between static and dynamic is the same as mentioned above (under the Global Lead Time Format section).

If you do set up a lead time at the category level, then all your products within that category (and sub-categories) will inherit the text. You can choose to override this for individual products should you want to.

Also, keep in mind that the category-level lead time will override the global lead time setting (as well as for individual products that do not have a set lead time).

Product level lead time

To set up a lead time at the product level, you’ll follow a similar process.

Go to your WordPress dashboard, then click Products → Edit Product.

In the Product Data area, there’s an inventory tab where you’ll find designated fields to set the lead time at the product level. Similarly to the category-level lead time, you can now set a ‘static’ or ‘dynamic’ lead time at the product level.

Product level lead time WooCommerce

If you do set a lead time in this area, it will override any settings you have at the category level and global level. Your product level lead time will always take precedence.

Also, keep in mind that products that don’t have a designated lead time will fall under the category-level lead time.

For both of these, the category-level and product-level settings, your lead time will only show up for the selected stock status options you selected at the beginning in the ‘Display lead times for’ section.

Why should you use WooCommerce lead time?

The WooCommerce Lead Time plugin stands out in multiple ways as it’s packed with features to help you manage your WooCommerce inventory. If you want to keep your customers informed, display product lead times, and have control over static and dynamic lead times, then you’re in the right place.

Here are some of its top features that everyone is raving about

Integrates into your theme

You don’t have to code anything extra when you set up this plugin. The styling for the lead time text is automatically inherited from your theme so it matches the look and feel you already have.

The plugin is lightweight

Your website won’t be bogged down when you download and install this plugin. It uses little resources so you can be sure that your online store is still loading up at an optimal speed.

Stock status control

You’ll have control at the smallest level over your product stock statuses. You can easily show static or dynamic lead times depending on the product, category, variation, or storewide stock status.

Highly rated customer support

This plugin comes with an expert support team to guide you along the way. If you’re stuck, have a question, or need more hand-holding, you’re covered.

Additional inventory management benefits

Should a product go out of stock, you want to make sure that your customers know when the product will be back in stock before they reach the checkout page. This visibility will greatly improve customer loyalty as they won’t feel disappointed when they’re ready to checkout.

Additionally, if you want to let your customers know how long it will take between their order and delivery, you can manage this as well with the WooCommerce Lead Time plugin.

Managing discontinued products

If you want to manage discontinued products, we highly recommend Barn2’s Discontinued Products plugin, which seamlessly integrates with WooCommerce Lead Time. When one of your products reaches the end of its shelf life and won’t be available again, your standard WooCommerce setup is limited in options.

WooCommerce Discontinued Products - easy backend reporting

With the WooCommerce Discontinued Products plugin, you’ll be able to quickly mark any products as discontinued without impacting their SEO value, which is highly valuable in and of itself. You’ll have the ability to either show them as discontinued or to hide them from your store, with either option making it easy for the customer to browse through.

For more details and information on the benefits of this plugin, you can go here.

An easy way to manage your WooCommerce Inventory

Having the right WooCommerce inventory management system will save you a lot of time down the line and make your life easier as an online store owner.

If you’re looking to add more functionality to your store, and flexible options for your custom and non-stock products, then the WooCommerce Lead Time plugin is the right fit for you, complementary to other inventory management plugins.

You’ll have the flexibility and control to manage your inventory lead time at the global, category product, and product variation levels. Give your customers the best possible shopping experience as you’ll take the guesswork and frustration away from them.

Download and install the plugin today!

Best WooCommerce delivery date plugins

Learn how to display expected delivery times on product pages, and allow customers to choose a WooCommerce delivery date on the checkout.

If you’re running an eCommerce store, then shoppers want to know exactly when they can expect their orders to arrive. Big stores like Amazon and Walmart display prominent delivery dates on product pages and checkout pages. With a WooCommerce delivery date and time plugin, you can bring that same clarity to your store. You can also display timely notices, like the last day for Christmas delivery.

A survey from UPS found that anywhere from 12-28% of consumers would abandon their shopping carts because there were no WooCommerce estimated delivery times before checkout. As a result, this can make a big difference to your bottom line.

In this article, I'm going to tell how you to set up two types of WooCommerce delivery date plugin:

  • The WooCommerce Lead Time plugin lets you show estimated delivery times right on the product page, helping customers to make an informed decision.
  • WooCommerce Delivery Slots plugin lets customers choose an exact delivery date and/or time on the checkout page, giving them guaranteed delivery dates.

Both plugin adds important functionality to your store, and you can use them together for best results.

Front-end WooCommerce delivery time plugin

Understanding the importance of delivery scheduling in WooCommerce stores

UPS surveyed thousands of consumers from around the world and found that, while the exact percentage varies by region, a lack of WooCommerce estimated delivery date can scare away potential customers. 

Here’s the percentage of consumers who would abandon their cart at checkout because there’s no estimated order delivery date by region:

  • Europe — 19%
  • Asia — 25%
  • Australia — 16%
  • Mexico — 25%
  • Canada — 17%
  • USA — 12%

These numbers are why you’ll almost always see a delivery date on big eCommerce stores:

WooCommerce estimated delivery date from Amazon

Benefits of setting up delivery dates in WooCommerce

WooCommerce is a powerful e-commerce platform that offers a wide range of features to help businesses optimize their online stores. While it lets you add a range of shipping methods, there's no way to show customers the expected WooCommerce delivery time. It also doesn't let customers choose a delivery date or time slot.

Setting up delivery dates for products can be beneficial for both the business and the customers. Here are some of the benefits of using WooCommerce to show an estimated delivery date:

  • Improved customer experience: Displaying delivery dates to customers can help manage their expectations and avoid disappointment. It provides transparency and helps customers plan their purchases accordingly, which can lead to increased satisfaction and repeat business.
  • Increased efficiency: By configuring delivery time WooCommerce rules, businesses can better manage their shipping and delivery processes. This avoids overloading their resources, and optimizes their operations for maximum efficiency.
  • Competitive advantage: Offering accurate delivery dates can be a significant differentiator in a highly competitive e-commerce market. Customers are more likely to choose a store that offers transparent and reliable delivery information over one that does not.
  • Reduced support queries: By providing clear estimated WooCommerce delivery date information upfront, businesses can reduce the number of customer queries. This frees up support staff to focus on more critical issues.

How to calculate delivery dates in WooCommerce

Calculating the delivery date for a WooCommerce order involves several factors. These factors can include the processing time required to fulfill an order, the shipping method selected by the customer, the shipping destination, and the availability of the product in inventory. Additionally, businesses need to consider the impact of holidays and weekends on delivery times, as these can affect WooCommerce shipping time.

So what factors go into calculating a WooCommerce order delivery date to share with customers?

1. Consider your available shipping methods

When it comes to displaying a WooCommerce delivery date, you can control everything from checkout up until you hand the package over to your shipping courier. Then, it’s up to them to deliver in the agreed number of days.

Picking the best shipping method is always going to be a balancing act between delivery time and price, depending on your number of deliveries.

Additionally, pay special attention to shipping cut-off times and other nitty-gritty delivery details. Those can also affect your WooCommerce delivery date plugin. For example:

  • What delivery days does your shipping method support?
  • What's the number of days per week it delivers?
  • Is it only available on weekdays?
  • Is there a next-day delivery option?

For example, USPS offers USPS Priority Mail which offers delivery in 1-3 business days. It also offers USPS Retail Ground and Media Mail, which range from 2-8 business weekdays.

While Media Mail offers lower prices in exchange for longer WooCommerce shipping times, it’s much tougher to offer a firm delivery date when the date range from your courier is 2-8 working days.

Similarly, Priority Mail Express offers next-day delivery seven days per week. It lets you guarantee next-day delivery if needed. Of course, this also comes at a cost.

If you want to display the estimated delivery date for a product, then you can set up different WooCommerce shipping zones. You can also use a table rate shipping plugin to charge for shipping based on factors like weight and quantity.

2. Be transparent with custom/handmade products that require preparation

If you offer custom or handmade products on your WooCommerce store, it's important to be transparent with your customers about the preparation time required before shipping. Unlike pre-made products that are ready to ship immediately, handmade or customizable products may require additional time for preparation and customization, which can impact the estimated delivery date.

To ensure that your customers are aware of this, you need to clearly communicate any lag time between when an order is placed and when it will be shipped. This can be done by displaying the estimated delivery time WooCommerce format on your product page and checkout page, and including a message that explains the preparation time required.

Using certain date formats or a date picker can also help to streamline the process and ensure that the preparation time is accurately reflected in the WooCommerce estimated delivery date. By being transparent and upfront about the preparation time required for your handmade or customizable products, you can help to manage customer expectations and avoid any confusion or disappointment.

In addition to communicating the preparation time, you can also consider offering customers the option to expedite the production process for an additional fee. This can be a great way to generate extra revenue while still providing the flexibility that customers are looking for.

3. Keep the holidays in mind

When you’re calculating an estimated WooCommerce order delivery date time slot, it’s important to keep major holidays in mind.

Not only can holidays affect delivery schedules for your courier, but the holidays are also usually your busiest time of the year, which might mean that it takes you longer to get orders out in the first place or you have different available time slots.

Holidays can also be high-stress for shoppers, which means they definitely want to know if they’ll get their orders in time before they checkout and what the delivery days are. That’s why most stores display a notice for the last day of Christmas delivery.

Most shipping services will publicly display shipping dates for big holidays based on different shipping methods. For example, the USPS publicizes its Christmas shipping details well in advance, which lets you plan the number of days you have to ship items.

As for your own shipping schedule, you’ll want to consider if you’ll still be able to get orders out as quickly when the number of deliveries picks up. If you think it might take you a little longer to ship orders, you might want to add some buffer to your estimated shipping times to be safe.

Holiday rules and how they work

Holiday rules are an important feature of WooCommerce delivery time plugins that allow you to adjust your delivery dates and times to account for holidays and other events. These rules help to ensure that your customers receive their orders on time, even when there are disruptions to the normal WooCommerce shipping time.

To set up holiday rules, you'll need to specify the dates on which your store will be closed for holidays or other events. You can then adjust the estimated delivery dates and times for orders that fall within these dates so that customers are aware of any potential delays.

For example, if your store is closed for Christmas Day, you can set up a holiday rule that adjusts the estimated delivery date for orders placed during that time. This will help to ensure that customers know that their orders may be delayed and can plan accordingly.

When setting up holiday rules, it's important to consider the impact on your shipping and delivery schedule, as well as the expectations of your customers. By communicating any potential delays or changes to your normal schedule, you can help to manage customer expectations and maintain a positive shopping experience.

Top WooCommerce delivery date and time slot plugins: A comparison

Customizing the display and options for the WooCommerce delivery date is easy with the use of plugins. As I mentioned earlier, I'm going to tell you about two plugins: Lead Time (which lets you display the WooCommerce estimated delivery date) and Delivery Slots (which lets customers choose a delivery time slot).

We'll start by learning how to display delivery dates on product pages. After that, I'll tell you how to add a delivery time picker to product pages and/or the checkout.

How to set a WooCommerce delivery date with Lead Time

WooCommerce Lead Time Cropped

WooCommerce Lead Time is everything you need to provide clear information about expected WooCommerce delivery dates.

Whether you want to provide general delivery estimates or a number of days, or show custom lead times for handmade products, this is the solution. This flexible order delivery date plugin lets you display delivery information without the need for custom PHP or CSS — just configure a few settings and you’re ready to go, with cut-off dates too.

Key features

  • Either display the same delivery estimate on all products, or do it separately per product or category.
  • Show a different WooCommerce delivery time message per stock status. For example, products on back order inevitably have longer delivery times, so you can display this information on the product page.
  • Either show the estimated delivery date as static text (e.g. "Next day delivery") or make it dynamic. Dynamic delivery dates involve selecting the exact date when a product will next be available, and letting the Lead Time plugin calculate the remaining time and display this on your site.
  • Integrates with the Delivery Slots plugin to add the handling time to the actual shipping time, and display an accurate delivery time which combines the two.
  • Customize the wording and color of the delivery date message to match your store.

The goal of this plugin is to allow customers to see the expected WooCommerce delivery date right on the product page. This allows them to make an informed decision before they add a product to the cart.

For example, if you ship your products right away, you could display something simple like "Estimated delivery date: 3 weekdays".

Alternatively, if you build products from scratch, then you could display when a product is ready to be shipped, like "Ready to ship in 1 week".

Display different delivery date information per stock status

Importantly, the WooCommerce Lead Time plugin lets you enter different delivery information per stock status:

  1. In stock products
  2. Out-of-stock products
  3. Backordered products

For example, you could display an estimate for when you’ll have a product in stock and ready to ship to customers. You can also create other messages for different stock statuses. 

Finally, WooCommerce Lead Time is also WPML and Weglot compatible if you’re running a multilingual eCommerce store.

Next, I'll tell you how to use the Lead Time plugin to add a WooCommerce delivery date to product pages.

How to set a global WooCommerce delivery date for all your products

  1. To get started, install, and activate WooCommerce Lead Time.
  2. Then, go to WooCommerce → Settings → Products → Lead Time to configure the plugin's global settings.
  3. First, you can choose the types of WooCommerce products for which you want to display estimated WooCommerce delivery times and delivery charges. For example, only in-stock products, out-of-stock products, or other product categories.
  4. Below that, you can choose the Lead time prefix. This is the text that will display immediately before the estimated delivery date, like delivery details.
  5. Below that, you can enter the Global lead time, which is the default WooCommerce delivery date message which will appear on all products. Remember, you can always customize this for individual products and categories. You don’t have to use a date picker or follow any special date format — just enter the number in plain text in the delivery settings. For example…
    • 3 days
    • 1 week
    • 5 hours

    Alternatively, select the dynamic lead time option to automatically show the date when the product will be available. 

  6. Finally, you can also choose the Lead time text color, which controls the color of both the lead time prefix and the lead time number itself. If you want to draw attention to the WooCommerce order delivery date, you can use an eye-catching color here:

    WooCommerce delivery time with lead time notice

    Once you save your changes, your shoppers will see the estimated WooCommerce delivery date, pickup date or despatch date on the front end of your WordPress store:

    Front-end WooCommerce delivery time plugin

Perfect!

Some delivery time message examples

  • If you offer same-day shipping option and use a shipping method that guarantees delivery in 3 days from the current date, you could put something like “Order before 12 pm and your pick up date will be [blank] day of the week”
  • If you need time to customize a product, you could put something like “We make all products by hand. Your product delivery date will be on [blank] day of the week” for your notification emails

How to set a custom delivery date for individual products

So far, we've learned how to display an estimated WooCommerce delivery date across your entire store. If the delivery times are different depending on the product, then you can enter different information or dates per category or product instead. For example, maybe your Woocommerce store has one product that you get from a different supplier that takes longer to ship than your other products.

To set a custom order delivery date for an individual product:

  1. Open the Edit product interface.
  2. Scroll down to the Product data box.
  3. Go to the Inventory tab.
  4. Use the Lead time box to enter the custom delivery date for the product. Alternatively, set a dynamic lead time to automatically display an exact delivery date or the time remaining.
Setting an estimated WooCommerce delivery date for an individual product

The WooCommerce Lead Time add-on will use the same lead time prefix that you set in the global settings. For example, if you change the lead time for a single product from “3 days” to “5 days”, you’d see that new number on the front end of your WordPress store:

You can also change the lead time prefix for individual products by following these instructions.

How to set the last day for Christmas delivery (or other holidays)

During holidays or other busy times, you might want to tell shoppers when they need to order to get their items in time for the holiday.

For example, during the busy Christmas shopping season, many shoppers will want to know the last day for Christmas delivery so they can plan their gifts. You certainly don’t want kids to be disappointed in Santa.

To set this up, you can edit WooCommerce Lead Time's settings to display a holiday-specific message.

Let's go with the example of displaying the last day for Christmas delivery.

To get started, you'd open the global WooCommerce Lead Time settings. Then, because you can enter any text in both the Lead time prefix and Global lead time boxes, you can configure a Christmas-specific message that details the last day for Christmas delivery.

For example, if you configure the order delivery date plugin like this:

Custom message for last day for Christmas delivery

Then you'd get a message like this on the front-end of your store:

Custom Christmas WooCommerce delivery date message

You'd still be able to change the delivery cut-off for individual products. For example, you could enter "Tuesday, December 16th" for products that take longer to ship:

Custom Christmas estimate for individual product

How to let WooCommerce customers choose an exact delivery date and time slot

So far, we've learned how to use the WooCommerce Lead Time plugin to display delivery information on product pages.

If you'd like to go a step further then you can use it with the Delivery Slots plugin from Iconic to allow customers to select an exact delivery date and time.

This handy plugin integrates with your WooCommerce delivery methods and WooCommerce Lead Time. That way, customers can view a table of available dates and times based on their chosen delivery method. They can then reserve a date, and the delivery time will be added on to the lead time that you set for the product in the previous section of this tutorial.

The Delivery Slots plugin comes with a shortcode that you can use to allow customers to select a delivery date and time on product pages. To avoid cluttering up the product page, it's best to put the delivery date picker in a dedicated 'Delivery' tab on the product page. You can easily do this with the WooCommerce Product Tabs plugin.

Alternatively, just display the delivery time picker on the WooCommerce checkout page.

Setup WooCommerce delivery time slots

Bonus: Let customers check the delivery area on the product page

WooCommerce Shipping Calculator cropped
WooCommerce Shipping Calculator

By now, you know all about how to display the WooCommerce estimated delivery time on product pages. However, we haven't talked about how customers can check that you actually deliver to their area.

The solution is to install the WooCommerce Shipping Calculator plugin. This handy zip code checker adds a shipping calculator right onto the product page. That way, customers can check they live in your delivery area and see the shipping cost before deciding whether to buy the product.

Conclusion: Add delivery dates and time slots to WooCommerce today 🚚

If you run a WooCommerce store, then shoppers want to know how long it will take to receive their orders. If they don’t see an estimated order delivery date or a date-picker, then a significant chunk of them might abandon their carts.

This is doubly true around the holidays. Your shoppers will be keen to know the last day for Christmas delivery so that they can have their gifts ready in time.

In this article, we've learned about two fantastic plugins for selecting and displaying WooCommerce delivery times in your store:

  • Use WooCommerce Lead Time plugin to show estimated delivery times directly on the product page, where customers expect to find it.
  • You can also use the WooCommerce Delivery Slots plugin so that customers can choose an exact delivery date and/or time to receive their order.

Use both plugins together to give customers complete flexibility along with clear, transparent information about the expected delivery date.

To calculate delivery times for your WooCommerce store, you'll want to consider: