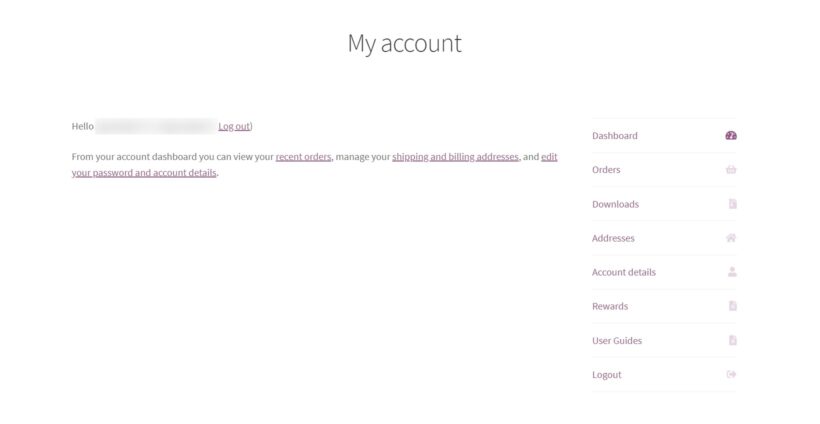
The way you set up your WooCommerce Account page can have a positive impact on the overall experience of your customers, especially after they’ve purchased from you. If you customize this area of your store, you’ll be able to enhance your customer’s journey, and improve loyalty at the same time. But in order to achieve this, you’ll need the help of the plugin WooCommerce Account Pages.
You’re probably aware that your standard WooCommerce installation doesn’t have a user-friendly way to add multiple pages or tabs to your My Account Page.
If you’re a store owner, the last thing on your mind is learning how to code in order to customize this area.
Customizing your WooCommerce My Account page doesn’t have to be an ordeal. With the right setup, the whole process can be a walk in the park. You’ll be able to provide your customers with up-to-date information, answers to their questions, and incentives to make future purchases.
In this article, we’re going to highlight the importance of customizing your My Account page. As well as how to go about accomplishing that with the help of the My Account page plugin, WooCommerce Account Pages.
Why customize the My Account page in WooCommerce?
The truth is that the out-of-the-box WooCommerce My Account page can be uninspiring.
As a business owner, your goal is to provide your customers with outstanding customer service. This means giving them the information you know they’re looking for. Whether that’s answering their questions in an FAQ style, or giving them the option to download instruction guides.
You don’t want your customers to jump through hoops to get their questions answered and frustrate them in the process. This can only be done through customization.
For example, by customizing your WooCommerce My Account page, you’ll be able to add user guides, as well as give them extra information about warranties for example. Essentially, you’re reducing the after-sale friction for them, so they don’t have to reach out to you.
Another reason why you should customize this page is that you can personalize the experience for your customers. With that in mind, your standard My Account Page does not come with the capability of segmentation. What this means is that you’re currently not able to display different content depending on the role of the user.
For example, if you have a membership site, it’s crucial to give your customers the correct view and access to their account depending on what they purchased. On the other hand, you don’t want to give everyone the same access and information if it’s not relevant to them.
So now we know why it’s worth customizing your My Account page in WooCommerce. Next, let’s look at what the overall benefits are.
By customizing the WooCommerce Account Page, you’ll get the following benefits:
Reduced returns
If you create a new page with additional product information/instructions for customers, they’ll know exactly how to use the product, which will reduce the likelihood of a return.
Physical products all come with instruction guides and manuals for further explanation. Add those as downloadables on your My Account page for easy access. Your customers will be less likely to ask for a refund if they feel confident that they have all the information they need for it.
Opportunity for further sales
By upgrading your My Account page in WooCommerce, you’ll be able to use this area to offer your existing customers additional coupons and discounts to keep them coming back.
Since acquiring a new customer is more expensive than retaining an existing one, you can increase your retention rate by offering customer-only coupons.
In fact, you can add coupon shortcodes within the content of the page you’re adding, and voila! Your customers will be eager to check in from time to time and see if there’s a new offer for them.
Increased loyalty
There are several ways customizing your My Account page will lead to increased loyalty.
For one, by giving your customers additional information in an easy-to-find location, you’ll make their lives easier in the after-sale process. It will take away their need to contact you or your customer service. This can be a pain point for customers and will likely cost you money.
Secondly, by giving them a place where they can receive exclusive coupons and discounts for being loyal customers, they’ll feel appreciated and come back for more.
Fewer customer service inquiries/complaints
By giving your customers a more holistic view of their product, they’ll feel less inclined to contact you or your customer service for questions or complaints.
Give them the user guides they need for the product they purchased, as well as answers to their most pressing questions in an FAQ section. Make it easy for them to enjoy their product by removing their need to contact you.
Now that we know the benefits and how they can be applied to your business, let’s add those extra pages to your My Account page with the help of the plugin WooCommerce Account Pages.
Edit the My Account page with WooCommerce Account Pages
We’re about to dive into how you can customize and edit your My Account page with the WooCommerce Account Pages plugin. But before we do that, let’s have a quick overview of what this plugin is about and what it has to offer.
What is WooCommerce Account Pages?
With the WooCommerce Account Pages plugin, you’ll finally be able to add custom pages to your My Account page. In fact, you’ll have the ability to create unlimited custom pages to suit your business needs. This is where you can put on your creative hat and let your imagination run free.
Here are some of the major benefits of WooCommerce Account Pages:
You don’t have to learn anything new. If you’re already familiar with the WooCommerce look and feel, then you’ll be comfortable from the get-go. There’s no need to learn how to navigate through it since it’s automatically built-in for you.
Add new pages within WordPress. Each new page/tab added is created within WordPress, similar to any standard page you’ve created in the past. You can add anything you normally would to a blog post or page.
You don’t have to start from scratch. Go ahead and add your FAQ section, contact forms, coupons, and any existing shortcodes you may have in WordPress directly into the My Account page.
All pages are linked. Should you want to create a sub-page to the main My Account page, it will be automatically linked to it so you don’t have to go looking for it.
Now that we’ve checked off all the major benefits, let’s go ahead and unpack the WooCommerce Account Pages plugin so you can finally customize your My Account page.
How to customize the My Account page
Here, we’re going to walk through the steps you need to take in order to customize your My Account page.
Before we begin, purchase the WooCommerce Account Pages plugin from the Iconic site.
Step 1: Install WooCommerce Account pages
Once you’ve purchased WooCommerce Account pages from the Iconic store, you need to take the following steps:
Go to Plugins → Add New → Upload Plugin.
Choose the zip file you downloaded, upload, and then click Activate.
Once activated, you’ll need to enter your license key.
With WooCommerce Account pages now installed, we can move on to customizing your My Account page.
Step 2: Add your new account pages
To add a new page to the My Account area in WooCommerce, take the following steps:
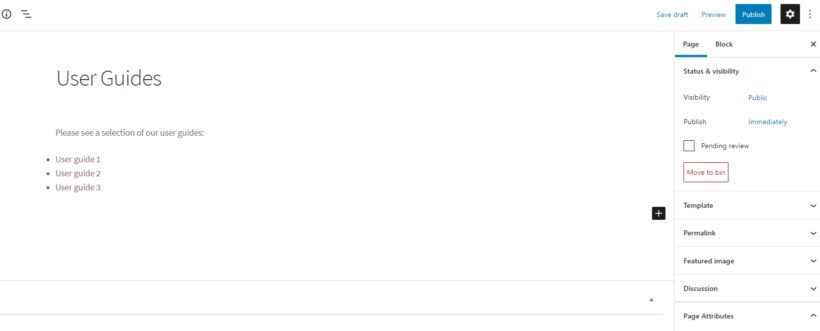
Go to your WordPress Dashboard and click on Pages → Add New.
Name your new account page (Example: User Guides). Remember that the content of this page is just like any other page you create in WordPress, meaning that you’re able to add links, video, images, etc., to it.
Within the page itself, look to the right-hand side of the Page Attributes section. Make sure you select your main account page as the parent page. This ensures that the ‘User Guides’ page you’re creating will show up in your My Account page.
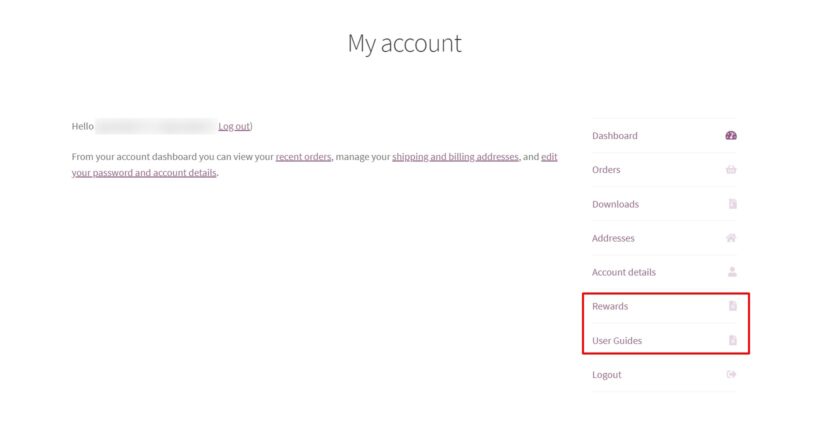
Click Publish once you're done. Your new page ‘User Guides’ will now be visible in your My Account page on the frontend of your website.
That’s it! Your new page is now live in your My Account page.
Copy these steps for each new page you want to create and watch how your customers interact with them.
Remember that you’re able to add and remove these pages just like any other page in WordPress. What’s exciting is that you can tailor the pages to your business as well as your customers’ needs.
You’ll be amazed at how much smoother their buying experience will be because of this.
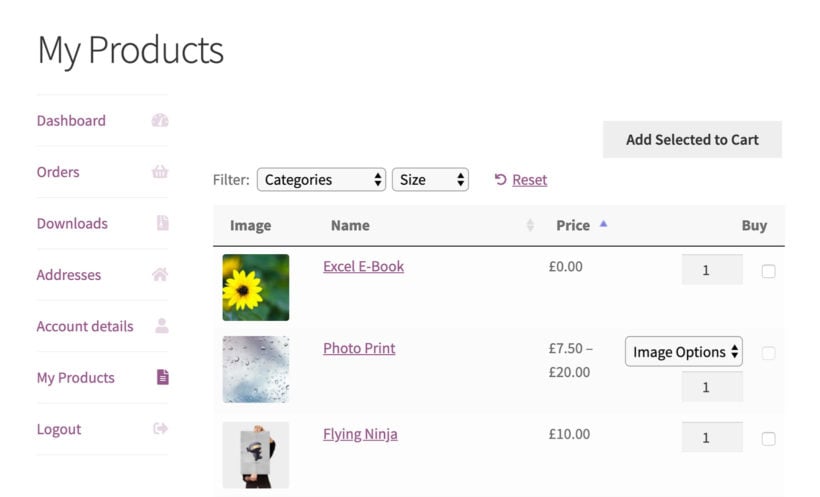
Bonus: Display previously purchased products
One way to make sure the My Account page is truly beneficial for your customers is to make sure it displays their previously purchased products.
By doing this, you’ll allow them to make repeat purchases without friction and find their previously purchased products without all the extra clicks. This is because they’ll be able to purchase these products on the My Account page.
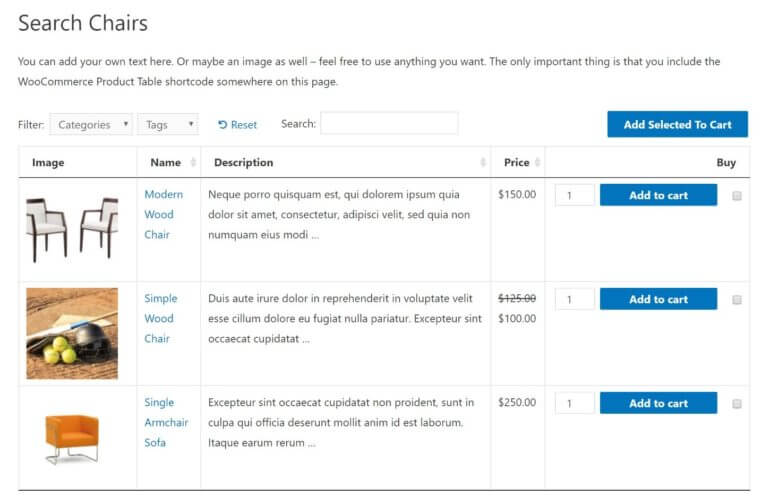
To do this, you’ll need the help of WooCommerce Product Table. With WooCommerce Product Table you’ll be able to automatically show a list of the current user’s (the person logged in) previously purchased products.
You just customized your My Account page! By using WooCommerce Account Pages, you’ll notice a significant improvement in your customers’ overall experience as well as yours.
The sky's the limit. You can now create and customize as many pages as you’d like and provide the most up-to-date information on your products. Your customers now have a one-stop place to go for all their needs.
Uber Eats is certainly a convenient way for restaurants to offer online delivery... but it also charges 20-30% of every order! In this post, you'll learn how to get the best of both worlds by using WordPress and WooCommerce to create your own restaurant ordering system to act as an Uber Eats alternative (or a Just Eat alternative, Gloriafood alternative, Deliveroo alternative, GrubHub alternative... it's up to you!).
The techniques in this article will let you create a seamless restaurant ordering system that you 100% own yourself. It will be user-friendly and work on any device (even smartphones), but you can cut out those pesky middlemen and stop letting your already thin margins get eaten up by commissions. Instead, your entire system can cost as little as ~$34 per month no matter how many orders you get.
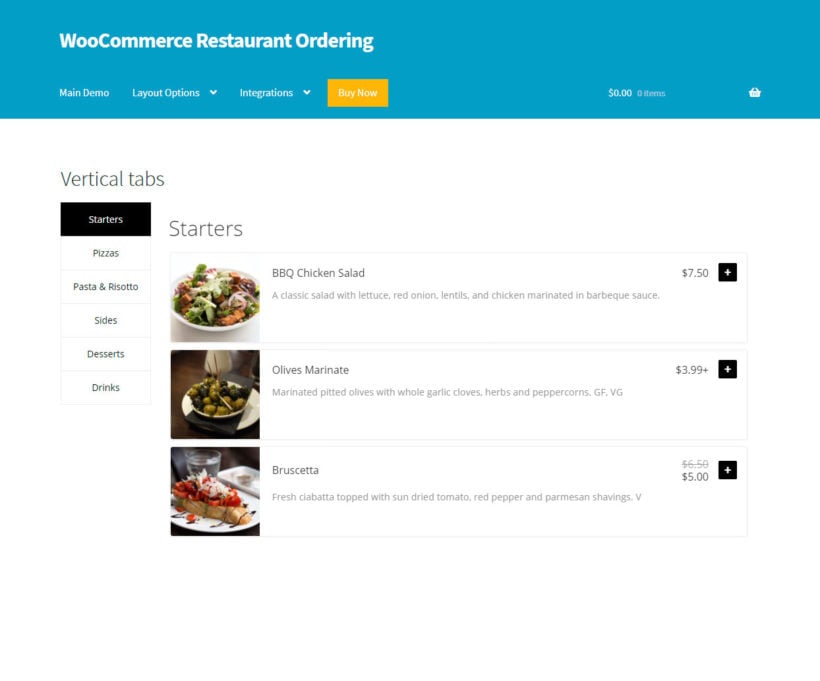
Here's an example of what you'll be able to build without requiring any special technical knowledge:
Online food order system powered by the WooCommerce Product Table plugin instead of Uber Eats
Your customers will be able to browse your entire menu and order food for delivery or for takeout.
Ready to build your own Uber Eats alternative with WordPress and WooCommerce? Let's dig in…
Why WordPress + WooCommerce make a great restaurant ordering system
If you're not familiar with WordPress and WooCommerce, here's a quick introduction:
WordPress is 100% free, open-source software that's by far the most popular way to make a website. According to W3Techs, WordPress powers over a third of all websites.
WooCommerce is a free extension for WordPress that adds full-service eCommerce features to WordPress. WooCommerce is the most popular way to make an eCommerce store.
While you won't be using WooCommerce to create a "traditional" eCommerce store, all of the features that it adds are also what you need to create your own Uber Eats alternative for free online ordering. You can also use other extensions to customize it to meet your restaurant's needs.
The important thing about this combination is that you 100% own everything. As a restaurant owner, you're not beholden to someone else's audience and you won't have to pay any commissions.
You can run your own promotions, grow your own email and marketing lists...you get the idea - it's yours.
Additionally, your online ordering platform will work on any device - laptop, tablet, smartphone, etc.
While the biggest benefit is avoiding those 20-30% commissions that other online ordering software charges, there's also a ton of value in owning your own platform.
For example, this New York Times article does a great job illustrating how Grubhub and other delivery companies can cannibalize existing local restaurants' own delivery business - so an order that would've been commission-free in the past suddenly comes with a commission.
What you need to use WordPress as an Uber Eats alternative
To create your own restaurant ordering system and Uber Eats alternative with WordPress, you won't need any technical knowledge, but you will need a few tools to help you get the job done:
Hosting + Domain Name - this is what powers your Uber Eats alternative. (We recommend Kinsta hosting.)
WordPress - the free open-source software that powers 34%+ of all the websites on the Internet.
WooCommerce - the free open-source eCommerce extension that's the most popular way to create an eCommerce store.
WooCommerce Restaurant Ordering - an easy-to-use plugin that extends WooCommerce to create a food menu and restaurant ordering system.
We'll also mention some other optional extensions that you might want to use to enhance your food ordering website.
How much does an Uber Eats Alternative cost?
Your online ordering system will not be free, but the important thing to remember is that it's a flat cost. Whether you have 100 orders or 500 orders, you're never going to pay any more.
Here's the bare minimum cost:
Hosting - ~$300 year (paid annually)
Domain name - ~$10 per year
WooCommerce Restaurant Ordering - $99 per year
So at the very low end, you can get by for ~$400 per year, or just ~$38 per month. Compared to Uber Eats' 20-30% service fee, that's incredibly cheap for your entire online food ordering system!
What about mobile ordering apps? Do you need a mobile app?
The restaurant ordering system that you'll build in this tutorial is 100% responsive. Essentially, that term means that your Uber Eats alternative will automatically adapt based on each visitor's device and allow for mobile ordering.
So whether your visitors are on their smartphone, tablet, desktop, or other mobile device, your restaurant ordering system will still work great. And it also means your visitors won't have to install yet another food delivery app just to order from your restaurant.
How to create your own Uber Eats alternative: Step-by-Step
In this video, watch Sam from Barn2 create a food ordering system in just 25 minutes. There are written instructions below, or you can sign up to our free e-course for even more advice and tips.
1. Purchase hosting/domain and install WordPress/WooCommerce
To power your restaurant ordering system and the WordPress software, you need web hosting and a domain name.
For web hosting, we recommend Kinsta, which offers affordable managed WordPress/WooCommerce hosting.
If you're only hosting a restaurant ordering system for a single restaurant, you should be fine with the cheapest Starter plan, which will cost you just $30 per month.
You'll also need a domain name, which you probably just want to make your restaurant name. Search for an easy-to-remember domain name that closely fits the name of your restaurant, such as myrestaurant.com. You can purchase your domain name from a domain registrar like Namecheap or Google Domains and follow Kinsta's instructions to point your domain name to your new Kinsta hosting.
Once you create your hosting account, Kinsta will help you automatically install both WordPress and WooCommerce to help you get up and running.
Once you've done that, you can log in to your WordPress dashboard by going to yoursite.com/wp-admin.
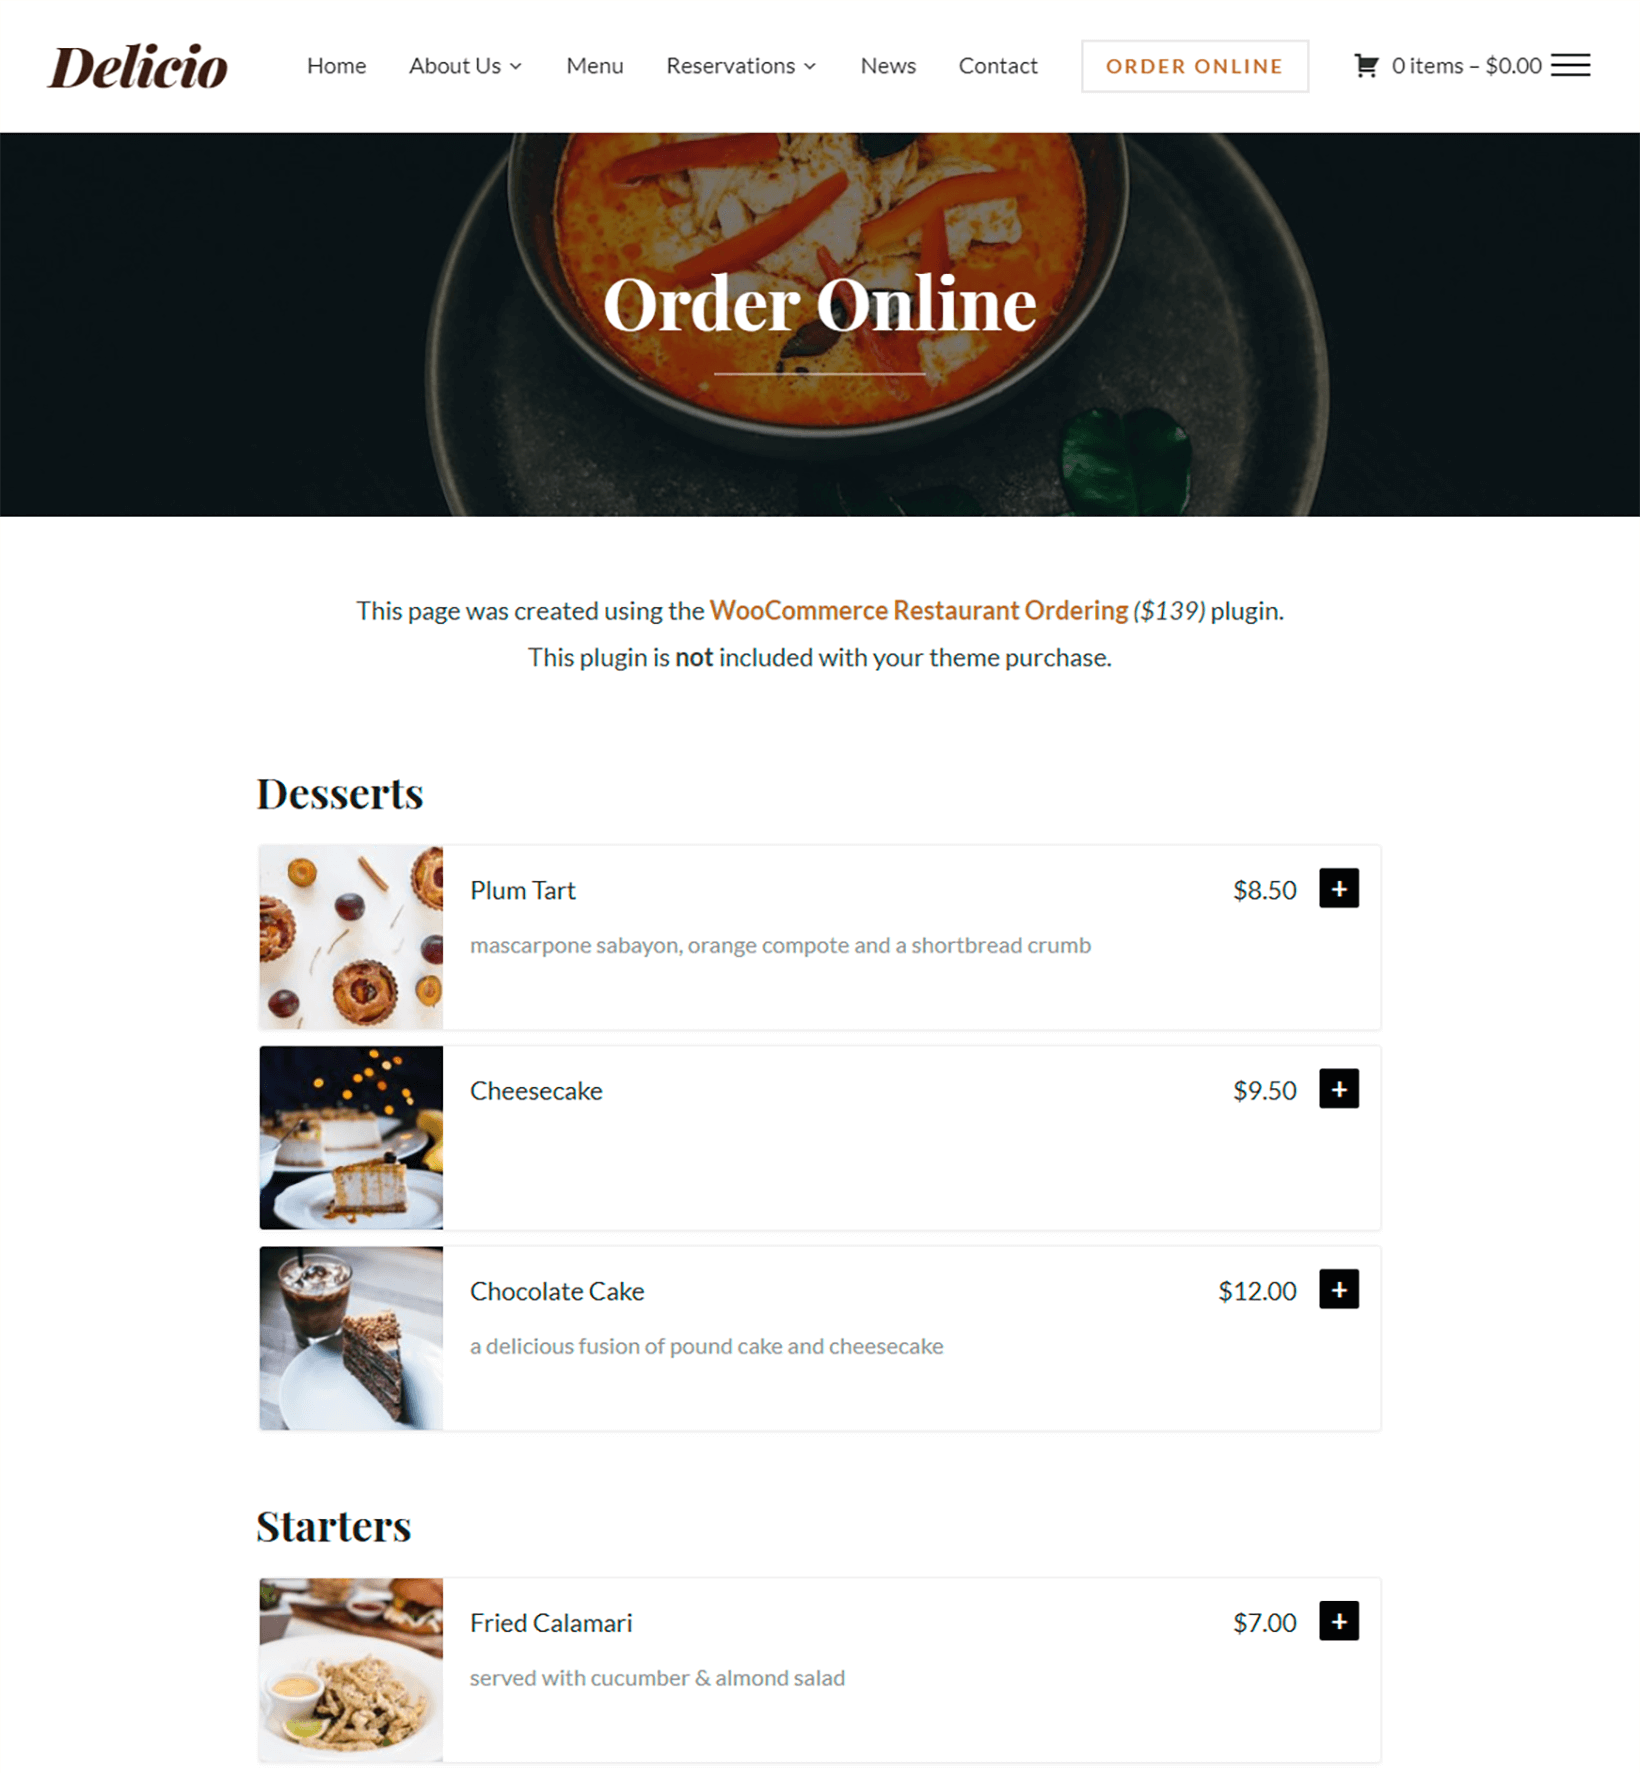
To control how the basic design of your site looks, we recommend that you use a WooCommerce restaurant in theme like Delicio.
The WooCommerce Restaurant Ordering plugin with the Delicio theme
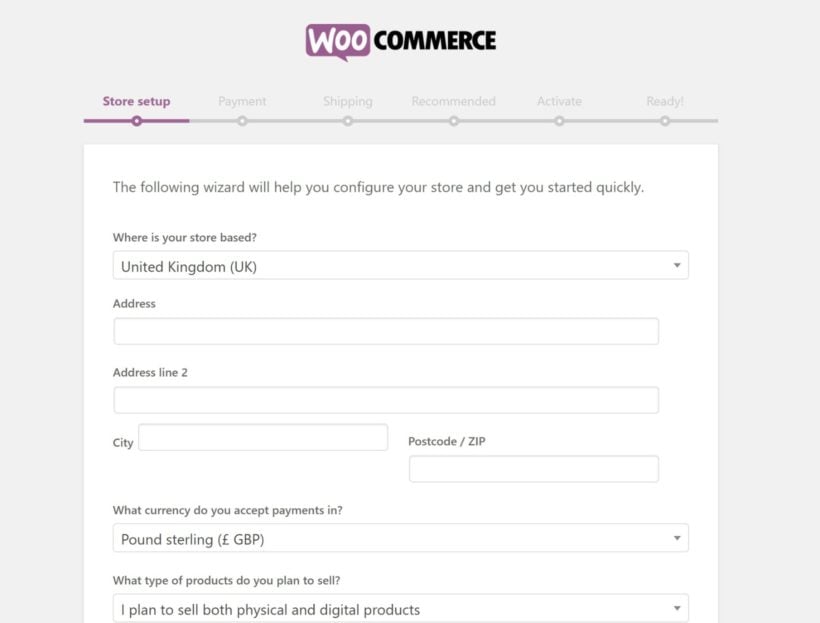
2. Run WooCommerce setup wizard
Once you log in to WordPress for the first time, you should see a prompt to run the WooCommerce setup wizard, which helps you configure the basics for your online ordering system:
If you want to accept payments for online orders via credit card, you can set up a payment method like Stripe, PayPal, or Amazon Payments in the Payment tab. But if you want to handle payments in person, you can just choose Cash on delivery.
If you want to charge for delivery, you can add a flat-rate or percentage charge in the Shipping tab. We'll talk more about shipping in a second.
You don't need to install the recommended plugins - so feel free to skip those steps.
3. Add food menu items as WooCommerce products
To add your individual menu items, you'll use separate WooCommerce products for each menu item.
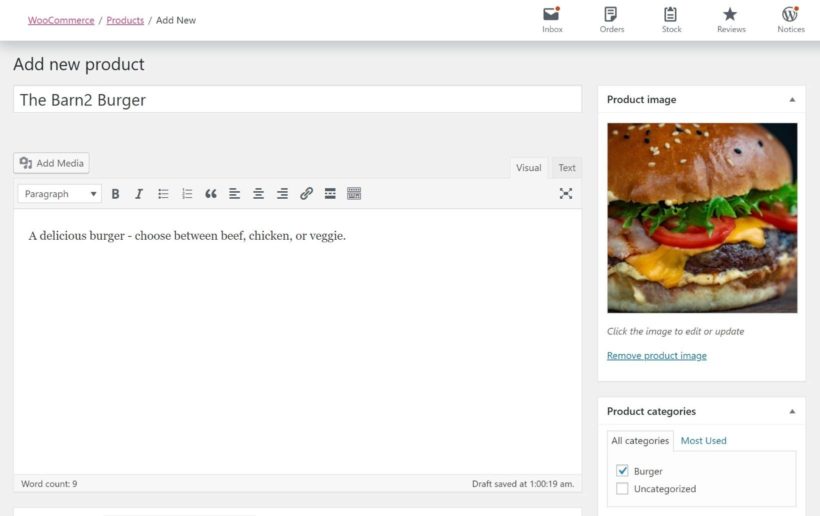
To get started, go to Products → Add New. There, you'll want to:
Enter the title of the dish.
Add a short description (optional). You can describe the dish here, and also add information such as calorie count, "Vegan" or "Gluten-free".
Upload an image to use on the menu page (optional).
Choose categories to organize menu items (optional). For example, a category might be "Sandwiches" or "Desserts".
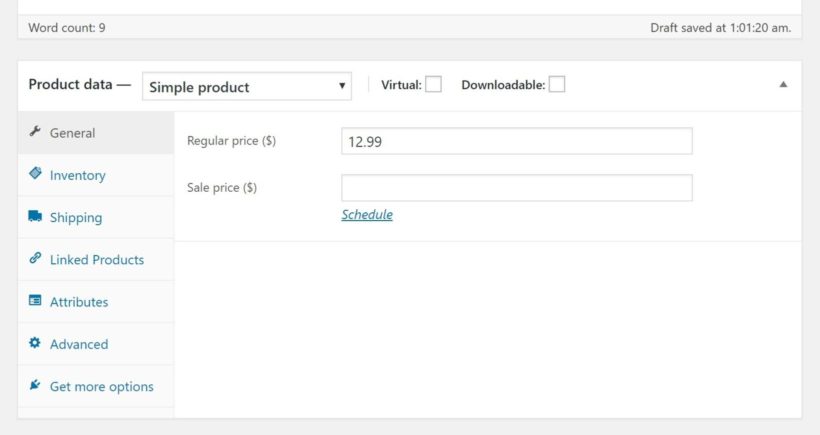
Then, find the Productdata box and add basic details like price:
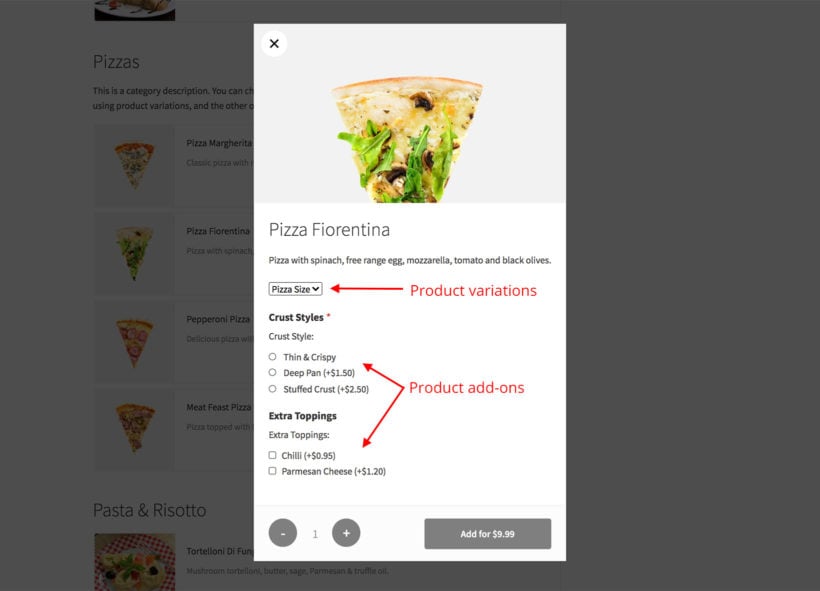
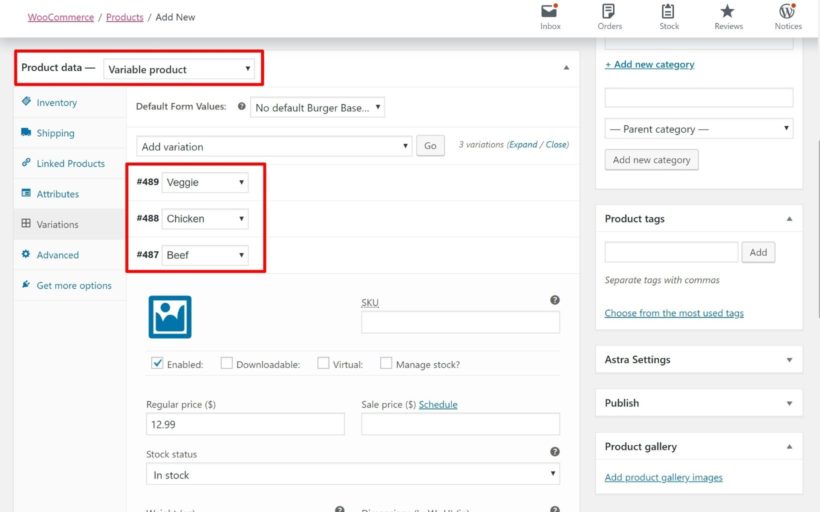
For a simple dish, this might be all you need. But you'll also probably have menu items where people can customize the dish, like choosing the size and toppings of a pizza.
If that's the case, you can use either product variations or product add-ons:
Variation - use variations when a customer can only choose one option, like the size of a pizza. Choose Variable product from the Product data drop-down to set these up.
For example, here's what it looks like to create a burger where people can choose between beef, chicken, or veggie, with each option getting a different price. For this situation, you would want to use variations:
Make sure to Publish your product. Then, repeat the process for all the menu items that you want to include in your online restaurant ordering system.
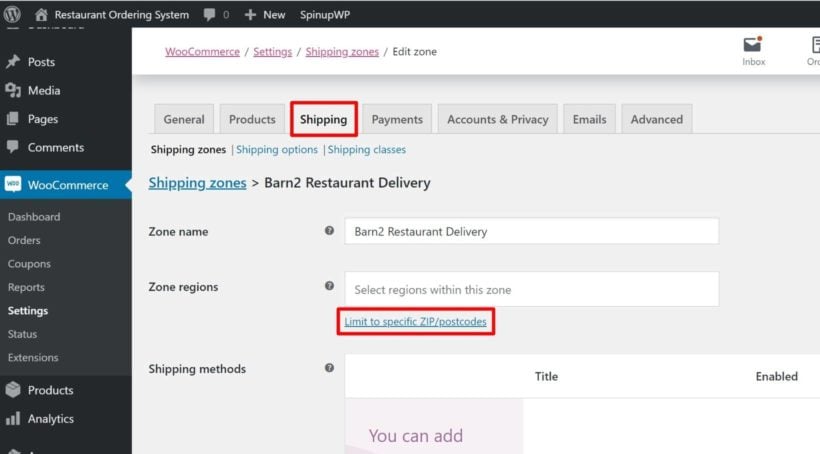
4. Restrict shipping areas
While an eCommerce store might ship nationwide or globally, your restaurant probably only delivers to a few specific zip codes.
To set this up, you can use WooCommerce's built-in shipping zones feature:
Go to WooCommerce → Settings → Shipping.
Click Add shipping zone.
In the shipping zone interface, click the link to Limit to specific ZIP/postcodes
Enter the postcodes that your restaurant delivers to
As long as you don't add any other methods, shoppers will only be able to ship to one of those zip codes.
You can also opt to charge a delivery fee or offer free delivery according to your preferences.
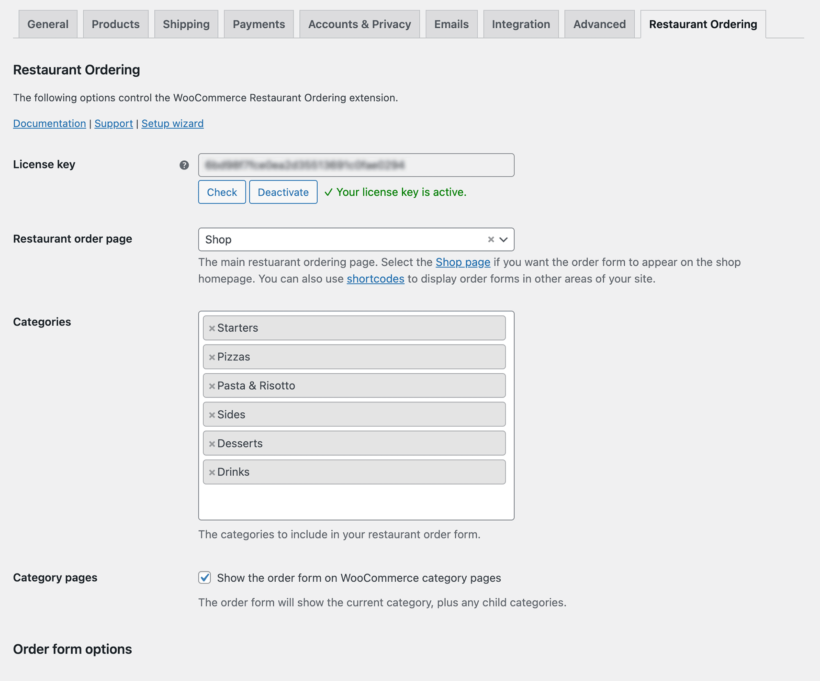
Once you install and activate the plugin, go to WooCommerce → Settings → Restaurant. Activate your license key, and customize the content and layout of your food order forms. Add your opening hours too.
Control your food ordering system on the settings page
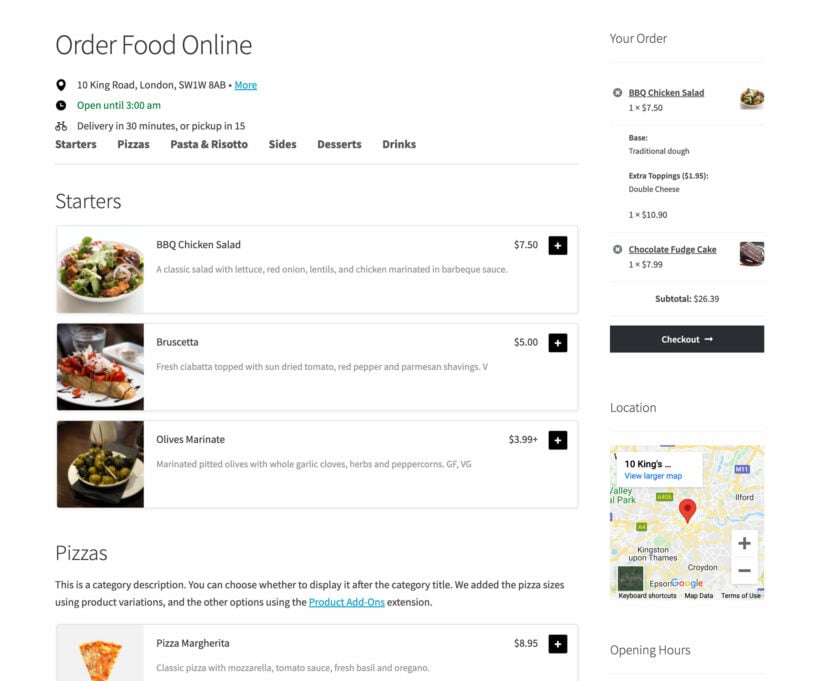
Once you've configured the plugin, find the page called 'Restaurant Ordering' from the Pages section of the WordPress admin. The WooCommerce Restaurant Ordering plugin has created this for you automatically. Rename it to whatever you like. View the page to see your foods listed in a neat order form, divided by category. This is the online menu for your Uber Eats alternative:
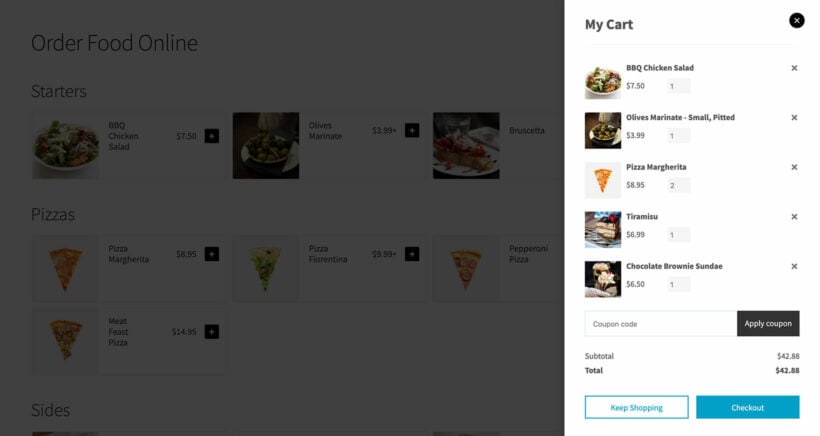
Tip: Add a cart to the food ordering page by selecting a page layout that has a sidebar, going to Appearance → Widgets, and adding the 'Cart' widget.
You can also create additional food order forms using the restaurant ordering shortcode. This lets you create more complex layouts, such as displaying each category within a different tab or toggle. You can also list different foods on different pages.
An example of a food order form in a tabbed layout
6. Set up backend processes for order notifications
By default, WooCommerce will send real-time email notifications when a new takeout or delivery order comes in.
However, because of the importance of getting started on orders right away, you might prefer a different method that's more attention-grabbing so you can ensure fast delivery. Here are some good options:
Official WooCommerce apps - WooCommerce has free apps for iOS and Android that can send push notifications for new orders. If you use an iPad or other tablet for your POS, you can install the app directly on your restaurant POS system.
WooSMS - receive text messages when new orders come in. It also lets you send text messages to customers to let them know the status of their order (like when your delivery person is on the way).
YITH Desktop Notifications for WooCommerce - get desktop notifications for new orders. This is great if you use a computer as your restaurant point of sale (POS) system.
7. Enhance your restaurant ordering system (delivery slots, popup cart, etc.)
Use WooCommerce Restaurant Ordering with Fast Cart for quicker ordering.
At this point, your WooCommerce food ordering system is all set up to function as an Uber Eats alternative. However, there are a few other tweaks you might want to make depending on your business.
Add a popup cart and checkoutWooCommerce Restaurant Ordering is designed to work with the WooCommerce Fast Cart plugin so that customers can complete their order from a popup cart and checkout, directly on the food ordering page.
Add restaurant opening times and delivery slotsWant to allow customers to choose an exact delivery time, or and restrict the number of deliveries within each time slot. You can do this with the WooCommerce Delivery Slots plugin. Customers can choose an available delivery slot, ensuring that your delivery drivers can cope with the number of food orders.
Manage your delivery driversUse the free Delivery Drivers for WooCommerce plugin to avoid the manual work of managing your local delivery drivers.
Add a minimum order valueLots of restaurant menu websites only want to take online orders above a certain value. Set minimum order rules with the WooCommerce Quantity Manager plugin.
Accept takeaway ordersIf you want to let shoppers pick up their orders (rather than delivering them), you can create a "Local pickup" shipping option for takeout.
If you're looking for a more flexible, cheaper Uber Eats alternative, creating your own WooCommerce food delivery platform cuts out the middlemen and gives you full ownership of your online platform. This approach also makes a great Just Eat alternative, Deliveroo alternative, Grubhub alternative, DoorDash alternative, PostMates alternative, Caviar alternative, etc.
It only takes slightly longer to set up your own food delivery service platform, but the benefits are permanent. Not only can you stop giving up 20-30% of your orders as commission to Uber Eats, but you'll also be able to grow your own audience and build an evergreen marketing asset for your restaurant.
Choose your WordPress hosting, install WooCommerce and WooCommerce Restaurant Ordering, and create your Uber Eats alternative for online ordering today.
Do you have any questions about using a WooCommerce restaurant ordering system as an Uber Eats alternative? Leave a comment and we'll do our best to help.
Looking for the best WordPress gallery plugin for your site?
While WordPress includes a simple built-in gallery feature, it's really only good for the most basic of image galleries. For most situations, a dedicated WordPress gallery plugin makes a better choice because it will give you more options when it comes to:
Gallery templates You can choose from table views, masonry galleries, Polaroid styles, etc.
Search/filter options You can help visitors find specific items in your gallery.
What content to include Beyond images, you can create a gallery of blog posts, portfolio items, WooCommerce products, and more.
In this post, we've collected the best WordPress gallery plugins for all types of galleries. Beyond creating a WordPress photo gallery, these plugins can also help you create video galleries, WooCommerce product galleries for eCommerce stores, portfolio galleries, and lots more.
What to look for in the best WordPress gallery plugin
Before we get into the best plugins, let's quickly go over some criteria to help you pick the best WordPress gallery plugin for your specific needs.
When you're looking through these WordPress plugins, here's what to consider:
Content sources — if you want to go beyond simple image galleries into different types of galleries, consider the content sources that your chosen plugin supports. For example, you might want videos, blog posts or other custom post types, WooCommerce products, etc.
Filter options — if you're going to include a lot of different gallery items, it might be helpful to let your visitors search or filter those gallery items to find the ones they're most interested in. Not all plugins let you create filterable galleries.
Deeplinking — do you want to be able to share links to specific gallery items? Not all plugins let you.
Watermarking — do you need to automatically add watermarks to items in your gallery? This can be helpful for photographers.
Gallery layouts — do you want a table layout? Masonry grid? Carousel?
Gutenberg compatibility — if you're using the new WordPress block editor (Gutenberg), make sure your chosen plugin is compatible with it.
Performance features — if you have lots of gallery items, performance-boosting features like lazy loading, infinite scroll, and pagination can help your galleries load faster.
Best WordPress gallery plugin: 5 options compared
Below, we've collected the five best WordPress photo gallery plugins for everything from a simple WordPress photo gallery to a gallery of your latest blog posts, portfolio items, WooCommerce products, and more.
All these popular gallery plugins will work with any WordPress theme.
Posts Table Pro is the best WordPress gallery plugin when it comes to flexibility and customization options.
Flexibility and customization
One unique feature is that Posts Table Pro gives you complete flexibility when it comes to content sources. You can create a gallery that pulls content from any post type at your site, including media content (like images or videos from the WordPress media library), blog posts, or any custom post type (like portfolio items).
In addition to flexibility for content sources, you also get flexibility when it comes to the information that you display about each source in your gallery. You can control the exact columns that appear in your table-based layout and add or remove information as needed.
For example, if you're creating a photo gallery, you can also show the image name next to each gallery item. Or if you're displaying a portfolio gallery, you can include additional information about each item, like the client and purpose of the project. This extra information is not just helpful for human visitors, it can also help you rank your galleries higher in Google by including more rich text content.
Other helpful features
If you include images in your gallery, you can also open a full-resolution image in a lightbox when a user clicks on the image thumbnail.
To make sure your galleries load quickly, Posts Table Pro includes helpful features for pagination, lazy loading, and infinite scroll. And you can also include search and filter options to help visitors find specific items in your gallery, which improves user experience.
To display your gallery on the front-end, you can use a shortcode in both the Classic editor and the new Gutenberg editor.
If you want the flexibility to create a gallery of any content type on your site, including images, videos, files, blog posts, portfolio items, and more, then Posts Table Pro is a great choice. It packs in plenty of power while maintaining ease of use.
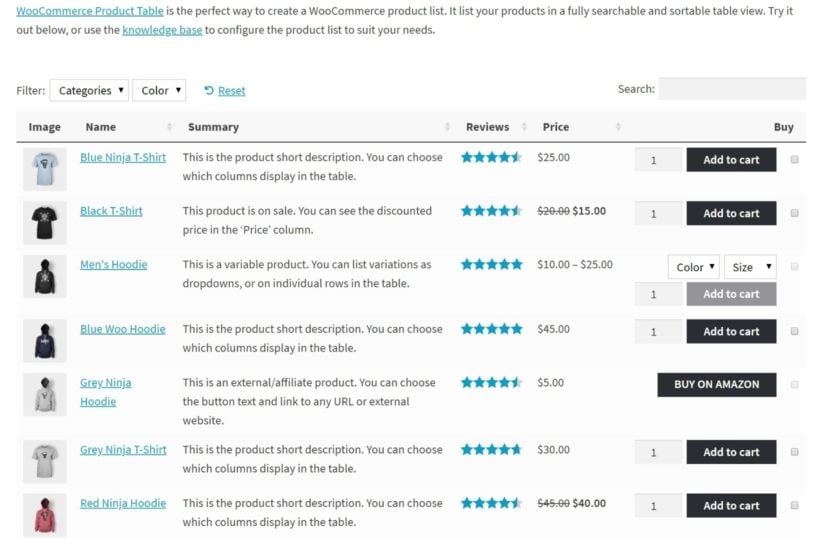
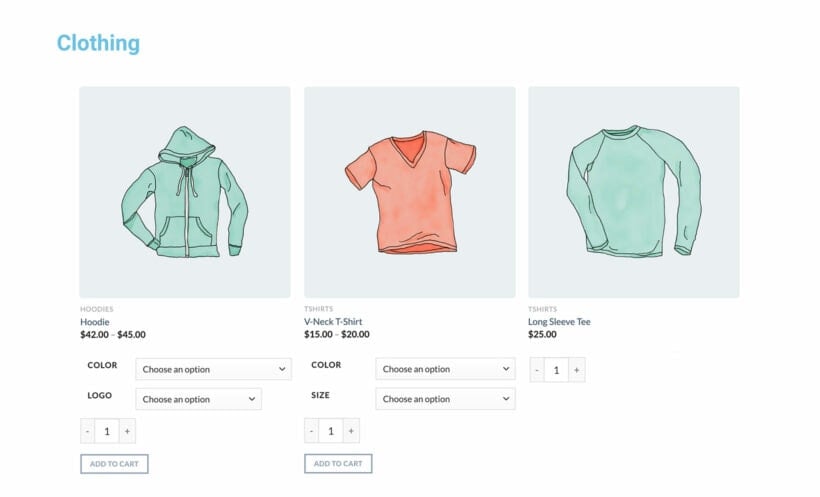
WooCommerce Product Table is the best WordPress gallery plugin for eCommerce stores. It also makes a great option for anyone who's looking to sell products related to gallery images.
WooCommerce Product Table lets you display some or all of your WooCommerce products in a customizable table-based gallery layout.
One of the unique things about this plugin is that it isn't just a gallery of product images - you have full control over the information that displays for each product in the gallery. For example, you can include the description, product attributes, price, etc. You can even include an add to cart button to make it easy for shoppers to purchase items from your gallery.
For product images, you can control the size of the product image thumbnail that appears in your gallery and you can also choose to open the full-resolution image if a visitor clicks on the product image.
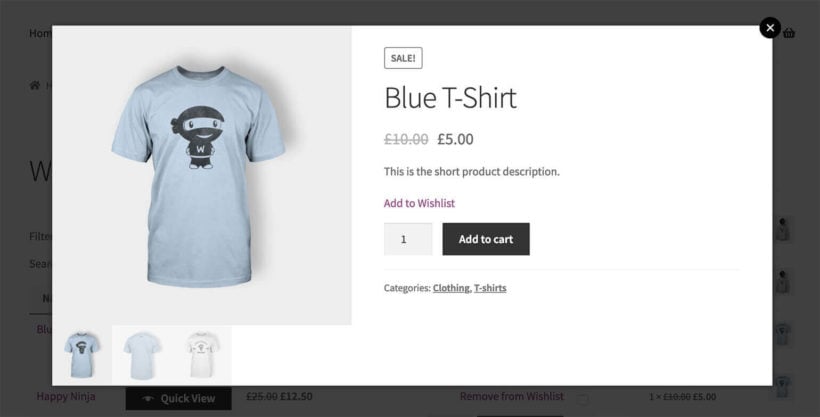
If you want to include the full product image gallery, WooCommerce Product Table integrates with the WooCommerce Quick View Pro plugin, which gives you two different ways to display product images/details in a lightbox popup:
A standalone image lightbox with thumbnail or bullet navigation.
A lightbox gallery that displays product images on the left and information about the product on the right.
To help visitors filter products in your gallery, you can add filters above the gallery table for product categories, tags, or attributes. WooCommerce Product Table also comes with dedicated product filter widgets for price and attributes that you can add in your WordPress site's sidebar.
Basically, if you have an eCommerce store or just generally want to sell items related to the images in your WordPress photo gallery, WooCommerce Product Table is the best WordPress gallery plugin for you.
When it comes to user interaction, Modula is incredibly user-friendly and provides all the whistles and bells you'd expect from a gallery plugin.
It doesn't really matter if you're a beginner or a professional photographer, Modula is the perfect match for anyone. This WordPress gallery plugin offers the most powerful features and is fully customizable. You will create your galleries in less than 5 minutes.
The best thing about Modula is that it provides a significant amount of gallery features: 4 different grid types (creative, custom, slider, and masonry), 42 image hover effects, a lightbox gallery powered by Fancybox, filterable galleries, and 4 image loading effects.
You can even create albums to organize your galleries according to your style. How about mixing videos and images? Well, Modula allows you to create both image and video galleries or a mix of both.
If you want to let your visitors share your images or galleries, you can add sharing buttons to your pictures. Or you can allow your website visitors to see your masterpieces in detail by enabling the Zoom extension.
How about displaying data from your image directly into your gallery and lightbox view? Thanks to its EXIF extension, you can add EXIF information - Camera, Lens, Focal Length, Shutter Speed, Aperture, ISO, and Date.
Newly, Modula integrates 3 more extensions: Modula Defaults (create multiple gallery defaults), Modula User Roles (decide which user role can create, edit, and remove galleries), and Modula Whitelabel (replace any occurrence of Modula with your brand name and logo).
Finally, if you want to migrate your galleries to another plugin, Modula provides a migration tool for importing and exporting galleries.
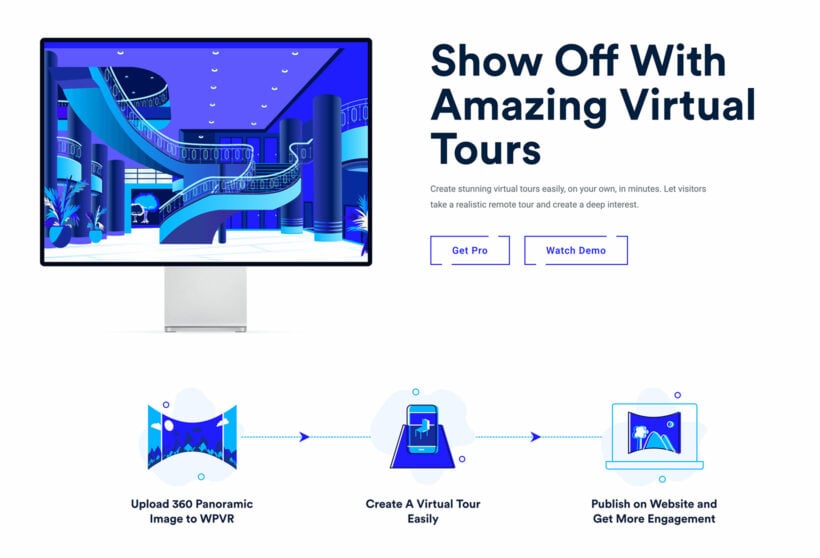
The WPVR plugin is a unique type of WordPress gallery plugin because it allows users to create 360 degree galleries. This means that users can display panoramic images and videos on their WordPress website, allowing visitors to fully immerse themselves in the content.
One of the key features of the WPVR plugin is its ability to create virtual tours. This means that users can create a series of linked 360 degree scenes, allowing visitors to explore a location or environment in a more interactive way. This can be particularly useful for real estate websites, tourism websites, or any other type of website where immersive content can enhance the user experience.
Another useful feature of the WPVR plugin is its compatibility with virtual reality headsets. This means that visitors can view the 360 degree content on their website using a VR headset, providing an even more immersive experience. This is a relatively new technology and the WPVR plugin is one of the first WordPress gallery plugins to offer this functionality. Overall, the WPVR plugin offers a unique and exciting way to display panoramic images and videos on a WordPress website.
For this reason, the WPVR WordPress virtual reality plugin is popular for a wide range of use cases - from real estate websites to much more.
Envira Gallery is a user-friendly WordPress photo gallery plugin that can help you create stylish masonry galleries or other interesting gallery layouts. You can also modify how the gallery styles look using your own custom CSS and use a drag-and-drop gallery builder to change the order of gallery items.
You can create standalone galleries or group galleries together into albums, complete with different album styles. It also has some nice features for photographers like automatic watermarking, an Adobe Lightroom integration, and support for online client proofing.
If you want to integrate with social media, Envira Gallery can help you add social sharing buttons to gallery items and you can also import Instagram posts as gallery items. With the premium version, other gallery sources include videos and blog posts, which is helpful if you're a blogger.
Finally, if you want to sell images from your galleries, Envira Gallery includes a WooCommerce integration to add eCommerce support.
Envira Gallery lite is a limited free version at WordPress.org that works for simple image galleries, but you'll need the premium version for access to the more advanced features. There are different premium tiers depending on the features you need, which can get a little pricey. You can also use it with add-ons for advanced functionality such as fullscreen galleries.
One unique thing about NextGEN Gallery is that it includes heavy-duty image file management on the backend. Rather than managing your gallery images in the regular WordPress media library, NextGEN Gallery gives you a separate interface to manage all of your images.
This approach can be a little complicated for casual users, but it's helpful if you need to manage thousands of image files.
Edit: Scott of Imagely, the developers of NextGEN Gallery, has shared a few points for us to note in a comment, such as;
"We have a built-in wizard which walks through how to use the plugin. Once users understand what the plugin can do they typically find themselves managing and displaying galleries in seconds. So while it might be a slight learning curve, in the beginning, it’s quite simple once you know what is what. But so is most of the WordPress ecosystem :) "
- Edge
Beyond the gallery management features, NextGEN Gallery also includes premium extensions to add gallery layouts (including carousels), automatic print fulfillment via White House Custom Colour (WHCC), image deeplinking, eCommerce support, online client proofing, hover effects, and social media integrations.
The automatic print fulfillment feature is definitely one of the unique things about NextGEN Gallery, so that's a point in its favor if you're looking to sell physical prints and outsource the fulfillment of those prints to a third-party.
NextGEN Gallery does have a limited free version at WordPress.org, but it only includes simple gallery styles and lacks most of the features mentioned above.
Scott also adds;
"I might argue that NextGEN Gallery actually is the most feature-rich gallery plugin of them all. It includes image protection of originals, advanced resize control, watermarking, thumbnail display, image browser display, tag cloud, single-image display, multiple lightbox options, and much more…for free."
"The last thing I would love to mention is the fine-tuning we’ve been doing lately. NextGEN Gallery, while it might have a lot of features, is the fastest loading gallery plugin for WordPress now. Meaning, it will have the least impact on site speed."
Thanks. - Edge
If you want to get the most from NextGEN Gallery, you'll definitely want to go with the premium add-ons, which come in different bundles depending on your needs. The cheapest premium version is NextGEN Plus at $99, but most people will want NextGEN Pro, which costs $149.
Because of the advanced features and comparatively high price, NextGEN Gallery is mostly just for power users.
Finally, there's the FooGallery image gallery plugin, which comes in both a free and premium version and makes a good option for a simple, stylish WordPress photo gallery.
The Pro version also adds support for video galleries from YouTube and Vimeo, but you don't get the option to create galleries from blog posts or other post types like you'd get with something like Posts Table Pro.
Edit: Brad of FooPlugins commented below that they, "recently released an update that includes a new datasource in FooGallery Pro, which allows you to build/load a gallery from a post query in the WP admin. You can choose the post type and a few other settings to build up a dynamic gallery."
- Edge
The Pro version also lets you create image galleries from sources beyond your WordPress media library, including Adobe Lightroom and FTP server folders.
One thing in FooGallery's favor is the variety of gallery templates. If you opt for the paid version, you'll get lots of style options including:
Slider
Masonry grid
Polaroid
You can also control the CSS, choose the pagination options, and add multiple loaded effects and hover effects. The plugin is also compatible with CDNs.
If you want to help visitors filter gallery items, you can add media categories and tags, along with front-end gallery filtering (including thumbnail gallery filters).
You also get advanced pagination options, infinite scroll, and lazy loading support.
FooGallery has a limited free version at WordPress.org, but you'll need the premium version for the best templates, video galleries, and other features. The premium version starts at $59 for use on a single site and ranges up to $199 or use on up to 25 sites.
Best WordPress gallery plugin in action: Two case studies
When you're trying to pick a visual tool like the best WordPress gallery plugin for your site, seeing the plugin in action is also an important part of making your decision.
To that end, let's look at two case studies of some of these WordPress gallery plugins being used on real live WordPress websites.
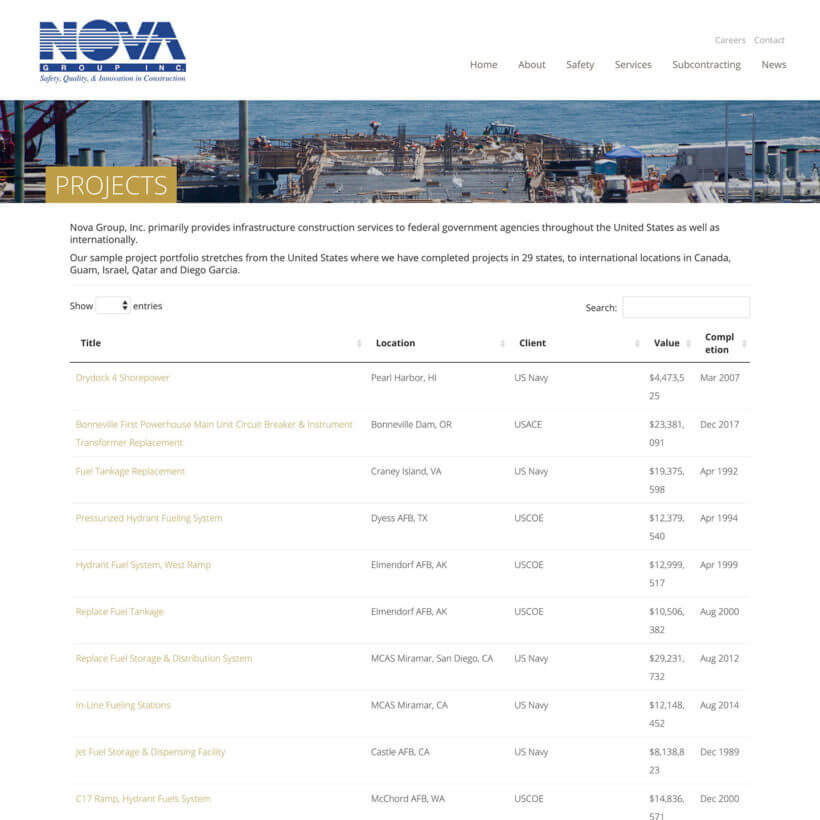
A portfolio gallery created with Posts Table Pro
Nova Group is an engineering contractor with a portfolio that includes projects from 29 US states, as well as multiple international projects.
To display a portfolio gallery of their projects, Nova Group uses Posts Table Pro to display a gallery that includes each project's title, location, client, value, and completion date.
Visitors can sort the gallery by each of those criteria and also search for specific keywords.
Nova Group's website is a good example of how you can use Posts Table Pro to create more than just a simple WordPress photo gallery.
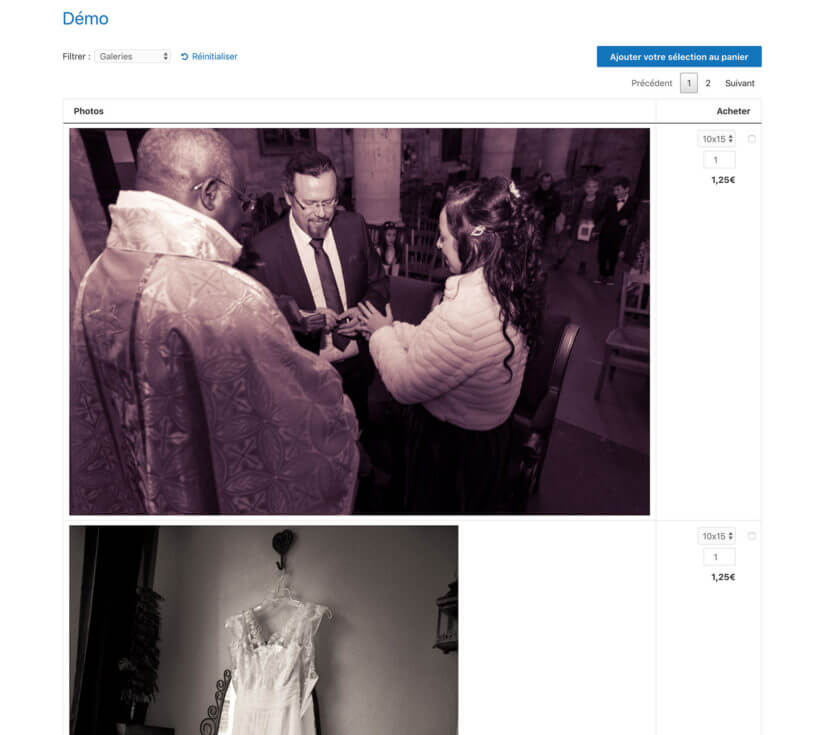
WordPress photo gallery for online proofing created with WooCommerce Product Table
Thierry runs a wedding photography studio in Paris, France called Photo Studio TNK.
To help clients proof the photos he takes of their weddings, Thierry uses WooCommerce Product Table to create a personalized WordPress photo gallery for each client at his WordPress photography website.
Clients can then browse through the image gallery and check a box for all the photos they want to purchase.
To make sure each client's gallery is private, Thierry also uses the WooCommerce Protected Categories plugin to add password protection to each photo gallery. And to make it easier to upload hundreds of images, Thierry also uses the Feed Them Gallery plugin to help with uploading images by automatically converting images into sellable WooCommerce products.
What's the best WordPress gallery plugin for your site?
In the end, picking the best WordPress gallery plugin depends on your goals and needs. Each plugin offers a different approach when it comes to gallery layouts, gallery options, and content sources.
For example, if you want the ability to create galleries from regular WordPress media items (like images or videos) as well as blog posts, portfolio items, and any other custom post type, then Posts Table Pro might be the best option for you.
On the other hand, if you want to create a gallery of WooCommerce products or sell something related to the items in your gallery, then WooCommerce Product Table might make a better option for you.
In total, we looked at five different WordPress gallery plugins, so let's recap them and briefly summarize what each plugin does best:
Posts Table Pro — the most flexible WordPress gallery plugin. Lets you create galleries from images, videos, audio files, blog posts, or any other custom post type at your WordPress site.
Envira Gallery — great for beautiful galleries. The paid version also adds other content sources and helpful features like automatic image watermarks.
WooCommerce Product Table — the best WordPress gallery plugin for creating customizable galleries containing WooCommerce products.
NextGEN Gallery — a heavy-duty WordPress photo gallery plugin targeted towards photographers. It makes a good option if you need custom gallery management for thousands of photos, and has a unique automatic print fulfillment feature.
FooGallery — a simple option to create stylish masonry galleries, polaroid layouts, or slideshows. The premium version also adds support for video galleries.
Do you have any questions about which solution is the best WordPress gallery plugin for your needs? Leave a comment and we'll be happy to help out!
If you're a graphic designer, learning how to sell fonts online is a great way to generate some passive income from your skills.
There are plenty of font designer marketplaces that will happily sell your fonts for you like MyFonts, Fonts.com, etc...but those resellers will typically take half your sales as a commission and might require that you exclusively sell through them.
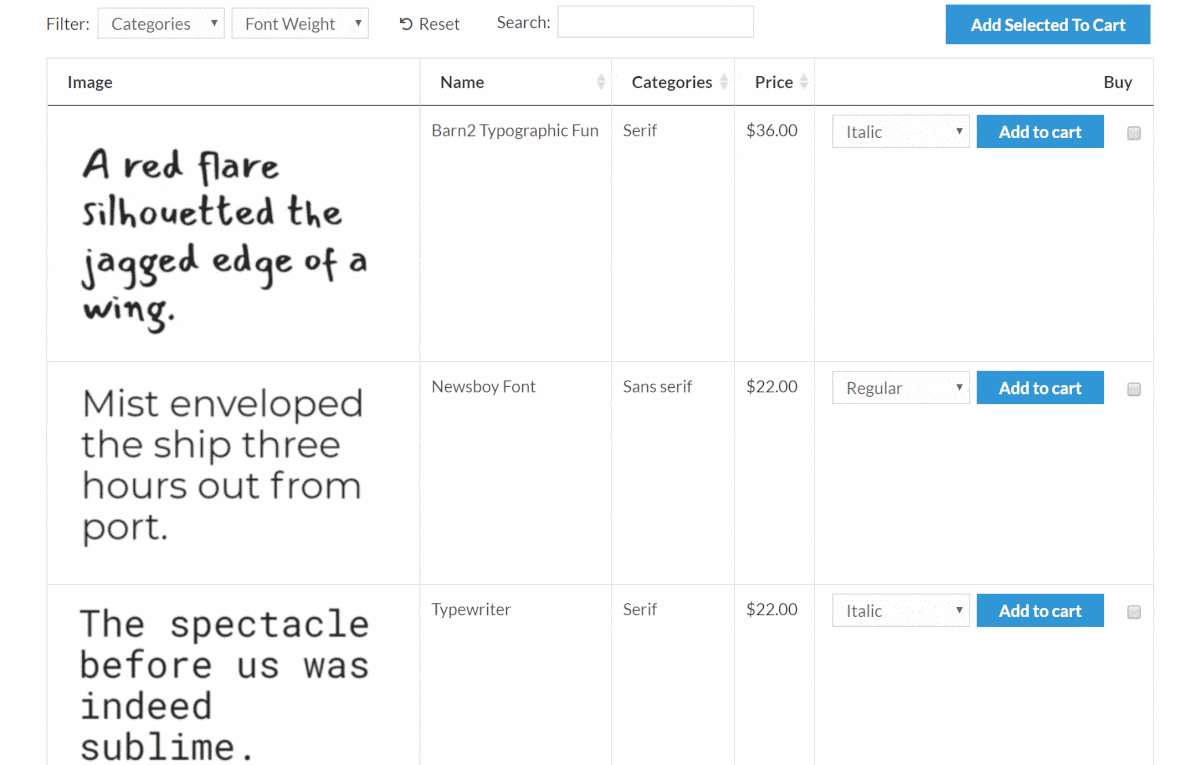
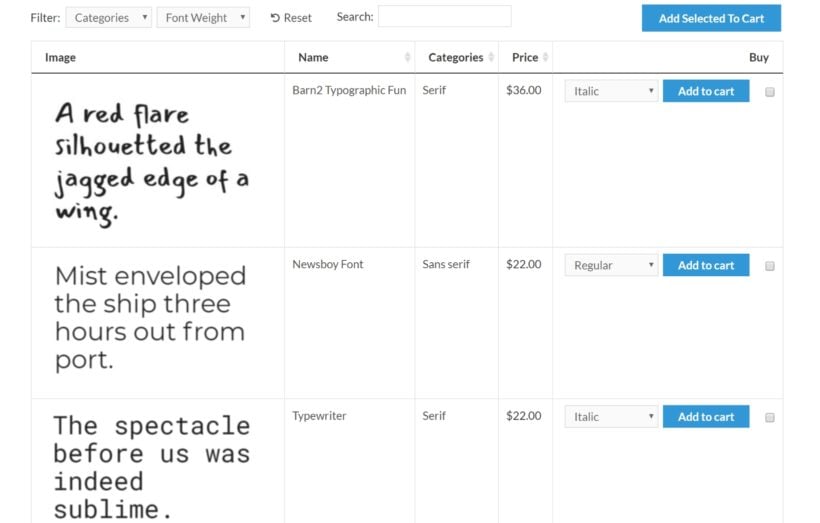
WordPress and WooCommerce provide a better way to sell fonts online that cuts out the commission and gives you full control. With the right WooCommerce plugins, you can create a store that's optimized specifically for fonts. You'll get a convenient table layout, complete with font previews and Ajax category filters to help your shoppers find the right font:
Why WooCommerce Product Table is the best way to sell fonts online
WooCommerce is the world's most popular way to create an eCommerce store and is fully capable of selling both physical and digital products. It makes a great option for a solo font designer, font shop, or type foundry.
However, the default styling of most WooCommerce themes displays products in a more "traditional" eCommerce layout that looks something like this:
Now, that might work great if you're selling physical products. But if you're selling your own fonts, that kind of shop layout...
Doesn't display the important information about a font, like how it looks, its different font weights, etc.
Wastes space and makes it hard for shoppers to browse all your available fonts.
WooCommerce Product Table is a flexible plugin that fixes those issues by letting you display your fonts in a table layout like you saw above:
This gives you a compact way to help people shop your fonts. Visitors can:
See a graphic preview of the font to see kerning, glyphs, ligatures, calligraphy, etc.
Choose different weights for each font family from a drop-down.
Use checkboxes to add multiple fonts to their carts.
Use filters to find specific types of fonts. For example, serif font vs sans serif font, or OpenType fonts.
View license options.
Plus whatever else fits your business - the plugin gives you full control over what information you display.
Integrate your table layout with product quick view
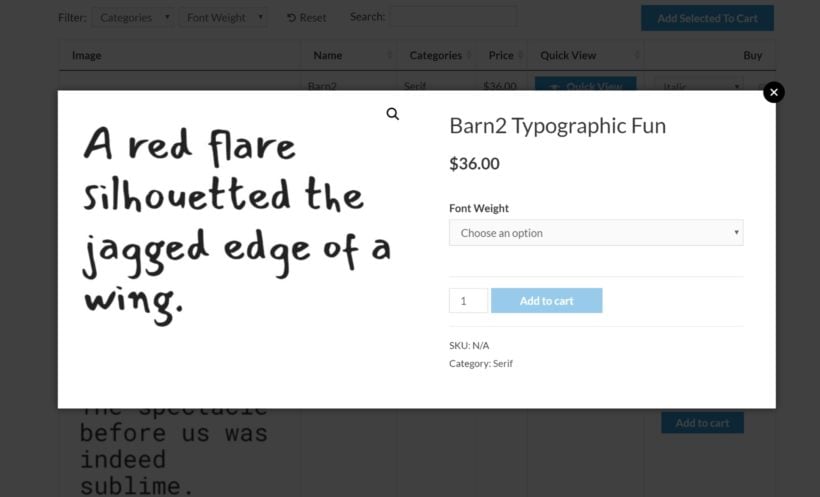
If you want to display more information about each typeface than the table layout allows, you can add a product quick view button to the table that lets shoppers browse more information in a lightbox.
For example, you could use this product quick view to show:
A description of the typeface and its inspiration.
More detailed licensing information.
More images of your typography in action (or different font weights in action).
Font bundles or upsells.
How to sell fonts online with WooCommerce: Step-by-step
Below, we'll take you step-by-step through how to sell fonts online with WooCommerce and WooCommerce Product Table.
To manage your fonts, you'll use the regular WooCommerce product system. The simplest approach is to create one unique WooCommerce product for each new font family that you want to offer. You can then add different font weights or licensing options as product variations within that product.
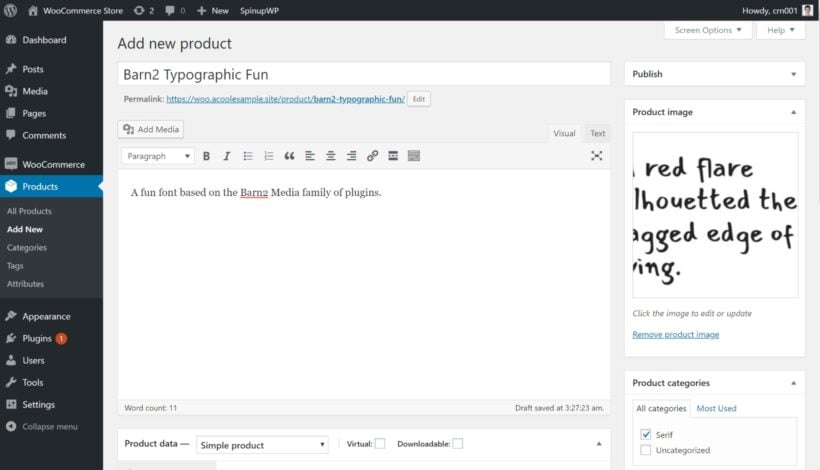
To do that, go to Products → Add New.
First, enter basic details like the font family name and description. You can also use product categories and tags to add other pertinent information, like whether the font family is serif or sans serif.
You can also add an image to preview how the font looks - the way that Google Fonts handles things is a good starting point:
Next up:
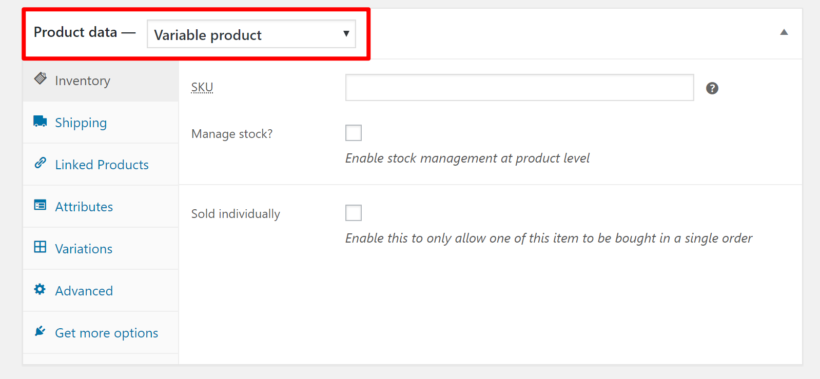
Scroll down to the Product data box
Choose Variable product from the drop-down (unless you're only selling a single font weight - then you can use simple product)
From there:
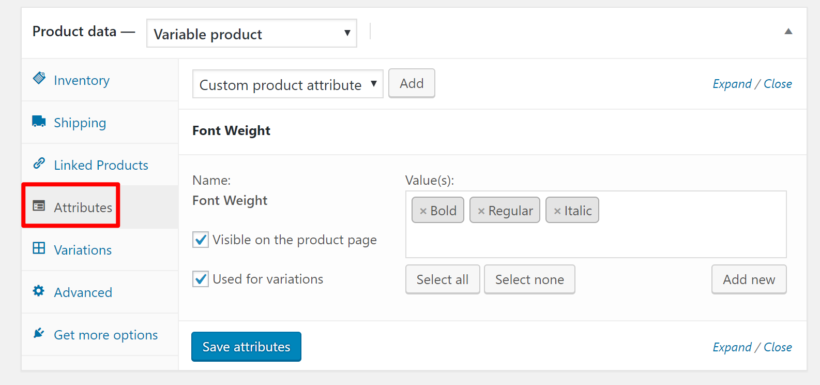
Go to the Attributes tab and select your attributes (you can set these up by going to Products → Attributes).
Select the Used for variations box.
Click Save Attributes.
To finish things out:
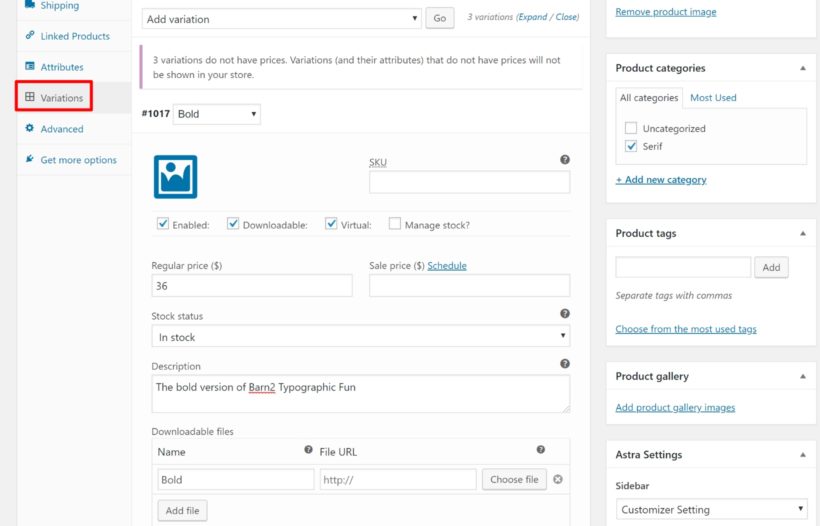
Go to the Variations tab.
Select Create variations from all attributes from the drop-down and click Go.
Check the Downloadable and Virtual boxes for each variation.
Enter the price. If you want to offer free fonts or other freebies, you can mark it as zero.
Upload the font file in whatever format you want to offer.
Once you've configured all of your variations, publish your product. Then, repeat the same process for all the different font families that you want to offer.
2. Configure WooCommerce Product Table
Once you've added all your font families as WooCommerce products, you're ready to create the front-end interface that you'll use to sell fonts online.
Make sure you've installed and activated the WooCommerce Product Table plugin. Then, go to WooCommerce → Settings → Products → Product tables to configure the plugin.
You can explore all of the plugin's settings, but here are the specific settings you'll definitely want to configure.
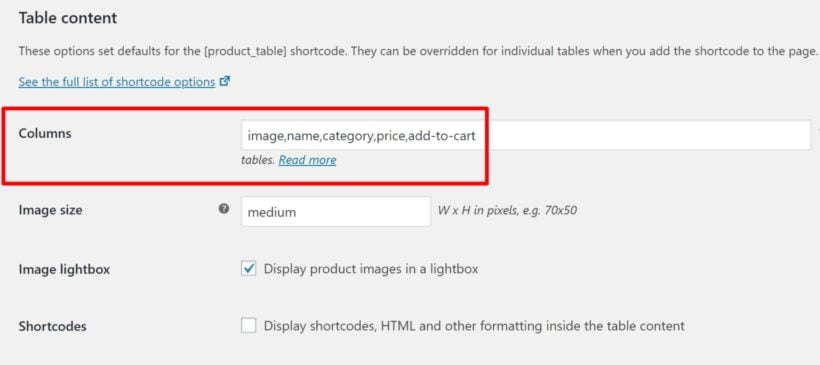
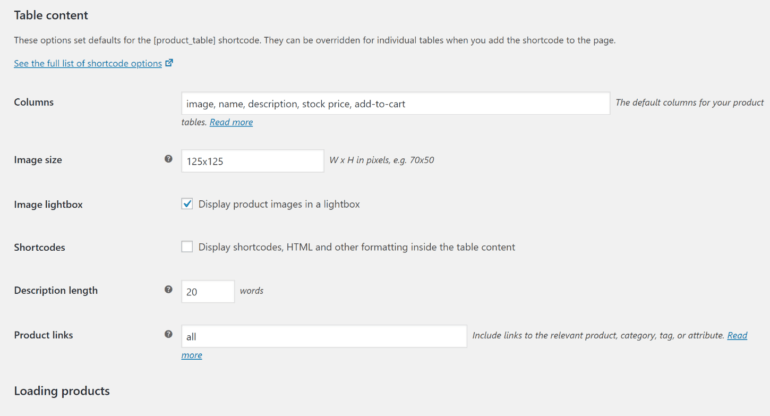
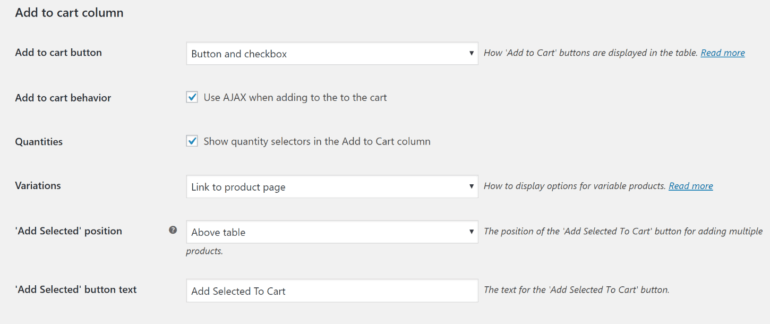
First, use the Columns box to configure what information you want to display for each font. A good starting point is:
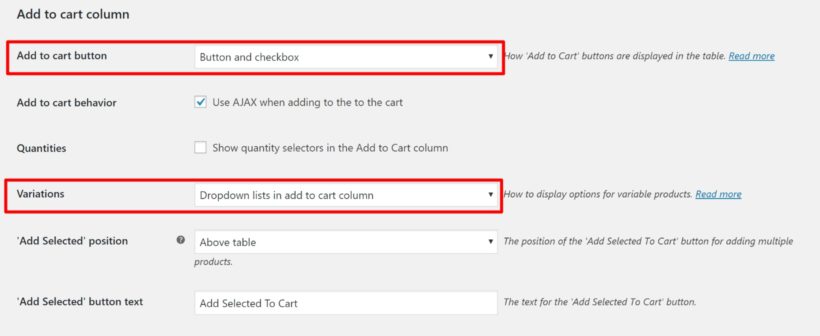
Then, scroll down to the Add to cart column settings and:
Choose Button and checkbox from the Add to cart button drop-down. This will allow shoppers to select multiple fonts to add to their cart.
Choose how to handle Variations. You can either display each font weight as a separate row in your table. Or, you can display a drop-down next to each font family that lists all of the weights.
Displaying variations as separate rows makes it easier for shoppers to purchase multiple font weights, while using the drop-down lets you display more font families in less space.
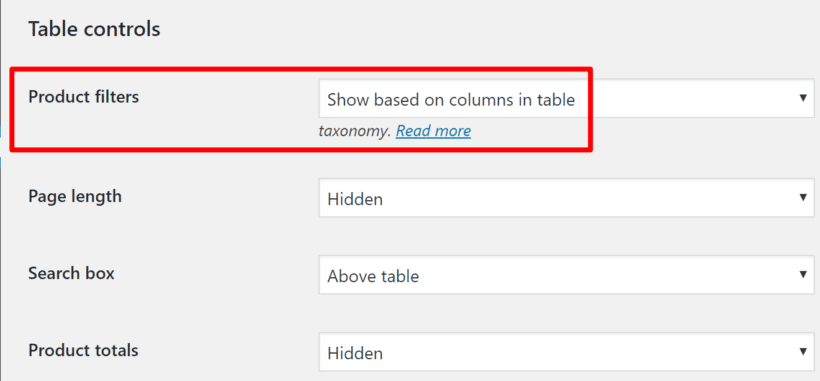
Finally, go to the Table controls section and configure your Product filters. You can use these to let shoppers filter by font category/tag (e.g. serif vs sans serif) and/or attribute (e.g. font weight):
Pro tip: For even more advanced filtering, use WooCommerce Product Table alongside its sister plugin WooCommerce Product Filters.
3. Create your front-end font shop page
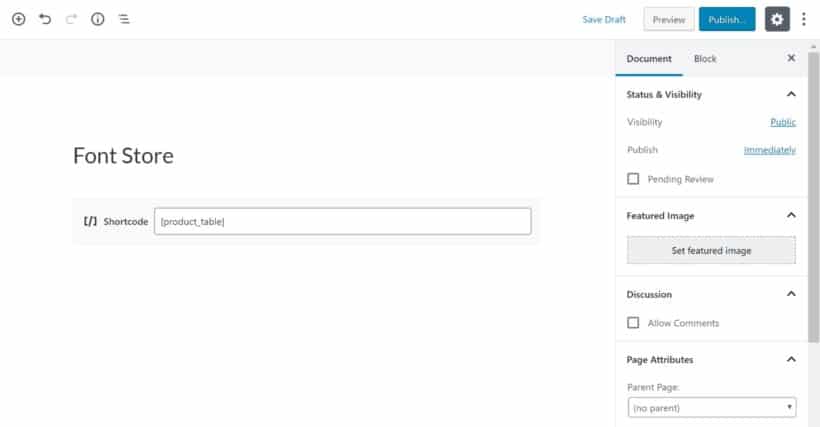
Once you've configured WooCommerce Product Table, you can display your front-end font store page by adding the [product_table] shortcode to a regular WordPress page:
And once you publish the page, you should see the table that will help you sell fonts online:
You can use various parameters to filter out specific fonts. For example, you could create one table to display fonts from a specific category. Or, you could create a dedicated table to promote your best font, or trendy or popular fonts.
4. Add product quick view button (optional)
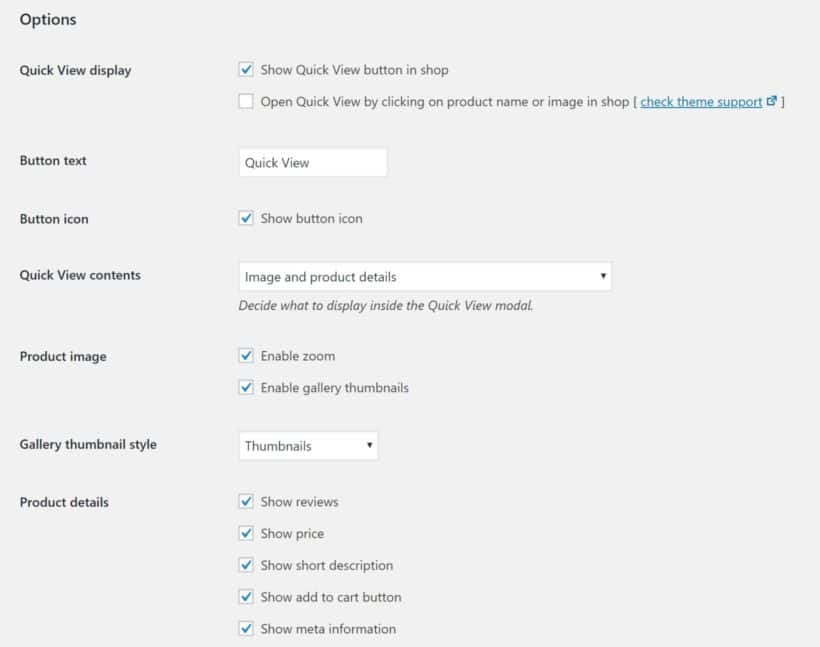
If you want to display more information about each font, you can add a product quick view column to your table using the WooCommerce Quick View Pro plugin.
Once you've installed and activated the plugin, you can then go to WooCommerce → Settings → Products → Quick view to configure how the quick view box works:
Then, you can add a quick-view column to WooCommerce Product Table to achieve this effect:
Tips for selling fonts more effectively
Once you've set up your basic online font store, you'll want to consider implementing some more advanced sales tactics to boost your revenue and sell fonts online more effectively.
Sell font bundles
People who purchase fonts online love bundles - there are even entire sites dedicated just to selling font bundles. For example, you could bundle different font weights together or fonts that pair well together.
The WooCommerce Product Bundles plugin lets you bundle together as many fonts as you want. You can then display your bundle options in the product quick view box in your fonts table. The bundles will not display in the table itself - but they will appear in the quick view box if you use WooCommerce Quick View Pro.
Create upsells
Another good option is font upsells, which let you recommend a similar font/bundle in place of the font a shopper is looking at.
By creating your own WooCommerce store to sell fonts online, you eliminate the middleman and ensure you don't have to give up 50% of your sales as a commission to a third-party font marketplace.
However, if you want to use WooCommerce to sell fonts online, you'll also want to use some extensions to create a more optimized font shopping experience.
WooCommerce Product Table lets you create an optimized, table-based shop layout page to display your fonts. You'll be able to share previews, list pertinent details like font weight and type, and allow shoppers to purchase multiple fonts at the same time.
If you want to display more information about each font, the WooCommerce Product Table plugin integrates with the WooCommerce Quick View Pro plugin to help you add a product quick view button that opens a box with more detailed previews, descriptions, and license terms.
Get started today and create your own WooCommerce store to sell fonts online!
Do you have any questions about how to sell fonts online with WooCommerce and WooCommerce Product Table? Ask away in the comments!
Are you looking for an alternative to the default WooCommerce category page design in your WordPress theme? Creating a custom design for your WooCommerce product categories lets you offer an optimized shopping experience, which can have a positive effect on your store's bottom line.
WooCommerce is one of the most popular e-commerce platforms in the world, powering over 30% of all online stores. With its user-friendly interface and easy-to-use features, WooCommerce makes it easy for anyone to set up an online store and start selling products or services.
One of the key components of a successful online store is a well-designed category page. Category pages are important for organizing and displaying products in a way that makes sense to customers. They allow customers to easily navigate your store, find the products they are looking for, and make informed purchasing decisions.
A category page in WooCommerce displays a list of products that belong to a specific category, such as "Shirts" or "Shoes." By default, WooCommerce provides a basic category page layout that includes a product grid, product filters, and paging. However, these default category pages can be limiting and may not provide the best user experience for your customers.
To truly stand out and create a unique online store experience, it's important to customize your WooCommerce category pages. By customizing your category pages, you can create a visually stunning and user-friendly shopping experience that reflects your brand and helps increase sales.
2 ways to customize the WooCommerce category page
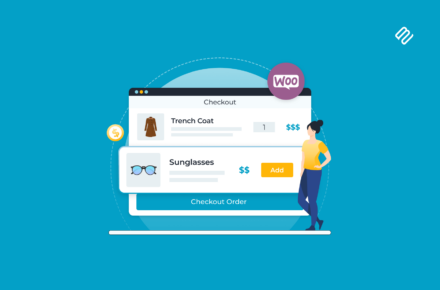
In this post, we'll mostly be focussing on how to turn your WooCommerce category pages into one-page product order forms. Here's an example of what that looks like:
We'll explore the importance of customizing category pages in WooCommerce and provide a step-by-step tutorial on how to create a custom WooCommerce category page design with the WooCommerce Product Table plugin.
I'll also share an alternate option for customizing WooCommerce category pages - the WooCommerce Express Shop Page plugin. Unlike the Product Table plugin, this adds extra functionality to category pages without changing the layout of your store. Specifically, it enables direct category page shopping by adding quantity boxes and variation dropdowns to your category pages like this:
Both the Product Table and Express Shop Page plugins speed up the shopping experience by letting customers view and select products directly on a customized category page. However, they do this in different ways. Look at them both and think about which is the best way to customize the category pages in your store.
The benefits of using a table layout for your category pages
Most themes' category page designs look something like this:
The exact category page design may look a bit different. For example, you may have created a WooCommerce theme layout using tools like Elementor and Astra. However, a WooCommerce category page generally contains a list of products similar to the above.
That layout is fine for some situations, but it limits the number of products that you can display. It also restricts how much information you can provide about each product (though adding product quick view buttons is one way to mitigate this).
Woo Multistore has written about the importance of designing the WooCommerce category page in a way that boosts conversions. A table layout helps you overcome the shortcomings by displaying more products and information in a compact layout that ends up using less space, as well as adding extra navigation features such as searching and filtering.
That means you can get more of your products/product details in front of shoppers' eyeballs, which ensures they can see your whole catalog and ups your chance of them making a purchase.
You'll also see SEO benefits with search engines as you can display more custom content on a fully custom page (or landing pages too). This lets you show products that are relevant, and then add contextual text too. All of this should be rewarded with higher rankings.
While this type of layout can benefit all types of eCommerce stores, it's especially helpful for:
Here's a brief summary of the steps involved in creating a WooCommerce custom category page in WooCommerce:
Understand your brand and target audience: Before you start designing your category page, it's important to have a clear understanding of your brand and target audience. This will help you make design decisions that align with your brand's personality and appeal to your target customers.
Customize your category page template:To save you from having to modify templates using PHP, we’ll do this using the WooCommerce Product Table plugin. This replaces the basic layout on your category archive pages with an optimized order form view.
Test and refine: Finally, test your new category page design to ensure it is user-friendly and functions as expected. Make any necessary adjustments and continue to refine your design over time to optimize the user experience and increase conversions.
Understanding WooCommerce Category Pages
Before diving into the process of creating a custom WooCommerce category page, it’s important to understand what category pages are and their purpose. Simply put, category pages are used to group similar products together on an online store. For example, if you sell clothing, you might have categories for men’s clothing, women’s clothing, and children’s clothing. Each category page would then display products related to that category.
How do category pages work in WooCommerce?
WooCommerce comes with built-in functionality to categorize your products. Essentially, category pages in WooCommerce are dynamically generated web pages that list products assigned to a specific category. These pages allow shoppers to browse through products of their interest and help you showcase your offerings in a more organized way.
However, by default, WooCommerce uses a generic template for all category pages, which can be limiting for businesses that want to showcase their products in a unique and more visually appealing manner. This is where customizing the product category page design can come in handy. With the right tweaks, you can make your category pages stand out and better reflect your brand and product offerings.
A well-designed category page can help improve the discoverability of your products and make it easier for shoppers to navigate through your site, ultimately leading to more sales.
The importance of category pages for SEO and user experience
Effective category pages are essential for organizing products, improving user experience, and boosting SEO rankings. Properly categorizing your products and optimizing your category pages can help your online store stand out in a crowded e-commerce market.
Not only do custom pages improve navigation, but they also play an important role in establishing a strong brand identity. By incorporating your brand's colors, typography, and product images, you can create a consistent look and feel throughout your store that helps build trust and credibility with your customers.
In addition to improving user experience, well-optimized category pages can also boost your store’s search engine rankings. Properly categorizing your products and optimizing your page content can help search engines better understand your site's structure and content, making it easier for them to remember your site. This can result in higher visibility and more traffic to your store.
How to create a custom WooCommerce category page design with WooCommerce Product Table
Another benefit of using a table layout for your WooCommerce product category page design is that you can set everything up without needing any special technical knowledge.
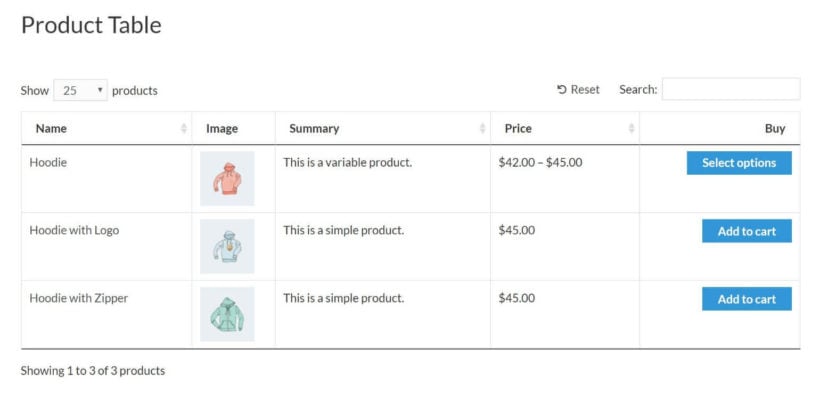
To do this, you'll use the WooCommerce Product Table plugin. This plugin lists your WooCommerce products in a flexible table layout that you control, along with the ability to add filters, search boxes, pagination, and more. It transforms your category pages into quick one-page order forms. That way, customers can quickly select multiple products, quantities, and variations, and add them to their cart in a single click.
You can also use the plugin to only display products from specific categories or subcategories. WooCommerce Product Table provides two ways to do this:
You can centrally enable the product table layout on all product category pages. (Ideal if you want to customize all your product category pages.)
Alternatively, you can use a shortcode to manually create your own WooCommerce category pages. (For example, if you create a new page listing products from specific categories only.)
Below, we'll show you how to set up the WooCommerce Product Table to achieve both options.
1. Configure WooCommerce Product Table
Once you've installed and activated the WooCommerce Product Table plugin, you'll want to configure its default settings.
This lets you control what information is displayed in your product table and how everything works, like whether or not to display certain product attributes or how the add to cart functionality will work.
To get started, go to WooCommerce → Settings → Products → Product tables to access the category plugin's settings. You can also do all this in the plugin setup wizard, which opens automatically when you first install it.
It's worth reading through all the available settings and choosing the ones that fit your situation. However, we're just going to cover the basics that are essential to design your WooCommerce category page.
First, find the Columns setting under the Table content section. This is where you'll control what information appears in your table. In addition to displaying core product information, you can also display product attributes, custom fields, and more.
Further down, you'll find the Add to cart column section, which lets you control the add to cart buttons.
To attract bulk purchases, you can add checkboxes that allow shoppers to bulk add multiple products to their carts. Or, you can also just add a separate add to cart button to each product (or both!):
Once you're finished, make sure to save your changes.
Once you've configured the product's settings, you have two ways to create your actual WooCommerce categories. We'll look at these next.
2a. Enable product tables on all category pages
WooCommerce Product Table comes with an option to automatically add the product table layout to all category pages. This is the easiest option and just takes a second to set up.
On the plugin settings page, simply tick the 'Product category archives' box:
This will globally enable the table layout for all categories, replacing the default layout that came with your theme.
2b. Use a shortcode to create your own WooCommerce category page design
You can also use a shortcode to list WooCommerce products by category. This option is perfect if you don't want to use the product table layout on ALL your categories.
Simply add the plugin's shortcode to a regular WordPress page, and specify which categories you want to list products from. Repeat the process as many times as you like - once for each category.
With this method, you're essentially creating a new WooCommerce product category page for each product category that you want to display, rather than redesigning the WooCommerce category page globally.
You can either continue to use your existing category pages in conjunction with your new table layout. Or, you can just replace the links to each existing product category page with your new table-powered category pages. (Tip: If you're no longer using the built-in category pages, redirect them to the new ones where you're using product tables.)
To get started, go to Pages → Add New to create a basic WordPress page. Then, add the [product_table] shortcode to the page. You can also add a category title using the regular title field.
By default, the shortcode will display all your WooCommerce products.
However, you can use the category shortcode parameter to filter out products from specific categories and/or subcategories. You can also combine multiple categories, or create conditions like a product having to be in multiple categories or subcategories to be displayed.
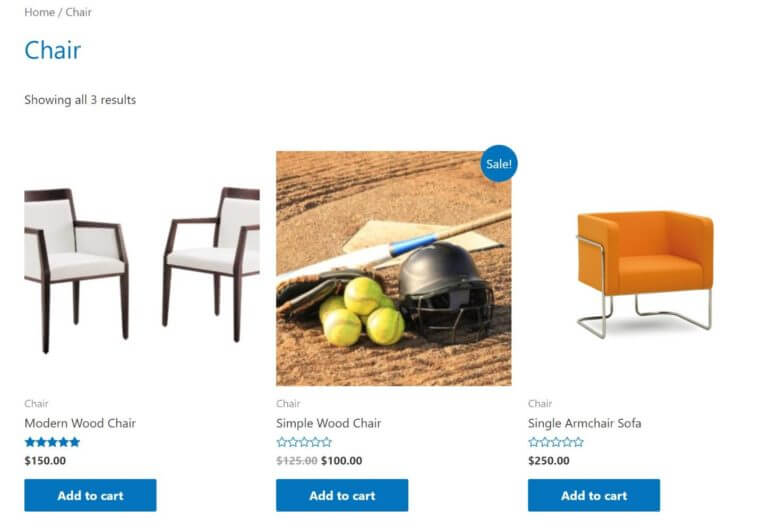
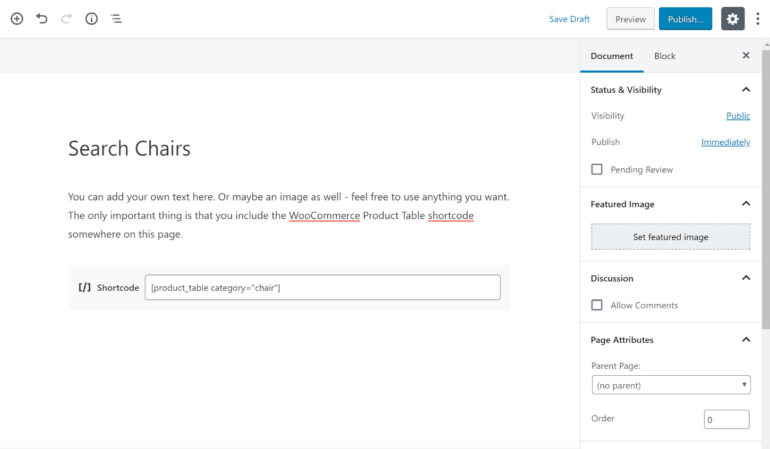
For example, to filter out products from the "chair" category, you could use the following shortcode:
[product_table category="chair"]
If you want to add a category image or category name, you can also do that above the shortcode using the regular WordPress editor.
Once you publish the page, you should see your new WooCommerce category page design:
To create pages for additional WooCommerce categories, repeat the process for each product category or subcategory that you want to display.
3. Make your WooCommerce categories more searchable with filters
If you want to add more search and filter tools to your WooCommerce categories, you have three options:
You can add search, sort, and filter options via the WooCommerce Product Table settings. These will appear above or below your product table.
WooCommerce Product Table includes widgets that you can use to add filters to your sidebar.
Alternatively, you can use the WooCommerce Product Filters plugin to power your filters. This is the most advanced filtering option for WooCommerce category pages.
Option 3: Use the WooCommerce Product Filters plugin to add filter checkboxes, image-based filters, color swatches, and more
Depending on which method you choose for adding filters to your custom WooCommerce category page, follow the instructions below:
Using WooCommerce Product Table's built-in filters (methods 1 and 2)
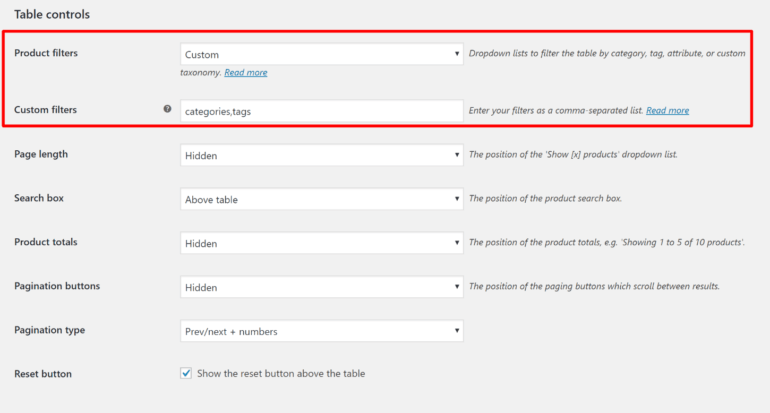
To add filter dropdowns above the product table, go to WooCommerce → Settings → Products → Product tables. Then, scroll down to the Table controls section and configure the options according to your preferences:
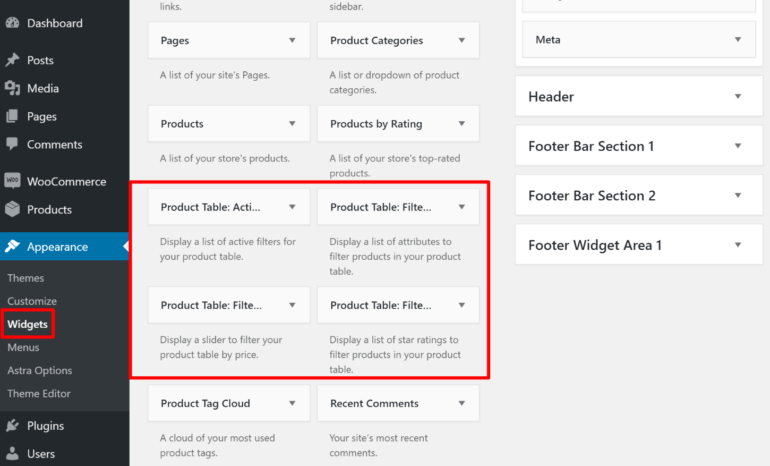
To use the WooCommerce Product Table filter widgets, you can go to Appearance → Widgets. There, you'll find four new widgets prefixed by "Product Table:". You can add all the widgets, or only choose the specific filters that you'd like to include:
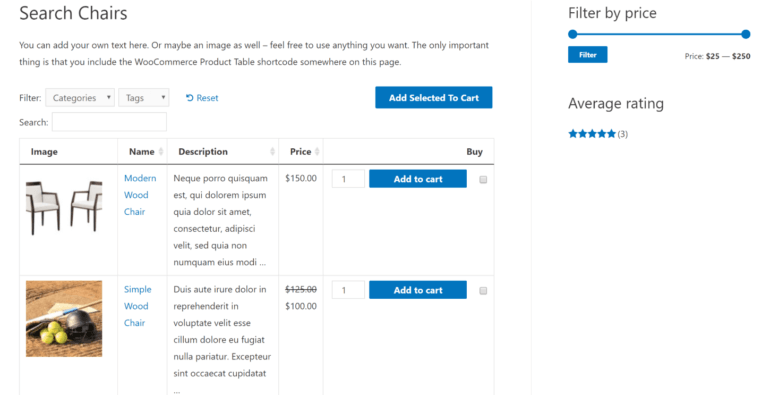
You can use both types of filtering together. Here's an example of what this might look like:
Using the WooCommerce Product Filters plugin (Method 3)
The Product Filters plugin provides the most sophisticated way to add WooCommerce filter by category to your shop page and category pages. You can add filters for any type of product data - sub-categories, tags, attributes, variations, colors, custom taxonomies, price, rating, etc. And even better, you can choose from a range of style options for each filter.
To use WooCommerce Product Filters on your custom category pages, follow these steps:
Install WooCommerce Product Filters.
In the setup wizard, select the filter group that you want to display on the WooCommerce category page. The plugin creates a recommended group for you, so you can just use that.
Next, go to Products → Filters and add filters to the filter group which you selected in the setup wizard.
Now, your custom WooCommerce category pages will show the advanced filters. Neat!
Create a custom category page with quantity and variation pickers
We've spent a lot of time learning about how to customize the category page with WooCommerce Product Table. Next, we'll move on to the other plugin featured in this article - WooCommerce Express Shop Page.
Unlike WooCommerce Product Table, this simple plugin customizes the WooCommerce category pages without changing the actual layout of your products. Instead, it lets customers choose variations and quantities directly on the category page like this:
That way, customers can choose quantities and options without clicking through to the single product page.
How to create a custom WooCommerce category page design with code
So far, we’ve learned how to use the WooCommerce Product Table plugin to create customized WooCommerce category pages. That’s a great option because it’s a no-code solution. However, if you have development experience then you can also use code to create your own custom category page.
Before you start making any changes to your category page, it’s important to plan out the layout and structure of the page. Consider the elements that you want to include on your page, such as product images, descriptions, and pricing information. Think about the order in which you want these elements to appear on the page, and how you want them to be styled.
Once you have a basic layout in mind, you can start adding custom PHP, CSS, and HTML to your WooCommerce product category page. This can be done by modifying the existing WooCommerce template files or by creating a custom WooCommerce category page template file from scratch. You can use CSS to change the look and feel of your WooCommerce category page, while HTML can be used to add new elements to the page.
You'll want to work with the archive-product.php file in your theme or child theme. You can also use this same approach to edit your WooCommerce product pages via the single-product file or other parts of your storefront.
Unfortunately, because you'll need to directly edit the code in your theme's template files to make each change, this method isn't accessible to non-developers. We recommend reaching out to Codeable if you need some help or sticking with the simpler table layout method above.
Testing your custom category page on different devices and browsers
After designing and customizing your WooCommerce product category page, it's important to test it on different devices and browsers to ensure that it looks and functions properly. Here are some steps to follow for testing your custom WooCommerce category page:
Test on different devices: Your WooCommerce category page should be tested on various devices such as desktops, laptops, tablets, and mobile devices. This will help you ensure that the layout and design are responsive and adaptable to different screen sizes.
Test on different browsers: Your WooCommerce category page should be tested on different browsers such as Chrome, Firefox, Safari, and Internet Explorer. This will help you ensure that your page looks and functions consistently across different browsers.
Check for errors: Use a tool like Google Chrome's Developer Tools or Mozilla Firefox's Firebug to check for any errors or warnings on your page. Fix any issues that are identified during testing.
Test page speed: Use a tool like Google PageSpeed Insights to test the speed of your page. A slow-loading page can negatively affect user experience and SEO rankings.
User testing: Ask a few people to test your custom WooCommerce category page and provide feedback on the design and functionality. This will help you identify any issues that you may have missed during development.
If you’re still getting problems, then it might be better to use a plugin like WooCommerce Product Table which comes with a WooCommerce edit category page feature. That way, you can be sure that your custom WooCommerce category page is fully tested and works perfectly.
Create your custom WooCommerce category page design today!
By using the WooCommerce Product Table plugin, you can create a custom WooCommerce product category page design that offers a more user-friendly way to display your products. This table-based layout allows you to showcase more products and provide additional details about each one. Moreover, you can incorporate search and filter options to help your customers easily find what they're looking for.
This custom WooCommerce product category page design can improve the shopping experience for your customers. As well as ultimately increase sales and revenue for your online store. Unlike directly editing your archive WooCommerce category page template file, setting up the WooCommerce Product Table plugin is easy and doesn't require any specialized technical knowledge.
By making use of this plugin, you can efficiently and effectively connect your customers with the products they want. As well as displaying your products in an organized and visually appealing way.
Get started today and create a more effective way for shoppers to browse product categories at your WooCommerce store.
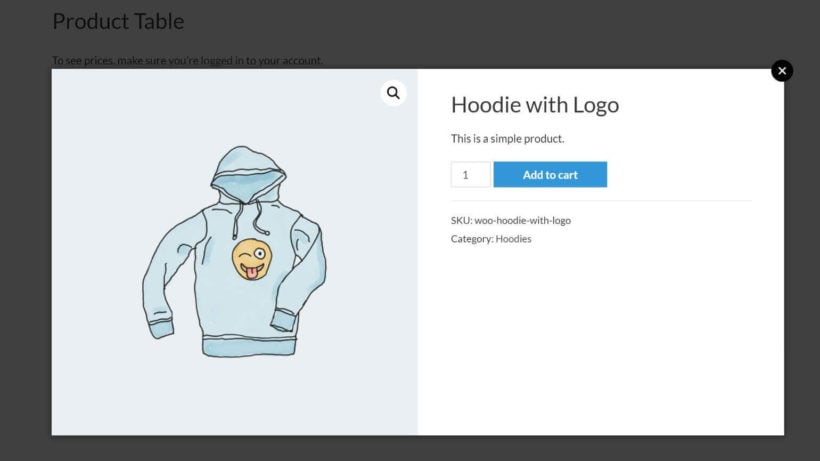
Looking for a WooCommerce hide price tutorial so that you can hide product prices from some or all of your store's visitors? Hiding prices from public view works great for wholesale stores, catalog sites, and many other situations. But, unfortunately, WooCommerce doesn't include any built-in way to hide product prices.
Don't worry, though! It's definitely doable, and you won't even need to write a line of code to set it up. Yup – you'll be able to hide WooCommerce product prices with no code snippets or editing functions.php!
In this guide, we'll show you how to hide prices in WooCommerce for a few different situations. By the end, you'll be able to completely hide prices for all visitors, conditionally hide prices by user role or logged-in status, plus a few other scenarios! Some visitors will see the price as usual, and others will see the WooCommerce products without price.
When does it make sense to keep prices hidden?
There are a lot of different use cases in which you might need a WooCommerce hide price plugin. Let's run through some situations in which WooCommerce without prices makes sense:
Wholesale stores If you have a WooCommerce wholesale store, you probably want to remove the price from retail customers while still letting authenticated wholesale customers see the wholesale price. That way, you can use WooCommerce to show prices only to registered users.
CatalogsIf you just want to create a browsable catalog of products, but don't actually want to sell them through your website, you might want to show WooCommerce products without price or add to cart button.
Members-only stores Similar to a wholesale store, you could create a members-only WooCommerce store where registered shoppers must login to see prices. You could even combine this with a WordPress membership plugin to charge users to sign up to your store and see the prices.
You can probably come up with your own scenarios where your store can benefit from a WooCommerce hide price plugin, too.
Different ways to hide prices in WooCommerce
In this WooCommerce hide price tutorial, I'm going to share several different methods with you. Read through the options and decide the best way to hide product prices...
First, let's look at the most dynamic option. This can conditionally hide WooCommerce product prices from logged in users. Prices appear as normal for logged in users. They simply login to WooCommerce to see prices.
To use WooCommerce to only show prices when logged in, you need the WooCommerce Wholesale Pro plugin. This WooCommerce hide price plugin lets you show/hide prices depending on:
Show/hide prices for users who are not logged in.
Display different prices and tax information depending on the user's role.
For example, if you're running a wholesale store, this would let you make your product catalog public, but only show prices to people who register for a wholesale seller account.
While the plugin is mostly designed for wholesale stores, you don't have to use it for wholesale. You can just use it to remove the WooCommerce price for guest users so that people must log in to see the price of each product.
How to set it up
Once you install and activate the WooCommerce hide price plugin, go to WooCommerce → Settings → Wholesale. Simply tick the 'Hide price until login' box and save the page. As if by magic, your WooCommerce prices will be hidden from logged out customers.
Now, the price will be hidden to non-logged in users everywhere on your site. This includes the shop page, category pages and single product pages. It also disables the buy buttons from logged out users. If you disable the price in WooCommerce, then they can't make a purchase!
WooCommerce Wholesale Pro integrates perfectly with WooCommerce Product Table. (In fact, you can save money by buying both plugins together as a bundle.) So you could, for example, create a product table that does include a price column, but only displays the price in the column if a user has a certain role or is logged in.
WooCommerce hide price by user role
In addition to hiding price by logged-in status, the same WooCommerce hide price plugin plugin also lets you conditionally hide prices and show different pricing based on a user's role.
For example, if you're running a public and wholesale store, then it works like this:
Logged out users are in catalog-mode, where they can't see prices or buy buttons.
Logged in users with the default 'customer' role can see your normal product pages.
Wholesale roles are shown the correct price for their role.
Exploring real-world applications of the WooCommerce Wholesale Pro plugin
The most obvious real-world application of using WooCommerce Wholesale Pro to hide prices from logged out users is for a B2B wholesale store. That's not surprising, given its name 😀. However, that is only one of many ways that you can use this hide price until login plugin.
Even if you're not selling to the trade, there are lots of reasons why you might want to hide prices based on user role. For example:
An exclusive members-only purchasing club might display products publicly, while only showing prices to logged in users. That way, the products can still rank in search engines for SEO purposes, while also attracting new members to join. However, they can only be purchased by logged in users.
Similarly, you might sell branded products to regular customers only, such as schools, sportswear or workwear. It's fine to display these products in the public areas of your WooCommerce store, for example so that potential customers are more likely to make an enquiry. However, you would want to hide the prices until login by an authorized user.
Option 2 - List products in a table without prices
In option 2, we'll learn how to completely eliminate price from the equation for all visitors. For example, you could use this to create a catalog page with a searchable directory of all your products.
For this use case, you'd likely want to:
Hide all mention of prices
Hide the add to cart button
To set this up, you can use WooCommerce Product Table to create a table view catalog of products. This also has the benefit of adding user-friendly filters and search options to help shoppers browse your catalog.
It's an alternative to the default WooCommerce shop page that you can use to completely replace the shop page. Alternatively, you can use it to list products in addition to the WooCommerce shop page.
The WooCommerce hide price plugin lets you control exactly which columns display in your product table. This makes it easy to remove the product price from WooCommerce, or even remove the add to cart buttons completely.
A product table with no price or buy buttons
If you're just looking to create a catalog or table listing and you want to hide the price from all users, WooCommerce Product Table is all you need. Or if you want to remove the price for logged out users only, then you also need the WooCommerce Wholesale Pro plugin from Option 1.
How to create a catalog page with no price or add to cart button
Go to the plugin settings page at WooCommerce → Settings → Products → Product tables.
Activate your license key and enable the options to show product tables on the shop and category pages.
Now view your main WooCommerce shop page. At first, it will look something like this:
A product table before hiding the prices
Of course, you don't want to show the price. To hide it, simply remove the price and add-to-cart columns. You can easily do this on the plugin settings page:
Once you remove the price from the WooCommerce table, there will be no more price or add to cart button in your product list:
Disable links to the single product page
To ensure that visitors can't click through to the single product page (and see the price and add to cart button there), you'll also want to use WooCommerce Product Table's Product links option to disable prices and links to the single product page:
Option 3 - Create quick view lightboxes without prices
Another user-friendly option is to stack WooCommerce Product Table with the WooCommerce Quick View Pro plugin. When a user clicks on a product name, it opens the product quick view box instead of taking them to the single product page.
The benefit of adding product quick view functionality is that customers can view more information each product, without visiting the actual product page. The product page contains product pricing, so you don't want that!
Quick View Pro gives you built-in options to disable the price and add to cart button in WooCommerce. That way, it lets shoppers view more details about your products without exposing the price.
Go to the plugin settings page at WooCommerce → Settings → Products → Quick view.
Activate your license key and disable price and 'Show add to cart button' options.
Go back to the WooCommerce Product Table settings page WooCommerce → Settings → Products → Product tables. Add a quick-view column to the product table.
You can also use WooCommerce Quick View Pro with the WooCommerce Wholesale Pro plugin from Option 1. This lets you show prices in the quick view lightbox to logged in users only.
To do this, enable the 'Hide Price Until Login' feature in WooCommerce Wholesale Pro, and enable prices in Quick View. That way, logged out users will see the quick view lightbox without prices. Whereas logged in users will see prices as usual.
Option 4 - Make your whole store or specific categories private
The above solutions assume that you want to hide the prices for otherwise public products. That is, you want everyone to be able to see the product details – you just don't want people to be able to see the prices.
However, that might not always be the case and, depending on your situation, you might actually benefit from a different approach than the WooCommerce hide price plugins above.
For example, if you don't want unauthenticated shoppers to be able to see any part of your products, you might want to:
Or, if you're specifically looking to hide WooCommerce prices to create a wholesale store where wholesale customers can see prices, but retail customers cannot, then you might want to check out our complete guide to creating a WooCommerce wholesale store. This guide will teach you how to offer different prices for retail customers and wholesale customers, rather than completely hiding prices. You can also learn how to set up a price per unit or WooCommerce paywall.
Where to get the plugins
There are lots of reasons why you might want to show a WooCommerce product without price. Learning how to hide prices in WooCommerce gives you more control over who has access to important pricing information. It's an especially great tactic for wholesale stores, though you can also use it for catalog sites, members-only stores, or any other situation where you just don't want product prices to be visible right away.
To recap, there are several WooCommerce hide price plugins to choose from:
Hide prices from logged out usersUse WooCommerce Wholesale Pro to hide prices from logged out visitors.
List products in a table without pricesUse WooCommerce Product Table to list products without prices.
Create quick view lightboxes without pricesUse the WooCommerce Quick View Pro plugin to create product lightboxes without prices.
To get started, grab your chosen plugin(s) and start hiding prices in WooCommerce.
Have any questions about how to add WooCommerce hide price functionality to your store? Ask away in the comments!
At Barn2, we've used Placeit for many years to produce branded images for our own site and our clients' sites. They have kindly provided this article on how any eCommerce site can build a successful brand.
Improve your eCommerce page by using helpful tools to upgrade your brand’s image. eCommerce competition is high and rising, so go the extra mile to make your website stand out from others. Think about how much time you really have to catch your website visitors’ attention. What are they looking at?
There are approximately 1.92 billion digital buyers out there waiting to see your eCommerce store. It’s literally never been a better time to open an online store! On the graph below, you can see that more and more people are predicted to buy online in the coming years!
“80 percent of people stop doing business with a company because of poor customer experience.” (Oberlo)
Because of this, you want to make sure your user experience is excellent. Let’s start with proper branding for your website. When designing a website you should keep it as clean, consistent, and professional as possible.
“A lot of eCommerce sites pick a template and call it a day. eCommerce is a highly competitive field as is, so, even the smallest edge can help you drive sales.” (5 Ways Design Affects Your eCommerce Site).
From your website layout to your branding all the way down to your images, there is a lot of room to experiment with your design. So let’s get into it.
Catch more flies with honey... & eCommerce branding consistency
Establishing a solid brand through your website and other platforms builds credibility for your business. This eventually results in gaining customer trust. From your website to your social media, brand consistently all the way! Also, make a brand that catches the eye of your visitor at first glance.
If you have no brand at all yet, you can start by developing your own logo. Developing a simple and effective logo can be a surprisingly daunting process, but with Placeit’s Logo Maker you can get a professional logo design in no time.
Impressed? What else can you do for your website using Placeit? Well, read on to find out.
You’ve mastered your WooCommerce skills, branding your eCommerce website won’t be any harder
Now that you’ve got your logo ready and you’ve established your brand’s color palette, you can make all kinds of branding assets for your website. For example, you can add seasonal Ad Banners to promote a certain sale.
Establish a social media presence too! Branding your business everywhere is kind of the point of a good branding strategy so do not forget about other promotional sites. This will always be the best way to increase your brand’s credibility.
Professional images to build your WooCommerce website
Great news! You can not only build all your branding assets using Placeit but you can also create the images you need to showcase your brand everywhere with professional mockups!
Make amazing mockups for your WooCommerce product table
If you're using WooCommerce Product Table to create one-page order forms, then you can showcase each product with real, professional images you don’t even have to take yourself! Using a mockup is really simple. All you have to do is upload your design onto the template and you will get an image in a real-life scenario with your designs on it!
For example, if you're selling t-shirts, clothing or promotional materials then you can use Placeit to superimpose your branding or imagery directly onto photographs. It looks incredibly realistic:
Also, mockups are very useful for your quick view plugIn
If you're using a WooCommerce Quick View plugin to speed up the buying process, don’t struggle spending hours trying to take good photos of your products. Placeit’s mockups look great even in a quick view lightbox because you always get very high-quality images that look exceptional no matter how much you zoom in!
Social media images for your WordPress post tables
If you're using Posts Table Pro to list blog posts or other information in a table, then you need to regularly create new content to keep your audience updated. A solid content strategy can increase your engagement, help you establish brand awareness, and can even help with conversions! By sharing memorable content, you can generate curiosity in the mind of your users. Also, it never hurts to engage with a new audience!
Be creative with your images too! Instead of using generic images for your post tables, make original designs for your brand's posts.
Consider sharing your business story with a fun video
Share your story, an insight into your brand's culture for your customers. Let them get to know you in order for them to feel an emotional connection with your brand. There are lots of great tools you can use to tell your story. We would encourage you to try making a video about it!
Final words
Now that you have the right plugins for your eCommerce shop, it’s time to get the right tools to brand your website effectively. Placeit has tons of amazing online design tools you can use to make your eCommerce website super pro! You can design amazing products for your shop, you can promote your designs easily with mockups and you can use all kinds of amazing promoting tools like videos or banner to get the word out on your newest sale! Let’s get started and succeed with lots of conversions!