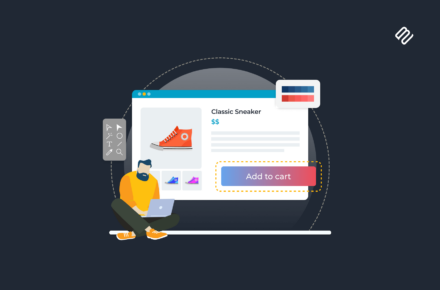
If you’re looking for a simple solution for taking customer orders at the counter or table using a tablet or iPad, this article is just the thing you need.

Here, we’ll show you how you can create a WooCommerce POS ordering system for your business. Whether you run an online store, physical store, retail store, restaurant, spa, local coffee shop, or hotel – a WooCommerce POS plugin (or "WooCommerce point of sale plugin") can help you streamline business operations.

Having software that enables you to take customer orders is incredibly important – regardless of what sort of business you’re running. It enables your staff to quickly enter customers’ orders into a single ordering system – not multiple versions for in-store and online, or worse, something on paper. It’s more accurate and more efficient, especially for cashiers.

A WooCommerce POS system will simplify the order-taking process and make it easier for your waiting staff or behind-the-counter staff (cashiers) to add and remove items from the order list, select variations, place orders for customers, and instantly send it through for processing.

By the end of this post, you'll know how to set this all up. 

You can also watch a video version of this post below.

What we'll cover

I’ll show you step-by-step how you can use WooCommerce with the WooCommerce Product Table plugin to create a one-page ordering system that enables your staff to take customer orders. They’ll be able to use this system on different types of devices including mobile devices like iPads or Android tablets/phones.

WooCommerce POS front-end table layout ordering system

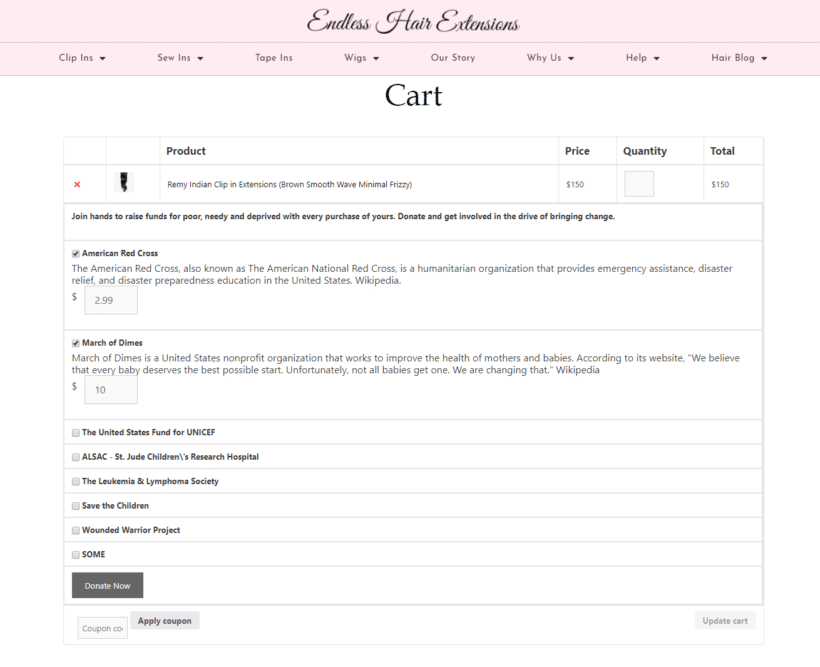
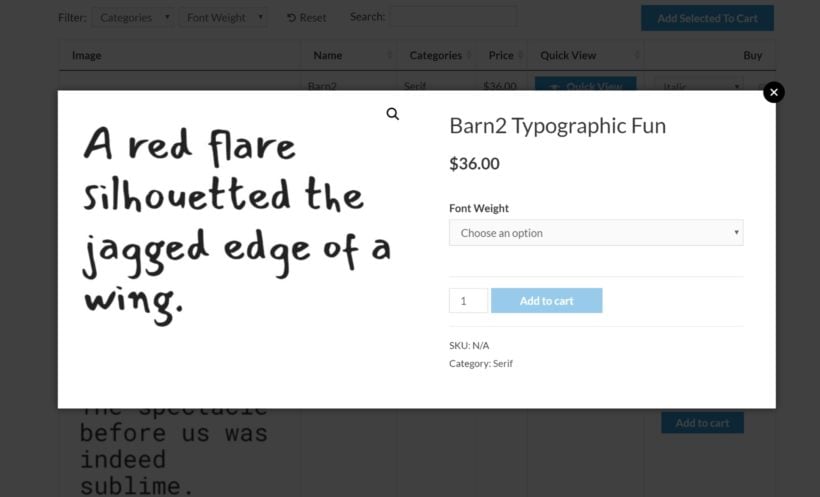
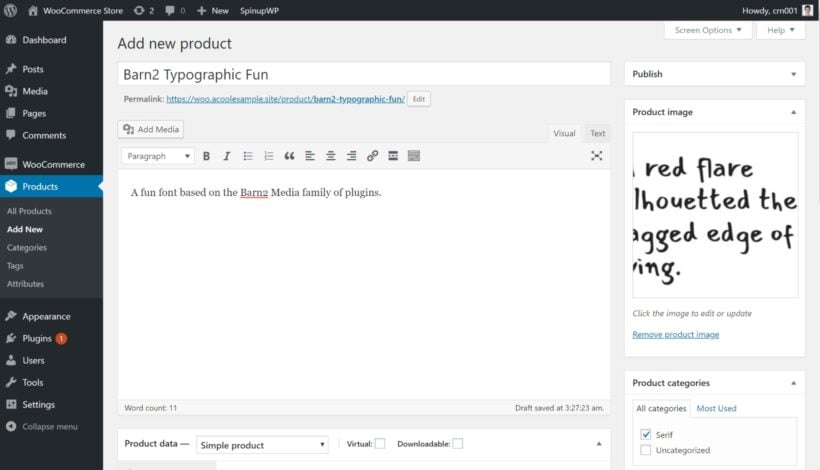
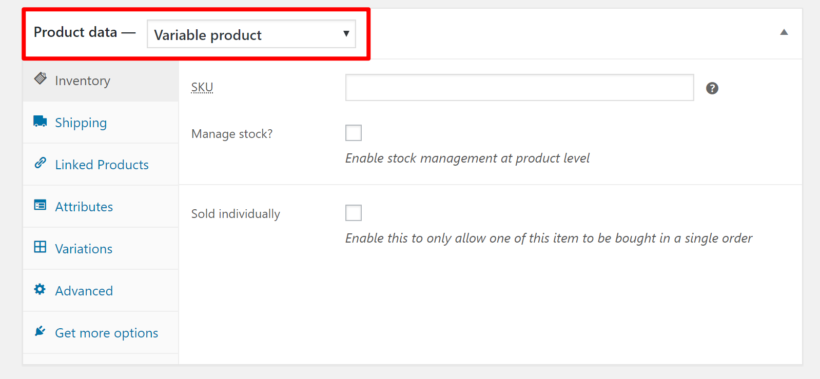
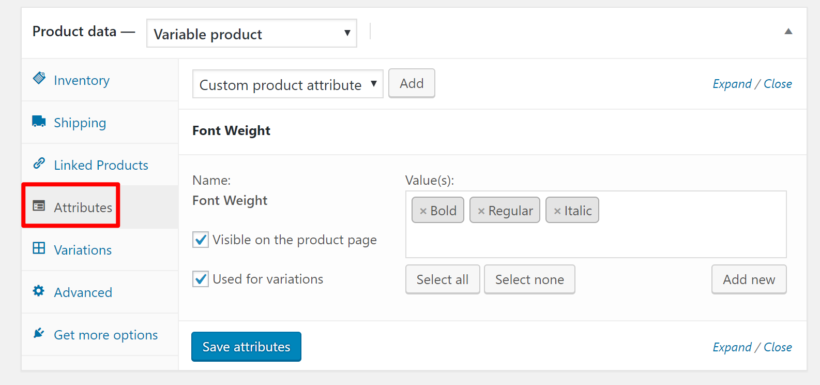
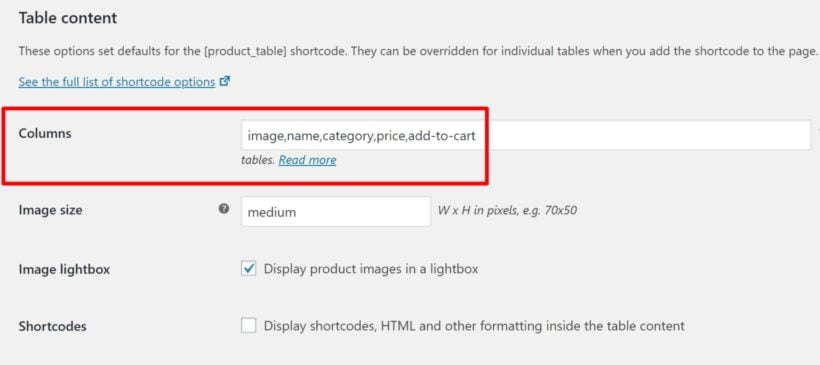
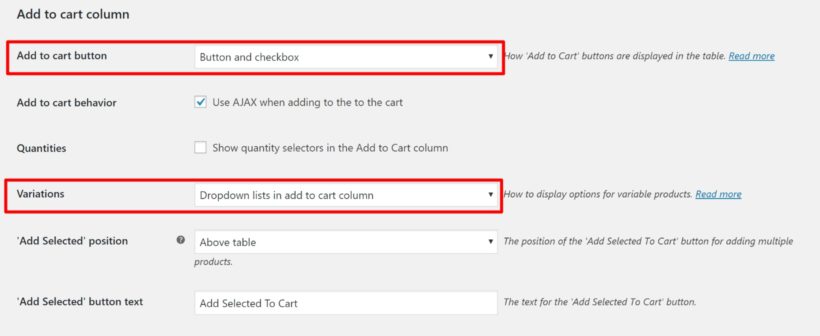
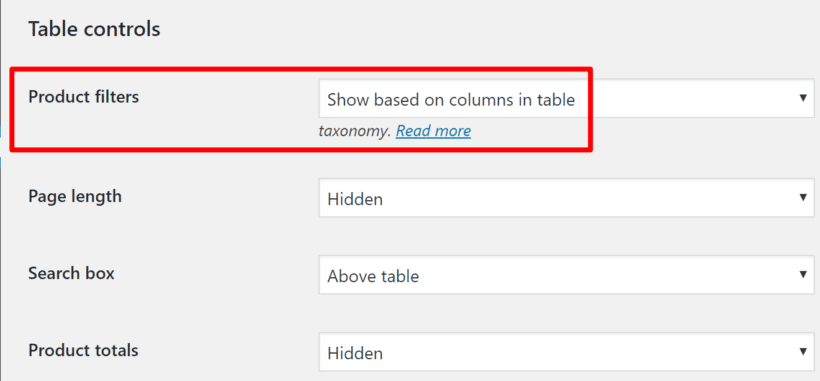
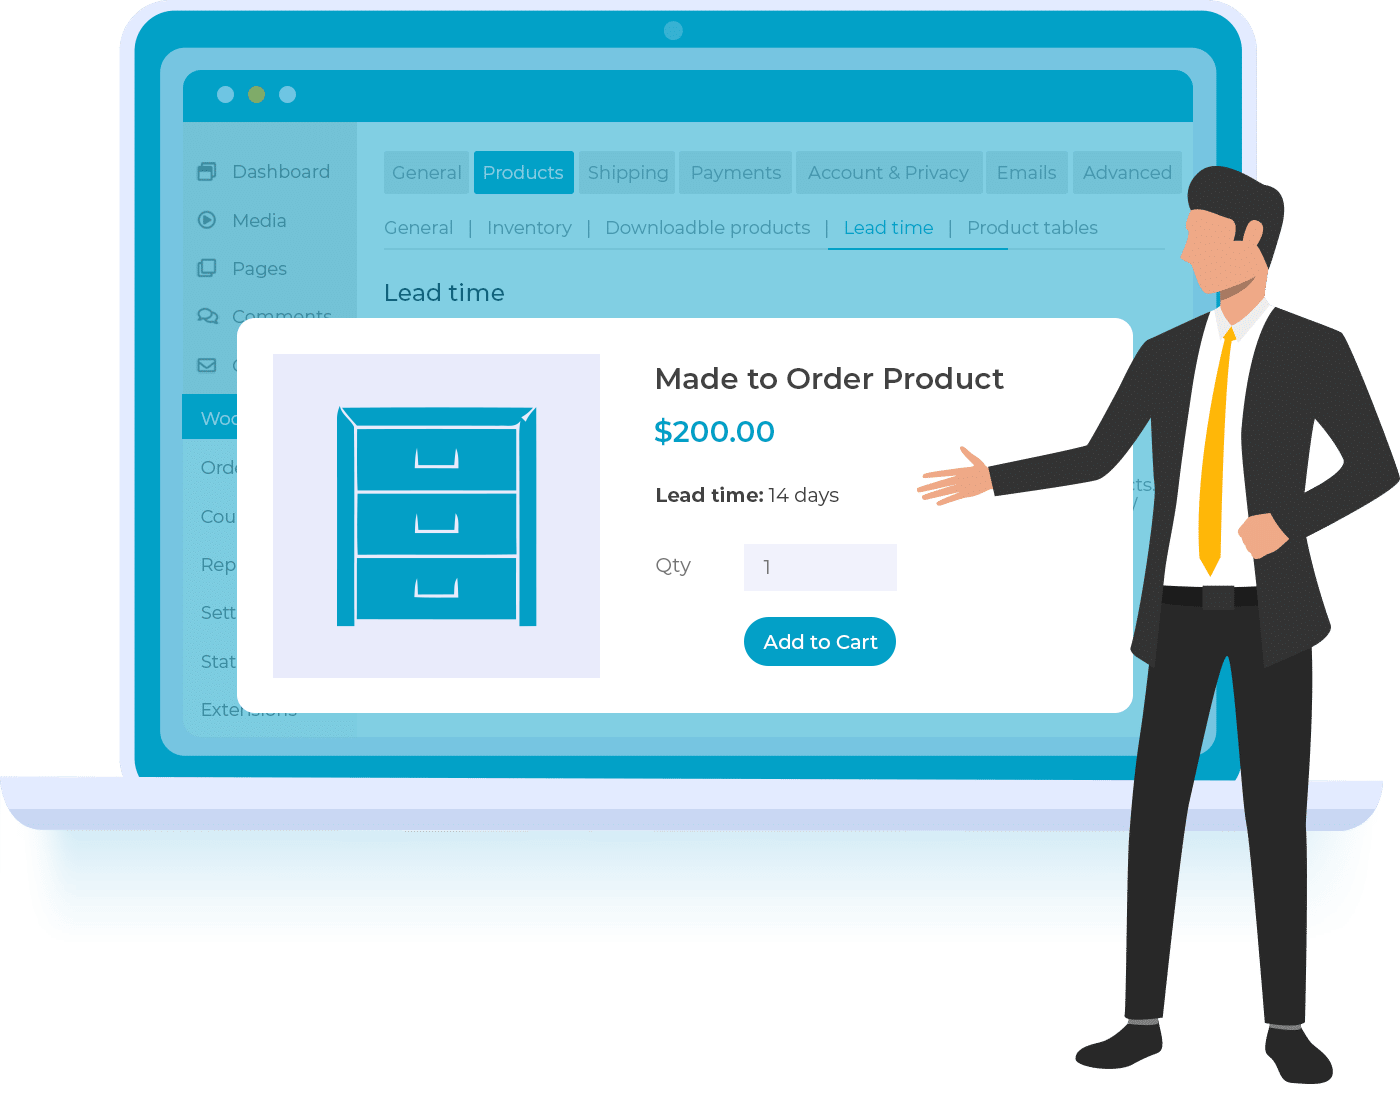
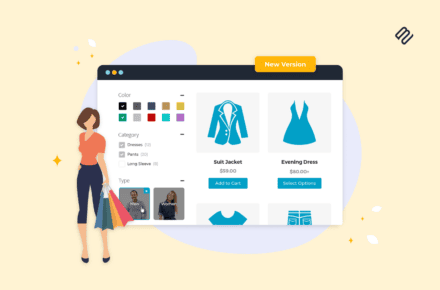
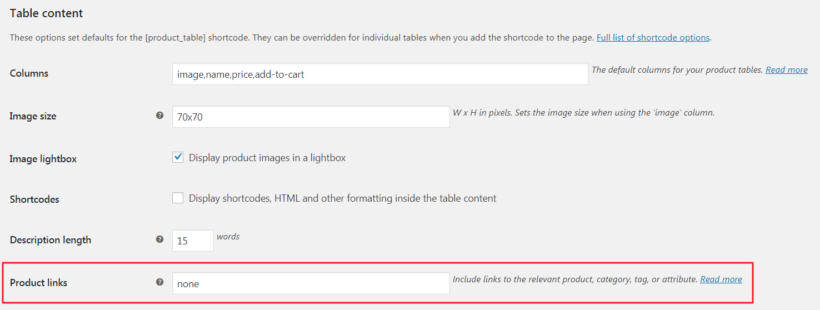
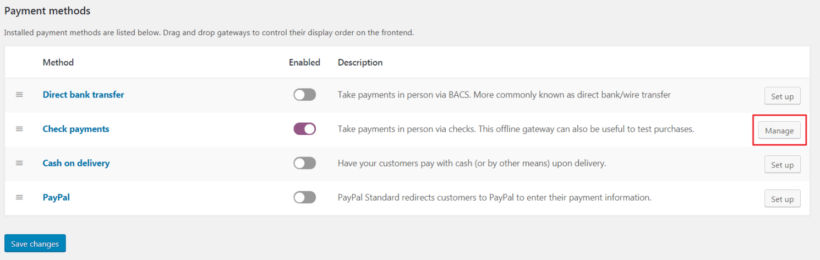
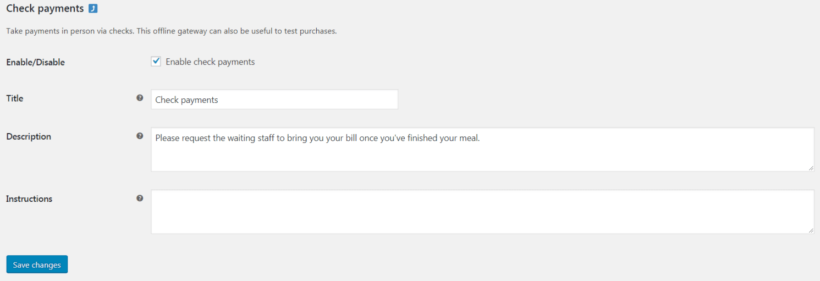
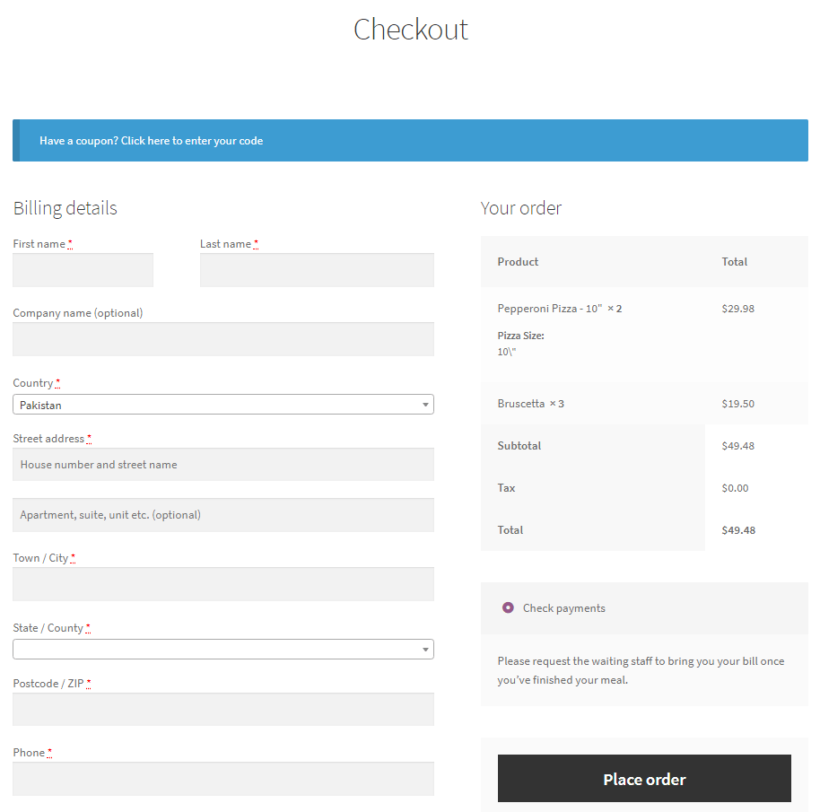
I’ll start by showing you how to install and set up the WooCommerce Product Table plugin on your existing WordPress website.

Then, you’ll learn how to use the plugin to create an easy-to-use, one-page POS ordering form. This form will enable your waiting staff to easily view, select, and customize the customer’s orders.

And, lastly, we’ll go over some tips about how you can optimize your order taking process using advanced features like routing orders to the right department.

Let’s get started.


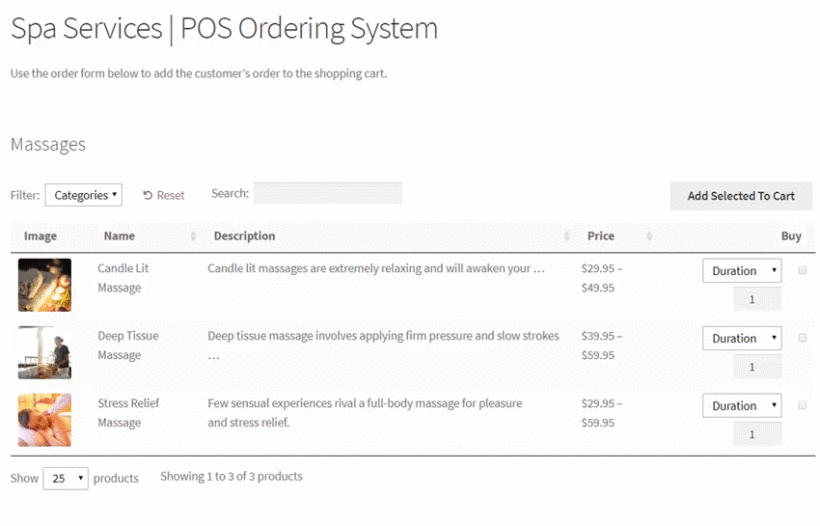
Why you need a WooCommerce POS tool to take orders

WooCommerce point of sale ordering system

Most stores take customer orders using a static computer screen. All of the items in the customer’s order are recorded and forwarded to the relevant departments. Unfortunately, there are a number of problems associated with this approach to taking orders:

  • The software used by these stores is outdated and difficult to use. You need something that’s up-to-date and easy-to-use, like WooCommerce and WordPress.
  • As there is a limited number of counters, either customers or the waiting staff have to stand in queues to pay for their items. This can be a real pain for anyone that has to wait for a long time in order to make a purchase.
  • Desktop computers occupy valuable space at the counter and on desks.
  • If you sell online as well, you'll need to maintain two order systems!
  • Setting up multiple POS systems means you need to maintain inventory and stock data across both systems. This can lead to inaccuracies.

The solution is to set up a WooCommerce point-of-sale system to quickly input the customer’s order, calculate the total amount owed, and collect payment information using an iPad or Android tablet.

Using WooCommerce for your point of sale system gives you a web-based, state-of-the-art solution. It's inexpensive, and it's easy to set up. If you're already using WooCommerce for selling online, then even better – integrating WooCommerce POS with your existing store will offer a huge saving of time, simplicity, and money for store owners.

How your business can benefit from an automated WooCommerce POS ordering system

So, what are the benefits of WooCommerce POS?

If you run a business that requires waiting staff to take customer orders or requires customers to place their own orders at the counter, you’ll be able to speed up the order placing process using a WooCommerce POS integration on your WordPress website. It’s easy to set up and uses the popular WooCommerce plugin with some minor modifications and additional plugins.

The best part is that a POS WooCommerce system is highly customizable. You get the freedom and flexibility to set up POS products the way you want. This way, you can create an intuitive interface that's easy for staff to use.

In addition to this, you can store all sales and inventory data for POS products in your custom WooCommerce point of sale system. This enables you to make informed business decisions in a timely manner such as preventing out-of-stock situations.

Related: Check out our complete guide on how to build a WooCommerce B2B wholesale store!

Which point of sale integrates with WooCommerce?

There are plenty of POS products that integrate with WooCommerce. Some examples include Square Point of Sale and wePOS. Although these are viable options, we recommend building your own WooCommerce POS system.

The main benefit of custom POS products for WooCommerce is that you have full control over its functionality and ease of use. You get to choose which features to include and which ones to leave out. This will depend on the types of products you sell and the technical expertise of your sales staff.

We're going to show you step-by-step how to create an easy-to-use, one-page POS system. This form will enable your waiting staff to easily view, select, and customize the customer’s orders in a way that aligns with your business requirements.


What you’ll need to get started

WooCommerce is the most popular e-commerce platform that you can use to sell just about anything. Whether you’re organizing your online store’s items, creating an online shopping cart, placing orders, or checkout pages, it’s got you covered. It’s a free plugin that can be installed to any WordPress site.

Along with a WordPress website and WooCommerce plugin, you’ll also need the WooCommerce Product Table plugin to turn your normal WooCommerce store into a WooCommerce point of sale product that's highly customizable and functional.

Introducing the WooCommerce Product Table plugin

You need the WooCommerce Product Table plugin to be able to display products in a user-friendly, one-page table layout that’ll also serve as an order form. Your front-of-house staff will be able to use this on any device to take orders.

Your front-of-house staff, waiting staff, or even customers themselves will be able to run a product search, sort, and filter the products they’d like to purchase and place orders. Any point of sale system needs to be fast, and using WooCommerce Product Table ensures there's no waiting around. Your uses will be able to:

  • View and choose product variations or add-on options directly from the order form.
  • Use the quantity selector to purchase more of the same items in one go.
  • Add extra notes about the order. For example, custom monograms or what color crinkle cut paper to include in the gift hamper.
  • Make a note of the customer’s order number which will be directed to the back-end for processing.

How it works

Confirmed orders are automatically sent to your back-end staff via email and are displayed on a computer screen. Additionally, you can pair your WooCommerce POS system with a WooCommerce order printing plugin (we'll recommend one later) that enables you to print out this information as a receipt.

When a customer places an order, they’ll be directed to the purchase page where they can choose the payment method of their choice, including PayPal and credit cards.

Advantages of using WooCommerce Product Table

Using a WooCommerce Product Table plugin enables you to handle variable products. You can quickly find and select the variants that your customers want to purchase using the product table’s search, sort, and filter tools.

And the best part is that all of this works in real time and is responsive across different devices.

How to create a WooCommerce POS point of sale system using WooCommerce Product Table

Once you’ve set up your WordPress site and installed a WooCommerce-ready theme, you can get started creating your own point of sale ordering system. This ordering system will enable your customers to easily add items to their shopping cart, and pay for the cart items using the payment method of their choice at the counter or at the table using an iPad/tablet.

Here, you’ll learn how to create a WooCommerce POS system that consumer-facing stores can use for taking orders. You can follow the steps outlined below from start to finish or jump straight to a specific step:

  1. Add items as WooCommerce products
  2. Install and activate the WooCommerce Product Table plugin
  3. Configure the Product Table settings
  4. Create a one-page WooCommerce POS order form for waiting staff
  5. Simplify the checkout process for staff

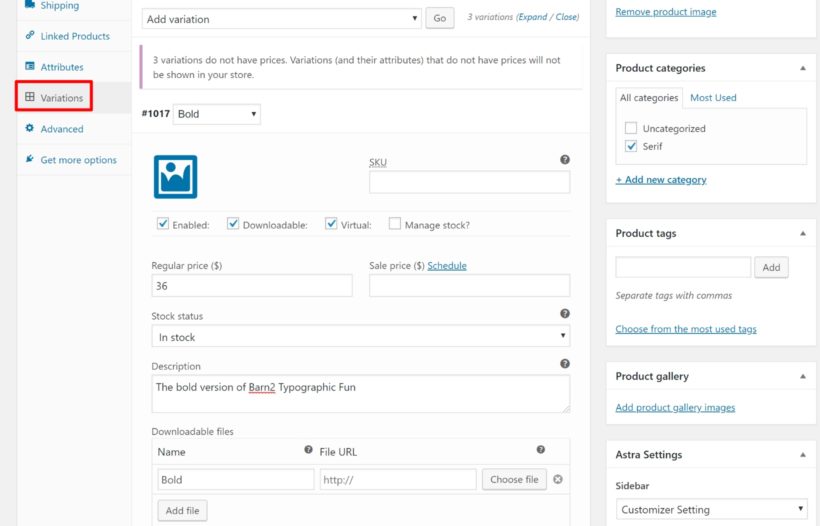
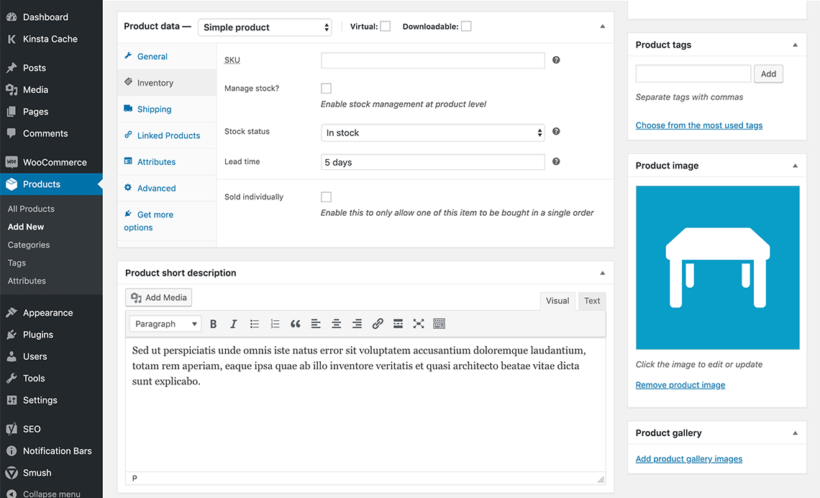
Step #1: Add items as WooCommerce products

If you don't already use WooCommerce, you'll need to start by adding your products.

WooCommerce offers built-in tools to help you handle product inventory and store management. Once you’ve installed the WooCommerce plugin, add your store’s items as WooCommerce products. Here’s what you need to do to add new products (including variable products) to your WooCommerce store:

WooCommerce add new product

Go to Products → Add New from the WordPress dashboard and enter the following product details:

  • Name Here you’ll enter the item name that’ll appear in your WooCommerce POS ordering system.
  • Product description Fill in the detailed description of the item in the main text editor.
  • Product data This is where you’ll enter the price, type, attributes, SKU, and variants of the product.
  • Short description Enter a short description of the item if you want.
  • Categories This helps organize your items into categories and keeps all the products nicely arranged in a systematic way. For example, if you were selling clothes, you could create categories like T-shirts, Hoodies, and Accessories.
  • Tags Similar to categories, tags enable your staff to further organize your items, and enables them to locate particular items. For instance, you can create tags like, For Men, For Women, and Baby items.
  • Product image Here you’ll provide your product’s image to display in your order form.
Variable products in WooCommerce

If any of your products don’t have options or choices, simply select the ‘Simple Product type’ in the ‘Product Data’ section. Use ‘Variable Products’ for adding choices. For example, if you’re selling t-shirts, you could add variations for the different available colors (blue, green, gray) or sizes (small, medium, large).

Click on the Publish button. Repeat the same process until you’ve added all of your products to WooCommerce.

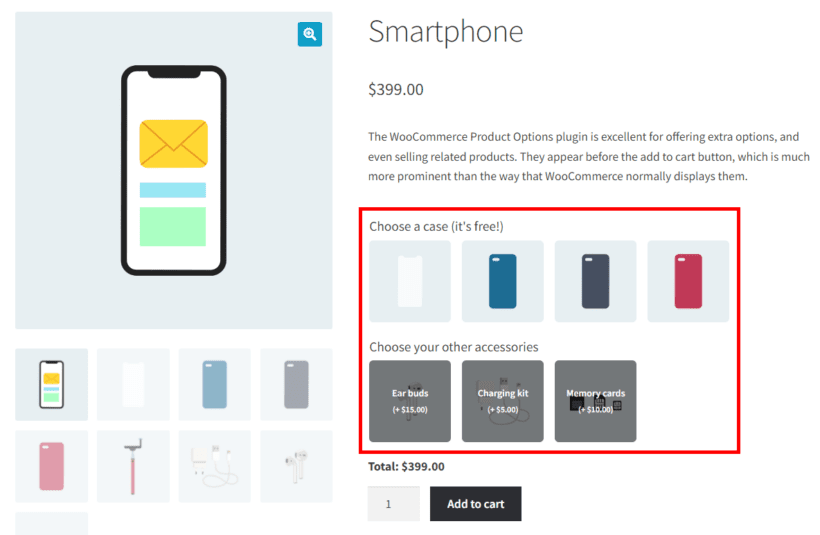
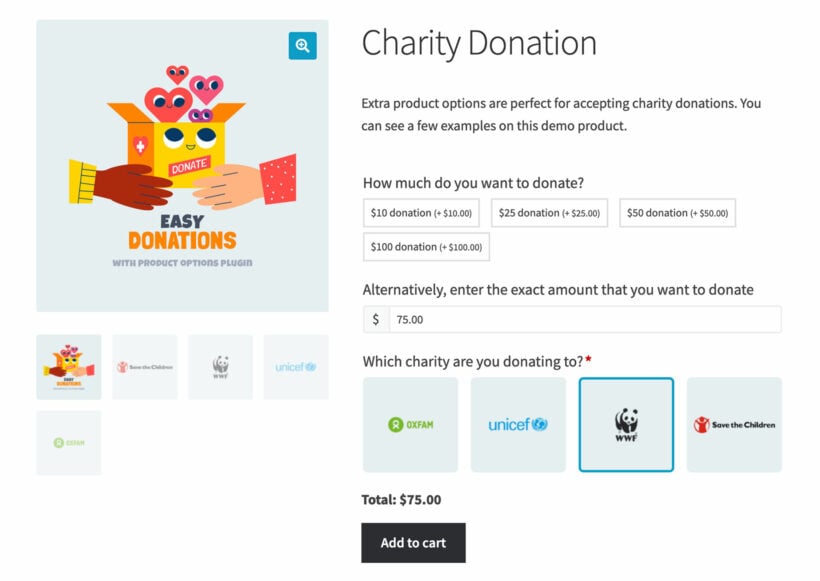
Use Product Add-Ons for accepting customer requests

WooCommerce Product Add-Ons Product Table PluginYou can also add text boxes and other fields to your order forms using the Product Options plugin. This is a great addition to robust POS products that aim to deliver a personalized user experience. They enable you to collect additional information from your customers like special requests or preferences. This information will be automatically directed to your back-end staff along with the order.

An extra product options plugin gives you more flexibility compared to the product variations. That's because it lets you add checkboxes and various other options.

Step #2: Install and activate the WooCommerce Product Table plugin

Now you’re ready to display your products in one-page WooCommerce POS order form:

  1. Get the WooCommerce Product Table plugin and find your license key from the confirmation email.
  2. Go to Plugins → Add New from the WordPress dashboard and upload the plugin’s zipped file to your site. Click the Activate button.
  3. Navigate to WooCommerce → Settings → Products → Product Table. Copy and paste the license key from the confirmation email into the License Key input field.
Activated license key

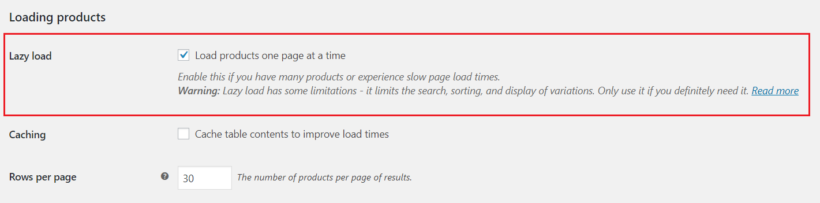
Step #3: Configure the Product Table settings

Once you’ve installed and activated the WooCommerce Product Table plugin on your website, head over to its Settings page to configure various options. From here, you can modify the WooCommerce POS order form to make it look the way you want it to appear on the front-end.

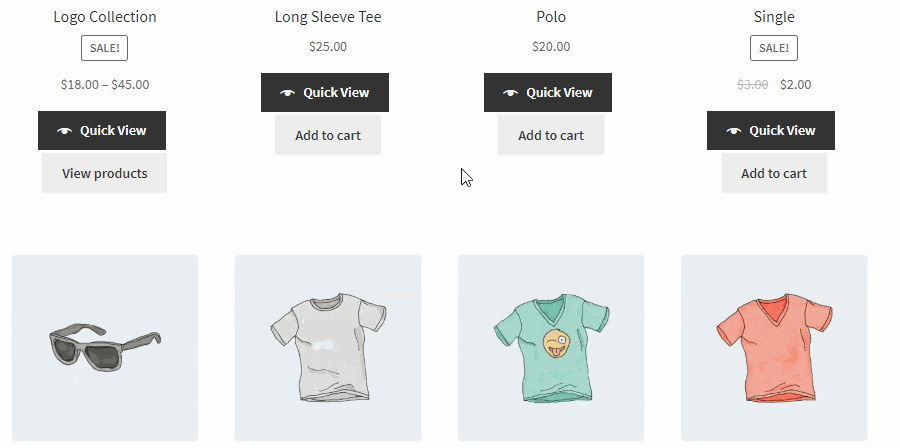
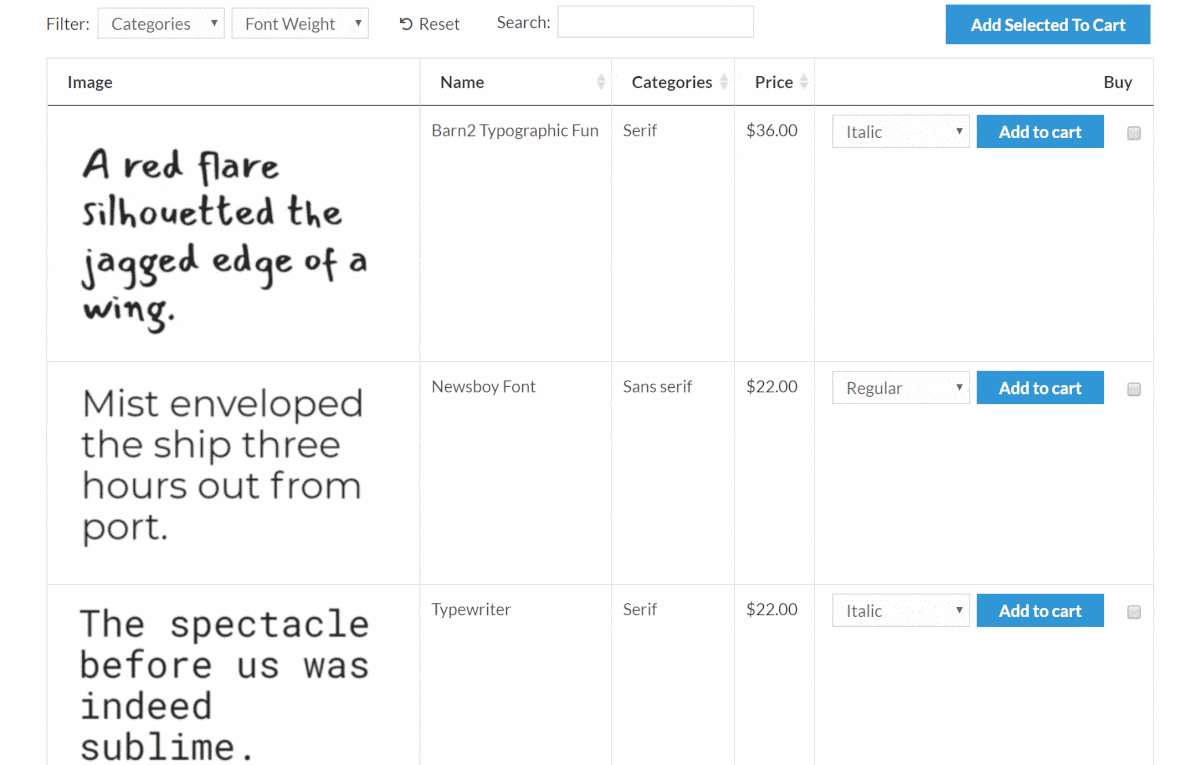
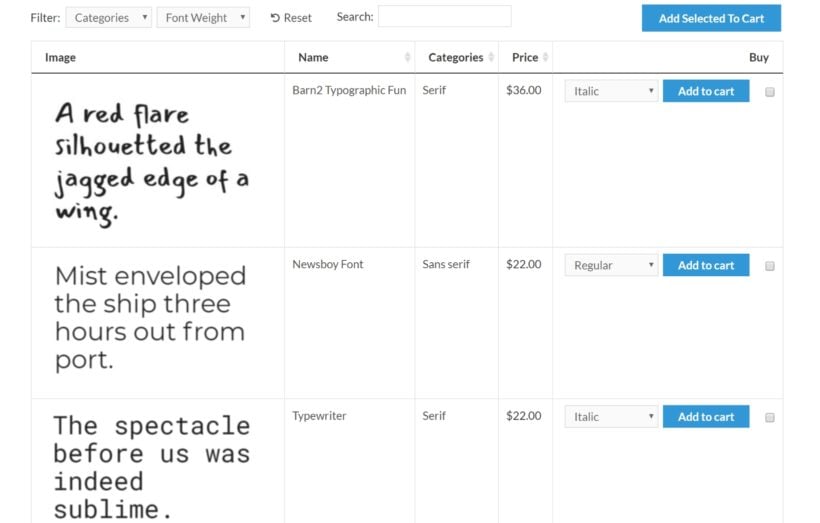
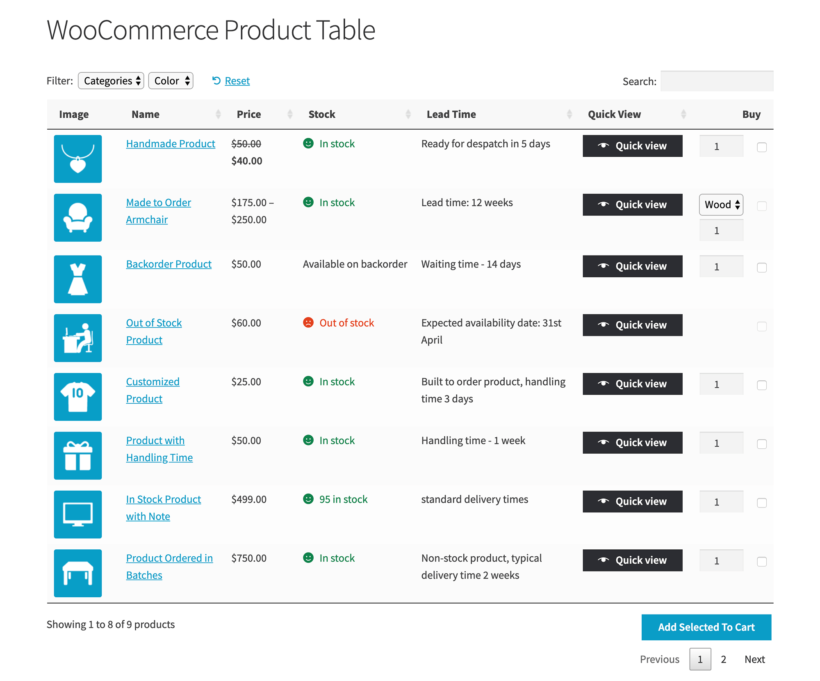
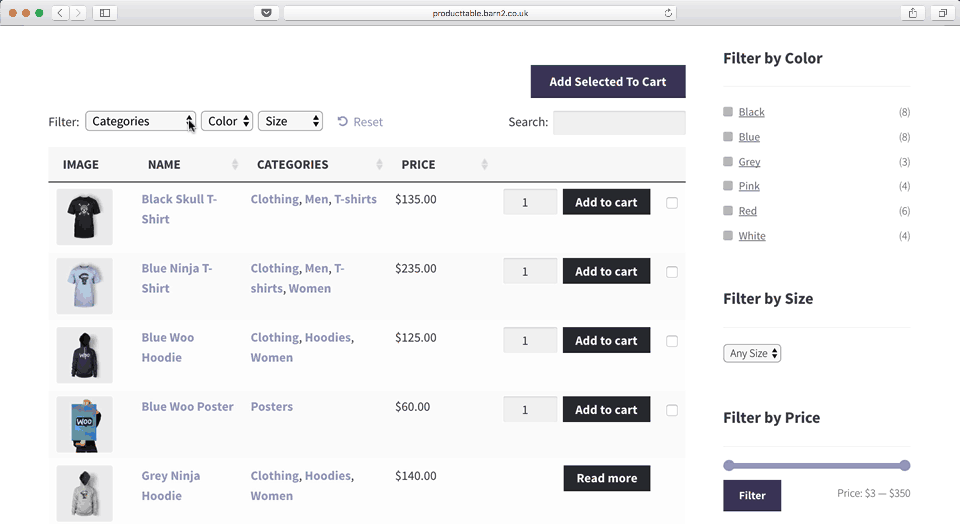
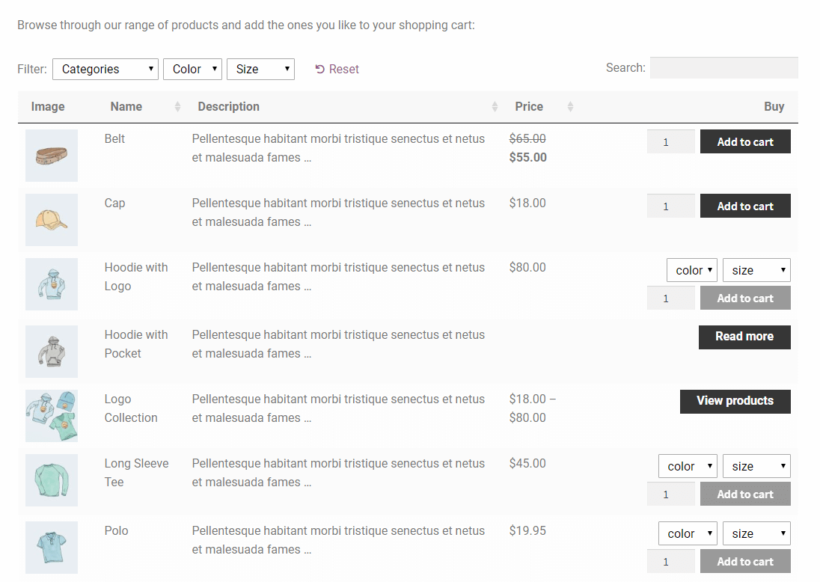
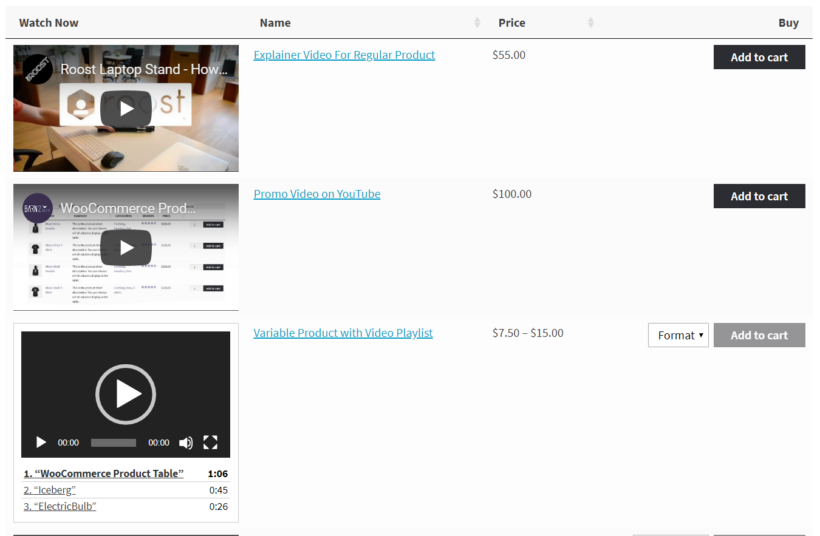
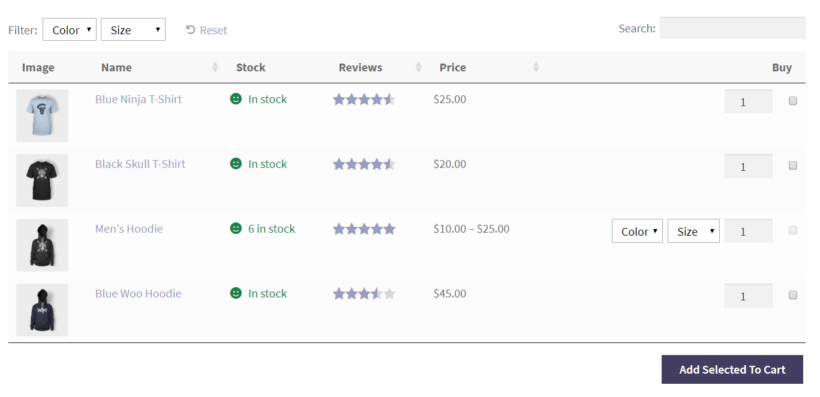
3a. Decide which columns you want to display in the product table

As you’re creating an order form to be used by your staff, choose columns that’ll make it easier for them to find exactly what they’re looking for. For starters, display columns for the product’s name, price, and add to cart button. To do this, you can add name, price, buy in the Columns text field.

Product Table columns field

You can also add an image of the product to make it easier for users to identify the product they’re looking for in the order form. This can be done by entering image, name, price, buy in the Columns text box.

Product Table columns field

Similarly, you can add other columns like product’s SKU in your POS order form. This helps staff members easily reference exact items and help your back-end staff find the correct item. Additionally, you can create a stock column to keep your customers updated about product availability. This will also help you monitor stock levels and restock them before they run out (this alone is a huge benefit for your inventory management, and a great reason to use this system). Here’s how it’s done:

Product Table columns field

Here's a complete list of available columns that you can choose to display in your WooCommerce POS order form.

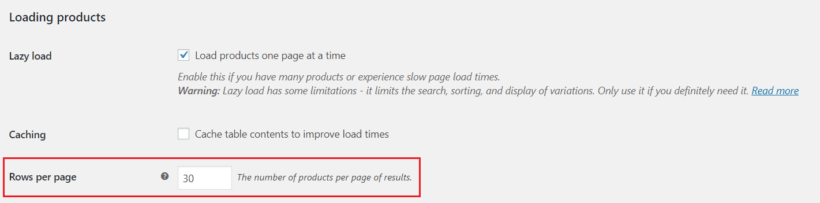
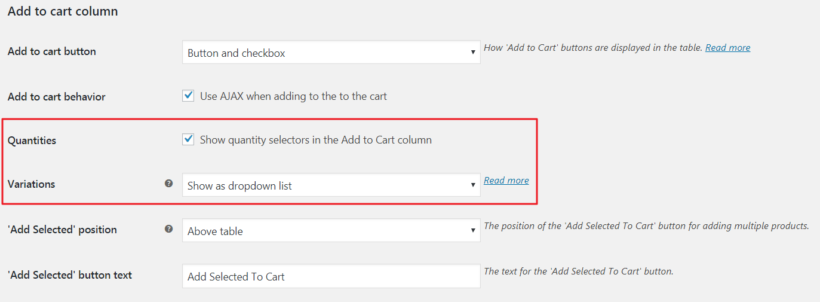
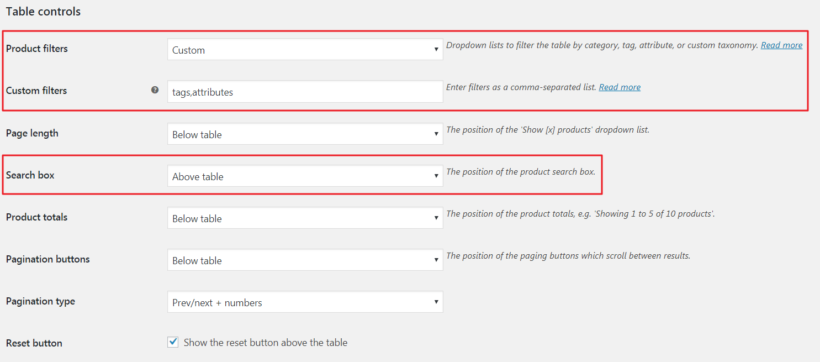
3b. Configure additional settings

There are several options that can be configured from the WooCommerce Product Table’s settings page. Our main goal is to make it easier for users to find products and add them to the shopping cart. For this reason, I’d recommend making the following configurations:

Under the Table content section

Product links option

Enter none in the Product links section. You should do this if your point of sale order system is meant for a business like restaurants or spas, where you don’t need your waiting staff to open up the single product page.

Under the Add to cart column section

WooCommerce Product Table settings

Tick the Quantities checkbox. This enables users to increase the quantity of each product.

If your products have variations, choose Show as dropdown list in the Variations section. This will allow users to view and select different variants of an item.

Under the Table controls section

WooCommerce Product Table settings

Set the Search box option as Above table. This lets customer’s easily search for an item quickly using the product name or SKU.

You can also add relevant filters for information you’ve already added about your products, like categories or tags. This will allow users to quickly find specific types of items. You can do this by setting the Product filters option to Custom and adding categories, tags in the Custom filters option.

Here’s a complete list of filter options you can set for your POS order form. Or even better, you can create even more advanced filtering options by using WooCommerce Product Table alongside the WooCommerce Product Filters plugin.

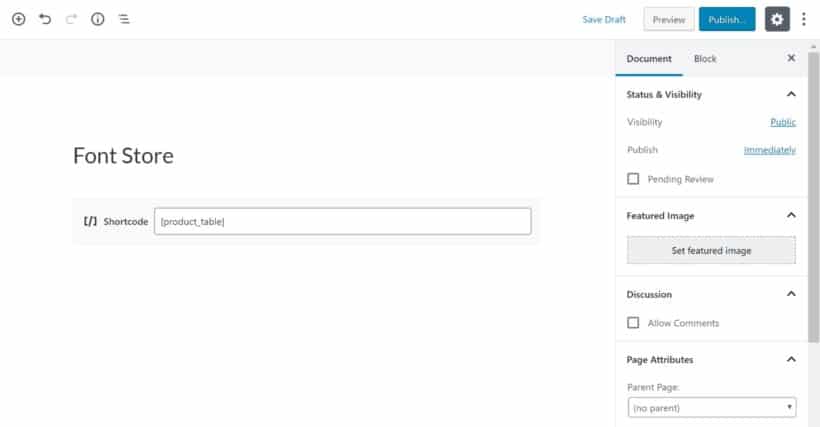
Step #4: Create a one-page WooCommerce POS order form

By now you’ve set up the WooCommerce Product Table plugin on your WooCommerce website and configured its settings. Next, we’ll create a simple, one-page order form for your users to take orders at the counter or table using a tablet/iPad. To do this, we’ll add the WooCommerce Product Table plugin’s shortcode to the ordering system page:

Head over to Pages → Add New from the WordPress dashboard to create a new page for your WooCommerce order form. Your customers and/or waiting staff will use this one-page order form to select items, add them to the shopping cart, and place the order:

Spa Services POS ordering system in WordPress
  1. Give the new page a title. For example, Spa Services | POS Ordering System.
  2. You can also add an introductory description in the text box.
  3. Create relevant sub-headings (Massages, Facials, or Nail Services) for each section of your order menu.
  4. Add the shortcode 
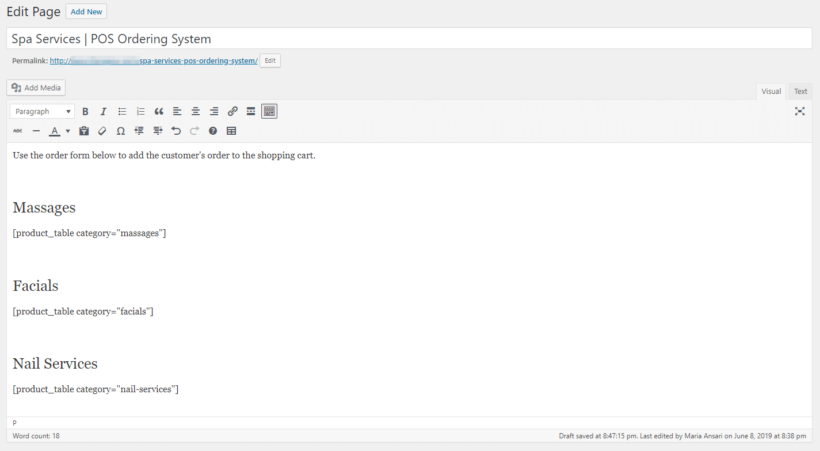
[product_table category="category-slug"] under each sub-heading. This will display all your products from the relevant category. And if you want to display products categorized under Massages, add the shortcode [product_table category="massages"].
  5. Publish the page and hit Preview to see how it looks on the front-end.
Preview of front-end POS ordering system in WooCommerce

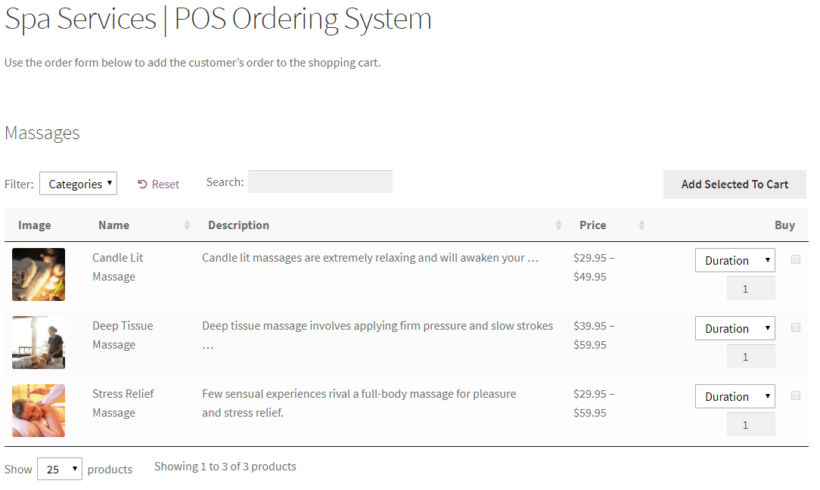
Step #5: Simplify the checkout process

WooCommerce requires your waiting staff to complete the necessary checkout fields, and click the Place Order button to place a customer's order. This is because WooCommerce is designed to take online customer’s orders, which wouldn’t work for other businesses such as spas and restaurants. We need to make sure there’s an option for waiting staff to take orders on behalf of the customer.

We’ll configure the checkout page to accept payments after placing the order. This will allow your waiting staff to place an order without making the payment. Here’s a quick tutorial explaining how it’s done:

Button for managing payment options
  1. Navigate to WooCommerce → Settings → Payments from the WordPress admin panel.
  2. Pick an offline method Check payments or Cash on delivery. This allows your waiting staff to place the order without actually collecting payment from the customer.
  3. You can rename the payment method or add a relevant description by clicking the Manage button. For example, if you’ve selected ‘Check payments’, then you can rename this to something like ‘Payment required at the end of services’.
  4. Click the Save changes button.
Text fields for display options

Here’s what your checkout page should look like:

WooCommerce default checkout page

WooCommerce has the default option set to ask your waiting staff for the Billing details. You can remove the Billing details fields by using the YITH WooCommerce Checkout Manager plugin. This will also make your checkout process faster for your staff. Another way is to create a shared user account for staff members to use and enter the default billing details for your business. This will auto-populate information for each order, so your staff can ignore this page, and just click the ‘Place order’ button to complete the order.

Bonus tips

By now,  you've learned how to create a one-page point of sale system in WooCommerce. Keep reading for a selection of bonus tips on how to fine-tune the POS order process to suit your organization.

Collect extra information from the customer

You can make it easier for your waiting staff to take POS orders at the table or the counter using an iPad/tablet by adding extra fields to your order form. To do this, you’ll have to add an extra field or two, to help them take note of any additional information. These could include:

  • Customer’s name (great for ensure you retain new customers; you could send this to a CRM or similar)
  • Token or voucher number
  • Customer’s table/room/station/parking spot number

The YITH Checkout Manager plugin lets you add, edit, and remove the fields shown on the WooCommerce checkout page. This makes it the ideal tool for adding an extra field to the checkout form.

Accept payment by credit card

You can let your customers make a credit card payment directly into the WooCommerce POS system by adding an online payment gateway such as Stripe. This allows your customers to add their credit card information directly into the checkout page. I

f you want to be able to scan their card, you’ll need to use a separate card reader and process payment outside of the WooCommerce POS order system. Similarly, you can also leverage barcode scanning options with a barcode scanner (use a plugin such as this to generate barcodes).

Protect your WooCommerce POS system and hide it from public view

You may want to add your WooCommerce POS order system to an existing WooCommerce site. This is an extremely efficient setup, as you'll have all your orders and inventory management in one place. But – you don't want the public being able to use your custom system.

In this case, you’ll have to hide your POS ordering system from public view. It should only be accessible to staff members who take customer orders at the table or from behind the counter.

You can do this by password protecting your page containing the POS ordering system. As a result, only staff members with the correct password will have access to it.

However, your products will still appear on the rest of your website, for instance, in the search results. You can use the WooCommerce Private Store plugin to add extra security which will hide everything related to your WooCommerce order system from public view.

Go to the WooCommerce Private Store plugin settings, and choose the same password you used to protect the ordering system. This enables all your staff members to unlock the ordering page and all other parts of WooCommerce using a single password.

Managing orders

Once you've set up the WooCommerce telephone ordering system, you need to plan how to manage the orders. Next, I'll share some tips on how to adapt the WooCommerce order process to make it easier for staff.

Automatically mark orders as complete

Out of the box, WooCommerce requires users to select payment options and enter payment information before they mark orders as complete. However, this might not suit your specific buying process (for example because you’ll be handling your payments outside of the website - e.g. at the end of the massage services).

The YITH Order Status Control plugin offers functionality that will let you automatically mark all your orders as complete. This way customer orders will be sent straight to the back-end staff without any further manual steps.

Forward orders to the right department and print receipt

You can now automatically send new orders to staff involved in the order process.

There are two default ways for back-end staff to view new orders:

  1. WooCommerce will automatically send new orders to the email address given in the settings.
  2. If they’ve access to WordPress admin, they can keep the WooCommerce orders page open and refresh it regularly to view new orders.

Alternatively, there are two easy plugins that improve the order notifications:

Automatically print new orders

Print out new orders automatically by pairing the WooCommerce-based ordering system with a GPRS printer. This will ensure that all customer orders are instantly printed for your back-end staff as soon as they’re placed.

Depending on the store setup, you can either print the receipt to give to the customer, or print the receipt for immediate processing by another team. You do this with the Bizprint plugin.

Send new orders to different email addresses

Use the WooCommerce Multiple Email Recipients plugin to send order notifications to different email addresses, depending on which product or category has been ordered. This is a huge time-saver if different departments are responsible for processing different types of product.

Set up your own WooCommerce POS ordering system

Setting up an efficient (and accurate) POS ordering system for customers and staff is simple and easy.

The WooCommerce and WooCommerce Product Table plugins together enable you to create a searchable, sortable, and customizable point of sale order form for your business. A point of sale for WooCommerce system makes it easy for your staff members to take orders at the counter or table using different devices (including mobile devices) like iPads or Android tablets/phones.

You can upgrade your existing ordering system by pairing it with some of the useful WordPress plugins we mentioned in this post.

What are some of the features you look for in a WooCommerce POS ordering system to make it easier for customers and staff members to place orders using an iPad/tablet? Let us know by commenting below!

One of the best ways to encourage customers to buy more from you is by setting up WooCommerce upsell and cross-sell opportunities. When done right, it can help you subtly nudge customers in the direction of spending more money without affecting their shopping experience.

In this article, we’ll show you how you can set up upselling, product bundles, and cross-selling on your WooCommerce store – the easy way! We’ll share some best practices and examples along the way to help you get a practical understanding of how to get started. We’ll also explain how you can upsell and cross-sell to customers using the 6 best WooCommerce upsell plugins.

Let's start by going over the key business benefits of upselling, product bundles, and cross-selling.

What are the benefits of upselling, product bundles, and cross-selling?

As an online store owner, you ideally want customers to buy more than one product from you at a time. This helps you increase your average order value, improve customer lifetime value, and boost sales.

Let's take a look at the differences between upselling, cross-selling, and creating product bundles, and the benefits of each strategy.

Upselling

For those unfamiliar, upselling is when you recommend a higher-priced alternative to the customer’s current consideration. The goal is to help them see value in the alternative offering and encourage them to spend more money.

For example, if you sell women’s blouses and a customer is interested in purchasing a white chiffon blouse, you might show them similar blouses by different brands and designers that are available for a slightly higher price.

Or, if you sell books and a customer is interested in the paperback version of A Dance with Dragons, you might encourage them to purchase the hardcover version instead. This is exactly how Amazon does it. It sells the hardcover version at a higher price point than the paperback version.

Amazon upselling example

The great thing about setting up a WooCommerce upsell strategy is that it doesn’t just increase average order value; it also increases the customer’s lifetime value. What this means is that customers spend more at your store while they remain customers.

Cross-selling

Cross-selling occurs when you recommend related (or complementary) products based on the products customers have added to their shopping cart. Similar to upselling, the goal is to get customers to buy more from you, thus increasing your average order value.

Forever21 cross-selling example

Following our example, if a customer added the chiffon blouse to their shopping cart, you might show them other related products. For example, you could set up a Frequently bought together section or a Complete the look section that recommends pants, skirts, or jeans to go with the chiffon blouse.

Product bundles

Depending on the products you sell, it might make sense for you to create and promote product bundles. From the customer’s perspective, product bundles are high-value products that give them the most bang for their buck.

Following our example from before, if a customer expresses an interest in purchasing A Dance with Dragons hardcover book from you, you might encourage them to purchase the entire A Song of Ice and Fire series as a product bundle as they are frequently bought together.

Product bundling can be either upselling or cross-selling depending on the types of products you sell and what would deliver the most value to your customers. For example, purchasing the entire A Song of Ice and Fire series would be a product bundling and upselling strategy. But if you were to create a product bundle of The Winds of Winter hardcover book and Game of Thrones: Seasons 1 to 8 Blu-ray then that would be product bundling and cross-selling since it's a related product.

The top WooCommerce upsell plugins to encourage customers to buy more

Store owners often take a pushy, aggressive approach which drives prospective customers away. The key to effective upselling and cross-selling is to do it subtly. Here, we’ll share some WordPress plugins that you can use to set up WooCommerce upsell and cross-sell strategies the right way.

WooCommerce Product Options

Display recommended product upsells above the add to cart button where customers can't miss them!

When you add cross-sell products using WooCommerce as it comes, it hides them at the bottom of the page. That won't inspire customers to buy more because they're so easy to miss. Why would a customer ever scroll down to find them hidden away down there?

The solution is to display cross-sells ABOVE the add to cart button.

woocommerce product recommendations smartphone example
Create a bundle with the WooCommerce Product Options plugin

While this sounds like a trivial change, it's actually really important because this is the part of the page where the customer is actively making choices about the product they're planning to buy. They're expecting to make choices like choosing a quantity and maybe some product variations. So this is the perfect time for them to make an additional choice - which related products to add to their cart!

You can do this by installing the WooCommerce Product Options plugin. This has a nifty feature which lets you select other products which appear as additional options on the product page.

For example, in this example, a smartphone product is upselling other products - phone cases and accessories - above the add to cart button. This forces every customer to make a decision on whether to purchase these extra products, instead of just the item they were considering in the first place. As a result, your upselling strategy suddenly becomes much more effective and customers add multiple products to their cart at once.

This WooCommerce upsell plugin gives you plenty of choice as to which products to upsell for each item in your store. You can either manually select individual products and give them a heading like "Frequently bought together". Or alternatively, you can select an entire category and let the plugin choose which products to upsell for you. For example, if you're selling a smartphone then you might select the 'Smartphone Cases' category and let the plugin choose which cases to display based on the criteria you select.

WooCommerce Fast Cart

Display product cross-sells in a popup mini cart.

4 related products in cart

The WooCommerce Fast Cart Plugin offers a new and improved way to display the standard WooCommerce upsells and cross-sells. It replaces the standard multi-page cart and checkout process with a quick on-page popup cart.

When customers add a product to their cart, the fast cart options - or if you prefer, they can click on a floating cart icon to launch it. Either way, they immediately see the products in their cart with eye-catching cross-sells and upsells underneath. These appear in an interactive 'You may also be interested in...' section. Customers can click on these to immediately add them to the cart, significantly increasing your average order value.

Displaying WooCommerce cross-sells and upsells like this is much better than the usual method. That's because the process is so much faster and simpler for the customer. Their eyes are immediately drawn to the related products, making them more likely to add them to their cart.

You’re essentially replacing a cart and checkout page with a robust WooCommerce upsell popup or side cart from where the customer can edit their orders. Customers can also apply coupon codes, see related products and checkout directly. Fast Cart offers a lot of features while being simple to use, and integrates with popular payment gateways like PayPal and Stripe.

WooCommerce Product Tabs with Product Table

Combine these plugins to add a 'Related products' tab to the product page.

This section actually features two plugins instead of just one! That's because the two plugins work together to provide another affective way of upselling on the product page.

It works like this:

  1. You use the WooCommerce Product Tabs plugin to add a 'Related Products' tab to the product page.
  2. In addition, you use the WooCommerce Product Table plugin to insert an order form listing the relevant upsells within the new tab.

WooCommerce Product Tabs related products

What is WooCommerce Product Table?

WooCommerce Product Table is an order form plugin that can help you set up subtle WooCommerce upsell and cross-sell opportunities. It’s incredibly flexible which means you can implement it however you’d like!

One of the main reasons why it’s great for encouraging customers to buy more products is that it lists more products per page than you’d get with the default WooCommerce shop page layout. In other words, it helps you subtly upsell (or cross-sell) products by increasing product visibility.

Another huge benefit of using the WooCommerce Product Table plugin to upsell and cross-sell to your customers is that it lets them add all the products they’d like to purchase from a single page. Customers won’t have to visit individual product pages in order to add products to their shopping cart.

With WooCommerce Product Table, customers can see which other products are available which is what cross-selling is all about. This way, they’ll be more likely to buy more from you than if they were to add products to cart from the single product page.

We recommend using the plugin’s add to cart checkboxes to make it even easier for customers to buy from you. All they have to do is tick the checkbox next to the products they’d like to purchase and add them to cart in one go. This upsell plugin also comes with search, sort, and filter options which makes it easy to quickly find what you’re looking for. Finally, you can also use it to sell product variations either by listing each variation on a separate row or by using a dropdown menu.

WooCommerce Quick View Pro

Display related upsells in a quick view product lightbox.

The WooCommerce Quick View Pro plugin offers a way to purchase from the shop or category pages. This way, customers don’t have to click through to single product pages to add products to their cart.

3_WooCommerce_Quick_View_Pro_Lightbox

The WooCommerce Quick View Pro plugin lets you showcase products in a lightbox view. There are two ways that it helps you to sell more WooCommerce cross-sells:

  • On the single product page - Each related product on the product page has a Quick View button. Customers can click this to learn more about the recommended products and add these to their cart.
  • In the quick view lightbox - If a product has cross-sells attached, then these will appear in the lightbox too. Customers can click the Quick view button to add products to the cart directly from the quick view lightbox.

Use Quick View with Fast Cart 🚀

That's pretty good, but it gets even better when you use WooCommerce Quick View Pro as well as WooCommerce Fast Cart, which we looked at a minute ago. WooCommerce Fast Cart displays cross-sell products in the on-page popup cart, and Quick View displays a Quick View button for each one. That way, customers can view details of the cross-sell products, select variations and add them without closing the popup cart. Neat!

After adding products to cart, the lightbox closes and the customer can continue from where they left off (i.e. they’ll still be on the same page). They can browse other products and will be more likely to add more products to their shopping cart.

The WooCommerce Quick View Pro integrates seamlessly with WooCommerce add-ons like the Product Bundles extension which is great for implementing a product bundling and upselling (or cross-selling) strategy. Of course, is also works with WooCommerce's default product cross-sells.

YITH WooCommerce Frequently Bought Together

Display a 'Frequently bought together' popup after adding to the cart.

YITH have a cross-selling plugin called Frequently Bought Together. It's perfect to sell customers products that are related to their purchase. Let’s say a customer adds a paintbox to their cart. You can show them brushes, palettes and easels - products that other customers frequently bought together with the paintbox.

YITH frequently bought together plugin

Increase your sales with the best WooCommerce upsell plugins today

It’s easier to get existing customers to spend more money at your online store than attract new buyers. Implementing WooCommerce upsell and cross-sell techniques is a great way to subtly nudge customers towards adding more products to cart.

In this article, we have shared some upsell and cross-sell plugins. Each one help you implement one-click upsell and cross-sell opportunities on your online store:

Think about which combination of these plugins is the best way to encourage customers to buy more in your store. Get the plugins today, and watch your average order value grow 📈 🚀

Have you used WooCommerce upsell and cross-sell methods to increase your average order value? We'd love to hear from you so let us know in the comments section below!

WooCommerce dispatch time plugin

Since building WooCommerce Lead Time - the first ever WordPress plugin to show product dispatch times on the product page - we've been researching how different eCommerce stores display this information. We're sharing this with you so that you can show product dispatch times on your own WooCommerce site.

Keep reading for a sneak peek at how some high profile sites are displaying dispatch times. This can be a fantastic way to get inspiration for your own site!

1. Etsy handmade and personalised products

Etsy's expected dispatch time for products

Etsy brings together independent sellers and craftspeople from all over the world. The items are typically handmade or made to order, so Etsy displays a dispatch time on the product page. This provides clear information on how long the customer can expect to wait for their order.

Etsy show the estimated dispatch time alongside the other product information, close to the add to basket button. They use the wording 'Ready for dispatch in...', which is generic enough to work for the wide range of products on Etsy.

If you sell a wide range of e-commerce products on your WordPress site, then this wording could work for you too.

2. Made.com non-stock furniture

Ecommerce product lead time on Made.com

Furniture store Made.com sells furniture with varying lead times. They display the dispatch time immediately above the add to basket button on the product page. This makes it clear how long the customer should expect to wait, so they can make an informed decision on whether to place an order.

3. Personalized products on Amazon

Amazon personalized product with dispatch time

Amazon sells just about everything under the sun, including personalized products with longer lead times. Marketplace sellers can choose to display lead times on their products.

The extra information appears with the stock status, making it clear that there is a processing time on top of the delivery time. Wording such as "Usually takes between 1 and 2 days to create" reassures the customer that the product is genuinely personalized to order, while letting them know the expected dispatch time.

Add dispatch times to your own WooCommerce products!

I hope these examples provide some new ideas on displaying WooCommerce dispatch times for your own products! To add the same information to your own site, get the WooCommerce Lead Time plugin today.

As an online store owner, there are many reasons why you might want to add charitable donations to your e-commerce checkout page. It helps you support a worthy cause and motivates customers to donate a fraction of their cart value. One way to do this is by using a WooCommerce donation plugin.

In this article, we’ll show you:

  • How you can add charitable donations to your online store using a WooCommerce donation plugin.
  • An easy way to list a range of donation products or options for customers to choose from.
  • How you can add donations to your checkout page using WooCommerce extensions.
  • How to let people choose between a selection of donation products before directing them to the checkout.

Let’s put everything into context before we begin.

Why you might want to offer charitable donation options to your customers

Did you know that it’s easier to find donations in retail verticals as compared to other spaces? This is mostly due to the fact that, at checkout, customers have their card or cash out and are ready to pay for their order. According to a recent survey, 71 percent of consumers said that they had made donations to charities at the register.

Another reason for adding donations to your checkout is that people prefer to do business with companies that give back to society and feel positive about them. According to a study, 65 percent of customers remembered the last retail business that asked them for donations, whereas 60 percent said that the experience made them feel positive about the retailer.

It’s easy to see that customers favor businesses that collect donations for a worthy cause and associate more trust with those brands. This is precisely why charity websites, as well as e-commerce stores wanting to make a difference, should encourage customers to make a donation at checkout.

This is incredibly easy to do with a WooCommerce donation plugin. Another reason for using a WooCommerce donation plugin to accept donations at checkout is that it can serve other purposes too. For example, it can also be used to enable a restaurant’s ordering system to take tips online or by service-based businesses that need a way to implement Buy me a cup of coffee!.

3 ways to offer charitable donation options

WooCommerce charity donation plugin

There are 3 main ways to offer charitable donation options through your website:

  1. Percentage of your order valueThis is calculated by taking a percentage of the customer’s order value. For example, 2% or 5% of their total purchase. This is a great option for store owners that want to donate a portion of their sales to charity.
  2. Fixed sum This involves asking customers to donate a fixed amount (for example $5 or $2.99) or in multiples of a base amount (for example $5, $10, $15, etc…) regardless of their order value.
  3. Offer a choice of donation productsAlternatively, you can list a range of donation options in a table before the customer visits the checkout page.

Of course, if you're a charity website, you might consider taking things a step further and accepting recurring donations. Now that we’ve discussed the importance of offering charitable donation options to your customers, let's talk about how you can let customers choose which charity they’d like to support.

How to select a charity to collect donations for

As an online store owner, you might want to gather donations for multiple charities or non-profit organizations. This way, you can give your customers the option to select which charity they’d like to donate to. Letting customers donate to a charity of their choice can help you gather more donations and make customers more likely to leave a donation at checkout.

To do this, you’ll need to set up drop-down options on the checkout page that let customers pick a charity of their choice. You’ll also have to keep track of how many donations were collected for each charity. For example, Charity A got $250 at the end of the month, Charity B got $150, and Charity C got $125. This will be done in the back-end though some WooCommerce donation plugins let you display progress bars on your site’s front-end, as well.

Best way to encourage customers to donate

While there are many ways you can ask for donations from paying customers, we recommend that you follow tried-and-tested methods when speaking to prospective donors. This is because customers who leave a donation will only be able to interact with your website unlike a real-life scenario where you can talk to them face-to-face.

Here are some of the best practices for encouraging customers to donate to charities:

  • Share the impact of donations You need to let people know how their donations will make a difference. For instance, sponsoring children’s education, building a community center, or feeding the homeless. In simple words, let them know where their money will go.
  • Use social proof Social proofing is all about everyone does it, you should too!. When people see other customers making donations to a worthy cause, they’re motivated to do the same.
  • Give customers control over donation amount You should let your customers choose how much they’d like to donate. Some customers might want to donate $5 while others might want to donate $1.99 – every little bit helps!

Now that we have a better understanding of why you might want to accept donations from customers at checkout, let’s take a closer look at how you’d go about doing this in WordPress.

How to add charitable donations to your checkout page

It’s easy for customers to make donations when they’ve reached the checkout page since they already have their card (or alternative payment option) ready to go. It’s often easy for them to make a relatively small donation compared to their cart value. For example, if they purchase products that add up to $22.99, they might leave a donation of $2 without hesitation.

Another benefit of adding a donation option to your checkout page is that you don't need to create a new donation button. Instead, customers can pay for their order and donate to a charity in one go.

It’s worth mentioning, however, that you should make charitable donations an opt-in option. In other words, customers who want to donate should be able to do so by ticking a checkbox or entering the donation amount. And the rest of them can proceed to complete checkout without having to opt-out manually. They shouldn’t have to untick a checkbox as that would negatively affect their shopping experience.

GiveWP: The best WordPress donations plugin

GiveWP is a free WooCommerce donation plugin that makes it easy for WordPress site owners to accept donations regardless of whether they’re using WooCommerce or not.

GiveWP WooCommerce donation plugin

This WooCommerce donation plugin is designed to help WordPress users easily create donation forms. You can quickly add fundraising campaigns to your e-commerce site as stand-alone web pages, display donation forms in your theme’s sidebar as widgets, or embed them using a shortcode.

GiveWP offers several options to customize the donation form templates along with extensive documentation to help you personalize the look and feel of your website. You can use GiveWP forms as widgets or add them to the checkout page. The plugin also lets you accept recurring donations from customers.

How to use GiveWP with WooCommerce

You can use the Donation Upsells for WooCommerce add-on to use the GiveWP plugin with your WooCommerce-based online store. This way, you can add donation options to your WooCommerce checkout (or cart) based on your GiveWP forms and form options.

One of the key benefits of using this add-on is that all payments made during the checkout process will be processed with the WooCommerce payment gateway you’ve enabled. In addition to this, the donation details you gather through your donation form will be saved in your GiveWP donation records in the back-end for reporting and donor management purposes.

The plugin delivers a seamless donation experience to your customers. When they click to view their shopping cart, they'll see a donation option directly under the products they've added to cart. This way, they can select which charity they'd like to donate to and select a donation amount. This will depend on how you've configured the plugin.

Here's an example of a website using the Donation Upsells for WooCommerce add-on to accept charitable donations at checkout:

Endless Hair Extensions example

Notice how customers can choose which charity they'd like to donate to and enter their donation amount. Customers can also choose to donate to multiple charities in one go.

Donate to multiple charities

How to use GiveWP without WooCommerce

You can use the GiveWP plugin to accept donations even if your website doesn’t use WooCommerce. This is especially useful for online store owners that:

  • Use other e-commerce plugins (like Easy Digital Downloads) for selling products, or
  • Website owners that don’t use a WooCommerce plugin at all but would like to be able to accept charitable donations.

GiveWP offers several payment gateways right out of the box. These include PayPal Standard and Stripe in addition to offline donation options.

Let customers make a donation on the product page

WooCommerce charity donation choose amount

The WooCommerce Product Options extension lets you set up donations in a way that lets customers decide how much they’d like to donate. In other words, instead of setting a fixed donation amount, you can let customers donate as much as they’d like.

It also gives you the option to configure donation amounts in multiples of $10, $20, and $50. This is in addition to a name your price option which simply allows customers to enter their own donation amount. 

This perhaps the easiest way to accept donations at the checkout page. It gives you the option to:

  • Suggest a price.
  • Enforce a minimum acceptable donation amount.
  • Let customers decide how much they'd like to donate.

How to sell a choice of donation products before the checkout

WooCommerce charity donation plugin

So far, we've talked about how to let customers to make a donation at the checkout. But what if you want to give customers a choice of donation options?

For example, maybe you offer a choice of charities or projects to donate to. Maybe you sell charity gifts, such as 'Send a Cow' or 'Pay to immunise a child'. If so, then it's best to create a quick order form listing all the donation options before taking customers to the checkout page.

You can easily do this with the WooCommerce Product Table plugin. This handy plugin takes your donation products and lists them in an interactive table with search box and filters. Customers can quickly find and select the projects or charities they want to donate to, and then add them to the cart. They can then check out as usual and pay for the donation products along with any other products in their cart.

How to set it up

It's easy to list donation products with WooCommerce Product Table:

  1. Install the plugin on your WordPress site. (Make sure you install the free WooCommerce plugin too.)
  2. Go to Products → Add New and add all your donation products. Use 'Simple Products' for donations that don't come with any options; or 'Variable Products' if you're offering a choice. For example, if you're selling a 'Choose Your Donation' product then use variations to list the available donation amounts.
  3. Go to the WooCommerce Product Table settings page (WooCommerce → Settings → Products → Product Tables). Enter the license key from your order confirmation email, and choose your options. To sell charity donation products, we recommend the following options:
    • Choose columns that will give people the information they need to know. For example, an image illustrating what the donation will be used for, the name, the price, and add to cart column.
    • Choose the add to cart 'checkbox' style. This lets people quickly select multiple donation options and add them to the cart together. This encourages them to donate more.
    • If you've created any variable donation products, then select the 'Dropdown' variation option.
    • If you have a long list of donations, use filters to help people to find projects they care about more easily.
  4. Create a new page and add the shortcode [product_table]. This will list all your products in a table. If you've created a specific category for your charity donation products then use the category option to list those products only.

Where to get the plugins

Customers are more willing to buy from companies who support charities. The easier you make it for them to leave a donation, the more likely they’ll be to do so!

We explained how you can collect donations for charities at the checkout using a WooCommerce donation plugin like:

Are you thinking of using a donations plugin? Will you let customers enter their own donation amount or set a fixed donation amount? Let us know by commenting below.

If you're a graphic designer, learning how to sell fonts online is a great way to generate some passive income from your skills.

There are plenty of font designer marketplaces that will happily sell your fonts for you like MyFonts, Fonts.com, etc...but those resellers will typically take half your sales as a commission and might require that you exclusively sell through them.

WordPress and WooCommerce provide a better way to sell fonts online that cuts out the commission and gives you full control. With the right WooCommerce plugins, you can create a store that's optimized specifically for fonts. You'll get a convenient table layout, complete with font previews and Ajax category filters to help your shoppers find the right font:

Example of table to sell fonts online

In this tutorial, we'll show you how to use WooCommerce Product Table and WooCommerce Quick View Pro to sell print or web fonts online with WooCommerce.

Why WooCommerce Product Table is the best way to sell fonts online

WooCommerce is the world's most popular way to create an eCommerce store and is fully capable of selling both physical and digital products. It makes a great option for a solo font designer, font shop, or type foundry.

However, the default styling of most WooCommerce themes displays products in a more "traditional" eCommerce layout that looks something like this:

Traditional WooCommerce example

Now, that might work great if you're selling physical products. But if you're selling your own fonts, that kind of shop layout...

  • Doesn't display the important information about a font, like how it looks, its different font weights, etc.
  • Wastes space and makes it hard for shoppers to browse all your available fonts.

WooCommerce Product Table is a flexible plugin that fixes those issues by letting you display your fonts in a table layout like you saw above:

Example of table to sell fonts online

This gives you a compact way to help people shop your fonts. Visitors can:

  • See a graphic preview of the font to see kerning, glyphs, ligatures, calligraphy, etc.
  • Choose different weights for each font family from a drop-down.
  • Use checkboxes to add multiple fonts to their carts.
  • Use filters to find specific types of fonts. For example, serif font vs sans serif font, or OpenType fonts.
  • View license options.
  • Plus whatever else fits your business - the plugin gives you full control over what information you display.

Integrate your table layout with product quick view

If you want to display more information about each typeface than the table layout allows, you can add a product quick view button to the table that lets shoppers browse more information in a lightbox.

For example, you could use this product quick view to show:

  • A description of the typeface and its inspiration.
  • More detailed licensing information.
  • More images of your typography in action (or different font weights in action).
  • Font bundles or upsells.
Font product quick view

How to sell fonts online with WooCommerce: Step-by-step

Below, we'll take you step-by-step through how to sell fonts online with WooCommerce and WooCommerce Product Table.

To begin, we'll assume that you already have a fresh WordPress/WooCommerce install. If not, you'll first want to install WooCommerce and complete the setup wizard.

1. Add new fonts as WooCommerce products

To manage your fonts, you'll use the regular WooCommerce product system. The simplest approach is to create one unique WooCommerce product for each new font family that you want to offer. You can then add different font weights or licensing options as product variations within that product.

To do that, go to Products → Add New.

First, enter basic details like the font family name and description. You can also use product categories and tags to add other pertinent information, like whether the font family is serif or sans serif.

You can also add an image to preview how the font looks - the way that Google Fonts handles things is a good starting point:

Add font as WooCommerce product

Next up:

  • Scroll down to the Product data box
  • Choose Variable product from the drop-down (unless you're only selling a single font weight - then you can use simple product)
Choose product type

From there:

  • Go to the Attributes tab and select your attributes (you can set these up by going to Products → Attributes). 
  • Select the Used for variations box.
  • Click Save Attributes.
Add attributes

To finish things out:

  • Go to the Variations tab.
  • Select Create variations from all attributes from the drop-down and click Go.
  • Check the Downloadable and Virtual boxes for each variation.
  • Enter the price. If you want to offer free fonts or other freebies, you can mark it as zero.
  • Upload the font file in whatever format you want to offer.
Configure product variations

Once you've configured all of your variations, publish your product. Then, repeat the same process for all the different font families that you want to offer.

2. Configure WooCommerce Product Table

Once you've added all your font families as WooCommerce products, you're ready to create the front-end interface that you'll use to sell fonts online.

Make sure you've installed and activated the WooCommerce Product Table plugin. Then, go to WooCommerce → Settings → Products → Product tables to configure the plugin.

You can explore all of the plugin's settings, but here are the specific settings you'll definitely want to configure.

First, use the Columns box to configure what information you want to display for each font. A good starting point is:

image,name,category,price,buy

But you can include other information, like custom fields or taxonomies. View all the column options.

Configure columns to sell fonts online

Then, scroll down to the Add to cart column settings and:

  • Choose Button and checkbox from the Add to cart button drop-down. This will allow shoppers to select multiple fonts to add to their cart.
  • Choose how to handle Variations. You can either display each font weight as a separate row in your table. Or, you can display a drop-down next to each font family that lists all of the weights.
Configure add to cart buttons

Displaying variations as separate rows makes it easier for shoppers to purchase multiple font weights, while using the drop-down lets you display more font families in less space.

Finally, go to the Table controls section and configure your Product filters. You can use these to let shoppers filter by font category/tag (e.g. serif vs sans serif) and/or attribute (e.g. font weight):

Configure online font store filters

3. Create your front-end font shop page

Once you've configured WooCommerce Product Table, you can display your front-end font store page by adding the [product_table] shortcode to a regular WordPress page:

Add shortcode to create front-end form to sell fonts online

And once you publish the page, you should see the table that will help you sell fonts online:

Sell fonts online example

You can use various parameters to filter out specific fonts. For example, you could create one table to display fonts from a specific category. Or, you could create a dedicated table to promote your best font, or trendy or popular fonts.

4. Add product quick view button (optional)

If you want to display more information about each font, you can add a product quick view column to your table using the WooCommerce Quick View Pro plugin.

Once you've installed and activated the plugin, you can then go to WooCommerce → Settings → Products → Quick view to configure how the quick view box works:

Configure WooCommerce Quick View Pro

Then, you can add a quick-view column to WooCommerce Product Table to achieve this effect:

Font product quick view

Tips for selling fonts more effectively

Once you've set up your basic online font store, you'll want to consider implementing some more advanced sales tactics to boost your revenue and sell fonts online more effectively.

Sell font bundles

People who purchase fonts online love bundles - there are even entire sites dedicated just to selling font bundles. For example, you could bundle different font weights together or fonts that pair well together.

The WooCommerce Product Bundles plugin lets you bundle together as many fonts as you want. You can then display your bundle options in the product quick view box in your fonts table. The bundles will not display in the table itself - but they will appear in the quick view box if you use WooCommerce Quick View Pro.

Create upsells

Another good option is font upsells, which let you recommend a similar font/bundle in place of the font a shopper is looking at.

You can create font upsells using the built-in Linked Products feature in WooCommerce and display them in your product quick view box.

Launch your WooCommerce font store today

By creating your own WooCommerce store to sell fonts online, you eliminate the middleman and ensure you don't have to give up 50% of your sales as a commission to a third-party font marketplace.

However, if you want to use WooCommerce to sell fonts online, you'll also want to use some extensions to create a more optimized font shopping experience.

WooCommerce Product Table lets you create an optimized, table-based shop layout page to display your fonts. You'll be able to share previews, list pertinent details like font weight and type, and allow shoppers to purchase multiple fonts at the same time.

If you want to display more information about each font, the WooCommerce Product Table plugin integrates with the WooCommerce Quick View Pro plugin to help you add a product quick view button that opens a box with more detailed previews, descriptions, and license terms.

Get started today and create your own WooCommerce store to sell fonts online!

Do you have any questions about how to sell fonts online with WooCommerce and WooCommerce Product Table? Ask away in the comments!

WooCommerce product lead times WordPress plugin

If you're displaying WooCommerce product lead times in your store, it's important to adapt it to your specific needs.

While the WooCommerce Lead Time WordPress plugin has 'lead time' in its title, that doesn't mean that you have to use these exact words on your site!

The purpose of the plugin is to tell customers how long they'll be waiting before the product is sent. There are many possible ways to do this, depending on what types of products you sell, and the setup of your business.

Alternative ways to describe WooCommerce product lead times

Here are some examples of popular alternatives to 'lead time', with advice on when to use each one:

Available on

Use this for non-stock products, for example if you are awaiting an order from the supplier. This is a good option for products that are normally in stock, where you have chosen to display the lead time text for out of stock or backorder products only. When the product goes out of stock, you can add the date when it will become available again. This tells the customer when to come back and place their order, resulting in more sales for you!

Ready for despatch in

Popular with websites selling handmade or made to measure products like Etsy, this wording is good for products that need some manual work to get them ready to send.

Handling time

Consider using this wording if you're showing WooCommerce product lead times for items that require some sort of handling or processing to get them ready for sending.

For example, you might use this for custom hampers or gift boxes which you compile based on the customer's selections.

Processing time

This text has a similar meaning to 'Handling time', but sounds slightly more formal because it removes the human element that is implied by 'Handling time'.

Made to order

You guessed it! This wording is good for made to order products. It indicates the reason for having to wait, which helps the customer to understand and reassures them that the product is worth waiting for.

You could also use 'Handmade' or 'Built to order'. They're both good alternatives for showing WooCommerce product lead times for this type of item.

Waiting time

This indicates how long the customer will be waiting before the product is dispatched.

Personally, I find it slightly negative. Customers don't want to view themselves as waiting! As a result, I would suggest choosing something that positively indicates when the product will be sent, rather than how long the customer must wait. However, it might work for some scenarios.

Delivery time

You can also use WooCommerce Lead Time to indicate predicted delivery times on the product page.

For example, you might add a note saying 'Standard delivery times' or 'Delivery time: 2 weeks'. Customers get frustrated at having to add products to the cart just to find out the delivery time, so showing it in the lead time field is an excellent solution.

Lead time

Of course, sometimes 'Lead time' is the best wording. Use it for non-stock products where there will be a wait before it becomes available to despatch. For example, this might include made to order products.

Are you managing stock?

When you choose your lead time label, remember that a stock message might be displayed next to it.

If you're actively managing stock for a particular product, then the stock text 'In stock', 'Out of stock' or 'On backorder' will appear before your lead time text. This might affect how you choose to word the lead time message.

How to set it up

Before we close, here's a quick video tutorial on how to display lead times for your WooCommerce products:

Where to get the WooCommerce Product Lead Times plugin

If you haven't started displaying WooCommerce product lead times in your store yet, then get the plugin today. You can set it up in minutes. Customers will instantly be able to make a more informed decision based on your lead times.

WooCommerce Lead Time: Easy Way to Display Product Lead Times

Customers are much more likely to order from your eCommerce online store if they know how long they'll be waiting to receive the product. That's where the WooCommerce Lead Time plugin comes in. Keep reading to learn all about it.

Typically, before customers buy anything online, they check to see:

  • If the product is in stock.
  • The approximate date of arrival of their order.
  • Expected delivery date and/or delivery time.
  • Available shipping methods.

This is one of the most significant parts of the customer’s purchase user flow and greatly influences their buying decision.

Out of the box, WooCommerce lets you mark products as in stock, out of stock, or on backorder. However, there's no way to add information to indicate when the customer will receive their order. This is called displaying a WooCommerce lead time, and is not available in WooCommerce as it comes.

Fortunately, you can easily do this using the WooCommerce Lead Time plugin. This is the only plugin which provides an easy way to add a lead time to the single product page in order to let customers know when the product will be sent.

Keep reading to discover:

  • Why you should display a lead time on product pages.
  • What types of products need lead time information.
  • How to set it up using the WooCommerce Lead Time plugin.
  • And how to display lead time information in other parts of your online store.

Why should I display a lead time on product pages?

Most eCommerce online stores sell items that aren't always in stock for any reason. This might be because they’re made to order or simply because the store doesn’t hold all of their products in stock at all times. As a result, store owners (and customers) can benefit hugely from showing an estimated waiting time on WooCommerce product pages.

Think about the situation from the customer's perspective. Have you ever been shopping online and looked for information about when the item will be sent? Have you ever struggled to find this information? I bet you have!

Have you ever been shopping around and ordered from one website rather than another simply because it told you when you would receive your order?

That's right - customers need to know the wait time, and might not order unless they have this vital information. This is important for all online purchases, and becomes even more essential when buying with a specific deadline in mind such as a birthday gift or anniversary.

Key benefits

WooCommerce Lead Time Plugin

Here are some of the main benefits of displaying handling times for WooCommerce products:

  • Improves customer experienceDisplaying the lead time enables you to deliver enhanced customer experiences and simplify the purchasing user flow. In addition to this, it minimizes uncertainty about your WooCommerce backorders, increases transparency, and helps build trust with your customers.
  • Customers can make informed decisionsIn an event where your stock runs out but will be available soon, you’ll still be able to share the approximate time of arrival of those products with your customers. This way, the customer can decide whether the estimated date works for them or not.
  • No need to call for product availabilityDisplaying the estimated time directly on your product page also saves your customer service representatives from having to manually look up the lead time for individual products while a customer is on the phone with them. In other words, customers won’t have to call your support staff as they’ll be able to find out when the product will be available directly through your website.

Clearly displaying the lead times of your WooCommerce products therefore helps to reduce your cart abandonment rate, remove friction from the checkout process, and improve the customer’s buying experience.

>What types of products need lead time information

I would say that any physical product would benefit from having lead time displayed. It's less relevant for digital products which are emailed to the customer immediately, although a lot of stores display a message like "Instant Delivery" to reassure customers. However, this isn't the main use case for displaying a WooCommerce lead time.

Here are examples of products which will benefit more than most from displaying lead time information.

Scenario 1: Mde-to-order or handmade items 🛋️

If you sell products which are made to order - for example made-to-measure or handmade goods - then it's essential that customers know the waiting time.

Let’s say, for example, that an online store selling handmade carpets made to order may require a 6 week lead time. You’ll need to let customers see this preparation or processing time on the product page. As a result, the customer can decide whether or not the time frame works for them.

Here’s how Etsy displays a lead time notice "Ready for dispatch in 1-2 weeks" on one of its product pages:

Etsy's expected dispatch time for products

Scenario 2: Stores that don’t hold all items in stock 📆

Lots of stores only order products after they receive an order, instead of holding inventory in stock. They may order in regular batches. This is common for large furniture items like sofas, and for small stores without a warehouse. Non-stock items may take longer to arrive with the customer, so you need to display the lead time.

Lead time on Made.com

It’s also important to keep in mind that the order dates might vary per product. Factors like the supplier’s location and processing times typically influence expected order dates.

Scenario 3: Out of stock or backorder products 🙁

This is different from non-stock products and means that the product is normally held in stock, but is temporarily unavailable.

Fluctuations in product demand - or problems with supply - happen all the time. When product orders are high, you might run out and need a way to let customers know when a popular product is expected to become available again. For example, if you sell t-shirts and a particular SKU is out of stock, you'd want customers to know when the next batch will arrive. This way, potential customers will be in a better position to make an informed decision on whether they should place the order.

Display WooCommerce lead time on the front-end

To deal with this, you could display an Out of stock | Available: August 31, 2019 WooCommerce Lead Time message on the single product page.

However, I think you can do even better than this! Instead of marking products as out of stock, I recommend selecting the 'Backorder' status and displaying the lead time. That way, the customer can still place the order while knowing how long they will be waiting. This is a way for you to guarantee the sale, so they don't look elsewhere - everyone wins!

Products with fast despatch times 🏃‍♂️

And conversely, you can improve your conversion rates by displaying a lead time on products that are in stock and will be despatched quickly.

This is a less obvious use case for a WooCommerce lead time plugin, but can have real benefits. That's because displaying a short lead time will impress customers and make them much more likely to buy from you. For example, imagine how much customers will like to see a message saying "Order before 4pm, and we'll send your order today" on a product 🚀.

As you can see, all sorts of eCommerce products can benefit from having the lead time displayed. Next, I'll tell how how to add this to your WooCommerce online store.

Introducing WooCommerce Lead Time

WooCommerce Lead Time is a lightweight plugin that allows you to display information about when the customer can expect to receive their order. This makes it easy for customers to decide whether they should place an order right away or wait.

There are two ways of setting the lead time:

  1. Static lead time - Add some static text which will be displayed on the product page. You can add different text for each stock status and the message will change automatically when a product goes out of stock or is put on backorder. This is useful for showing information about permanent lead times, for example "Handling time: 2 working days".
  2. Dynamic lead time - Alternatively, you can select a date from a calendar and let the WooCommerce Lead Time plugin automatically display the number of days or weeks until it becomes available. This is useful for products that you are expecting in stock on a particular date.

Either way, you can set lead times globally or per product, category, or even variation. That way, you can either share lead time information across multiple products, or have more fine-grained control if each item has a different wait time.

How to add lead times to your WooCommerce products

The WooCommerce Lead Time plugin makes it easy to display waiting times on the single product page. This is how to set it up:

  1. First, install WooCommerce Lead Time on your WordPress website.
  2. Use the setup wizard to choose any global settings that will apply to all your products. For example, you can set a prefix (e.g. "Waiting time:" which will appear before all your product lead times. You can also set a global lead time which will appear on all your products, except where you have overridden this by setting product-specific lead times. There's a further setting to customize the WooCommerce lead time text color.
  3. To set lead times per category, go to Products > Categories and click on a category to edit it. Fill in the lead time for each category to override the global lead time (if set).
  4. To set lead times per product or variation, go to Products in the WordPress dashboard and click to edit a product. Scroll down to the 'Product Data' section, find the 'Inventory' tab, and enter the lead time as needed. (Or for variation lead times, go to the 'Variations' tab instead.
WooCommerce show product lead time

How the WooCommerce waiting time looks on the front end

Once you have added a lead time, it will look like this on your WooCommerce product pages:

WooCommerce lead time displayed on the front-end

If you have enabled the option to manage stock for the product, then the handling time note will appear after the stock availability text, on the same line. For example, it might be: 'On backorder | Waiting time: 3 months'.

3 ways to display lead time information elsewhere in your store

So far, we've learned how to use the WooCommerce Lead Time plugin to display waiting times on individual product pages. However, that's not the only place that you can display this information.

Before we finish, I'm going to tell you 3 other ways to display the product lead time in your WooCommerce store.

On your main shop pages

Sometimes, the waiting time is so important to customers' buying decisions that it's worth displaying it before the customer even clicks on a product. If that applies to your store, then you can enable an option in WooCommerce Lead Time to also display lead times on your shop pages. This adds is to your main shop page, category pages, and so on - in addition to the single product page.

WooCommerce show stock shop category page

In a one-page product order form

The default shop page layout doesn't suit every type of products. Some products sell better if you list them in a quick one-page order form. This displays extra information about each product, along with a 'Buy' columnn so that shoppers can quickly add multiple items to their cart.

You can do this with the WooCommerce Product Table plugin. It integrates with WooCommerce Lead Time so that you can display the waiting time for each product in a dedicated 'Lead time' column of the order form.

WooCommerce Lead Time Screenshot Product Table

In a quick view product lightbox

You can launch quick view lightboxes from the main shop page and allow customers to learn more about each product without having to visit a separate page. The WooCommerce Quick View Pro plugin integrates with WooCommerce Lead Time and displays the lead time directly in the product lightbox. It therefore provides another way for customers to view lead time information away from the product page.

Start displaying lead time information today!

By using the WooCommerce Lead Time plugin on your WooCommerce-based online store, you’ll be able to:

  • Let customers know when the product will be back in stock before the reach the checkout page.
  • Build trust with customers, increase transparency, and help them make informed purchasing decisions.
  • Improve the customer experience your online store delivers.
  • Allow customers to place orders for products that are currently out of stock or on backorder.

WooCommerce Lead Time is the only plugin out there that displays waiting times. Install it today, and empower your customers to make more informed buying decisions.

Do you agree that displaying product lead times on your single product pages can improve customer experience? Let us know by commenting below.

There are many reasons why you might want to change the default number of WooCommerce products per page on your store’s main shop page. For example, you may be selling lots of (or very few) products, you may want to display more information with each product, or you might want to change the layout of the WooCommerce shop page.

And, of course, there are many benefits of changing the number of products per page on your product site. Depending on the type of products you sell, it could enhance the visual appeal of your website, increase product visibility, or streamline the purchasing user flow.

WooCommerce Product Table Demo

Unlike other tutorials, we’ll show you how to change the number of WooCommerce products per page without having to code. This is a non-technical guide that explains how you can change the default number of products per page using a plugin.

Why you might want to change the number of WooCommerce products per page

Most WooCommerce stores use the default page layout that displays 3 to 4 products per row. For each product, there’s typically a large product image, product name, price, and an add to cart button to go with it.

While this may work for small stores that sell a dozen or so products, it isn’t the ideal solution for every online store. This is partly because the default shop page layout can make it difficult for shoppers to find what they’re looking for. Shoppers can quickly get up due to having to scroll through so many pages of products. As a result, everyone loses!

You don’t need code to change the number of WooCommerce products per page

Typically, you’d have to mess around with code to change the number of WooCommerce products per page. This involves modifying your theme's functions.php file and using a variety of advanced functions (such as cols or add_filter). The problem with this is that it's not an easy and intuitive option for users who aren't particularly tech literate.

Another way to change the number of WooCommerce products per page is to use your active theme’s built-in settings or customization options. However, not all themes have built-in settings for changing the number of WooCommerce products per page.

Thankfully, with WooCommerce Product Table, you can easily change the number of products per page without having to code. It’s an incredibly easy option for users who aren’t particularly tech-savvy, or those using themes that don’t come with built-in options to change the default number of WooCommerce products per page.

How to change the number of WooCommerce products per page

For the purpose of this tutorial, we’ll assume you already have a WooCommerce-based online store set up with some products added to it.

Step #1: Install and set up WooCommerce Product Table

Get the WooCommerce Product Table plugin and install it to your WordPress site.

Next, navigate to WooCommerce → Settings → Products → Product Tables and enter the license key you received in the confirmation email.

WooCommerce Product Table license key

Click the Save changes button at the bottom of the screen to proceed.

Step #2: Add product tables to your store

There are two ways to add product tables, replacing the default store layouts:

  1. Add a shortcode to a page (best for beginners)
  2. Replace the WooCommerce default shop and category pages (for intermediate and advanced WordPress users)

Method 1 - Add a shortcode to a page

The WooCommerce Product Table plugin comes with simple shortcodes that you can use to add product tables anywhere on your site.

Simply add the shortcode [product_table] to whichever pages you want to list products. And if you want to create multiple tables, each listing different products (for example, by category), then you can do so using these instructions.

If you like, then you can prevent shoppers from accessing the default shop and category pages. Just install the free Redirection plugin, and redirect the default pages to your new product table pages.

Method 2 - Replace the WooCommerce default shop page

Many WooCommerce store owners replace the default shop page with a dynamic, front-end product table created using the WooCommerce Product Table plugin.

You can easily do this by enabling the 'Shop' option on the WooCommerce Product Table settings page. Just go to WooCommerce → Settings → Products → Product Tables and tick the required option:

WooCommerce add product table to shop and category pages

You should now be able to see product tables on the front-end of your default WooCommerce shop page. It should look something like this:

Change the number of WooCommerce products per page

Step #3: Edit number of products to display on the front-end

WooCommerce Product Table allows you to control the number of products that appear in the front-end table as well as how many products are displayed on each page of the table.

Head over to the WooCommerce Product Table plugin’s settings page by going to WooCommerce → Settings → Products → Products Tables.

Rows per page

The rows_per_page option lets you control the number of products that will be displayed on each page of the product table. The default number of rows per page is 20. Setting it to -1 will display all the products on a single page.

Change the number of rows per page in the table layout

You can choose to set this option globally on the plugin settings page. Alternatively, you can use a shortcode to set row values for individual tables. This is useful if you’d like to showcase a different number of products in each product table e.g. for category pages.

Simply add the shortcode [product_table rows_per_page)="30"] to the page you’d like to display the product table on. Replace 30 with the number of products you’d like to display in the table.

Product limit

The product_limit option lets you control the maximum number of products that’ll be displayed in the product table. The default number of products is 500.

Enable lazy loading products in the table layout

You can use a shortcode to set product limits for individual tables. If you need to display a few dozen products at a time in your product table, we’d recommend enabling the lazy load option to deliver optimal performance. For this, use the shortcode [product_table product_limit="750" lazy_load="true"]. Simply replace 750 with the maximum number of products you’d like to showcase in the table.

Pagination

WooCommerce Product Table will, by default, add a pagination button at the bottom of your table. You can choose to show or hide this, globally on the settings page in the WordPress admin, or using the  pagination function in the shortcode. An example would be: [product_table pagination="false"].

You're now all set to change the number of WooCommerce products per page!

Change the number of WooCommerce products per page

Examples of stores that would want to change the default number of products per page

Here are some examples of online stores that might benefit from changing the number of products per page on their main shop page:

  • Stores that sell many products. Stores that sell lots of products need to be able to effectively showcase dozens of products per page. These include wholesale stores where shoppers frequently purchase the same products. Since they already know the products they’ll be buying, they shouldn’t have to click through to individual product pages for each item.
  • Stores that sell a handful of products. Micro stores that sell a handful of products (i.e. between 5 to 10 products) might want to showcase only 2-3 products per page. This enables them to improve both the visual appeal and usability of their online store. For example, Casper’s product page displays only three different types of mattresses.
Three products on store page
  • Online course and memberships. Online course instructors and membership site owners might want to display course previews along with important course details. Typically, an online course site or membership site sells 3-4 courses (or membership tiers). Displaying a preview of course content in a table layout is a great way to attract students and boost sales.
Displaying video content in a table layout

Next, we’ll explain some of the different ways you can change number of products on your main shop page.

How you're changing the number of WooCommerce products per page

The WooCommerce Product Table plugin lets you change the number of WooCommerce products per page without having to code. This is a great way to enhance your main shop page’s usability, increase product visibility, and improve the purchasing user flow.

Do you agree that changing the number of WooCommerce products per page can help you improve your conversion rate? Let us know by commenting below.

Unlocking personalized pricing: A guide to customer-specific pricing in WooCommerce

WooCommerce customer-specific pricing is a powerful strategy where you charge unique pricing to specific users in your online store. Discover the easy way to set it up - no technical knowledge needed!

In the bustling world of e-commerce, where every click counts and customer loyalty is paramount, businesses are constantly seeking innovative ways to enhance user experiences. Customer-specific pricing is a strategy that can significantly impact sales and customer satisfaction. Imagine tailoring your product prices to individual shoppers, offering personalized discounts and creating a sense of exclusivity - all while boosting your bottom line. It’s not just a dream; it’s a powerful reality 🔥

Keep reading to discover how to add WooCommerce customer-specific pricing to your store. We'll do it using Discount Manager, an easy-to-use WooCommerce plugin that makes it easy to add and display flexible pricing rules for specific users.

What is WooCommerce customer-specific pricing?

As online retailers, we’ve all faced the dilemma: How do we cater to diverse customer needs without compromising profitability? Traditional pricing models treat everyone the same. However, in reality, each customer brings a unique set of preferences, behaviors, and purchasing power. A first-time buyer may need an extra nudge, while a loyal VIP deserves special treatment. And what about those high-volume wholesale clients who keep our revenue flowing?

It's ideal for any website that wants to charge different amounts to different types of customer. For example, WooCommerce wholesale stores often need to charge different amounts to retail and wholesale user roles, or even different amounts to each wholesale customer.

WooCommerce Discount Manager - the best customer-specific pricing plugin

WooCommerce customer specific pricing plugin

Now you know why customer-specific pricing is so important, I'll tell you how to achieve it in your own store.

The best user-specific pricing plugin is WooCommerce Discount Manager. This powerful plugin lets you add simple or advanced pricing rules to WooCommerce.

You can choose from a choice of 6 discount types, each with plenty of options:

  • Select which products and categories the pricing will apply to.
  • Set the start and end dates for the special pricing, or run it permanently.
  • And most importantly - select which individual user accounts and/or user roles the pricing will apply to.

Unlike other WooCommerce customer-specific pricing plugins, Discount Manager actually lets you display unique information to each individual user. This helps to create a truly personalized user experience, boosting customer loyalty.

Next, I'll tell you how to set up user-specific pricing with the WooCommerce Discount Manager plugin.

How to charge different prices per customer in WooCommerce

To learn how to implement customer-specific pricing, either watch the video or follow the step-by-step written tutorial below:

Step 1: Install WooCommerce Discount Manager

  1. First, buy WooCommerce Discount Manager and download the plugin zip file to your computer.
  2. Go to Plugins → Add New in the WordPress admin and install and activate the plugin.
  3. The plugin setup wizard will open automatically. Use it to activate the license key from your order confirmation email.

Now the plugin is installed on your WooCommerce site, it's time to set up customer-specific pricing.

2. Create customer specific pricing rules

  1. Go to Marketing → Discounts and click the 'Add Discount' button.
  2. Choose the type of discount that you'd like to create for the user. There are several to choose from, each of which has a helpful explanation and examples. For example, you can choose a simple percentage pricing change, discounts based on the quantity ordered, and so on. All of these work with customer-specific pricing, so choose whichever one best fits the type of pricing rule you require.
    WooCommerce Discount Manager add discount type
  3. Next, fill in the information about how the customer-specific discount should work. This includes adding a name for the pricing rule, choosing how the user-based price will work, and selecting which products and categories it will be used on. The exact options depend on which type of discount you're creating.
  4. In the 'Applies to' section, select the individual user accounts or/roles that should receive the special pricing. For example, in the below screenshot I have selected a user called Ben. You can select as many users as you like, or entire user roles in order to give the same customer-specific prices to multiple people.
    Create WooCommerce user specific pricing
  5. In the 'Availability' section, you can optionally set dates when the customer-specific discount will run. For example, to give a personalized discount to Shanaz during her birthday month, you would select the start and end of that month.
  6. If you'd like to display a notice on the product page, then fill in the 'Product page content' and choose a location for it to appear:
    Display customer specific pricing message in product page content
  7. If required, you can also add a 'Cart notice' which will appear on the cart page for all users who the pricing rule applies to.
  8. Save the discount.
  9. Repeat the above steps for each customer-specific discount that you wish to create. There's a 'Duplicate' option for each discount to save you time. Simply copy an existing discount and change the details for the next user as needed.

Pro tip for setting customer specific prices for groups

When we talk about WooCommerce customer-specific pricing, it's easy to assume that you should create a separate pricing rule for each individual user. Before you do this, think about whether that's the most efficient way to charge different prices per product for each user.

For example, if you have several users who you want to give the same special pricing, then here are some easier ways to achieve the same result:

If you do this, then you should word the product page content and cart notice in a generic way that applies to all users who receive the group discount. For example, don't mention their individual names in it like I did in my screenshot above!

What sort of WooCommerce sites need user-specific pricing?

At first glance, charging different prices to specific users sounds a bit strange and unfair. However, personalized pricing is actually common practice in the eCommerce world.

Here are some examples of where a WooCommerce shop might need customer-specific pricing:

Loyal VIP customers

Give preferential rates to top-tier customers who consistently make high value purchases. Offer them a personalized discount or a custom price for specific products. For instance:

  • SuperVIP Jane gets 15% discount on all items.
  • Platinum customer Mark receives a fixed price of $50 for a premium product.

High-volume buyers

Recognize users who consistently order in bulk. Tailor pricing based on their historical order quantities. For example:

  • Wholesale partner Alex orders 100 units of a product regularly, so they get a 10% discount.
  • Bulk buyer Sarah purchases 500 units, earning a 20% discount.

Early adopters or beta testers

When launching a new product or feature, offer special pricing to users who participate in testing or provide valuable feedback. These users might receive a unique discount code or reduced price on all orders. This might be a permanent personalized discount, or it might be for a fixed period such as 6 months.

Referral program participants

Encourage users to refer others by offering personalized discounts. For instance:

  • Refer-a-friend Lisa receives a 10% discount for referring new customers.
  • Ambassador Mike gets a fixed price on a specific product for promoting your brand.

Birthday discounts

Celebrate users' birthdays by sending them a personalized coupon code. For example:

  • Birthday Girl Shanaz receives a 25% discount during her birthday month.

Customer-specific products

If you sell user-specific products, such as branded items to a school or sports team, then you might need customer-specific pricing too.

Behavior-driven discounts

Monitor user behavior (e.g., time spent on site, items viewed) and offer personalized discounts. For instance:

  • Frequent browser Alex gets a 5% discount after browsing specific products extensively.

Start charging different pricing per user today 🚀

As you can see, user-specific pricing is a powerful way to reward your best customers while making your eCommerce store more profitable. Discount Manager is the best WooCommerce customer-specific pricing plugin because it has everything you need to tailor your product pricing per user:

  • Choice of 6 flexible discount types.
  • Select which individual user accounts and roles each pricing rule applies to.
  • Display customer-specific information on the front end.
  • No-risk 30-day money back guarantee.
  • Detailed documentation, plus access to expert support.