In today's online world, people expect to view and buy absolutely everything online. This goes way beyond ordering physical products. If you sell services then it's equally important to add a WordPress services list to your website. It's surprisingly easy to sell services online.
In this ultimate guide to selling service products, I'm going to teach you how to create a WordPress services list using a choice of plugins. We'll learn how to list and sell services on a WordPress e-commerce site with either WooCommerce or Easy Digital Downloads.
You'll discover how to sell services for a fixed one-off price, by the hour or day, or sell recurring services with ongoing subscription payments. Along the way, I'll provide useful tips on how your WordPress services list can upsell and sell more services to each customer.
Let's get started!
What is a WordPress services list?
A service is defined as "The action of helping or doing work for someone". This means that services are work that you provide manually for a person or organization. Selling services differs from selling products because you provide them directly to each customer. This may be face-to-face in person, or online. The key point is that you (or your employees/contractors) will be personally involved in providing services. In other words, you'll be service providers. A service cannot be fully automated, because if this happens then it becomes a product instead!
With this in mind, you might be wondering how to add a WordPress services list to your website. After all, a service is carried out manually and not online!
The answer is that you can create a WordPress services list by separating the sales and provision of the service. Services can be listed and sold online in a similar way to products. The difference is that once a customer has ordered a service online, you will carry out work for them manually instead of posting them a product. So you sell the service online, and carry it out in real life.
And of course, these days you can productize and automate services, too! For example, you might sell software-as-a-service (SAAS) on your website. The instructions in this article will work whether you carry out services manually or automatically. Either way, you'll learn how to create a WordPress services list with options and 'Buy' buttons.
How listing services in WordPress works
First, the customer visits your website and views WordPress services list This might be a simple list of one or more services, or you might provide variation options. You might sell one-off services for a fixed price, or charge by the hour. Perhaps you'll generate recurring revenue by selling subscriptions to your services? You might have a dedicated page for ordering service, or your WordPress services list might appear in an e-commerce order form directly on the pages describing your services.
Second, the customer orders the service directly from the WordPress services listThey choose any options from the WordPress services list and adds the service to the cart. They then view the cart and checkout, including paying online with credit card/debit card or PayPal checkout. The customer receives a 'Thank you for your order' email, and you receive an email with the order information. You can use this option with either WooCommerce or Easy Digital Downloads, including with the option for extensions such as selling time-based bookings - I'll show you how to do all of these later.
Finally, you contact the customer to arrange to provide the service This can be done outside of your WordPress website, or automatically depending on your setup. Either way, it will fit nicely into your usual working processes.
Do I need an e-commerce plugin to create a WordPress services list?
If you want to keep it really simple, then you might want a WordPress services list without the e-commerce side of things. However, you'd be missing out on many advantages of using e-commerce to sell services online.
Benefits of adding e-commerce to your list of services
Online payment for services By using a WordPress e-commerce plugin such as Easy Digital Downloads or WooCommerce, you can sell services and take payment online. There's a choice of payment gateways such as PayPal and Stripe. This saves you time compared to collecting payment offline and chasing invoices. It's also better for your service business' cash flow because customers pay upfront, before you provide the service.
List services more effectively When we get to the e-commerce section of this tutorial, I'll show you how to list services in a searchable pricing table with filters, buy buttons and extra information. This is vital if you're listing more than a couple of services.
Easier to upsellWordPress e-commerce plugins come with options to sell more services through up-selling and cross-selling. This can involve advertising one service on the sales page for another service. Or it can involve adding optional extras to encourage each customer to buy more. Either way, it's easier to do this if you link your WordPress services list with WooCommerce or Easy Digital Downloads.
Built-in recording and invoicing With a simple service order form that doesn't use e-commerce, your sales aren't recorded anywhere. You have to maintain manual records about the services provided. In contrast, an e-commerce plugin keeps records of all your sales and sends invoices or payment receipts. This saves you admin time. To save even more time, there are even WooCommerce and Easy Digital Downloads extensions to automatically send data to accounting software such as Xero and QuickBooks.
Reporting E-commerce plugins come with embedded analytics and reporting. You can see statistics on who has bought your services and which are selling best, directly in the WordPress Dashboard. This helps you to make your service business more successful, making ongoing improvements over time.
Offer appointments more efficientlyIf you're selling bookable appointments, you can save time and money by selling these services through WordPress. The easy of use should also drive more sales for you.
Some examples: Service products you can sell online
Before we start with the setup instructions, I'll share some examples of services that you can sell online. You can sell any type of service in WordPress, for example:
Professional services - architecture, conveyancing, document preparation and review, legal services, real estate advice, medical, will writing.
Expert services - online business, copywriting, CV writing and resumes, career development, coaching, consulting, lifestyle, life coaching, love and relationships, marketing, photography, search engine optimization (SEO), social media, web analytics.
As well as selling your time, you can package services into specific 'products' which people can select and order from you, such as website technical support, online training sessions or coaching webinars. For example, we had one web design client who used his WordPress website to sell remote Skype advice sessions. If you're a blogger or freelance writer, you might be interested in selling blogging services.
You can find more ideas for services to sell online on Google. For example, Amazon lets people sell professional services (such as assembling and installing products) through their site. Similarly, Fiverr is an online marketplace for freelance services. Whatever type of services you offer, keep reading to learn how to sell them online in WordPress.
Which e-commerce plugin is best for selling services in WordPress?
There are two main e-commerce plugins which are perfect for creating a WordPress services order form:
WooCommerce is the world's leading e-commerce plugin, powering over 44% of all online stores. While it does let you sell physical products, it also comes with virtual products that are perfect for selling WooCommerce services.
Easy Digital Downloads is popular for selling virtual and digital products in WordPress. It's generally used to sell downloadable products such as WordPress plugins or ebooks. It's also ideal for selling services in Easy Digital Downloads.
Even better, both WooCommerce and Easy Digital Downloads are free WordPress plugins. I'll recommend some paid add-ons that will help you to sell services more effectively. However, the core e-commerce plugins are free of charge.
Choosing an e-commerce plugin for selling services online
Like I said, WooCommerce and Easy Digital Downloads are both good options for selling services in WordPress. So which one should you use?
A lot of service businesses sell using Easy Digital Downloads because it only deals with virtual products. This keeps it simple behind the scenes. WooCommerce comes with several shipping options (such as shipping rates, tax calculation, and shipping labels) many of which are on offer with WooCommerce Services plugin from Jetpack. However, the fact that WooCommerce can sell physical or virtual products isn't a disadvantage. If you disable the shipping options then these will disappear anyway, which keeps things nice and simple in the WordPress admin.
There are a few reasons to choose WooCommerce over Easy Digital Downloads:
If there's any chance that you might sell physical products and need to charge postage one day, then you should definitely choose WooCommerce. This simply isn't possible with Easy Digital Downloads.
It's also slightly easier to use WooCommerce to display the WordPress services list in a table. I'll show you how to do this with both plugins in the next sections. However, there's one extra step with Easy Digital Downloads that happens automatically with WooCommerce.
If you want to sell your time based on the number of hours or days, instead of charging a set price for each service, then WooCommerce is best.
If any of these points apply to you, then I'd recommend selling services in WooCommerce rather than EDD. Otherwise, they're both excellent options and you should read about each one to choose which is best for selling your services.
Tutorial 1: How to sell services with WooCommerce
1. First, set up WooCommerce
In the WordPress admin, go to Plugins → Add New and search for 'WooCommerce'.
Install the main WooCommerce plugin and activate it.
After you activate WooCommerce, you'll be invited to run the Setup Wizard. Do this, and choose your store currency, tax settings, etc. When it asks "Will you be shipping products?", do not tick this box. You're selling services, so you won't need the shipping settings.
On the payment gateways page, enter the email address that you use to log into PayPal to accept PayPal payments for services. I recommend Stripe for credit card and debit card payments (you'll need a Stripe.com account for this). Ideally, add your PayPal and Stripe account so that customers can choose how to pay for your services. If you want to give your customer base a 'Pay Later' option of paying manually offline too, choose the 'Check' payment option. You can then change the wording for this payment gateway as needed. (Tip - it doesn't need to say 'Check' at all - this is just a handy way of creating an offline payment method in WooCommerce.)
At the end of the Setup Wizard, click the button to Create Your First Product.
For more in-depth tutorials on setting up WooCommerce, check out these guides.
2. Add service products to WooCommerce
You'll be taken to the Add Product screen. This is where you'll add the first service to sell in WooCommerce.
Add a product title and description, plus categories and tags as required. Also upload a product image if you like, although this isn't essential for selling services with WooCommerce.
Use the 'Inventory' tab to limit the number of each service that people can buy from you in WooCommerce. This is useful if you have limited capacity. There's also a box that you can tick to prevent customers from buying more than one of each service.
Click 'Publish'.
Go to Products → Add New and repeat these steps for each service that you want to sell in WooCommerce.
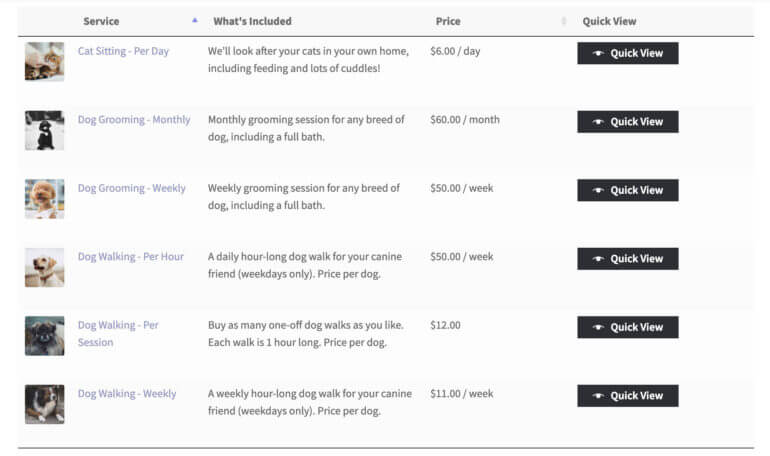
3. Create a WordPress services list of your WooCommerce products
Next, we need to display your service products on the front end of your website. This is essential so that people can view your services in WooCommerce and buy them online.
WooCommerce comes with some built-in layouts for displaying products. Unfortunately, these aren't at all suitable for selling services. You don't want your service website to look like a clothes shop!
Instead, you need to showcase your list of services in WordPress in a professional-looking table layout. You can do this using the WooCommerce Product Table plugin. Once you've added your services as WooCommerce products, the Product Table plugin will automatically list them in a user-friendly table layout.
Why is a table good for listing services in WordPress?
Services sell better in a WooCommerce table because:
This layout prioritizes information rather than images. (You can include a small thumbnail picture if you like.)
If you have lots of services, it's easier for customers to find the services they need via built-in filters and keyword search box. Customers can view prices, choose options and add services to the cart directly from this service pricing table layout. For more information (like testimonials), customers can simply click through to the single page.
The other benefit of displaying WordPress services in a table is that you can insert the table anywhere on your website, without using a website builder.
For example, a lot of WordPress sites have a 'Services' pages containing text describing their services. It's best to display the WordPress services list for purchase directly on the Services page, instead of linking customers to a separate shop page. You can add an e-commerce table of service products directly within the content of your service pages, keeping everything in one place.
How to show a WordPress services list in a WooCommerce table
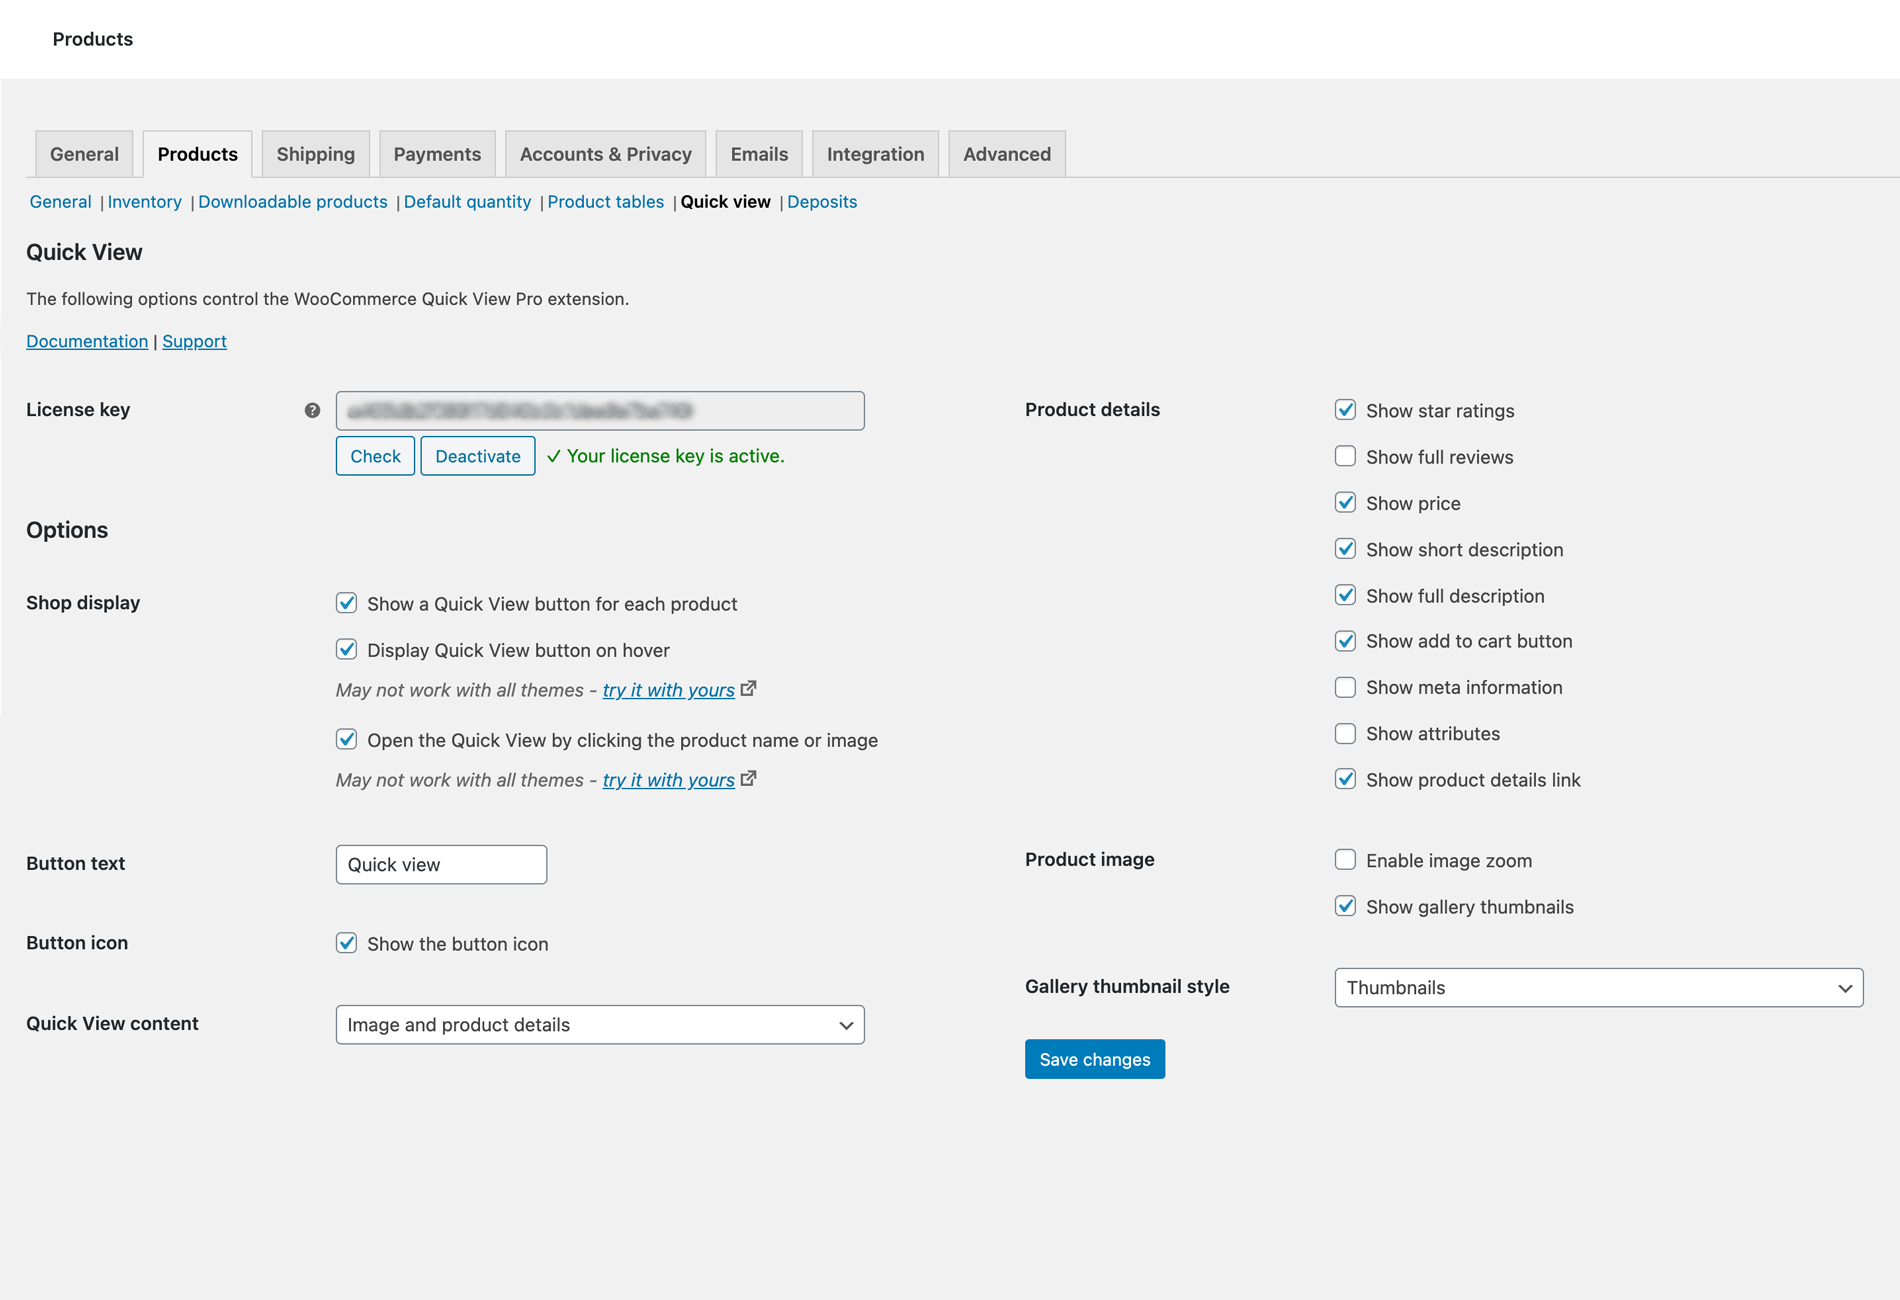
Header over to WooCommerce → Settings → Products → Product tables.
Paste your license key from the confirmation email.
Read through all the product table options, and choose the ones that will present your services most effectively.
Next, create a page where you want to create a list of services in WordPress. Alternatively, edit an existing page on your website. For example, you might want to list the service options with prices and buy buttons directly on a page which already describes your services.
Click the 'Insert product table' toolbar button to add the following shortcode to the page [product_table].
This will show all your list of services on the page. If you'd rather list specific services only (e.g. based on their category or tag), then you can do this instead.
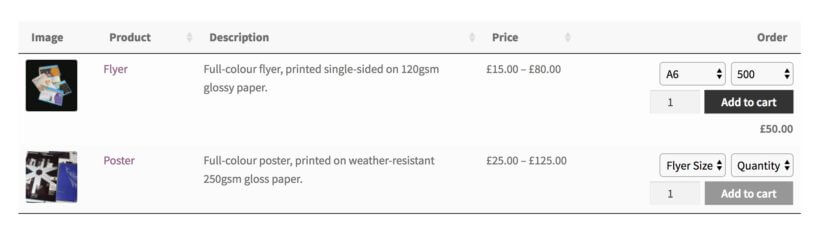
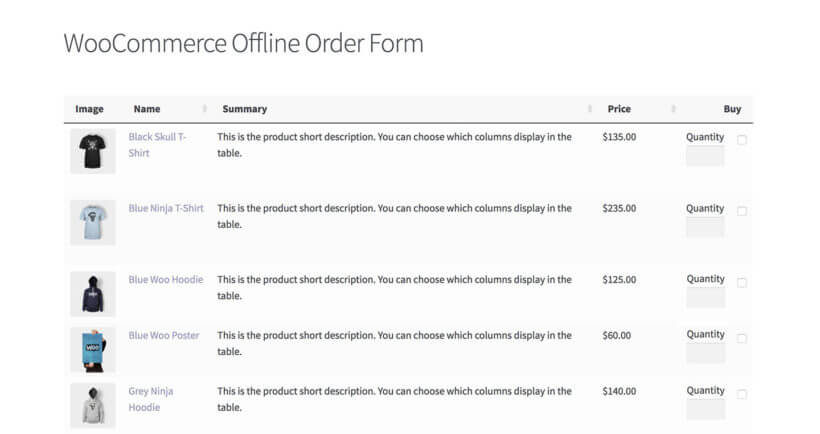
Your finished table of services might look something like this:
Nice!
4. Use product variations to provide a choice of services
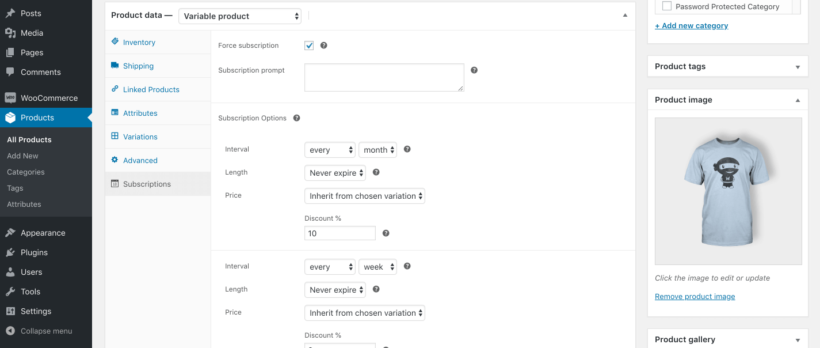
In step 2, I told you how to create a simple service product with a fixed price and no options. WooCommerce also supports variable service products.
The instructions to create a service with variation options are similar to the ones in section 2, above. However, when you go to the Product Data section, use the Product Type dropdown to select 'Variable Product'. You then need to create attributes on the Attributes tab, and select these to create variations on the Variations tab. For each variation, you need to add a price and tick the 'Virtual' box to use it to sell services.
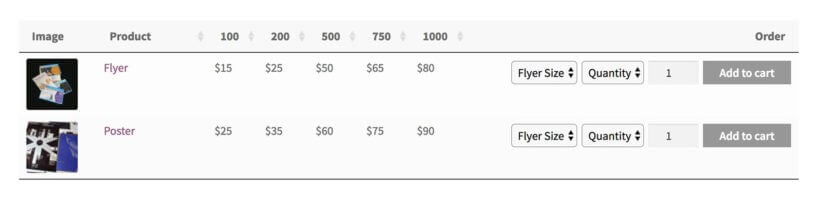
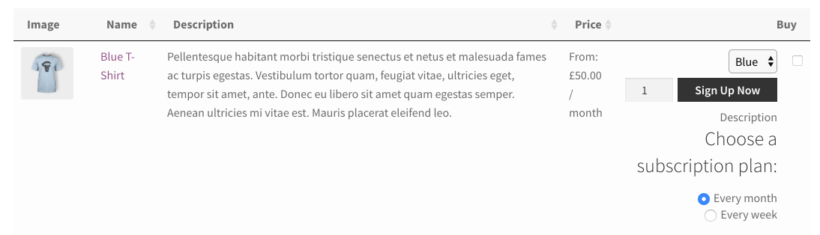
In this example services list, I created a 'Legal Services' product with a 'Service Type' attribute. I used this to create variations for 'Conveyancing', 'Wills' and 'Divorce Services', each with their own service cost:
If you select variation dropdowns on the WooCommerce Product Table plugin settings page, then the table will list 1 product per row. Each product will have a dropdown so that customers can choose variation options.
Alternatively, if you selected the separate variations option, then it might look something like this:
WooCommerce Product Table with each service variation on a separate row
Both are good options for selling options from the WordPress services list.
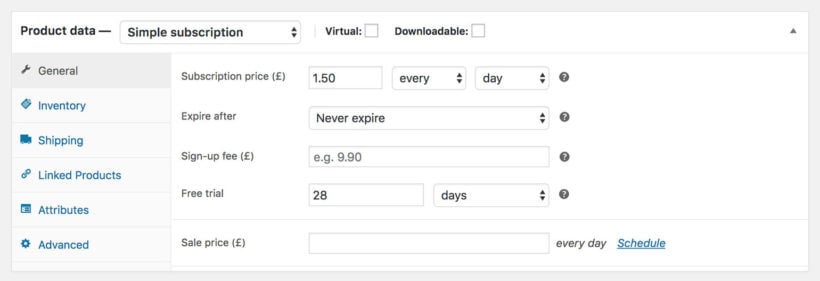
5. Use WooCommerce subscriptions to sell regular ongoing services
So far, we've talked about create a WordPress WooCommerce services list with a one-off price for each service. This may fit your business model, but most small business owners know that recurring revenue is the holy grail. With this in mind, you might want to sell ongoing subscription services via your WordPress website.
Fortunately, you can do this with the official WooCommerce Subscriptions extension. This will set up an ongoing payment plan or subscription for each service. The customer will be billed automatically at the correct intervals, using their chosen payment gateway.
WooCommerce Product Table with Subscription Service Products
First create a subscription on the plugin settings page.
Next, instead of creating a Simple Product, you should select 'Subscription Product' from the 'Product Type' dropdown.
Set an ongoing cost for your service, for example an initial setup fee followed by a regular monthly payment.
Both PayPal and Stripe support recurring subscription payments. This is much better than sending invoices for manual payment each month. No more chasing overdue invoices - it all happens automatically via your WordPress website and WooCommerce!
Please note that WooCommerce Product Table doesn't work with variable subscriptions. To use the plugins together, we recommend adding each subscription option as a separate product. Another option is to add the options as product add-ons instead of variations. The add-on options will appear in the add to cart column of the table of subscription services.
6. Use product add-ons to sell optional extras
Let's say you're selling website maintenance services. You might have created 3 service products: Weekly Maintenance, Fortnightly Maintenance, and Monthly Maintenance. But how can you sell more services to each customer?
The answer is the WooCommerce Product Options extension. This handy plugin lets you add a range of optional extras to your service products in WooCommerce. These appear alongside the add to cart button, offering a powerful incentive for customers to order more from you.
In the following example, I used Product Options to add tick boxes for extra dog grooming service options. As well as ordering a basic dog grooming session, customers can tick boxes to add different types of doggy haircut. The dog grooming products are displayed using the WooCommerce Product Table plugin with Product Options and Subscriptions. As you can see, this is a great way to significantly increase revenue, from the same number of customers.
WooCommerce Product Table with the official Product Options plugin
How to sell services by the hour or day
You've learned how to use WooCommerce to sell services for a fixed price. But what if you want to sell your time, rather than a specific service? Luckily, you can do that too.
To sell critical services based on the amount of time, the instructions are similar to the ones I provided above. You'll just need to activate a few extra options on the WooCommerce Products Table settings page:
Tick the 'Quantity' box to display a quantity picker in the add to cart column for each service.
When you set your product table columns, use these instructions to customize the 'Buy' column heading. It needs to be clear that the service is priced by the hour or day.
For example, if your WordPress services list contains columns for name, short description and add to cart column, then you need to list the columns like this: image,name,summary,price:Price Per Hour,buy:Select Hours & Buy
Alternatively, if you're not selling all your services by the hour, then you can just add the unit to the product name. Here's an example of what this might look like when you list WordPress services:
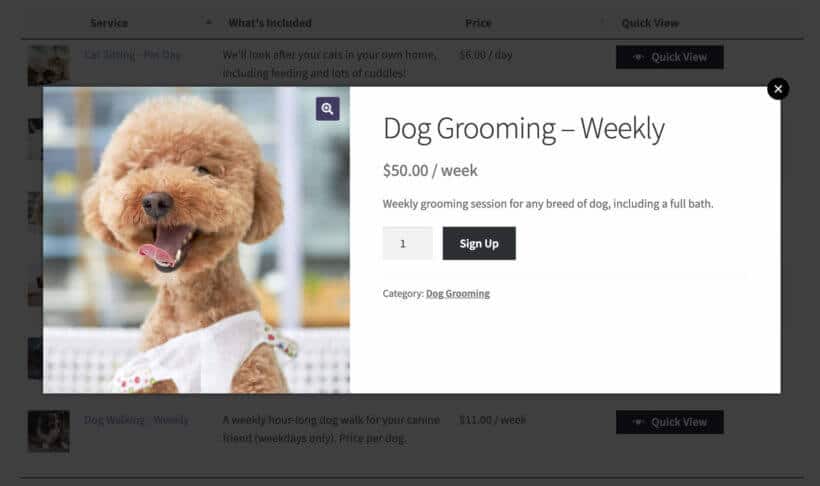
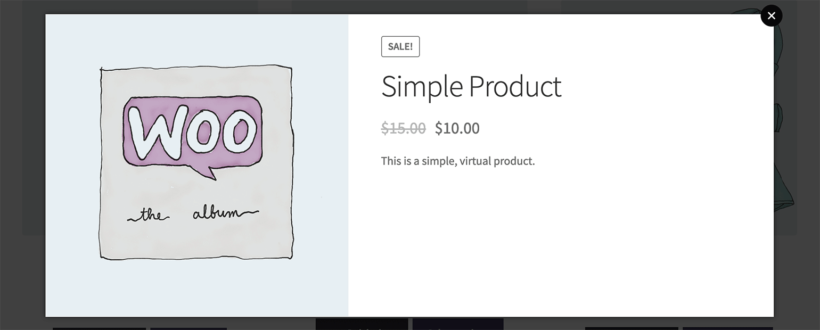
Tip: Use quick view to provide more information
By now, you know how to display a list of services in WordPress in a table layout. Maybe you want to show extra information about each service, but don't want to send people to a separate page for each service. Maybe you have too many variations or add-on options to fit into the table view.
If this applies to you, then you can add the WooCommerce Quick View Pro plugin to show extra information and purchase options from a lightbox window:
Next, I'll reveal how to use Easy Digital Downloads (EDD) to create a WordPress services list. This is similar to WooCommerce, so read about the two e-commerce plugins and choose the one that best suits your needs.
Easy Digital Downloads is nice because it's simple and only contains the features you need to sell virtual products such as services. There's nothing extra to weigh it down, such as shipping options which you don't need for listing services.
However, the downside of EDD is that it's less popular. That's not necessarily a bad thing, but it means that fewer companies have developed useful add-ons and extensions for it. For example, you can use EDD to create your WordPress services list - but you can't add the other handy plugins which I mentioned in the WooCommerce section above. For example, there's no Easy Digital Downloads quick view or product add-ons plugin.
But if EDD is the right e-commerce plugin for your WordPress services list, then this is how to set it up:
1. First, set up Easy Digital Downloads
In the WordPress dashboard, head to Plugins → Add New. Type 'Easy Digital Downloads' into the search box.
Install and activate the plugin.
Navigate to Downloads → Settings and choose the settings that you'll use to sell services with Easy Digital Downloads.
2. Add your services in Easy Digital Downloads
Now it's time to start adding your services as EDD products:
Go to Downloads → Add New.
Add your EDD service product name and description. You can also add categories and tags, plus an image if this will help to promote the service.
Add the service price.
Click Publish.
Repeat these steps for each service that you want to sell using Easy Digital Downloads.
3. Use product variations to provide a choice of services
Like WooCommerce, Easy Digital Downloads also comes with a 'Variable Pricing' option. You'll see this when you add the price for your service in EDD. If you want to offer different options for a particular service, tick this box and add all the options. Set a price for each service option.
You can use this to provide quantity discounts to reward customers to buying more services, or for selling different service options at different prices.
4. Create an Easy Digital Downloads WordPress services list
Next, we need to list your services for sale on the front end of your WordPress website.
Like other WordPress e-commerce plugins, the standard Easy Digital Downloads store layouts aren't ideal for selling services. This isn't surprising, because they're mainly designed to sell digital products such as ebooks and WordPress plugins.
You can showcase the WordPress services list more effectively with the Posts Table Pro plugin. This dynamic WordPress table plugin lets you list all sorts of content from your website in a table view. It's particularly popular for creating an Easy Digital Downloads product table.
Customers can view your WordPress services list anywhere on your website, see the price and any other data you choose to display, select options, and add services to the cart. They can then checkout and pay for their services online with Easy Digital Downloads.
How to list services in an Easy Digital Downloads table
Install the Posts Table Pro plugin on your WordPress website and activate it.
Go to Post Tables → Settingsand activate your license key from the order confirmation email.
Follow the instructions in this tutorial to list your EDD service products in a table. You can use Easy Digital Downloads to sell services via any page on your website. Just put the Posts Table Pro shortcode wherever you want to display your WordPress services list.
Your finished table of Easy Digital Downloads service products might look similar to this:
Perfect!
5. Sell service subscriptions with Easy Digital Downloads
Finally, you can install the EDD Recurring Payments extension to take regular payments for services. This automates the payment for regular services, so you don't need to worry about taking payment manually.
Selling bookable services with EDD bookings
You can also use the EDD Bookings extension to sell services using Easy Digital Downloads. This means that a client can pay for a service for a specific period of time. This can apply to doctor's appointments, yoga sessions, consultancies, hairdresser appointments and much more.
Once the extension is installed, you can set up Services, each with its own set of criteria.
Every service will have its own name, description and image, all of which are used when the client selects a service from the booking form. A service will also have one or more session types. For example, a consultancy could be offered as a 30-minute session or a 60-minute session. They would each have their own price.
The availability of a service is when it will be available for booking. As an admin, you can set up various rules to determine the dates and times your clients will see as bookable on the calendar in the booking form.
To list your bookable EDD products on your website, follow the instructions in the previous section to list them with Posts Table Pro. Instead of having purchase buttons directly in the table, use the 'Links' option to allow customers to click through to the single download page for each service. From there, they can complete the booking form and purchase the service.
As the business owner, you will be able to monitor all your bookings from a list or calendar view. You may also create bookings manually from the back-end, which works great for bookings that are requested in-person, on the phone or via email.
If you want customers to book specific times, then combining Posts Table Pro with EDD Bookings is the perfect solution.
Start selling services in WordPress!
Even though you carry out services manually, you can save time and get more customers by selling services in WordPress. Use the instructions above to display the WordPress services list and let customers order services online and pay manually, or automate the sales process for your services using WooCommerce or Easy Digital Downloads. Once you've added your list of services to WordPress as e-commerce products, use either WooCommerce Product Table or Posts Table Pro to display them in a user-friendly layout.
This is the best way to attract customers and sell more services. To take things to the next level, you can set up an email marketing and digital marketing strategy to promote your services.
If you've used any of the methods in this tutorial to sell and list your services in WordPress, please let me know how you get on. I'd love to add some case studies to this article (which will include a link to your website!). Please add your comments below.
Need to hide a WooCommerce category from the shop page? Sometimes you might have products that you don't want to publicly list on your shop page. To your dismay, though, WooCommerce doesn't have the option to hide categories from the shop page.
One of the key features of WooCommerce is its ability to organize products into categories, making it easy for customers to navigate and find what they're looking for. However, there may be times when you want to hide a particular category of products from the shop page.
Sometimes you need a happy medium between hiding a single product and hiding your entire WooCommerce store. Perhaps you have some products that are not quite ready for public release, or maybe you want to restrict certain items to a specific group of customers. Whatever the reason, you may be disappointed to learn that there is no option for WooCommerce hide category from shop page.
This can be a frustrating problem, especially if you have spent a lot of time and effort creating your WooCommerce product categories and organizing your inventory. Thankfully, there are a few methods available that can help you achieve your goal of hide category from shop page WooCommerce.
Benefits of hiding categories in WooCommerce
One of the key features of WooCommerce is its ability to organize products into categories, which can be helpful for customers who are trying to find specific products on the website.
However, there are situations where WordPress site owners may need to hide category WooCommerce of products. For example, if a product is out of stock or has been discontinued, you may not want that category to be displayed on the WordPress website. This can help to avoid confusion for customers who may be interested in the product, only to find that it is not available for purchase.
Another reason why it's important to be able to use WooCommerce hide category feature is to simplify the navigation of the website. When there are too many categories displayed on the website, it can be overwhelming for customers to find the products they are looking for. By hiding specific categories on your ecommerce store, you can provide a simplified user experience for your customers and potentially improve your store's SEO or search engine ranking. Hiding irrelevant categories reduces clutter, highlights the most relevant products, and can lead to higher customer engagement and satisfaction, ultimately resulting in increased conversions.
When to hide categories in your WooCommerce store
Effective category management is a key aspect of running a successful online store. Improving website usability and enhancing the customer experience can be achieved by strategically hiding certain categories in WooCommerce. To learn how to hide categories in WooCommerce and implement this effective approach, continue reading. Here are some common examples of when hiding categories can be beneficial for WooCommerce shops:
Discontinued products: When a product is no longer available for purchase, it's important to remove it from the website to avoid confusion. By hiding the category of discontinued products, you can ensure that customers don't see or try to checkout these items.
Out of stock items: If a product is temporarily out of stock, you may want to hide category WooCommerce until the product is back in stock. This can help to avoid customer frustration and reduce the number of inquiries about the availability of the product.
Seasonal products: Some products may only be relevant during certain times of the year. For example, Christmas decorations may only be relevant during the holiday season. By hiding the category of seasonal products during the off-season, you can create a more streamlined user experience and avoid overwhelming customers with irrelevant products.
Restricted products: Some products may be restricted by age, location, or other criteria. By hiding the category of restricted products, you can ensure that only eligible customers are able to access these items.
Exploring different methods to hide WooCommerce categories
If you want to hide specific categories on your WooCommerce shop page, there are two main methods you can use.
Method 1: Using a plugin to hide categories
Using a plugin is the recommended method for hide category from shop page WooCommerce. The main benefit of using a plugin is that it is easy to use, even if you don't have much technical knowledge. All you need to do is install the plugin, activate it, and then configure the settings for WooCommerce hide the category from shop page.
To help, we're going to show you how to hide a category in WooCommerce shop page via a user-friendly plugin.
Our simple written tutorial and video will show you how to customize how your hidden WooCommerce categories function - all without writing a single line of code.
Method 2: Hiding categories with code snippets
The second method for hide category from shop page WooCoomerce involves using code snippets. This method requires more technical knowledge than using a plugin, but it can be useful if you want more control over how categories are hidden.
To use this method, you will need to add some code snippets to your theme's functions.php file or to a custom plugin. You can find code snippets for hide category WooCommerce stores, and then modify them to suit your specific needs.
You can customize the code for WooCommerce hide category from shop page in a specific way or to achieve a particular result. However, it's worth noting that using code snippets can be risky if you don't know what you're doing, as a mistake could break your site or cause other issues.
The best plugin to hide a WooCommerce category
The problem
There are lots of reasons why you might want to use WooCommerce hide category from shop page from the main page. For example, maybe you're creating a WooCommerce wholesale store and need to hide the wholesale categories from the shop page. Maybe you're selling customer-specific products, with a hidden category for each company.
Whatever you're reason, unfortunately, WooCommerce doesn't come with an option to do this.
While it is possible to use a PHP function for WooCommerce hide category from shop page, that solution:
Isn't very user-friendly because it requires you to work directly with PHP code, rather than a human-friendly interface.
Makes it difficult to change which categories are hidden later on, because you'll need to dive back into the code every time you want to make an adjustment.
The solution
WooCommerce Protected Categories offers a simpler solution to hide a WooCommerce category (including all products/subcategories inside). It:
Gives you more flexibility than the WooCommerce PHP function in terms of how shoppers interact with your hidden categories.
Lets you choose which categories to hide right from your WordPress dashboard.
Lets you decide whether use WooCommerce hide category from the shop page completely, or whether to show them but require customers to enter a password or login to access a protected category or its products.
How does this WooCommerce hide categories plugin work?
To hide WooCommerce categories, you can use the WooCommerce Protected Categories plugin. It enables you to conceal one or multiple WooCommerce product category within your WooCommerce store. When you hide a category from the shop page…
All the products inside that category are also hidden.
You can choose whether or not to display hidden categories and their products on your shop page, category pages, archive pages, and search results.
With the WooCommerce hide product category functionality, you have the flexibility to decide whether hidden categories and their associated products should be visible in your navigation menus and widgets.
And as I mentioned earlier, you can "unhide" your categories via:
A password - once a user enters a correct password, the plugin automatically unlocks all the products in that category. They can then navigate through the hidden category and its sub-categories without having to re-enter the password.
User roles - by utilizing the WooCommerce hide category by user role feature, you can restrict visibility of hidden categories and their corresponding products exclusively to users with specific user roles.
Individual users - only selected logged in users can see the hidden category and its products.
Have a read through this glowing review from a happy customer using the WooCommerce Protected Categories plugin:
I highly recommend Barn2's 'WooCommerce Password Protected Categories' plugin for a whole range of uses. For our particular use, we needed to allow only certain categories of our products to be accessed by 'select' customers, with a shared password. The plugin enabled us to do this really simply and cost-effectively. Whenever we have needed any assistance with the plugin Barn2's team have been very helpful and prompt with their replies.
I'm sure this is a decision you won't regret.
Step-by-step guide: How to hide WooCommerce categories with WooCommerce Protected Categories
Below, we'll show you how to hide WooCommerce categories on shop page using WooCommerce Protected Categories.
Step 1: Choose how to hide your categories
First, install and activate WooCommerce Protected Categories in the WordPress admin panel. Next, go to Products → Categories to hide WooCommerce categories on shop page.
You can either create a new category to house your hidden products or you can edit an existing category. Whichever method you choose, you'll see a new Visibility section at the bottom of the page. Click the 'Protected' option, and choose between:
Password protected Visitors will need to enter a password to see the category. You can create multiple passwords to unlock the category if desired.
User roles Your category will only be visible to certain user roles.
Users Your category will only be visible to the users that you select here.
Once you've hide WooCommerce categories on shop page or category page via either method, go to WooCommerce → Settings → Products → Protected categories to configure a few more basic settings.
Step 2: Configure general plugin settings
One especially important group of settings is Category Visibility.
If you want to completely remove a WooCommerce category from the shop page, you should uncheck both boxes. Alternatively, tick both boxes to still display the category, but require users to enter a password or login to see its contents.
Use the other settings to control your password login form, and what happens when a logged-out user tries to access a protected category:
Step 3: Enable password protection, user role restriction, and more
Once you've hide WooCommerce categories on shop page, you'll want to provide other ways for selected customers to access them. There are a few ways to do this, depending on whether you've hidden the categories behind password protection or user login.
Providing access to WooCommerce password protected categories
Create a central category login form by adding the shortcode [category_login] to any page. Customers will be directed to the hidden category with the password they have entered. Once unlocked, the customer will be able to see the protected category, products and pricing and cart buttons on the main Woo shop page. The protected content will remain hidden from the store catalog for everyone else. As store owner, you can customize the hidden category login page in the plugin settings.
Providing access for a user or role-protected WooCommerce categories
If you've created user or role protected categories, then there are some different settings for your hidden categories. These let you choose what happens when someone without the correct privileges (e.g. a logged out user) tries to access a WooCommerce hidden category or product.
To provide access to the WooCommerce hidden category, simply encourage users to login as usual. For example, they can login using the WooCommerce Account page, which shows a login form for logged out users.
I also recommend using the free Peter's Login Redirect plugin. Use it to redirect users to the correct hidden category after they log in. This gives you fine-grained control over where each individual user or user role is redirected after logging in.
Attendees download course materials ahead of the training session. But these materials need to be kept private. That’s why they needed a WooCommerce hide category WordPress plugin. Files are hidden behind a password protected category page and eLearning Launchpad sends out passwords to access the page. From there, customers can download materials. The Free Downloads WooCommerce Pro plugin lets eLearning Launchpad capture customer data before files are downloaded.
The downloads are set up as WooCommerce products even though they aren’t being sold on the ecommerce site. This is to simplify managing the downloads and take advantage of the benefits, such as being able to hide categories and products in WooCommerce.
Below, I'll show you how to use this WooCommerce hide category plugin…
Alternative method: How to hide categories through shortcodes
Another way to utilize WooCommerce hide category on your main shop page is by using HTML and CSS. This method requires some technical knowledge.
First, you need to inspect the category you want to hide on your product page using your browser's developer tools. You can then identify the HTML element that represents the category and its ID or class. Once you have this information, you can add some custom code that hides the category by setting its display property to "none."
It is important to note that using how to hide categories in WooCommerce only affects their visual display and does not impose any actual access restrictions. Users can still access the hidden category through direct links or by typing its URL. So, if you want to restrict access to the category, you'll need to use the WooCommerce Protected Categories plugin.
It's worth noting that if you're not familiar with coding, using this method can also be risky. A mistake in your code could break your site or cause other issues. Therefore, you should only use this method if you have some basic knowledge of HTML and CSS or if you're working with an experienced WordPress developer.
Efficient category management is crucial for a well-organized and user-friendly online store. Here are some tips to optimize your category management process. Use them to ensure smooth navigation and a seamless shopping experience for customers:
Organize categories thoughtfully: Take the time to carefully plan and structure your categories. Ensure that they are logical, intuitive, and reflect the products you offer. Consider creating subcategories or using parent-child relationships to further organize your products. This helps customers easily locate the items they are looking for and improves the overall browsing experience.
Utilize conditional rules: Leverage the power of conditional rules to further customize category visibility. With the right plugin, like WooCommerce Protected Categories, you can set up rules based on user roles, membership levels, or other criteria. For example, you can hide specific categories from general customers while making them accessible to VIP members-only. This level of control allows you to provide tailored experiences to different customer segments.
Prioritize category display: If you have overlapping or conflicting rules for category visibility, prioritize the display order. For example, if a customer belongs to multiple user roles, you can prioritize the display of categories associated with their highest role.
Regularly review and update: Category management is an ongoing process. Regularly review your category structure, rules, and priorities to accommodate any changes in your product offerings or customer segments. Monitor customer feedback and behavior to identify areas for improvement or potential adjustments to your category management strategy.
Test and optimize: Experiment with different category arrangements, conditional rules, and priority settings. This lets you find the optimal configuration for your specific business needs. Test the user experience and gather feedback to fine-tune your category management strategy.
Start hiding WooCommerce categories today!
If you have products that you don't want to publicly list on your WooCommerce shop page, you can easily hide them using the Protected Categories plugin. This is the best WooCommerce hide category from shop page option. That's because it's easy to use and doesn't require technical knowledge.
The plugin is super-flexible. You can choose to require a password, restrict access to certain user roles, or only allow specific individual users to view the hidden categories.
Questions about how to hide a category in WooCommerce shop page? Leave a comment and we'll do our best to help.
Thierry at Photo Studio TNK is a photographer in Paris, France. He does photoshoots for clients and then sells them securely on his WooCommerce photography website. Thierry spent a long time searching for suitable WordPress plugins that would allow him to do this. After much research, he found the perfect solution in our WooCommerce Protected Categories and WooCommerce Product Table plugins, combined with some other third party plugins.
The way it works is that each photography client has their own hidden WooCommerce category, containing their photos. No one else can see these hidden photos. When the client enters the password, they are taken to an exclusive WooCommerce page listing their photos in a filterable table layout. They can view photos, select variations and quantities, and add multiple photos to the cart. This makes it quick, easy and secure to order photo prints with WooCommerce.
After telling Thierry's story, I will provide step-by-step instructions on how you can achieve the same setup to sell your own photography in WooCommerce.
I am a studio and wedding photographer: https://photostudiotnk.com/en (not every page is translated in english, I never had the time…).
I am 58.
In other lives I used to be an engineer, a searcher, a software developer, the CEO of an Open Source Company, etc., but I have practiced photography since I was a kid.
Some years ago, I decided to quit « industry world » to become an independent photographer and build my own company.
My business model is mainly about studio photo sessions and weddings. But selling prints is also part of my business (I print photos by myself on a A2 Canon Pro Printer).
The problem
If you have dozens of photos every week, you can find software that can be more or less OK to sell prints.
But, for weddings, which are the main source of revenues, nothing really exists on the shelf to sell prints. (I have tested nearly every software that exists - either with WooCommerce, or independent of WooCommerce.)
Between May and October, I have about 500 photos to post-treat and put online EVERY WEEK. And no software exists for this amount of photos. I need to show photos to customers in a unique easy to use interface, where they can buy several photo prints on the same page.
The solution
The first thing to do is to make a product for each of the 500 weekly photos. Using CSV to do this is archaic and prehistoric!!!
So, now I use this to make products from each of my photos. And it does this very well.
Now, some thoughts about galleries, lightboxes, etc…
I think that galleries, with fancy layouts, lightboxes, etc, belong to the past.
Why?
because more than 70% of web accesses are made from smartphones. Who cares about galleries, lightboxes, fancy boxes and gallery themes to see photos on a smartphone?
Of course, I have to « show » the photos to my brides, grooms and their guests, so I need « something » for showing the photos.
But, from a marketing point of view:
the page to see the photos and to buy them MUST be the same (no click to go to a shopping page): this is a key point: when a potential customer is on a page to see photos, do not ask him to go on another page to buy prints!!
the photos should be "big" enough both for desktops screens (30% of my customers) and for mobiles (70% of my customers), without need of gallery functions or lightboxes. What I sell is photo prints, not gallery themes!!
So I decided to give the WooCommerce Product Tables plugin a try.
My settings
Here is some feedback about my settings:
Lazy load is mandatory with 500 photos in a category.
Image size « original » is the only way to get big enough photos both on desktops and mobiles. I tried « large » but it does not work on mobiles, image size is not responsive. medium is too small on desktops, and defined sizes seem not to be responsive. (Editor's Note: All themes have different default image sizes, so you'll need to experiment to find the right size for your photos or add a custom size.)
I added a filter of each wedding moment (engagement, preparation, church, cocktails, etc) using categories (sub categories of the main category for a given wedding).
Use the add to cart checkbox option to add photos to the basket. This encourages customers to buy more photos…
I customized this template to show my « free downloads » category on the same page as the photos. This is because I offer free low res photos downloads to my customers using the Free Downloads WooCommerce plugin.
Photography client login page (created using WooCommerce Protected Categories plugin)
Hidden client gallery & sales page selling photo prints (created using WooCommerce Product Table plugin)
How to create your own WooCommerce photography website
Thank you very much to Thierry for sharing his story. Next, I'll provide step-by-step instructions on how to use WooCommerce to sell to your own photography clients via their own individual client area.
Your finished WooCommerce photography website will have these features:
Each client will have their own private category, hidden from public view. You can choose whether clients must enter a password to view and buy their protected products, or log into their individual user account. (Either way, we'll need the WooCommerce Protected Categories plugin for this.)
You can easily bulk upload photos from each photoshoot to the WordPress Media Library and convert them into sellable WooCommerce products. (We'll need the Product CSV Import Suite plugin for this.)
Each client's photos will be displayed in a filterable table layout with add to cart checkboxes. (We'll need the WooCommerce Product Table plugin for this.)
Before you start, you need a WordPress website with WooCommerce already installed.
Step 1 - Create a private WooCommerce category for each photography client
Go to WooCommerce > Settings > Products > Protected Categories in the WordPress admin. Paste the license key from your order confirmation email, and make sure the Catalog Visibility boxes are unticked. This keeps your photography clients' photos hidden from the public parts of your site.
Go to Products > Categories and create a separate category for each client. Choose the 'Protected' option and either password protect the category or use the 'Users' option to automatically unlock them for individual logged in clients. Either option is fine, but the 'Users' option will require you to create a separate user account for each client. If you don't want this, then use WooCommerce password protected categories instead.
Add any sub-categories, e.g. 1 for each of the client's photoshoots, or 1 for each part of their wedding. Leave these set to 'Public', as the plugin will automatically protect them with the same protection as the client's main category.
Finally, create a user-friendly way for clients to access their hidden photo product categories. This depends on what type of category protection you're using for your WooCommerce photography products:
Password protected categories - Create a new page where customers will log into their hidden category. Add the shortcode
to insert a login form. Link to the photography client login page from the main menu on your website (Appearance > Menus).
User-protected categories - Add a link to the WooCommerce 'Account' page to your website menu. This displays a client login page for logged out users. Install the free Peter's Login Redirect plugin and go to the plugin settings page. Create a login redirect for each client so that they are automatically forwarded to their hidden photo category after logging in.
Step 2 - Bulk upload photos from each photoshoot and convert them to WooCommerce products
Use these instructions to create a gallery for each photography shoot. This will let you upload all the photos to the WordPress media library, before you convert them into WooCommerce products.
Use the Products CSV Import Suite documentation to create a CSV file containing the data for all the photos and variations that you want to add as products, plus the URL's of the photos you just uploaded.
Import your CSV file to WordPress in order to create the products, each one linked to the correct photos.
Now, go to the 'Products' list in the WordPress Dashboard. You'll see your photos listed as proper WooCommerce products, complete with prices, variations and more.
Step 3 - Sell to your photography clients with a WooCommerce product table layout
In the WordPress Dashboard, go to WooCommerce > Settings > Products > Product Tables.
Enter the license key from the order confirmation email, and choose all the settings for your product tables. (Tips: As Thierry recommended above, you'll probably need to enable lazy load. You'll also want to experiment with different image sizes to perfect the presentation of your photography products. It's also a good idea to activate variation dropdowns (if you're selling variable products) and choose the 'checkbox' add to cart button style to encourage customers to buy more.)
Next, you need to add the product table layout to the product category archive template in your theme. This is necessary to show product tables on each client's password protected category. Use these instructions for this step.
Finally, view one of your password protected category pages. Once you've entered the password, you'll see all the client's photos in a neat product table grid.
Bonus step (optional) - Add a WooCommerce quick view gallery for each product
If you only need to upload one image for each product, then you can skip this step. Or if you're uploading multiple images for each product, then you need a way for customers to view the full image gallery. That's where a quick view gallery comes in!
The WooCommerce Quick View Pro plugin is designed to work on its own, or alongside WooCommerce Product Table. It adds quick view links and/or buttons. You can choose what information to include in the quick view lightbox. This includes the full product image gallery with a choice of 2 gallery styles (thumbnails or bullet navigation). You can also show product data and add to cart options directly in the quick view.
Quick view lightbox with thumbnail image gallery and no product information
3 WooCommerce Quick View layout options: Image only, Product Details only, or both
2 gallery styles for multiple product images - bullet navigation or thumbnails.
Quick view is the perfect addition to your list of WooCommerce photography products.
Once you've completed these steps, the next step is to give your customers the logins so they can start buying photo prints online!
There are lots of reasons why you might need to create an all products list on a single page of your WooCommerce website.
For example, maybe you want to create an index page listing your entire inventory. Maybe you don’t like the way products are listed on the main WooCommerce shop page, and would prefer a WooCommerce list view on your homepage. Perhaps you’re building a WooCommerce order form and want customers to be able to quickly select products from your whole range.
I’m going to tell you how to use our bestselling WooCommerce all products list plugin to display all products in a table.
And it’s not just any table. Your all products table can contain whatever product data you like, with user-friendly extras such as search box and filters. Unlike some WordPress table plugins, it will even be fully responsive and work beautifully on mobile devices and tablets!
Keep reading and I’ll tell you all about it.
What is the WooCommerce all products list plugin?
You can list all products in a table using the WooCommerce Product Table plugin. This popular all products list plugin for WooCommerce takes the products already in your WooCommerce store, and automatically lists them all in a flexible table layout.
The plugin has over 50 options, which let you configure your all products tables to your exact requirements. Here are some of the main plugin features to list all WooCommerce products in a table:
Choose your table columns The product list plugin supports all the standard WooCommerce product data. Each piece of data (product information) can be listed as a separate column in the all products list. You can keep it simple and just list all your WooCommerce products with a column for the product title and nothing else. Or if you prefer, you can add extra columns for other product data (or "Free Download" links), and even extra columns for WooCommerce custom fields and taxonomies. This makes it a very powerful way of listing all your e-commerce products.
One-page order form option If you just want to list all products for information purposes, that’s fine. You can create a basic WooCommerce list view, either with links to the single product page where people can purchase or with no links at all. Alternatively, you can include an add to cart column in the list of products. After adding products to cart, customers can proceed straight to checkout. This column converts your product list into a fully-fledged WooCommerce order form, complete with variation dropdowns, add to cart buttons and quantity arrows.
More features
Let customers search and filter the all products table - If you have a large product inventory, then you’ll want to add extra controls to help customers find specific products. WooCommerce Product Table comes with an optional search box. You can also add filter dropdowns above the list and/or sidebar filter widgets. Customers can click column headers to re-order the list in real-time. This makes it quicker to find products. Or for even more advanced filtering, install the WooCommerce Product Filters plugin.
Set the order of the all products list - By default, the plugin lists all WooCommerce products with the most recent first. You can change this and order in other ways, e.g. alphabetically. This is AJAX-based so it will appear to happen in real-time.
Choose pagination styles and how many products to list per page - Your WooCommerce product table will list all products on one page, but that doesn’t mean that you want them all visible at once! Control how many rows of products to show on each page of the table. Choose from 4 pagination styles to display page numbers and previous/next buttons.
List unlimited products - With a one-page product list plugin, you’re potentially loading far more data at a time than the default WooCommere layout. WooCommerce Product Table makes this possible as it has a lazy load option. By activating lazy load, the table loads 1 page of products at a time. This keeps it loading quickly, even if you display hundreds or thousands of products.
Choose whether to include images - Some products sell best with big images, others with small images, and others with no product images at all. You can do any of this with WooCommerce Product Table.
Optional quick view - WooCommerce Product Table has a sister plugin, WooCommerce Quick View Pro. Use both plugins together to add 'Quick View' buttons to your list of products. Customers can use these to view extra product data and images in a lightbox, without having to visit the single product page. Once they're done, they can proceed to checkout.
In the WordPress admin, go to WooCommerce > Settings > Products > Product tables. Add your license key and read through all the settings, choosing the ones that you want for your WooCommerce all products list.
Now create a page where you want to list all products in a table (Pages > Add New.
Add a shortcode to your page: [product_table].
Publish the page and view it. You’ll see a list of all your WooCommerce products, professionally presented in a neat table layout.
Well done - you’ve created an all products table in just 5 simple steps. Nice!
What if I don’t want all products in the table?
This article is about how to use WooCommerce Product Table to create a list of all of your WooCommerce products. If you want to choose which products to include, that’s fine too. The plugin has plenty of options to display products based on category, tag, and various other data.
This way, you can choose to create a list of products from a specific WooCommerce category instead. For example, you can list IOT (Internet of Things) products on one page and regular tech products on another. Or, you can list all WooCommerce products that fall under a specific tag. For some online stores, this may deliver a better user experience to shoppers.
Where to get the plugin
As you can see, it’s easy to use WooCommerce Product Table to list all products in a neat table view. Spend some time experimenting with the plugin options and getting the list exactly how you want it.
I’d love to hear how you use the plugin to display products. Do any of the use cases that I mentioned above apply to you, or are there others I’ve missed? Please leave your comments below.
Do you need to create a WooCommerce grid / list view for your store? Keep reading to learn how to use the bestselling WooCommerce Product Table plugin to let customers choose between a grid or list view of your products. This can make your store more user-friendly and improve your conversion rate.
I’ll also provide full step-by-step instructions on how to create your very own WooCommerce grid/list view toggle.
Why do I need a WooCommerce grid/list view plugin?
When you create a fresh WordPress/WooCommerce install and add a theme, your store will come with some fairly standard built-in layouts. Your products will be listed in a default grid layout with approx. 3 products on each row, large product images, and some basic data such as name and price. There will be an add to cart button but no extras such as quantity arrows or variation dropdowns. Each product will take up quite a bit of the page because of the large images and extra space between each row.
Some types of product lend themselves perfect to this default grid layout. However, others don’t sell well in this way.
When you set up WooCommerce, it’s important to think about the best way to present the types of products you’re actually selling. Don’t just stick with the grid that comes with your WordPress theme.
Many types of products sell better when listed in a tabular WooCommerce list view. The data is listed in a much more structured way, with each product on its own row of table, and multiple columns of information about each product.
Other products work well in either format, but it's nice to give customers a choice of how to view products.
Keep reading to learn how to display products in a table-based list format; and also how to add a grid/list view toggle so that customers can switch between the two views.
While you’re reading this, I expect that you’ve already started thinking of ways a WooCommerce grid or list view can boost your sales. Here are some of the main reasons:
More products per page
A WooCommerce list view plugin lists products in a way that takes up significantly less space per product. This means that customers can see more products at a time. They don’t have to scroll as much or click to multiple pages. This helps them to find and buy products more quickly, boosting your conversion rate.
More product data directly in the list view
When you discover that a list view plugin uses less space per product, you might assume that it contains less information about each product. Surprisingly, the opposite is actually true!
By listing products in a space-saving table, each product takes up a small amount of space. But the extra columns let you display extra product data, all within the table view.
You can see how this works in the screenshots below. As you can see, the default store layout displays just 3 products in the same space as the WooCommerce list view shows 6! Yet the table layout contains columns for extra data, quantity and variation options which aren’t available in the basic layout. It’s a win-win, for both you and your customers!
Left: Grid view. Right: List view.
Order form functionality
When you use WooCommerce Product Table to create a list view, you can just list products with links to the single product page. If you prefer, you can even disable the links and use it to create a read-only product catalog.
But for many stores, the best way to grow your sales is to use the product list view to use it as a one-page WooCommerce order form. An order form layout puts ALL the information that customers need to buy on a single page. There are extra columns of information to allow customers to make buying decisions. And once they’ve chosen, they can quickly select the products they require, choose variation options and quantities, and add them to the cart.
By adding these extra purchasing elements, you can transform a basic product list view into a fully functional WooCommerce order form. The entire ordering process is kept on a single page, which significantly speeds up the buying process. And research shows that the quicker the buying process, the more sales you’ll get!
What types of products sell better in a list or grid layout?
Like I said, some products sell best in a list view, while others benefit from having a grid view too. You need to think about the types of products on your store. Decide which layout will best boost your sales - or whether it's best to let customers toggle between a grid/list view.
Here are some examples of products that work well when listed in a WooCommerce table view:
Non-visual products such as car parts - Lots of WooCommerce stores sell products where data is more important than what the product looks like. If you’re selling something like car parts where looks aren’t important, then it’s much better to list products in a compact list view. Sure, you might have a small thumbnail image of each product (although this isn’t essential). But you shouldn’t use the huge images that come with the standard grid layout.
Industry-specific products such as restaurant foods - Some types of product sell best when displayed in a specific way, based on customer expectations. For example, a restaurant online ordering system is most effective when the foods are presented in a way that mimics the layout of a printed restaurant menu. The best way to achieve this is via a web page with separate product tables for starters, main courses and desserts, with quick tick boxes for customers to select foods and order online.
All wholesale products - If you’re building a WooCommerce wholesale store, then a product list view will nearly always be better than the standard layout. That’s because by definition, wholesale users are regular customers and are already familiar with your products. They don’t need a grid of large pictures to help them make buying decisions. Instead, they need factual information and a fast buying process. A WooCommerce wholesale order form listing your products is exactly what trade users need.
What products aren't suited to a WooCommerce grid/list view plugin?
I would say that clothes and furniture are examples of products that aren't suited to a WooCommerce grid/list plugin. For something like clothes or furniture, customers need to see big images of each product. After all, they’re buying based on what the product looks like!
Are your products similar to the examples listed above, where space and factual information are the priority. Or are they more like clothes or furniture, where large images are what matters?
Perhaps you have some products that you’d like to list in a tabular grid layout, and others where you’d prefer the built-in store layouts. Maybe you want to let customers choose between a grid/list view of your products. That’s absolutely fine, as you can use both in different parts of your store - or on the same page, with an option to toggle between the grid/list.
Keep reading to learn how to set up either option.
How to create a WooCommerce list view
By now, you should have decided whether your products will sell well in a table-based list view - either as the only way to present your products, or with a toggle to switch between the grid/list layout. Next, I’ll tell you how to use the WooCommerce Product Table plugin to create a list view for some or all of your products. After that, you'll learn how to let customers choose between both layouts.
Next, go to WooCommerce > Settings > Products > Product tables. Add your license key (you’ll find this in your confirmation email). Then look through all the settings and choose the default options for your product tables. Use the knowledge base links for guidance on how to choose which columns of data to include in the product grid view, add filters above the table, etc.
Next, create a new page where you want to display products in a WooCommerce list view.
Add a shortcode to your page: [product_table]
If you want to list all your products on a single page, skip to step 6. To list specific products only in the table, use these instructions to select products based on their category, tag or other data.
Finally, publish and View the page.
You’ll see your products beautifully displayed in a WooCommerce product list view with the options you selected on the plugin settings page. Read through the full list of product table options and tweak them until you’re completely happy.
Can I import products to the list view?
As you can see, it’s pretty easy to list your existing WooCommerce products in a grid/list view. The neat thing is that WooCommerce Product Table takes the products already in the WordPress database and instantly lists them in a table layout. No extra data entry required.
This means that if you haven’t already added your products, you can import them using the built-in WordPress/WooCommerce importer or any CSV import plugin. This is a handy way to bulk import products to your site.
How to add a product list view to the main shop and category pages
In the above instructions, I told you how to list products in a table view on any page. This is a handy way to list some products in a table, while still using the built-in WooCommerce grid for other products.
If you prefer, you can add the product table layout directly to the template files in your theme. This will replace the standard layout throughout your store. For example, it changes the layout on the main WooCommerce shop page, product category archives, etc. The benefit is that the WooCommerce list view will be used whenever someone accesses any pages in your store. You don’t have to add any shortcodes to your site or specify which products to list on each page.
The method for doing this is slightly more technical, as you actually have to modify template files in your theme. There are instructions on how to do this in the plugin knowledge base.
Let customers toggle between the grid/list view
So far, we've looked at how to replace the standard grid layout with a product list view.
If you'd rather let customers toggle between the product grid/list view, then that's fine. Simply follow the instructions in this knowledge base article to add these links to your shop and category pages.
Add quick view to the grid/list of WooCommerce products
Sometimes, you'll find that you want to show extra information about each product but don't want to take shoppers away from the grid/list view. You might also have too many variations to list directly in the grid of products. This is a valid concern, because customers will buy more from you if they remain on the list of products and don't get lost on individual product pages.
The solution is to use WooCommerce Product Table with WooCommerce Quick View Pro. This adds user-friendly 'quick view' buttons to the list of products, or to the default product grid. Customers can click on these to view extra product images, more information and even choose variations and add to the cart from a quick view lightbox.
It's the perfect compromise because you can show information that wouldn't fit in the product table; without taking customers to a separate page.
A WooCommerce grid/list view plugin like WooCommerce Product Table isn’t for everyone. Consider the type of products in your store, and whether displaying them in this layout will improve customer experience.
For less visual products, listing items in a compact table layout with extra information can make a huge difference to sales. Get the plugin, follow the instructions to set it up, and improve your store layouts today.
Looking for a WooCommerce private category plugin to make one or more categories at your WooCommerce store private?
While WooCommerce includes built-in functionality to make a single product private, it's not really suited for making an entire category of products private because:
It's time-consuming.
It greatly complicates managing your private products later on.
To save a lot of time and give you more flexibility, you can use a WooCommerce private category plugin like WooCommerce Protected Categories.
With this plugin, only users with certain user roles (that you can choose) will be able to see the product categories that you mark as private - or the products within them.
How does this WooCommerce private category plugin work?
Only logged in users with a certain role can see the private WooCommerce category or its products.
The private category and its products will be hidden from everyone else - including on your shop page, category pages, archive pages, search results, navigation menus, and widgets. (There's also a setting to show protected categories and products in public areas, if you prefer.)
You can choose which user roles have access to the private category. For example, you might want to make the private categories available to all logged in users, or a specific role such as 'wholesale'.
All the products in that category are also private.
Any subcategories are also private.
Below, you'll learn how to use this WooCommerce private category plugin.
To do that, go to Products → Categories to view a list of all your WooCommerce product categories.
Edit an existing category or create a new category that you want to make private.
Whether you're creating a new category or editing an existing one, you should see a new Visibility option near the bottom of the page.
There are a few options here:
Protected - Tick this to see a choice of 3 options below:
Password protected - Make the category private so that only people with a correct password can unlock it. Enter 1 or more passwords.
User roles - Make the category private so that only certain logged in WordPress user roles can see it. Select the user roles here. You can easily create extra user roles (e.g. 'Wholesale') with the free User Role Editor plugin.
Users - You can also make WooCommerce categories private to individual users, and hidden from everyone else.
Private - This is another way to create a private WooCommerce category. It uses the 'Private' posts feature built into WordPress itself, which restricts content to specific user roles (normally administrators and store managers). Use the private categories option if you already use private posts/pages/products elsewhere on your site. But for most people, the various 'Protected' options are best because they give you more fine-grained control.
At this point, your category and all its products are private. But you still will likely want to perform a few additional steps to configure how that privacy actually functions.
To configure the plugin's general settings, go to WooCommerce → Settings → Products → Protected categories.
There are lots of options here for how your private WooCommerce categories will behave. For example, this is where you customize the login page and choose what happens when a logged out user tries to access a protected category. You should also use these options to choose whether or not to show private content in the public parts of your store.
You can also choose whether not to add a 'Protected' or 'Private' prefix to the category page. Here's an example of the WooCommerce private category prefix setting:
Can I put a product in a public category and a private category?
Each product can only be in a private WooCommerce category OR a public category - not both.
If you want to put the same product in a public and private category (for example, to charge different prices to different users role) then you can easily clone WooCommerce products using the free Duplicate Post plugin. Just bear in mind that when someone accesses a private category, they can still see all your public products.
(If you're cloning products and want to manage inventory across each version of the product then we recommend the Group Stock Manager plugin. This lets you share stock levels across multiple products.)
Can I create different private categories for different users?
Yes! You can either do this by creating a separate WooCommerce password protected category for each person; a separate category for each user role; or a unique category for each user. You can create as many protected WooCommerce categories as you like, each with different protection options. You can then give a password to everyone who needs access to them. This is a good way to create customer-specific products.
Please note that the 'Private' categories option doesn't let you create user-specific products, as they're visible all logged in users with access to private content. Use one of the three 'Protected' options instead.
Save time with a WooCommerce private category plugin
By using a WooCommerce private category plugin, you can easily make multiple products private and control exactly who has access to them.
Have any other questions about how this WooCommerce private category plugin works? Just leave a comment and we'll try to help you make your decision!
WooCommerce is a fantastic plugin for selling any type of product online. There are also lots of great WordPress pricing table plugins, ideal for creating tables listing your prices.
Unfortunately, there aren't many WooCommerce Pricing Table plugins that automatically create price tables for your products or variations. Most WooCommerce stores end up installing a generic WordPress pricing table plugin and manually entering the prices. That's crazy because your product prices are already stored in the WordPress database!
Today, I'm going to tell you about two different types of WooCommerce pricing table plugin. They both work by creating automatic pricing tables for your products or variations. No more manual data entry!
Plugin 1: WooCommerce Product TableWooCommerce Product Table creates a pricing table of several or all of your products. You can show as many columns of information as you like, including a price column, product images, and optional add to cart column.
Plugin 2: Bulk VariationsWooCommerce Bulk Variations creates a pricing table of the variations for a specific plugin. You can display the variations as a price matrix with prices and no add to cart buttons; or you can include quantity fields and add to cart buttons.
Plugin 3: WooCommerce Discount Manager/list_heading]Discount Manager lets you create a wide range of discounts, including bulk discounts with tiered pricing tables which you can display on product pages.
Plugin 1: WooCommerce Product Table
2 - Price matrix
3 - Tiered pricing table
As you can see, all three plugins create similar-looking pricing tables. The main differences are that WooCommerce Product Table can list products or variations for multiple products together, whereas WooCommerce Bulk Variations creates a price matrix showing the variations for one product only. In contrast, WooCommerce Discount Manager displays quantity-based discounts to encourage customers to spend more.
Keep reading to learn more about each option and how to set it up.
Plugin 1: WooCommerce Product Table
Instead of creating a product list view, as many people do, we'll be using the WooCommerce Product Table plugin to create a WooCommerce price table. It's perfect for displaying the prices of multiple products at once.
Case study - Print Station's WooCommerce pricing table
Print Station specialize in printing short runs of digitally printed business cards and flyers. They created a WooCommerce pricing table powered by our WooCommerce Product Table plugin.
They’ve used our plugin to create a table of variations and prices because the total price can depend on up to five variables including quantity and paper quality. As a customer makes their selections using the dropdowns embedded into the product table, the price changes with each click.
And since changing any dropdown sees the total price change, the customer can easily play around with their order preferences and quickly find out what everything's going to cost.
Read on to find out how you can add a pricing table powered by the WooCommerce Product Table plugin.
Example: WooCommerce pricing table for an online print shop
To show you how to do it, I'm going to create a WooCommerce pricing table for an imaginary online print shop.
Since digital printing became a thing, lots of companies have sprung up selling online printing services. Nearly all digital printing websites provide price lists showing the pricing for each quantity option. For example, an e-commerce site that prints flyers will have a fixed price for print quantities of 100, 250, 500, and so on. You might have different prices for multiple combinations of options - such as size options as well as quantity.
A print shop will add their products and any variations so that people can buy online. They also need a pricing table listing the price options, with buy buttons so that people can order the printed materials.
3 ways to create a WooCommerce price table with product tables
Option 1 - Display each product on its own row in the table, with a single price for the entire product
The standard usage of WooCommerce Product Table is to list each product as a separate row, with a price column. This is a good way to create a WooCommerce price list of simple products, without variations.
The benefit of this option is that as well as the price and add to cart button, you can include extra information about each product. The prices in the 'Price' column are generated automatically based on the main WooCommerce price for each product.
Option 2 - List each price option as a separate row in the table
If you're using variable products, then you might want to list all the variation options to be visible in the WooCommerce pricing table at the same time. To do this, you can use the plugin to create a table of variations and prices.
With this option, the prices shown in the 'Price' column are displayed automatically. It shows the correct price for each variation in the product pricing table.
With this type of WooCommerce product pricing table, each variation is listed individually. The correct price for that variation appears in the add to cart column.
As with Option 1, you have full control over what data to include in the pricing table. You can show or hide columns as needed. In the above screenshot, I've removed the image column because each variation option looks the same. However, you can include an image column with individual variations if you like.
Option 3 - List each product on a single row in the pricing table, with WooCommerce variation dropdowns for each price option
Finally, you can list product variations as WooCommerce variation dropdowns in the pricing table. Each product has its own row, and the variations appear as options in the add to cart column.
As with the other options mentioned above, you can choose whether or not to include a quantity picker so that customers can choose the quantity before adding to the cart. You can also choose which columns to include in the pricing table.
How to add prices with this option
Unlike options 1 and 2, this option has a bit of manual data entry if you want to display it like the above screenshot. For this example, I added the columns showing the price for each quantity as custom fields. I then displayed each price option as a separate pricing table column.
I like this method because you can list all the prices directly in the table, while still having variation dropdowns. The downside is that you have to add the prices to the custom fields manually - you'd need to do some extra coding to automatically populate these based on the variation values. All the other data in the WooCommerce pricing table - i.e. the product image, name, variation dropdowns, quantity picker and add to cart button - are added dynamically.
If you don't want to do ANY data entry, then is an alternative way to display prices with this option. Simply include a 'price' column in the product table, and this will show the price range for all the product's variations. For example, if the cheapest variation costs $10 and the most expensive costs $100 then the Price column will say '$10 - $100' for that product. When a customer chooses a variation from the pricing table dropdown, the actual price will appear underneath. Like this:
As you can see, setting up the product pricing table like this leaves more room for extra columns, too.
Can I create a WooCommerce pricing table without add to cart buttons?
Yes. The plugin can dynamically list product prices in a pricing table without providing the ability to buy now. Simply remove the add to cart column from the price table.
This will work with Options 1 and 2. It won't work for Option 3 because the variation dropdowns can only appear within the add to cart column.
Plugin 2: WooCommerce Bulk Variations
Unlike WooCommerce Product Table, the Bulk Variations plugin creates a pricing table for one product at a time. It's super-simple to use, and you can enable it for any or all of your variable products. If you don't want to show pricing tables on the single product page, then you can use a shortcode to add WooCommerce pricing tables anywhere you like.
Go to WooCommerce → Settings → Products → Bulk variations and activate your license key. (You'll receive this in the order confirmation email.)
Also on the settings page, choose the global options for your WooCommerce pricing tables. This includes whether to show product images, and whether to include quantity boxes and add to cart buttons or just display the product pricing without purchase options.
If you haven't enabled the pricing tables globally, then you can enable them for individual variable products on the Edit Product screen. Alternatively, you can use the shortcode to add them elsewhere.
Simple!
Plugin 3: WooCommerce Discount Manager
Our final plugin is very different because unlike the others, it actually changes the prices in your WooCommerce store. Use WooCommerce Discount Manager to created a tiered pricing structure which gives a percentage or fixed discount amount based on the quantity purchased.
Once you've set up your bulk pricing, you can tick a box to dynamically display it on the front end for qualifying products.
Buy WooCommerce Discount Manager and install it in your WordPress dashboard.
Go to Marketing → Discounts and click 'Add New'.
Choose 'Bulk pricing' from the different types of discounts.
Now fill in all the information for the bulk pricing deal. This includes:
Discount name (for internal purposes only).
Which products? - Leave this set to 'All products' to apply the quantity pricing rules storewide. Alternatively, select specific products or categories for the discounts to apply to.
Calculated based on total cart contents, or individual products? - This option controls whether customers can mix and match multiple products to get the deal, or whether the qualifying quantity must be used on the same product only.
Rangetype - Choose whether to give a % or fixed amount discount in the WooCommerce pricing table.
Bulk pricing tiers - Now enter all the discount tiers that you wish to create.
Lower down the page, fill in the remaining fields:
Tick the 'Display table of pricing tiers on product page' box to display the WooCommerce pricing table on the front end of your website.
Choose whether to restrict which users and dates the discount will be active for.
You can also add some extra static content to display on the product page. This helps to promote the deal, alongside the pricing table.
Content location lets you choose where to display the pricing table and additional content.
You can also add a cart notice which will appear on the cart page, reminding customers that they have qualified for the deal.
Save your discount, visit a product page, and you'll see the WooCommerce pricing table beautifully displayed 🔥
And WooCommerce Discount Manager - Create quantity discounts and display them in a tiered pricing table to encourage customers to spend more.
Whichever plugin you choose, you can stop creating manual pricing tables listing product prices. Choose whichever plugin is best for you and set it up today.
It only takes a few minutes because the pricing tables are created automatically, using information that is already stored in the database for your WooCommerce products.
And even better? All three plugins come with full support, documentation and a 30-day money back guarantee. This means there's absolutely no risk and no way to get it wrong!
It's well documented that if you want to build a successful e-commerce business, then a recurring revenue model is the way forward. Selling WooCommerce subscription products can be much more profitable than charging for each purchase as a one-off.
After all, your marketing costs are the same whether the customer makes a one-off purchase or a regular subscription. But with an ongoing subscription, that same customer is paying you every week, month or year (depending on your billing schedule and business model) on top of sign-up fees – for no extra customer acquisition or marketing costs.
WooCommerce Subscriptions is the official extension for taking recurring payments in your WooCommerce store. It provides an easy way to create subscription products and sell them on a daily, weekly, monthly or annual basis. It comes with all the subscription management features you'll ever need, such as the option to add a free trial period and one-off sign-up fees on top of the regular subscription payment and subscription renewals. Your customers will be billed automatically for their regular subscription fees using your chosen payment method - whether this is PayPal, Stripe, or another payment gateway. This means you can enable automatic payments.
WooCommerce Subscriptions integrates nicely with our top selling WooCommerce Product Table and Quick View Pro WordPress plugins. Used together, your subscriptions are listed in a searchable, sortable table view with filters and quick view lightboxes
I'm going to tell you more about the benefits of using WooCommerce Product Table and Quick View to list subscription products. I'll also explain exactly how the two plugins work together and where to get them.
I think that WooCommerce Subscriptions is a fantastic WP plugin. We've used it on lots of our clients' websites and helped them to build recurring revenue for their business. However, it does have one major problem.
The problem: You can only buy subscriptions on the single product page
The Subscriptions recurring payments plugin just lists subscription products or downloadable product in the same layout as any other WC product. The only difference is that the 'Add to Cart' button is replaced with some other text. Customers have to click through to the single product page to see information such as the product description and other useful data. That's fine for some types of subscription, but others will sell better with a different type of layout.
For example, what if you want subscribers to be able to view your subscription products alongside one another and make comparisons? Well, that's not possible with the default layouts because you have to click through to the single product page for full details.
What if you want customers to subscribe without having to visit a separate page for each product?
WooCommerce Product Table lists each subscription product on a separate row in the table layout. Subscribers can easily view the subscription pricing, make comparisons, and add to the cart without having to click elsewhere. Every time you add a new subscription or new product, it'll automatically appear in the product table.
It's an ideal way to increase the recurring revenue from your online store.
WooCommerce Product Table has over 50 options for choosing how to list your subscription products. Here are some of the most important ones to use with WooCommerce Subscriptions:
Display add to cart buttons directly in the subscription product list. Customers can choose a quantity and buy directly from the product table view.
You can choose your columns to show extra data about each subscription directly in the table. This means that customers can choose a subscription without having to click elsewhere.
Add filter dropdown lists above the table or filter widgets in the sidebar. This lets customers quickly find a subscription product based on category, tag, attribute, and other data.
Alternatively, you can sell subscriptions outside of the single product page by adding the WooCommerce Quick View Pro plugin. This adds quick view buttons for each product. Customers can use these to view extra information in a lightbox window. They use the lightbox to choose variations and add subscriptions to the cart, without having to visit a separate page.
Can I use solutions 1 and 2 together?
Absolutely!
You can use WooCommerce Product Table and Quick View Pro together. Your subscription products will be listed in a table layout, with or without add to cart buttons. The tables can also contain quick view buttons or links so that customers can also purchase subscriptions from the lightbox. It'll look just like this on the front-end:
How to list WooCommerce subscriptions in a product table
WooCommerce Subscriptions and WooCommerce Product Table work together automatically. You don't have to do any extra setup to use them together.
Simply install the WooCommerce Subscriptions plugin and set up your subscription products. This is really easy - just choose 'Simple subscription' from the dropdown in the 'Product data' section when you create a product. You can then choose your subscription amount, frequency and add a free trial period and setup free if required.
Once you've done that, install WooCommerce Product Table and follow the instructions to create your first product table. Make sure you include a 'Price' and 'Add to Cart' column in the product table. This is where the subscription product information and pricing will appear.
Now view the product table page. You'll see the subscription information listed in the 'Price' column. The plugin has replaced the text in the add to cart button with the wording that you can configure on the WooCommerce Subscription plugin settings page. When a customer adds a subscription product to the cart, the recurring payment (made through PayPal, Stripe, credit card, or a different payment gateway) will be correctly passed through. The subscription information will appear in the cart, checkout and in order confirmation email notifications. Perfect!
How to use WooCommerce Subscriptions with Quick View Pro
WooCommerce Subscriptions is fully compatible with WooCommerce Quick View Pro. As a result, you can use the two plugins together and let customers buy subscriptions from the quick view lightbox.
The plugins work together with no special configuration. This means that you simply set them both up in the usual way, and the subscription options will automatically appear in the lightbox. Just make sure you enable the Add to Cart buttons on the quick view plugin settings page.
Both of these WordPress memberships plugins let you restrict access to an exclusive members-only area on your website. They work in slightly different ways, so check out this comparison to help you choose. In a nutshell, both plugins work by creating a WooCommerce product for each type of membership or subscription plan that you wish to sell. For example, if you want to sell access to 3 different areas on your website, then you would create a membership product for each one and list them individually using WooCommerce Product Table. Customers can choose the membership options they require and add them all to the cart, directly from the product table view.
Used without WooCommerce Subscriptions, WooCommerce memberships lets you take one-off payment for access to hidden content on your website. You can use it with the Subscriptions plugin to get ongoing revenue from your membership site, e.g. to take recurring annual subscription payments. This is obviously a better business model than one-off access!
Variable subscriptions
WooCommerce Product Table works perfectly with standard subscription products. It does not integrate with variable subscription products.
If you'd like to offer different options for your WooCommerce subscription products, then there are two simple workarounds:
Workaround #1 - Use WooCommerce Quick View Pro
If you're selling variable subscriptions, then you can list these successfully in a product table without an add to cart column. Instead, install the WooCommerce Quick View Pro plugin and add a quick_view column to the product table.
Customers can click on the button to select variations and buy variable subscriptions from the quick view lightbox. This makes the subscribing process incredibly easy.
Workaround #2 - Use All Products for WooCommerce Subscriptions
Alternatively, you can use the All Products for WooCommerce Subscriptions plugin to sell variations for your simple subscriptions. This allows you to sell variations directly in the add to cart column of the product table, without the problems that you get with variable subscriptions:
Set up the product as a 'Variable product', NOT a 'Variable subscription'. Add your attributes and variations in the usual way.
Install the All Products for WooCommerce Subscriptions add-on for WooCommerce Subscriptions. This handy plugin lets you add subscriptions options to normal variable products, instead of having to use the 'Variable subscriptions' product type.
Click the 'Subscriptions' tab near the bottom of the Product Data section. Set up your subscription options as required.
Your variable simple subscription product will appear in the product table. If you just offer one subscription option then this will automatically be passed to the cart when the customer selects a variation. If you offer a choice of subscription options (e.g. weekly and monthly subscriptions) then these will appear as radio buttons when the customer chooses a variation:
You can also see the workaround in option in the second table on our subscriptions demo page.
Where to get the subscription plugins
As you can see, WooCommerce Product Table is the perfect way to display your subscription products. Customers can quickly look through the list of subscription options and add their subscriptions straight to the cart. No need to visit the single product page!
You can get the plugins by clicking on these links:
Our WooCommerce Product Table plugin is one of the most popular order form plugins out there. Since the publication of our tutorial on how to create a WooCommerce order form, lots of people have asked us how to create a printable WooCommerce order form that their customers can fill in offline.
I was surprised when I first heard that people wanted to use the plugin in this way. After all, most WooCommerce websites take orders online! However, I fully understand that everyone uses WooCommerce differently. There are many valid reasons why you might want to list products on your website, while letting customers print the order form and fill it in with good old fashioned pen and paper. They can send it to you by post, fax - however they like.
The good news is that WooCommerce Product Table functions equally as an offline order form for printing. Keep reading to learn how to set it up in this way.
How a printable order form works in WooCommerce
With a printable order form, you set up a WordPress website and install WooCommerce as usual. Add all your products in WooCommerce.
If you're only planning to take orders offline, then you don't need to set up any shipping options, tax settings or payment gateways. You simply add the products and prices.
The WooCommerce Product Table plugin takes your products and displays them in a beautiful order form layout. Each product appears in a table view, with 1 product per row - just like a traditional order form. You can choose what data to include in the order form, such as the product image, name, short description, price, weight, dimensions, etc. You can also use custom fields and taxonomies to display extra data in the printable order form.
Customers view the order form on your website, and click a button to print it. This prints the entire web page, including all the products in the table and any other fields you've added to the page such as their name, address and payment details. Next, they simply fill in the order form on paper, and send it to you. You receive the printed order form and process is manually.
Keep reading to learn how to create a WooCommerce printable order form for your own website.
1. Set up WooCommerce Product Table
To create a printable WooCommerce order form, first get WooCommerce Product Table and set it up by following the instructions in our main order form tutorial. There are lots of ways to set up your order form. For example, you can choose your columns and whether to show all your products or just some of them (e.g. based on category).
When you've set up the basic order form, come back and use the following steps to convert it into an offline order form for printing.
2. Replace the add to cart buttons with checkboxes
By default, the WooCommerce order form plugin comes with an add to cart button next to each product in the table. That's fine for online ordering, but doesn't work if you're using the order form offline.
Instead, go to the plugin settings page (WooCommerce > Settings > Products > Product tables) and choose the 'Checkbox' box option for the add to cart buttons.
This will change the add to cart buttons to checkboxes. Each button will have a small tick box next to it. After printing the WooCommerce offline order form, customers can write a tick in the box for each product they wish to order.
3. Add a quantity field to the offline order form
WooCommerce Product Table comes with a quantity field that you can include in the printed order form. However, this isn't ideal because it has up/down arrows (which obviously don't function offline) and has a '1' in the box by default.
Here are some suggestions on how to add a quantity field to the WooCommerce offline order form:
You could write some CSS to hide the up/down arrows and remove the default quantity from the box.
Alternatively, you could use the WooCommerce Product Options plugin to add a text field next to the add to cart checkbox for each product. This plugin is fully integrated with WooCommerce Product Table and will automatically appear in the add to cart column. Label this field 'Quantity' and customers will write the required quantity in the box. (Tip: If you want to make the quantity box smaller, use the 'widths' option to reduce the size of the add to cart column.)
4. Hide the 'Add Selected to Cart' buttons
This is the only part of the tutorial that's slightly technical. If you're using add to cart checkboxes, then an 'Add Selected to Cart' button will appear above the table. This is ideal for online ordering, but isn't needed for a printable offline order form.
If you don't want the 'Add Selected to Cart' button, then you can hide it by adding some custom CSS to the Customizer. To get you started, here's a link to the CSS selectors in the WooCommerce Product Table developer documentation. This is a developer task and if you don't know how to do this, then we recommend posting a job on Codeable. Codeable is perfect for finding suitable people for small customizations like this.
5. Show all your products as a one-page order form
By default, the WooCommerce order form plugin shows up to 25 products per page. If you have more than 25 products, then pagination links will appear at the bottom. Customers can use these links to see the remaining products.
This arrangement doesn't make sense for a printed WooCommerce order form, because only the visible products will appear in the print-out. Instead, go back to the plugin settings page (WooCommerce > Settings > Products > Product tables). Change the 'rows per page' option to ensure that all your products are shown on a single screen.
6. Hide the order form controls
WooCommerce Product Table adds various controls above and below the WooCommerce order form. Above the product list, you'll see a search box and a dropdown where customers can choose the number of products per page. Below, the order form, you'll see pagination buttons and the total number of products. None of this makes sense for an offline order form!
Use the plugin settings page to set each of these options to 'false'. Your printable WooCommerce order form should contain the column headers and the list of products, but nothing else.
For the same reason, make sure your page is full-width - your theme probably has a template for this. There's no need to clutter up your printed order form with extras such as filter widgets that don't work offline.
7. Add empty columns to the order form
Do you need a blank column for writing notes about each product? To do this, add a blank column to your product table which customers can fill in when they print it out.
To do this, simply add cf:notes to your list of columns. This tells WooCommerce Product Table to display a custom field called 'notes' - but since this custom field doesn't exist, the column will remain blank. Simple!
If you don't want to call the column 'Notes' then replace 'notes' with anything you like - so long as it doesn't exist, then it will appear as a blank column.
8. Add other fields to the printable WooCommerce order form
Order forms in traditional printed catalogs have fields for the customer to write their name, address and payment details. You can easily add these fields above or below the product table on your printable order form. Simply install any WordPress contact form plugin (e.g. Contact Form 7), create a form with the required fields, and add it to the order form page.
Remember to remove the Submit button, since people won't be submitting the form online.
9. Make the order form printable
People can easily print the order form by using the 'Print' option that comes with their browser. However, you can help your less technically savvy customers by adding a user-friendly 'Print' button to the printable order form page.
You can easily do this by installing the free Print, PDF, Email by PrintFriendly plugin. This simple plugin adds customizable buttons to your order form, which let your customers click to print the page in a print-friendly layout.
You can use your printable WooCommerce order form as a multi-functional form where people can order online, or print it and post it to you. If you're just using it as an offline order form, then it's worth making sure this is clear to your users.
When people see your products listed online, it needs to be clear to them that you only accept orders offline. You can easily achieve this by adding a notice to the top of the page. This should instruct customers to print the order form page, with details of how they can submit the order (e.g. by posting it to you).
Bonus tip - Add quick view links to your printable order form
The aim of a printable order form is to keep everything on one page. You don't want customers to click through to a separate page to learn more about each product. That's important because this would lose the selections they had already made on the order form - a guaranteed way to frustrate the customer.
But what happens if you want to provide extra information that isn't part of the printable order form?
The solution is to install our other plugin, WooCommerce Quick View Pro. This lets you add quick view links to your products. Customers can click on these to see extra images and information about the product in a lightbox window. When they close the lightbox, they remain on the printable order form page, so they won't lose their selections or have to start again.
Go to the plugin settings page: WooCommerce → Settings → Products → Quick view.
Add your license key and choose what you want to show in the quick view window. If you're adding quick view to a printable WooCommerce order form, then I recommend showing information such as the product image gallery and short description. That's the sort of thing that customers want to see before ticking a product and sending their order. However, you probably don't want to include add to cart buttons because it's an offline order form and you're not using the e-commerce features.
Now to go the WooCommerce Product Table settings page: WooCommerce → Settings → Products → Product table.
Scroll to the bottom to find the WooCommerce Quick View options. Tick the option to replace all links to the single product page with quick view. That's more suitable for a printable order form than adding actual quick view buttons. After all, you don't want quick view buttons to show on the printed order form! By just linking the product name and/or image to the quick view, these won't show on the printed order form.
Where to get the plugin
As you can see, WooCommerce Product Table is ideal for creating a printable WooCommerce order form to be used offline. Customers can see the products listed on your website and print the page. They can then tick the products they require and write the required quantity for each one. Finally, they can fill in their details, and post the order to you.
This is a brilliant way of taking manual orders with WooCommerce. I'd love to add some example use cases and case studies of how people are using WooCommerce to provide offline order forms. Please get in touch or add a comment below.


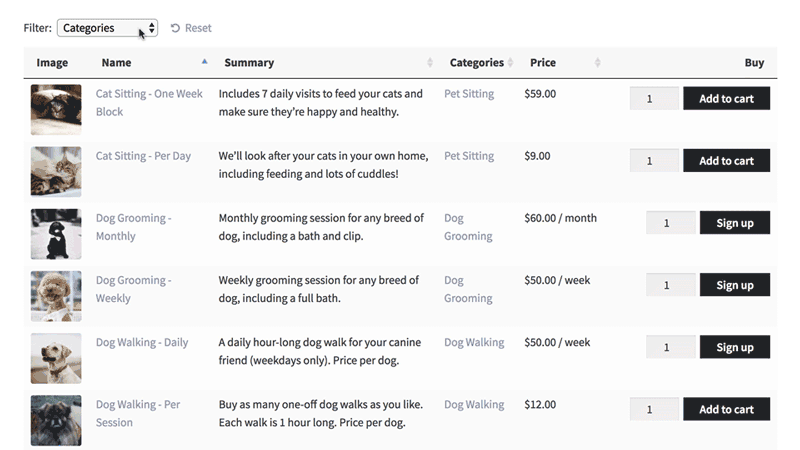
 First, the customer visits your website and views WordPress services list This might be a simple list of one or more services, or you might provide variation options. You might sell one-off services for a fixed price, or charge by the hour. Perhaps you'll generate recurring revenue by selling subscriptions to your services? You might have a dedicated page for ordering service, or your WordPress services list might appear in an e-commerce order form directly on the pages describing your services.
 WooCommerce is the world's leading e-commerce plugin, powering over 44% of all online stores. While it does let you sell physical products, it also comes with virtual products that are perfect for selling WooCommerce services.
 Easy Digital Downloads is popular for selling virtual and digital products in WordPress. It's generally used to sell downloadable products such as WordPress plugins or ebooks. It's also ideal for selling services in Easy Digital Downloads.
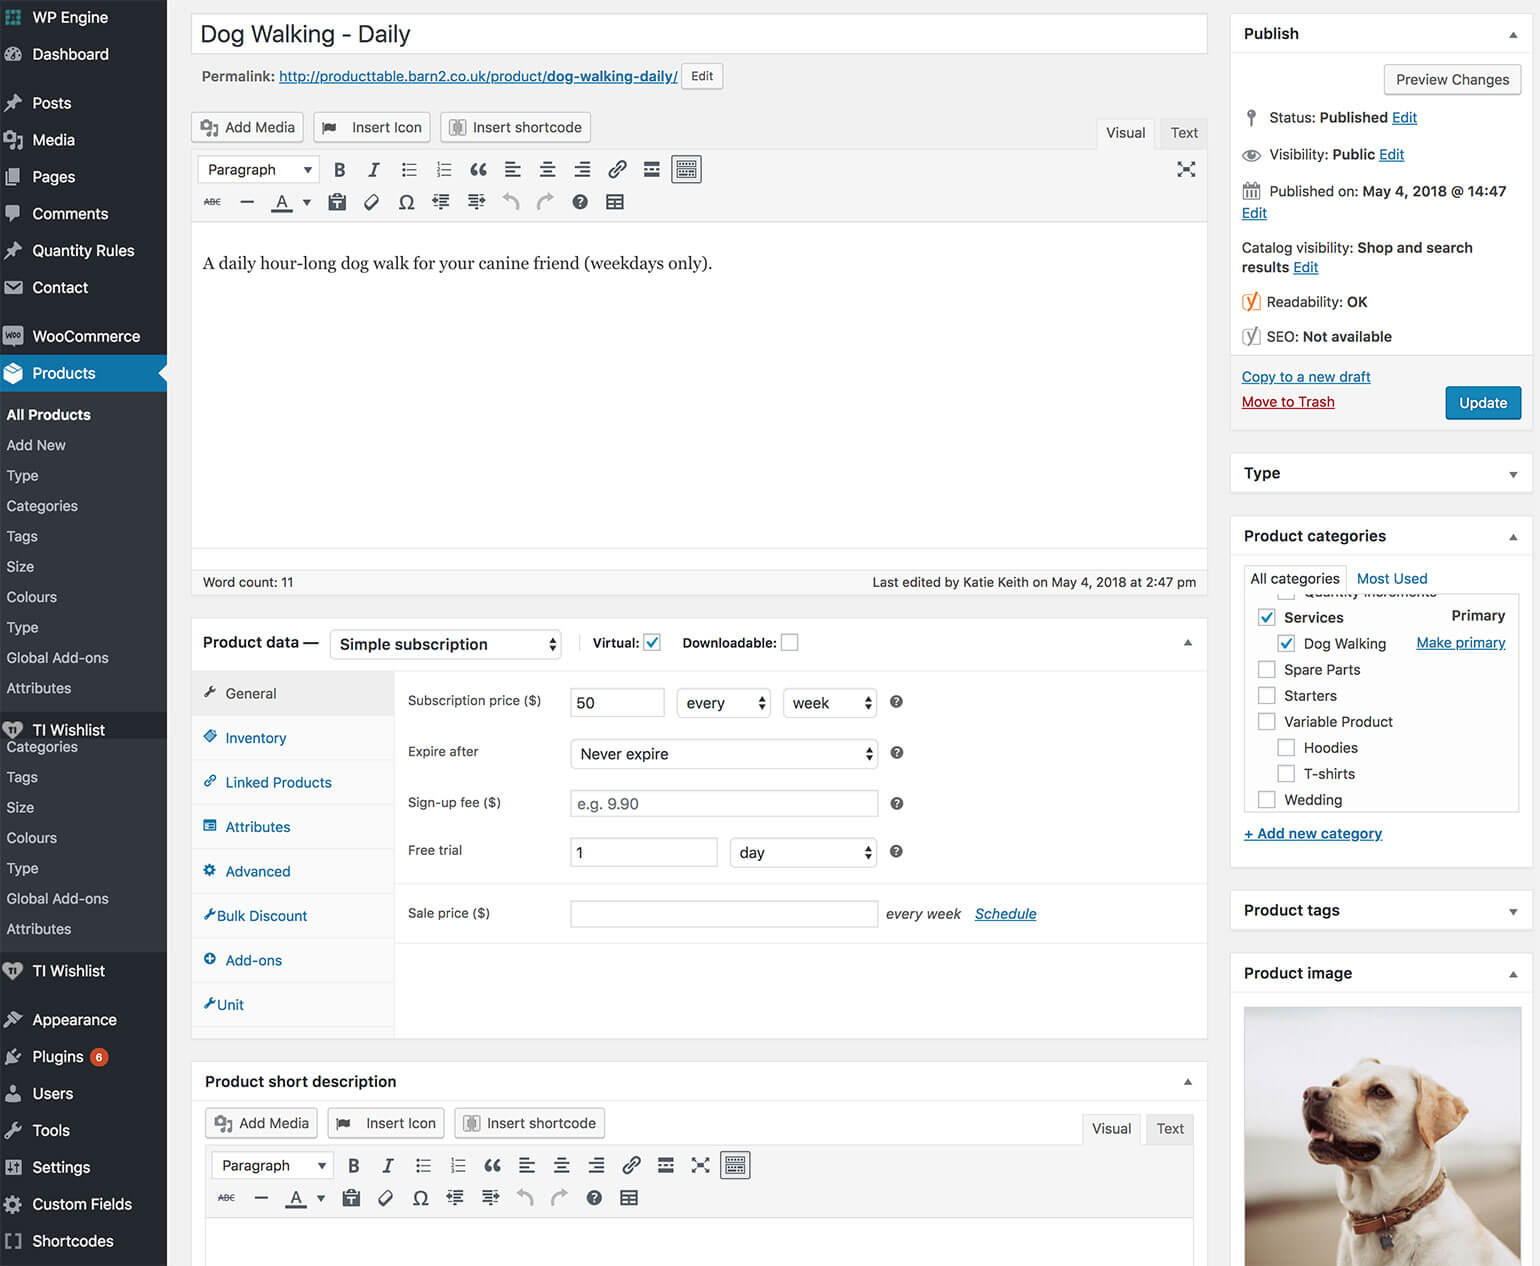

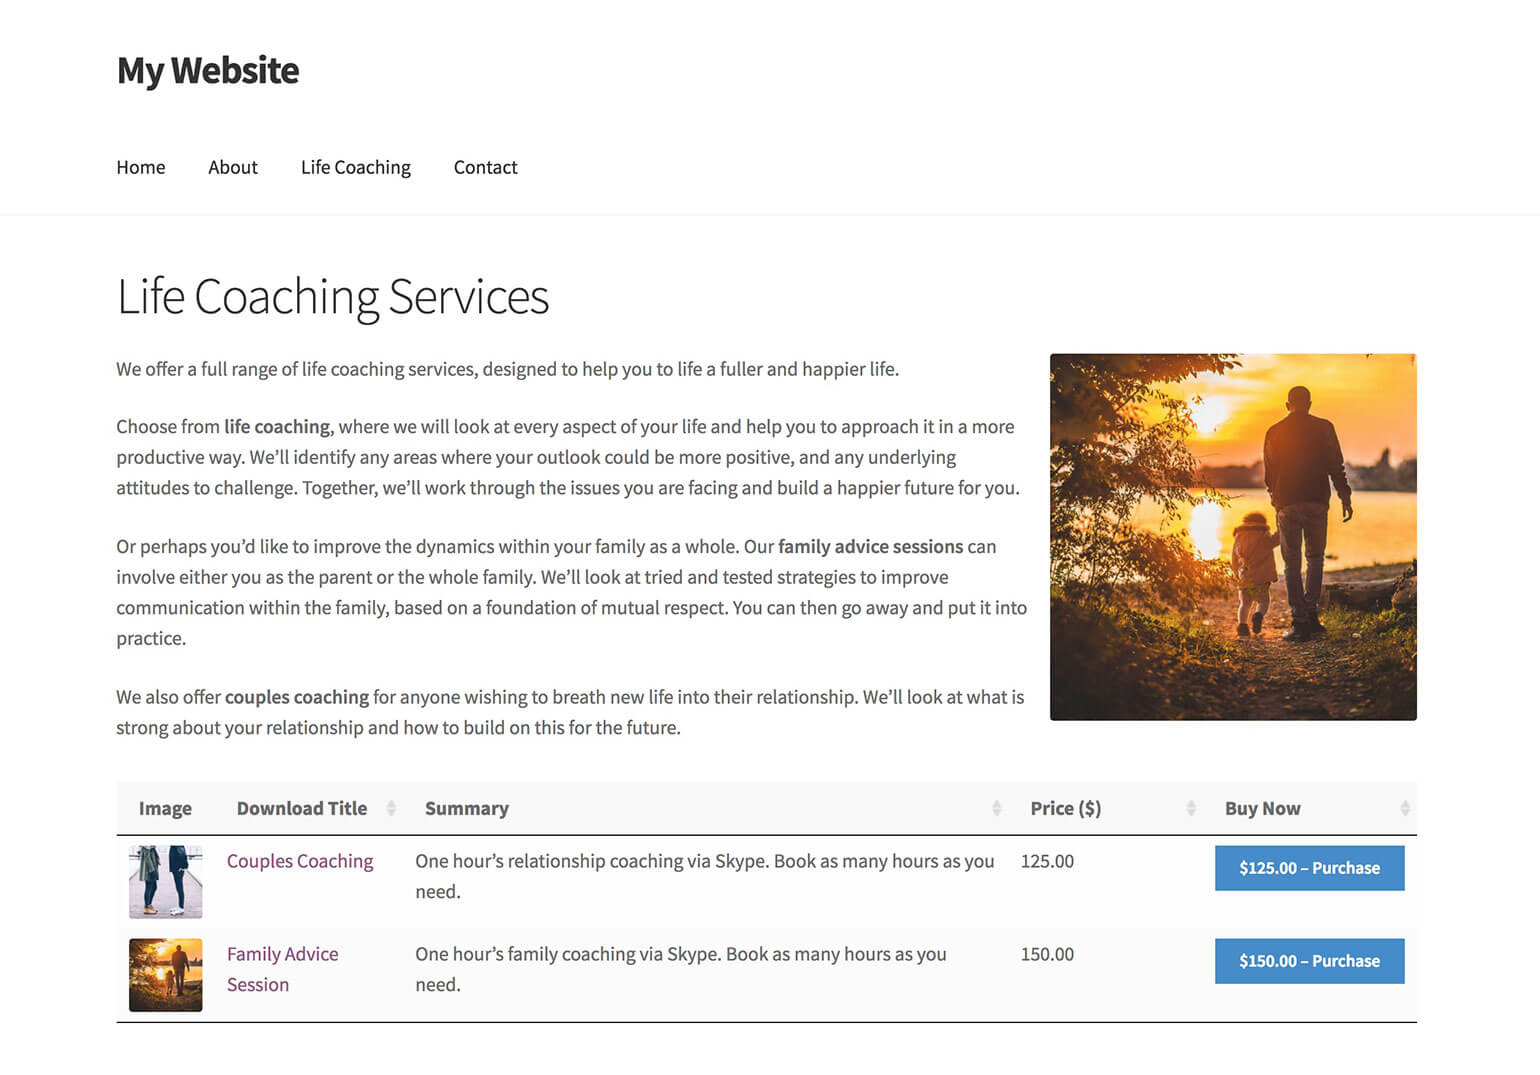
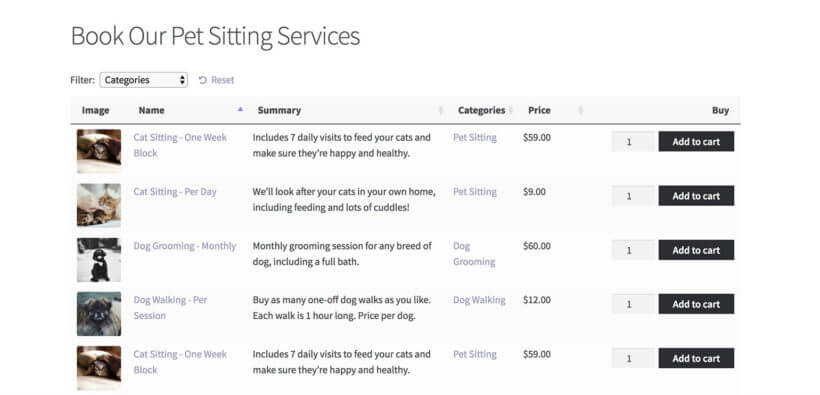
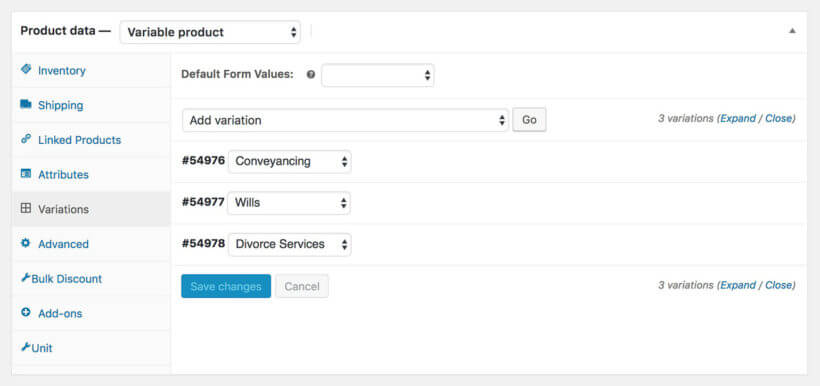
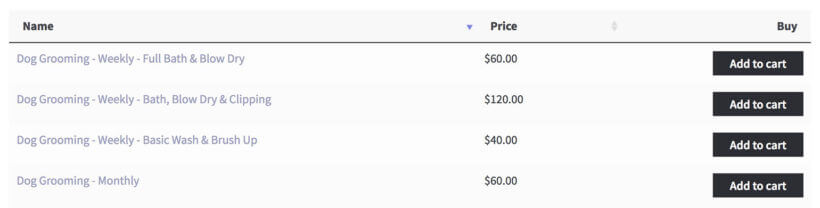
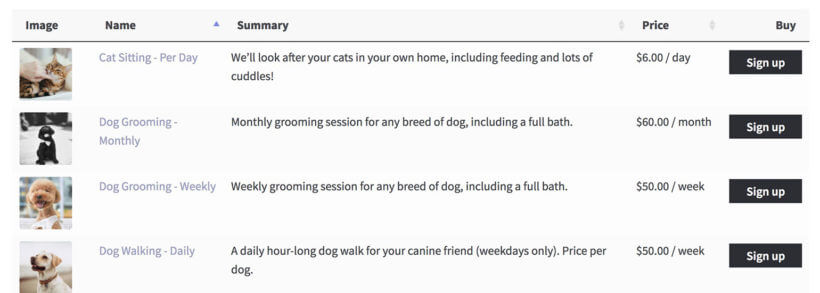
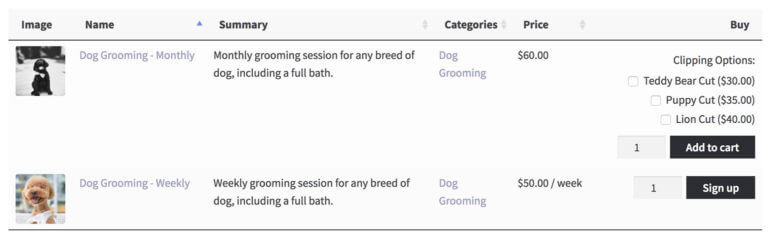
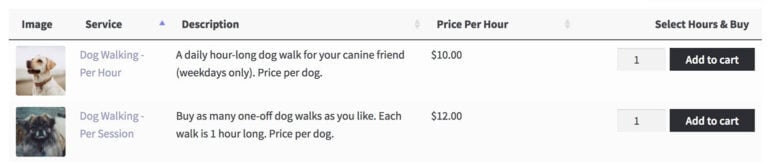
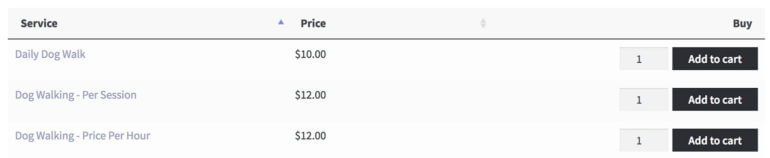

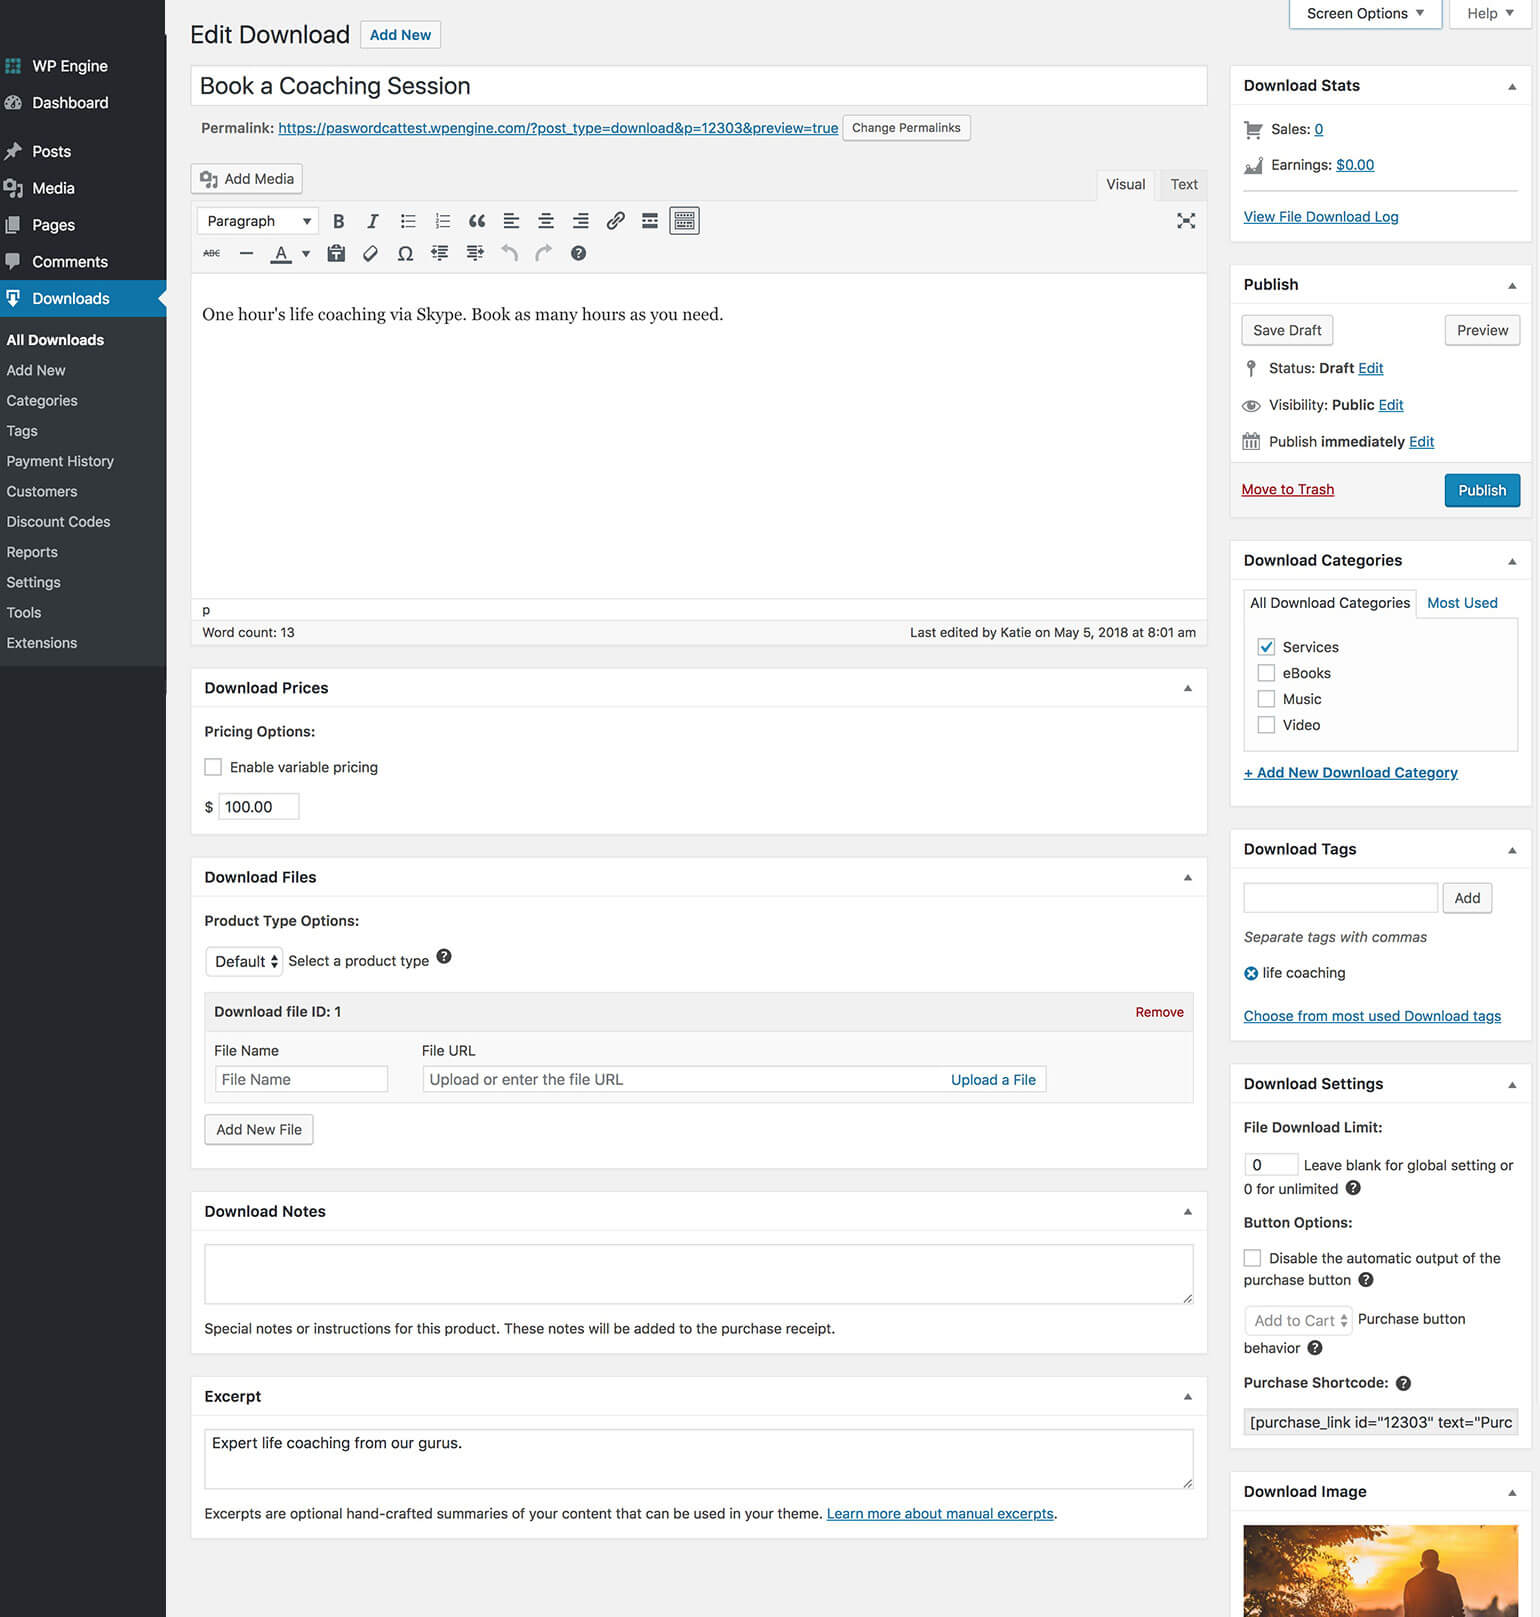
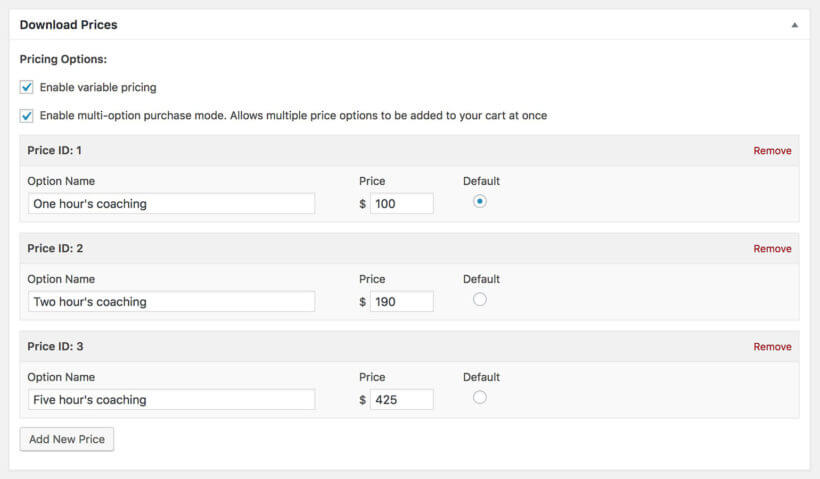
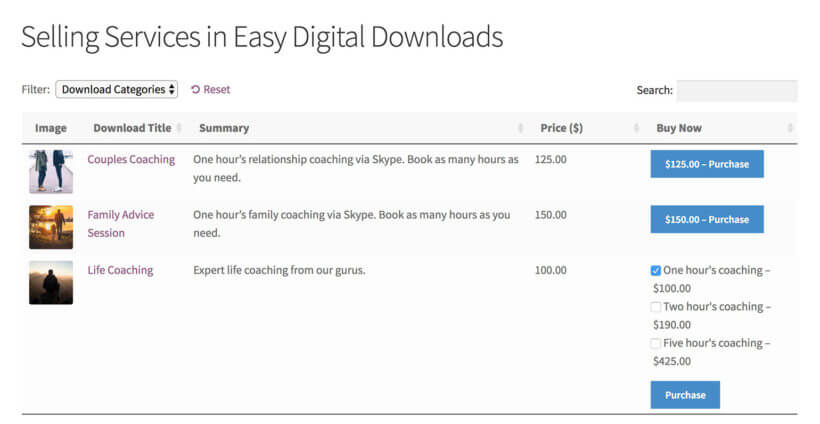
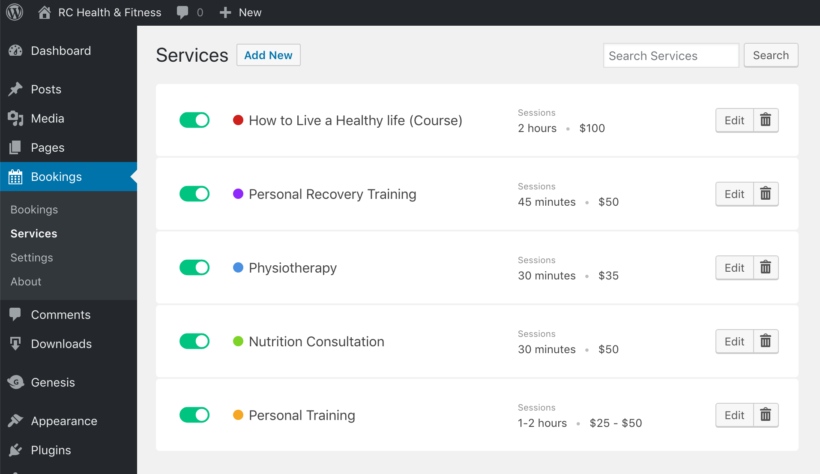
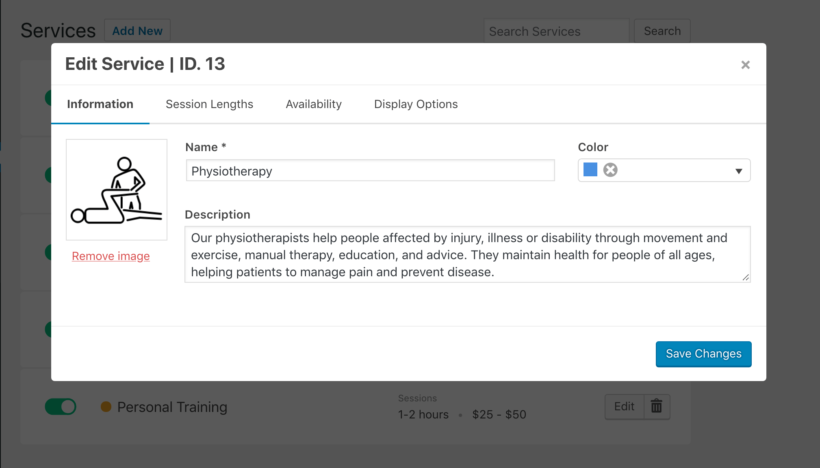
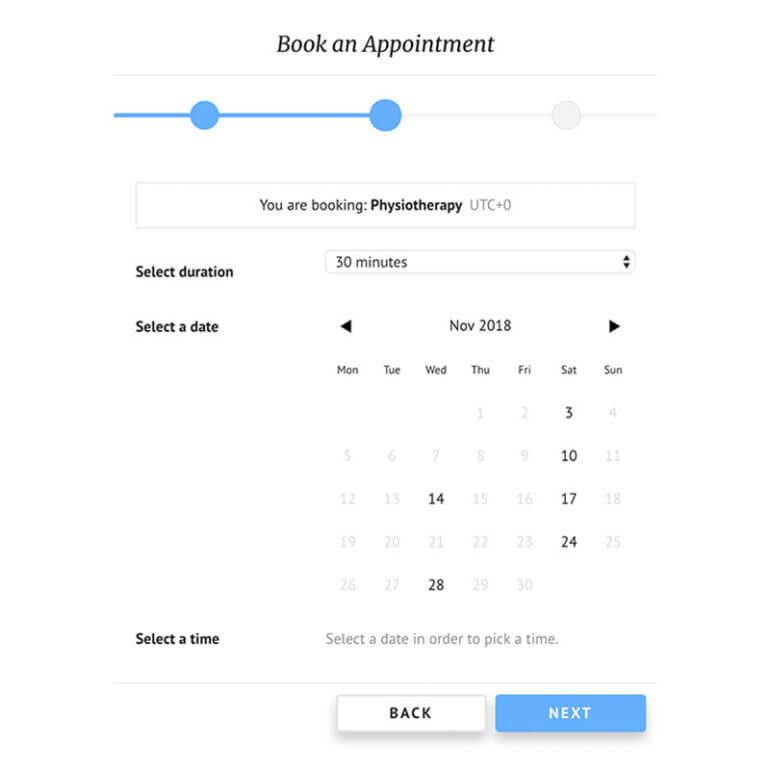
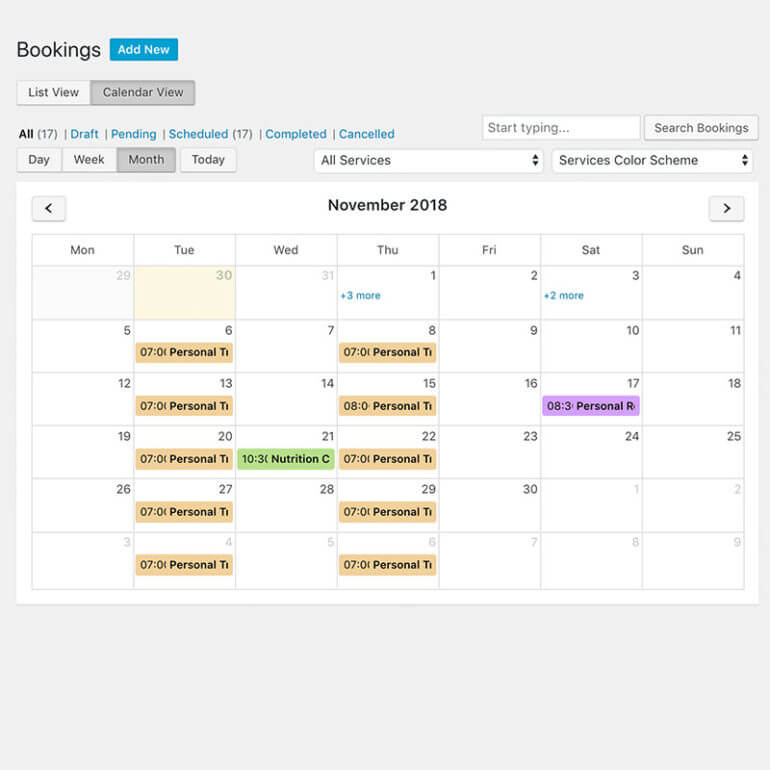

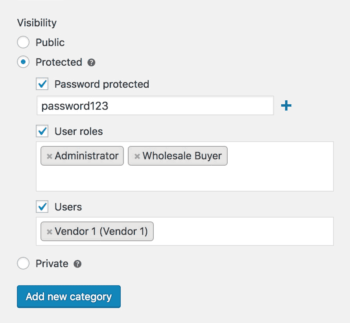
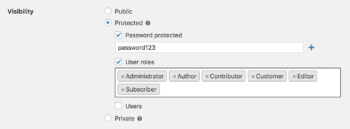 Password protected Visitors will need to enter a password to see the category. You can create multiple passwords to unlock the category if desired.
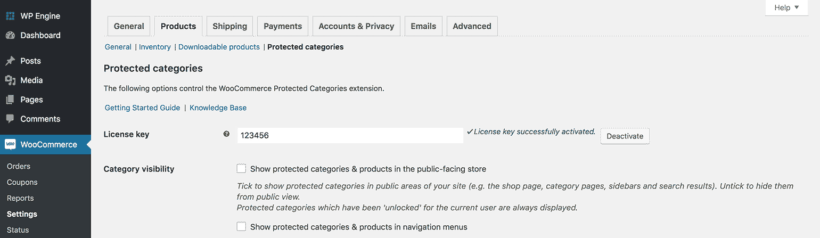
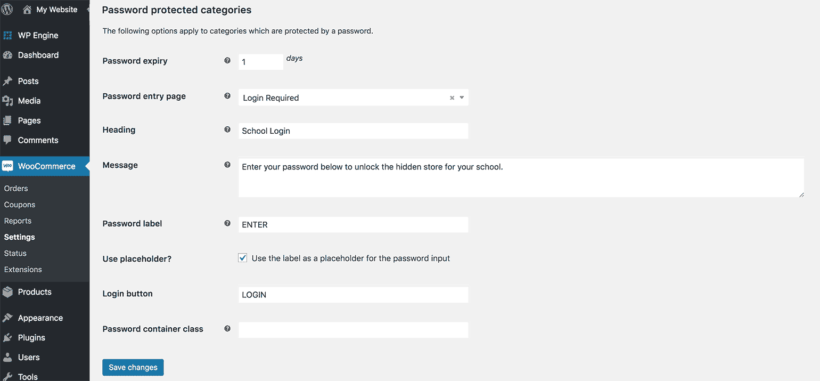
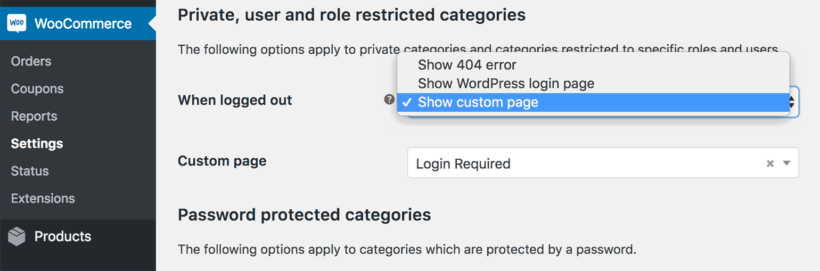

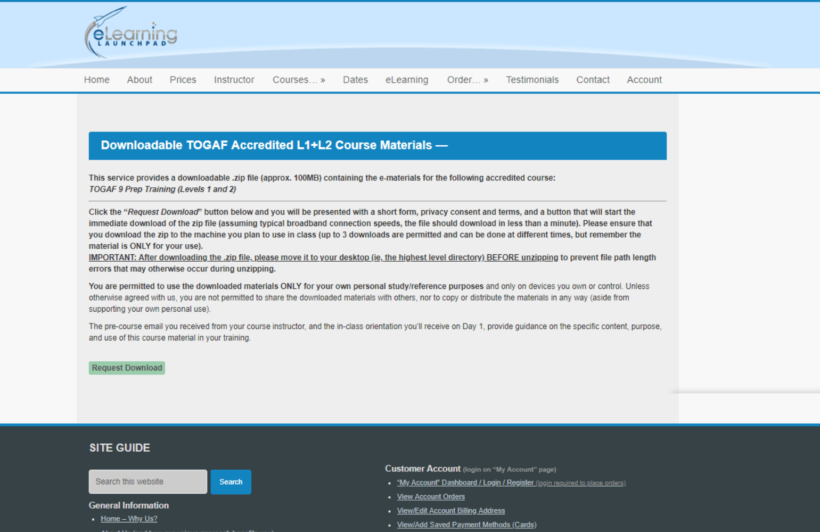
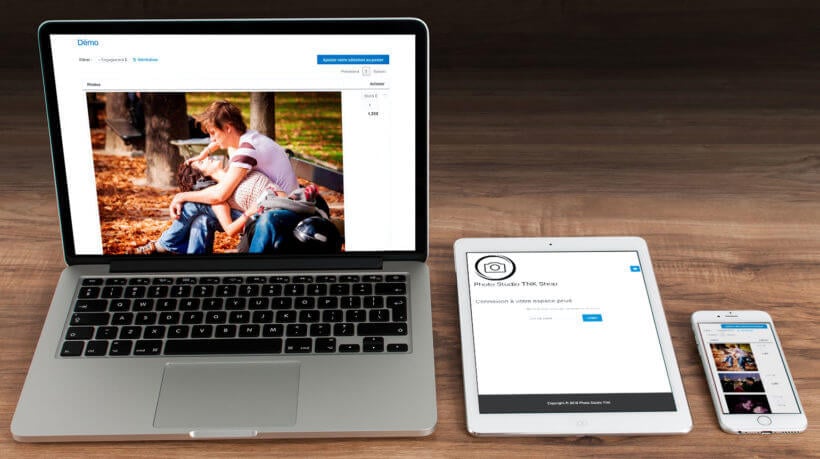

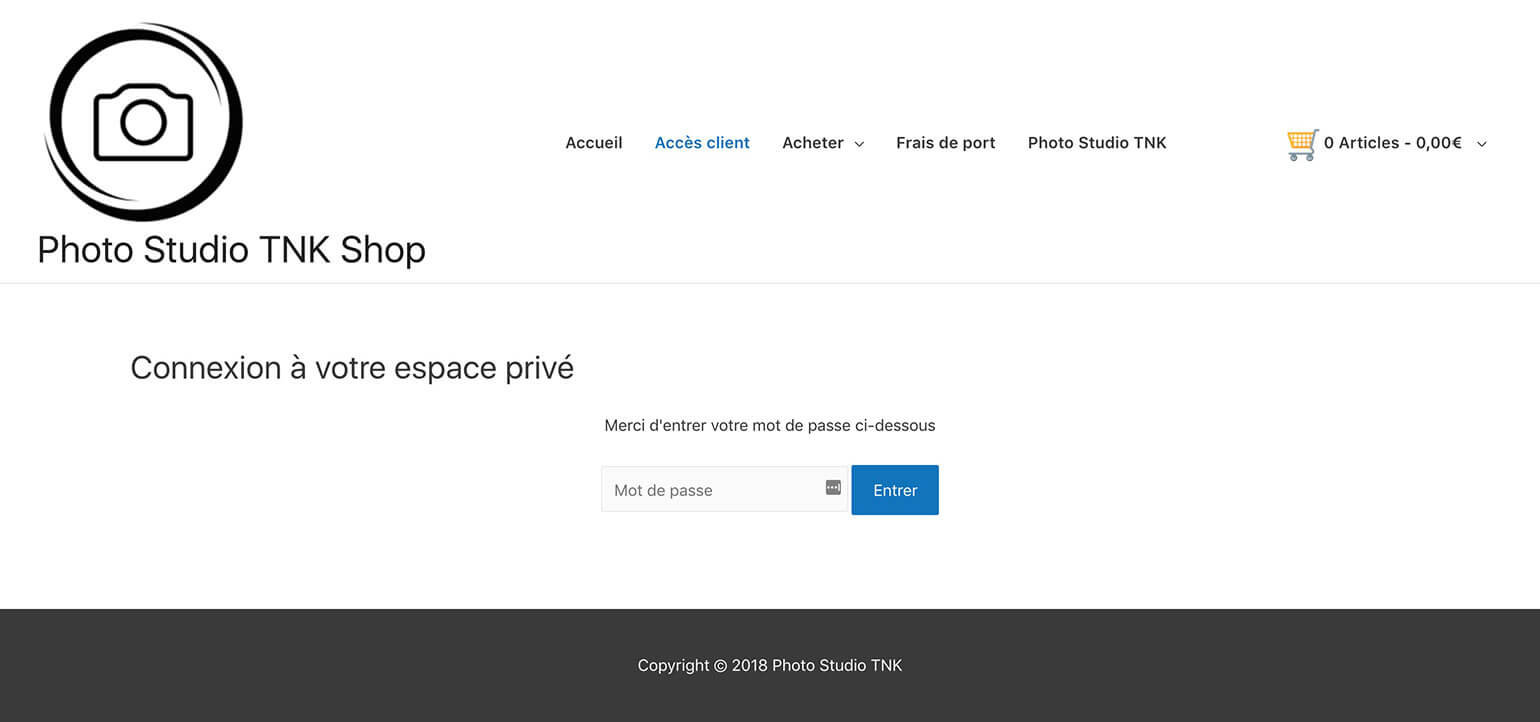
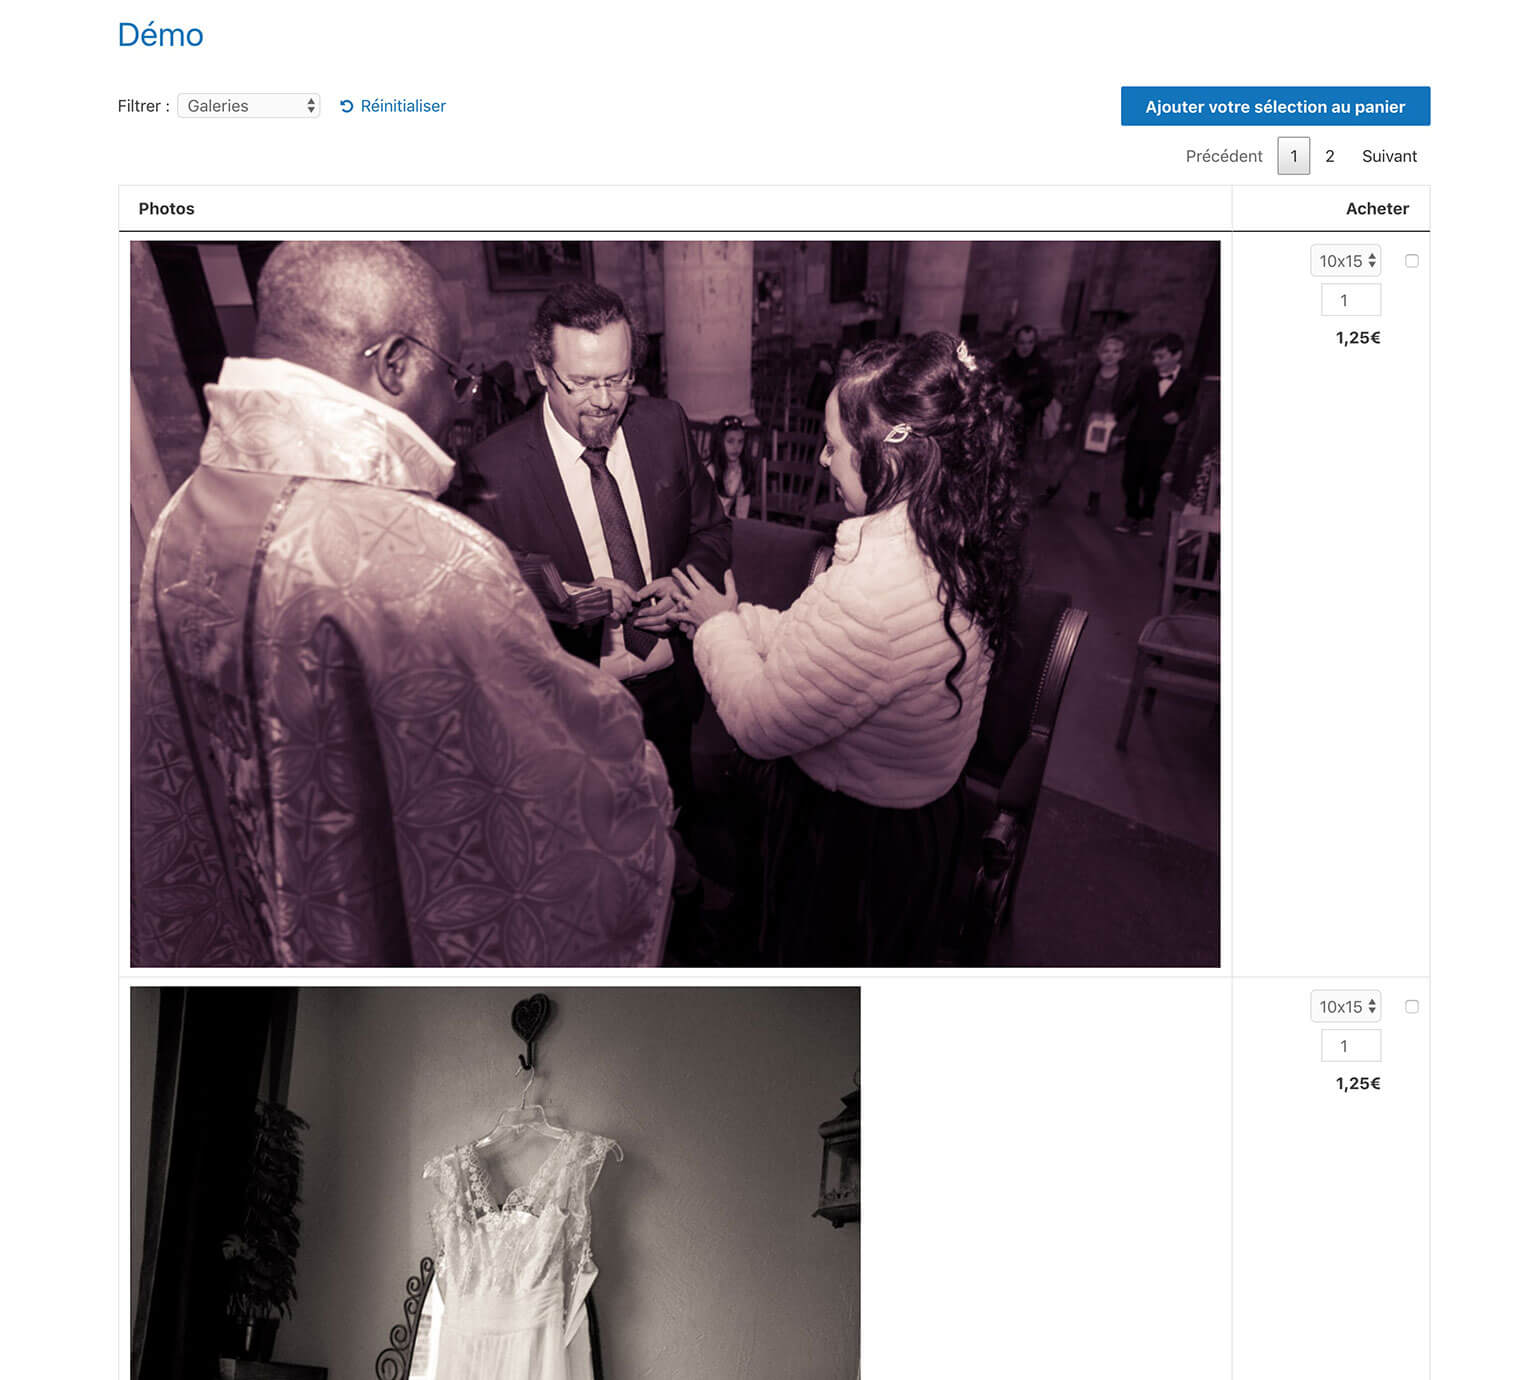
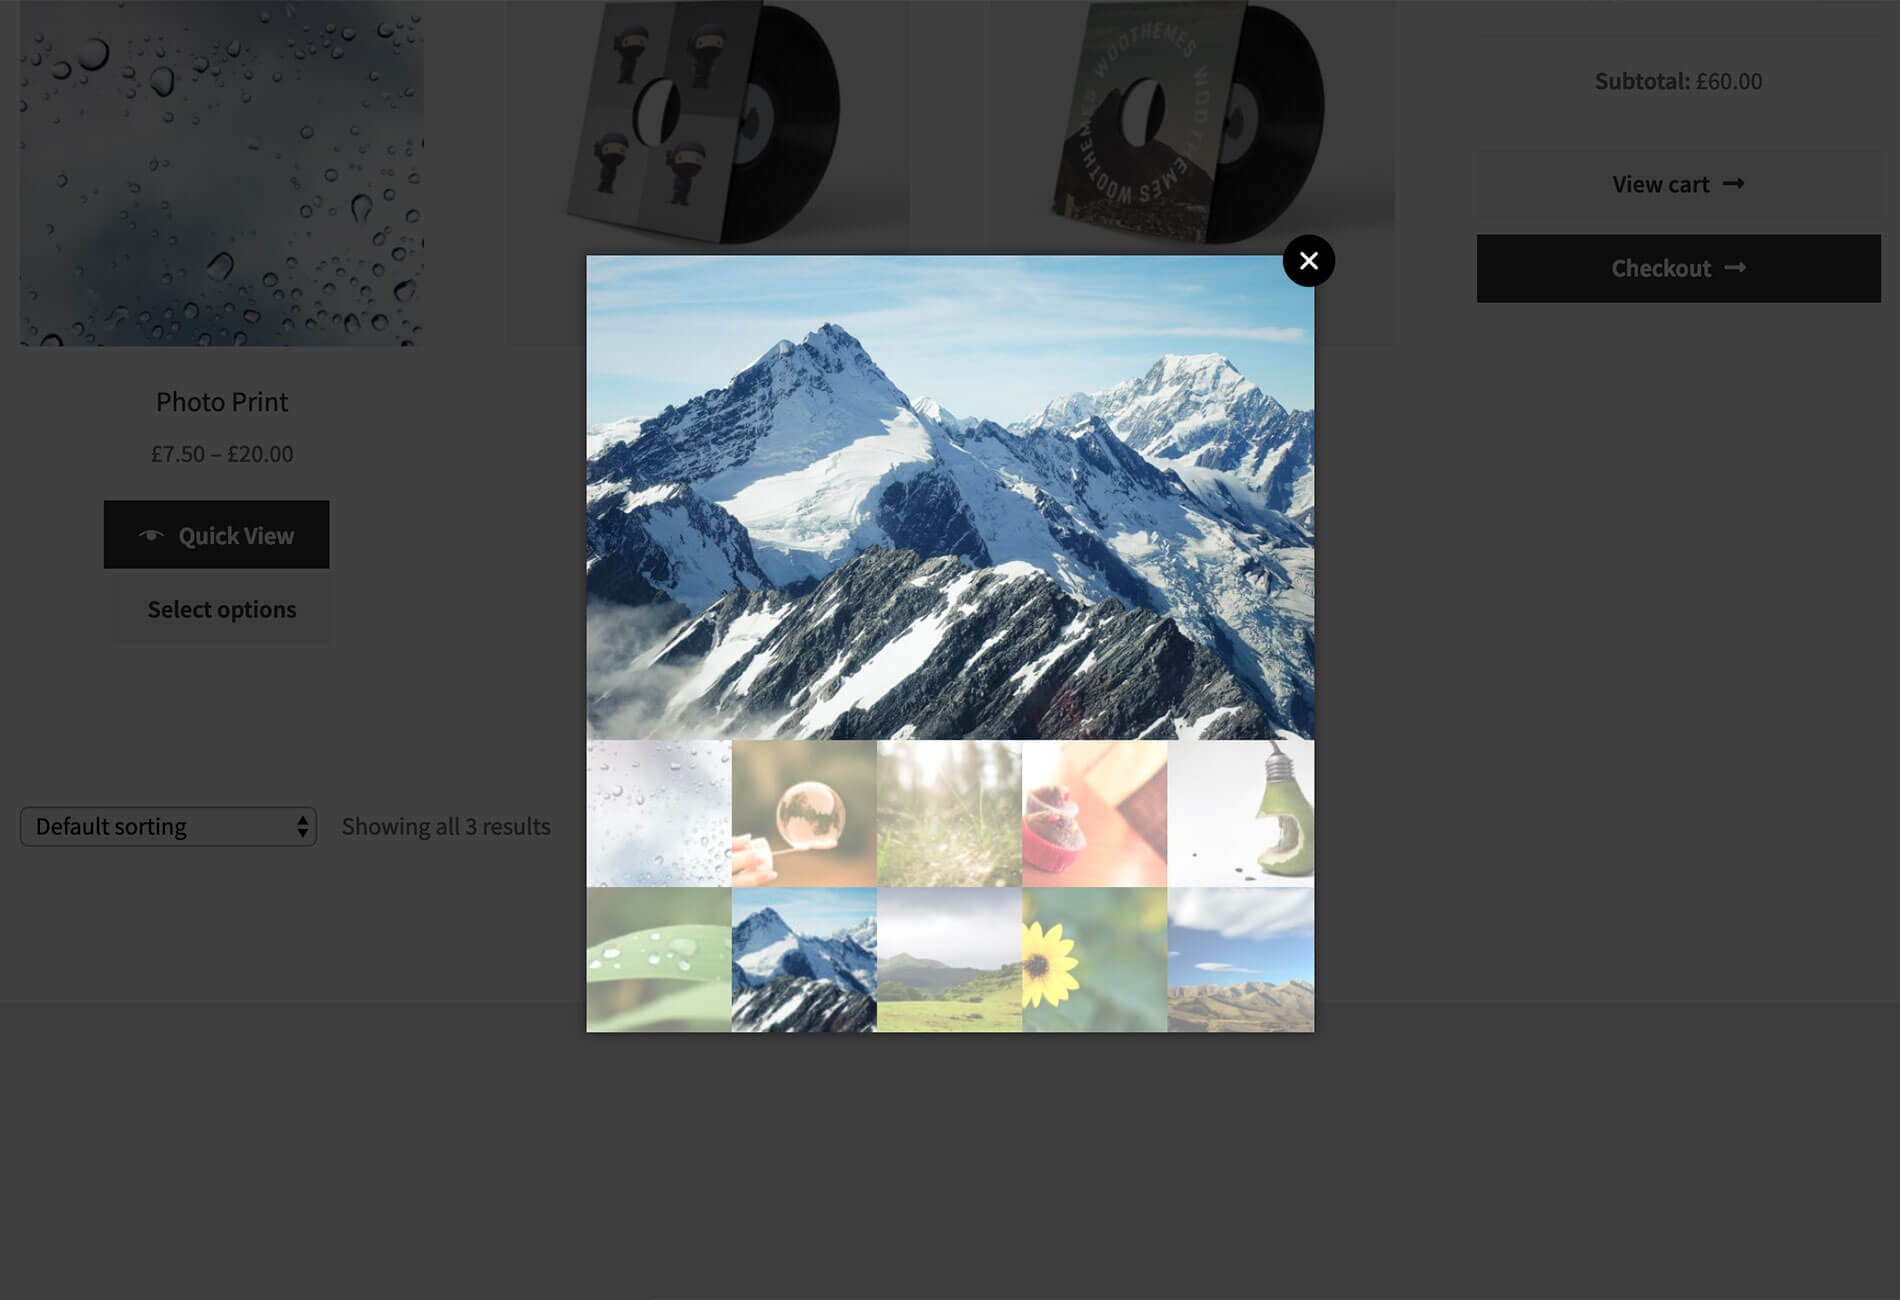
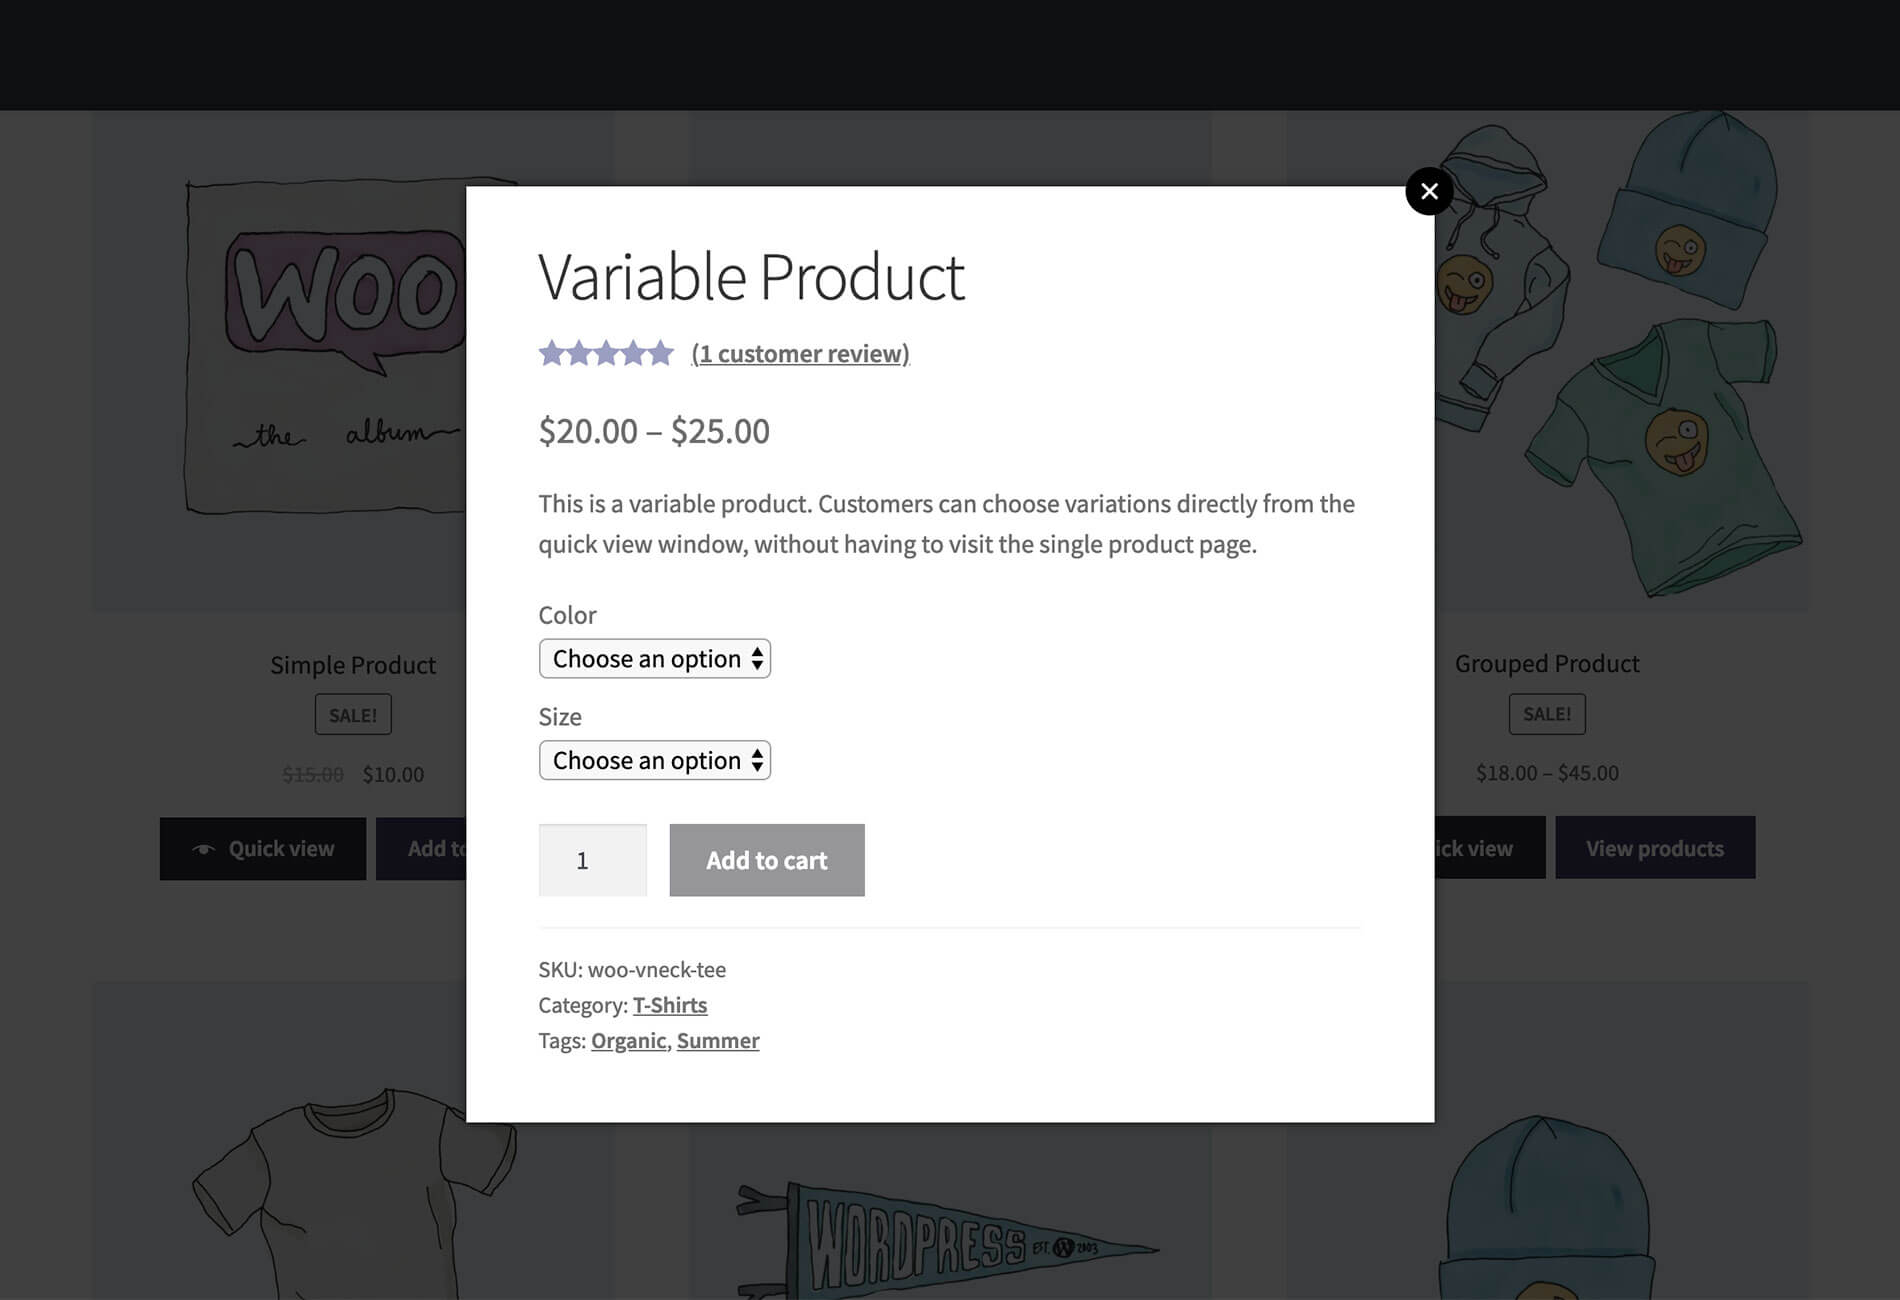
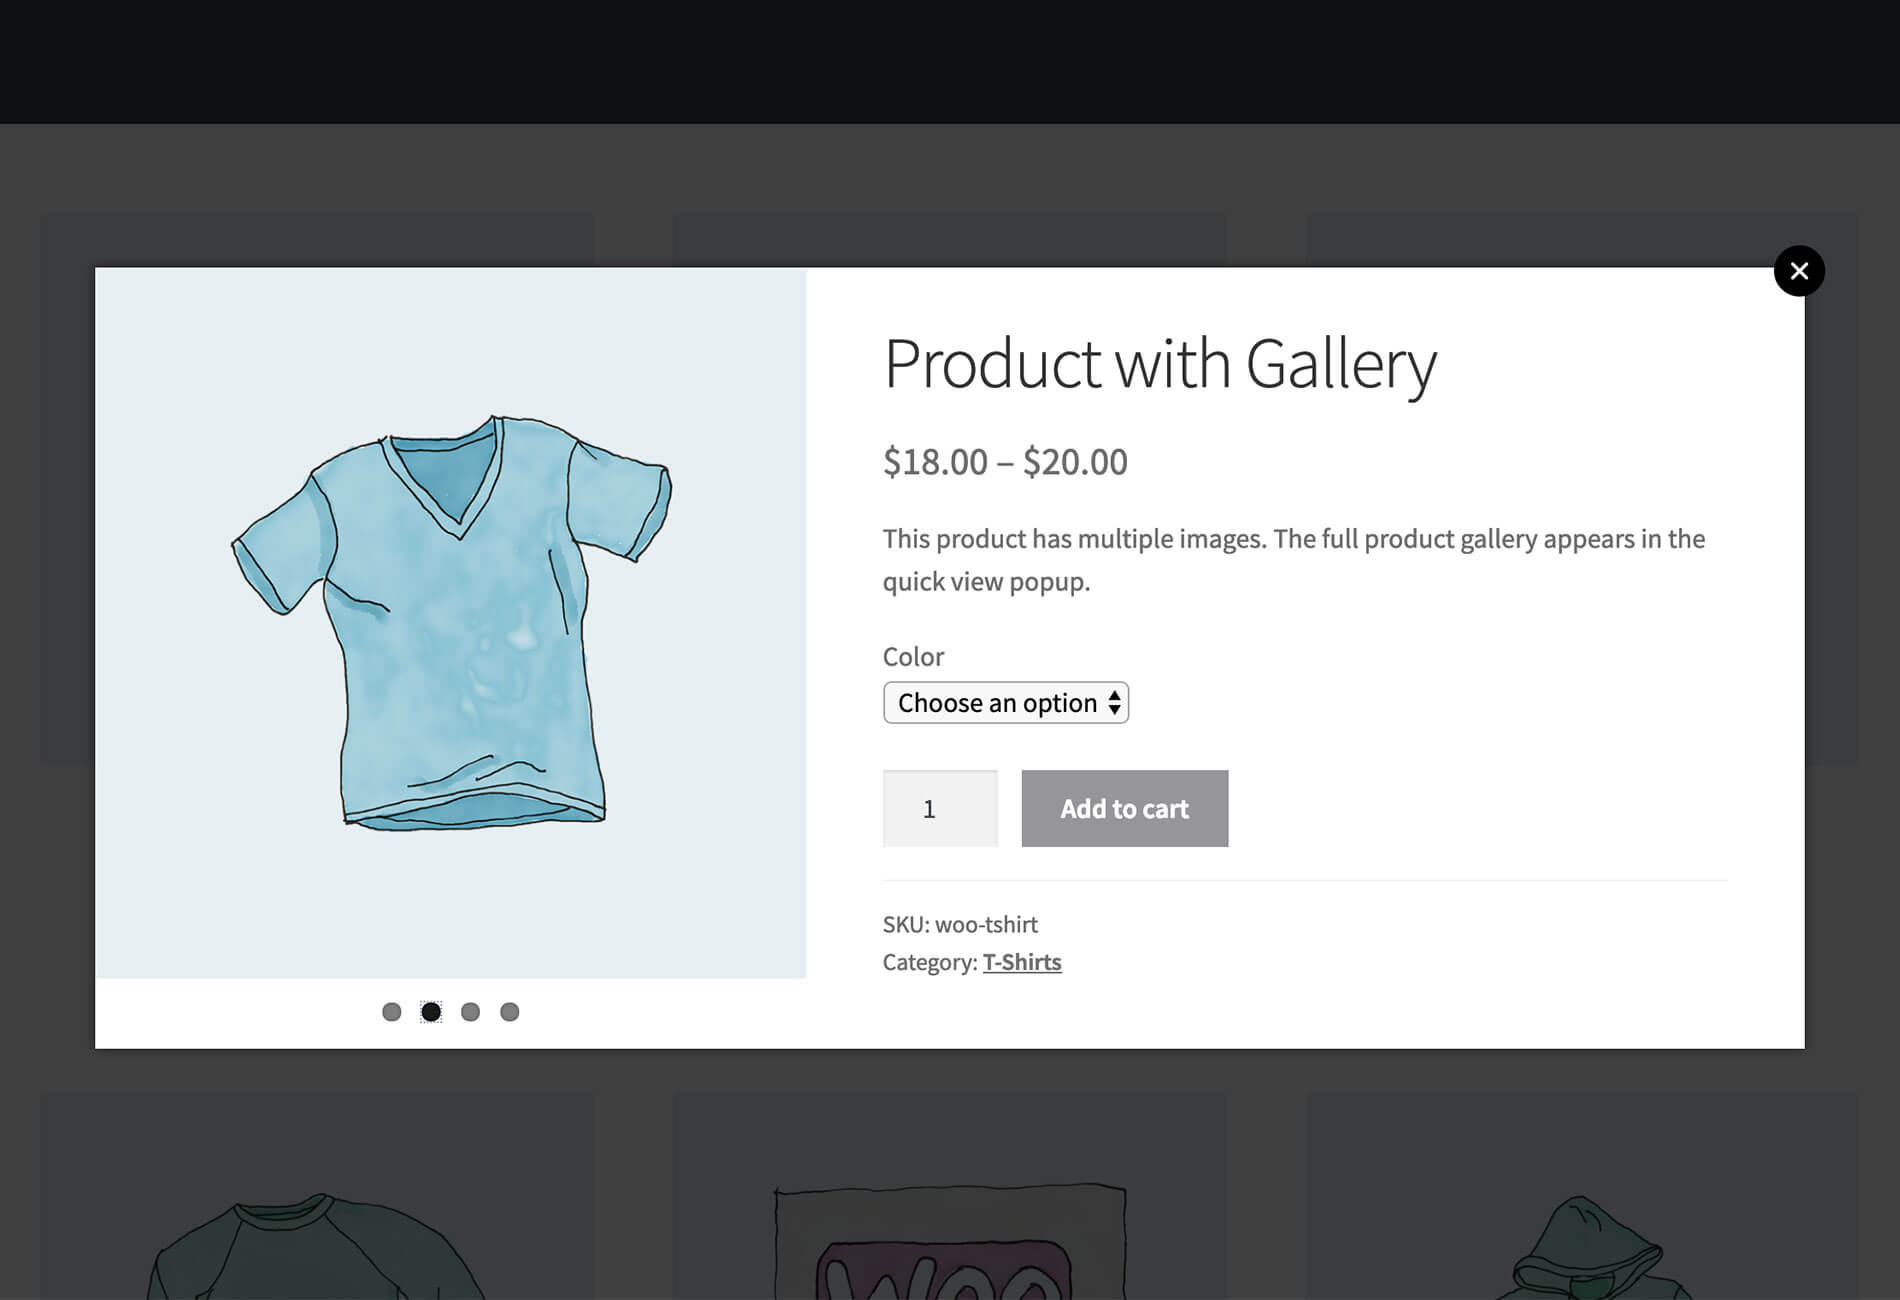

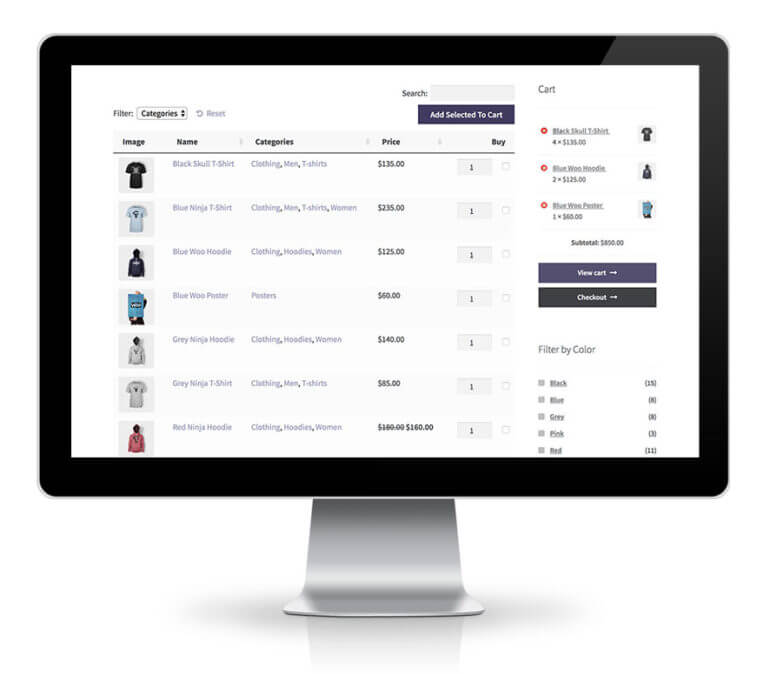
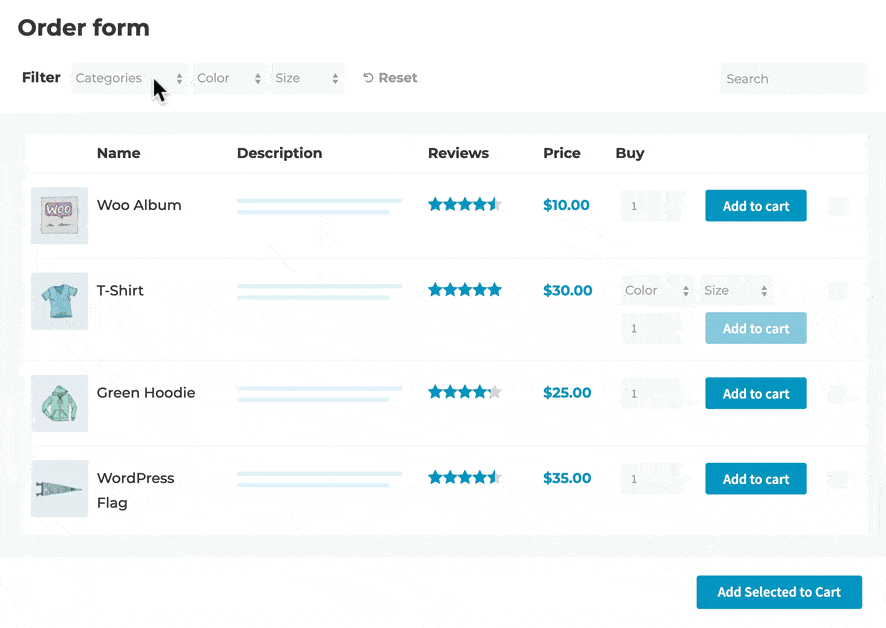


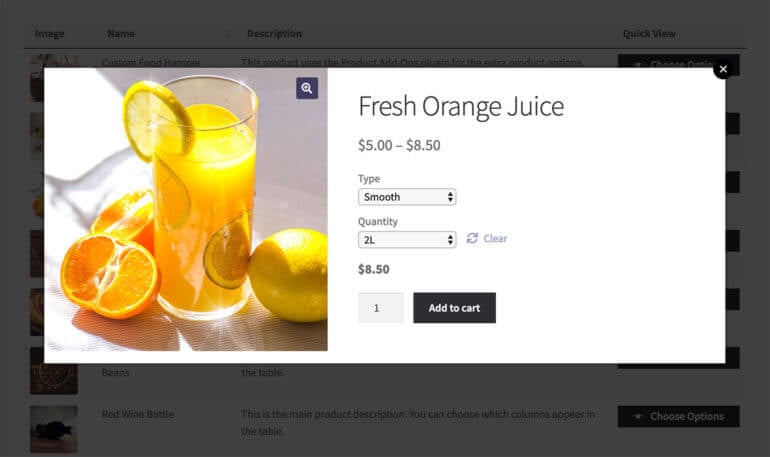
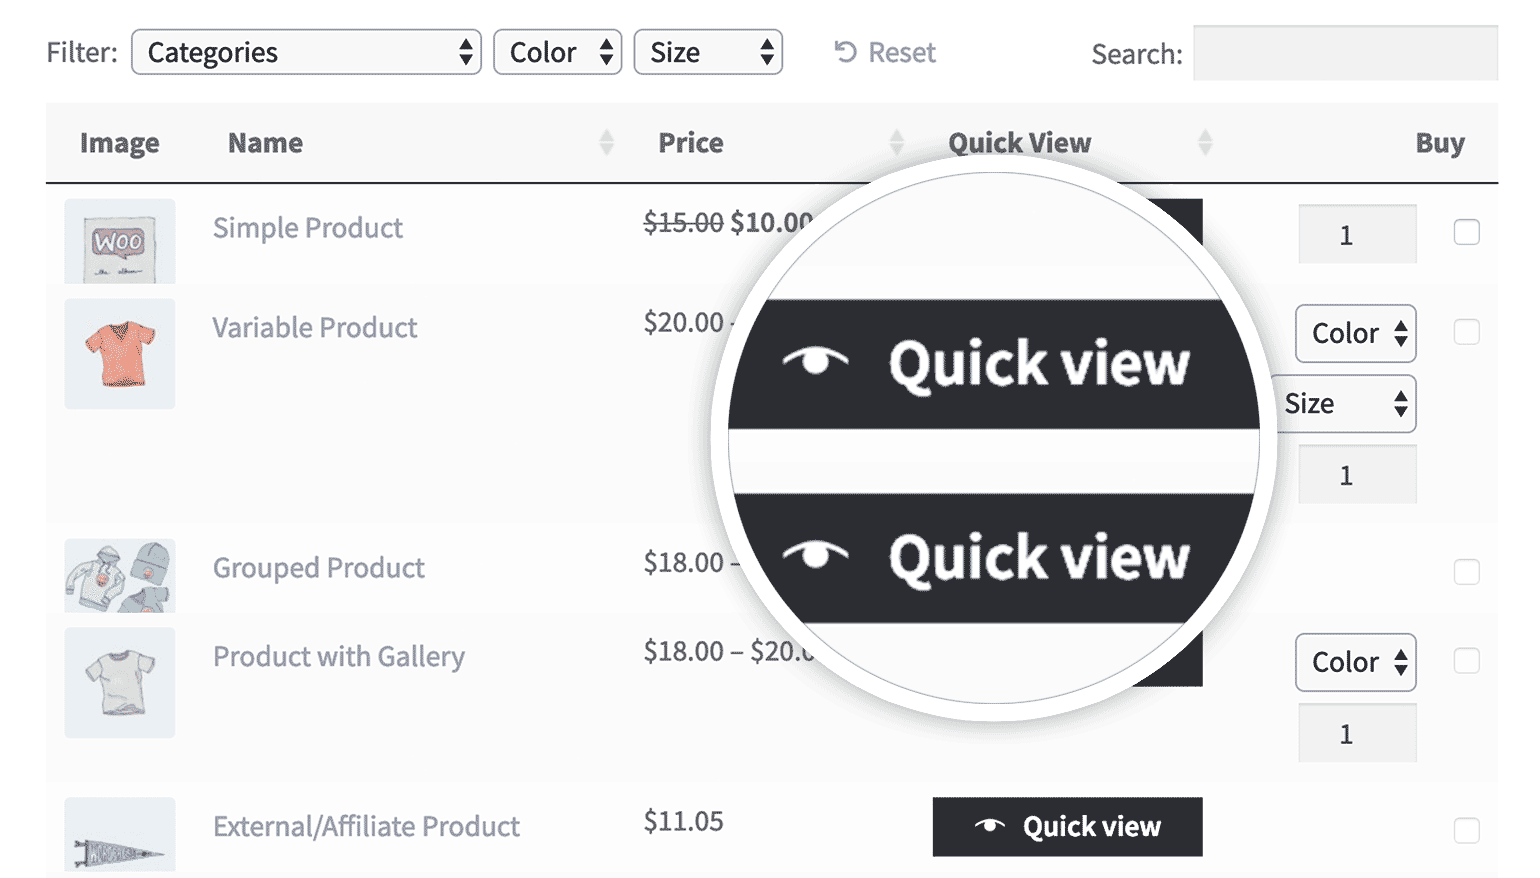

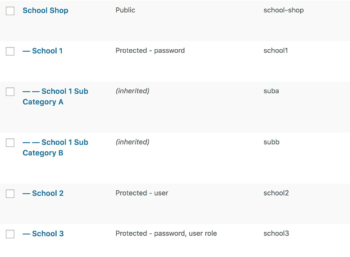
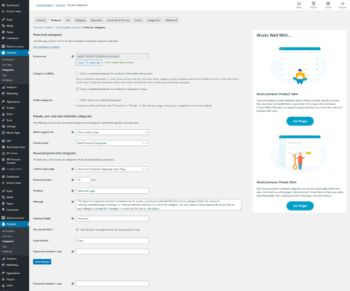
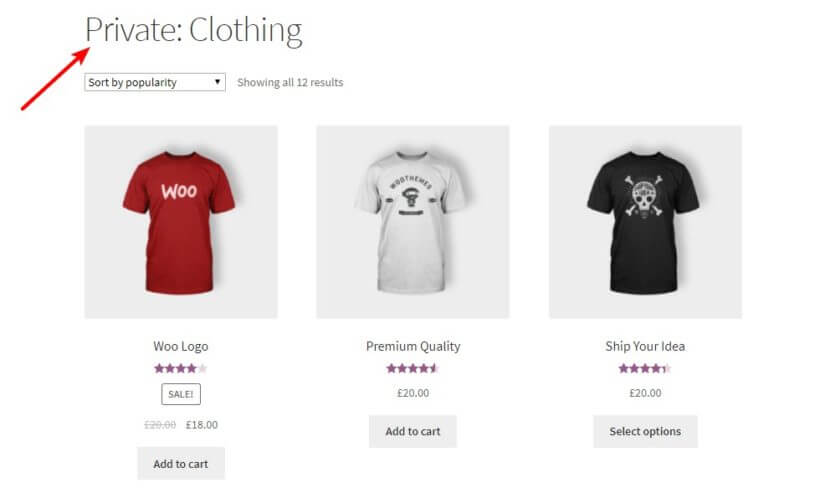


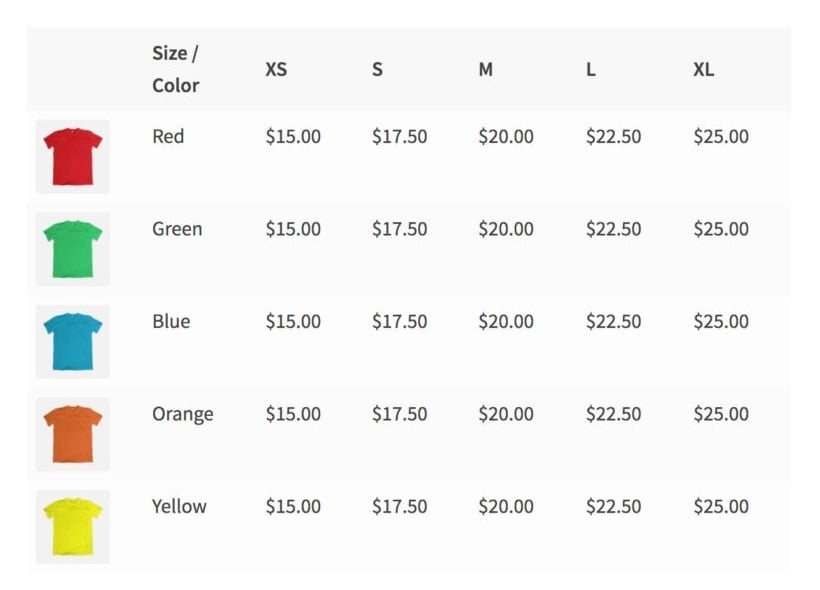


 The standard usage of