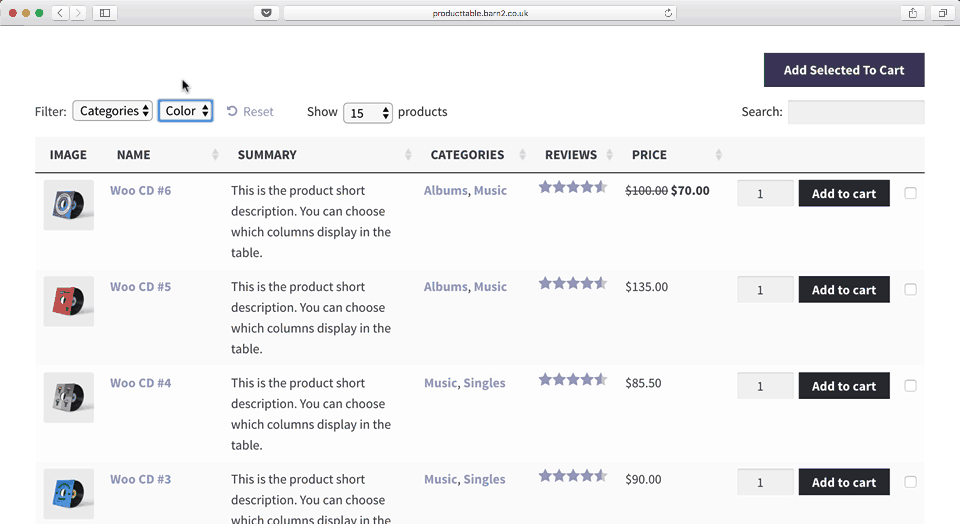
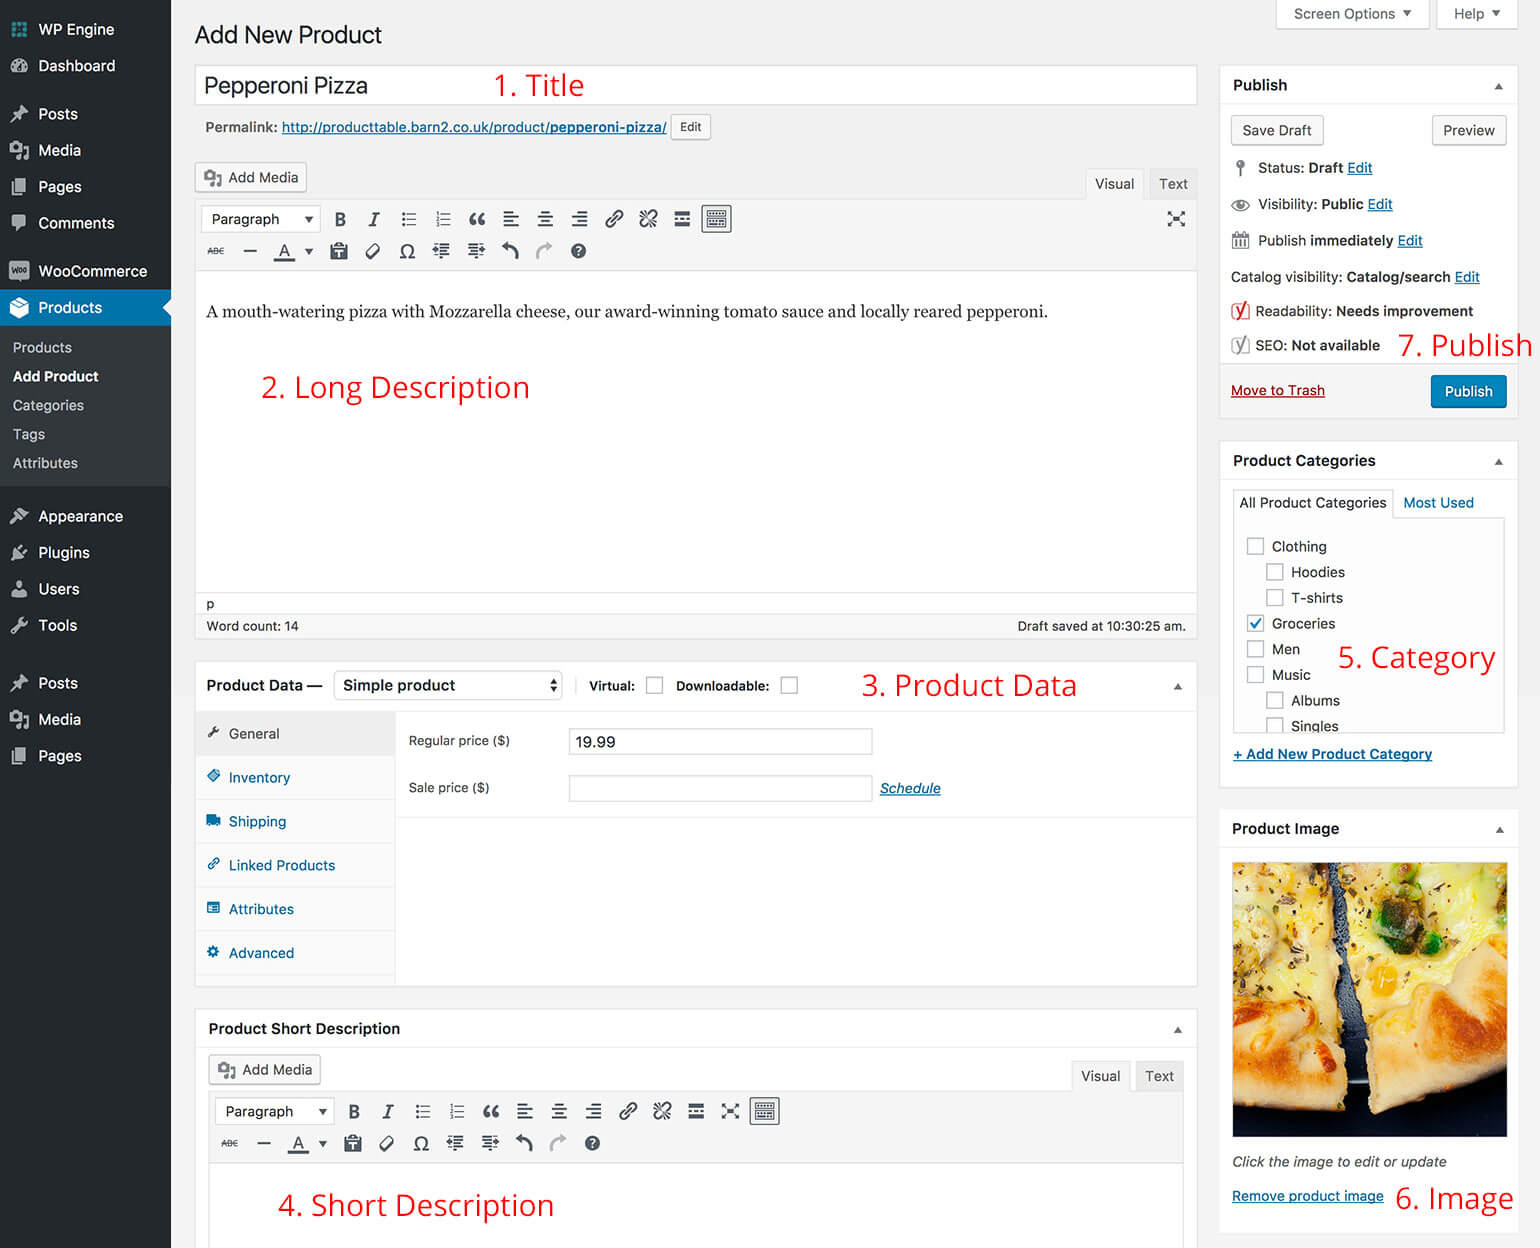
We're pleased to announce that our bestselling Product Table Plugin now supports all the WooCommerce product filter widgets. Keep reading to learn all about them.
What are the new product filter widgets?
WooCommerce Product Table now works with the filter widgets that are included with WooCommerce. You can use them in addition to - or instead of - the product table dropdowns that were already available to filter by category, tag, custom taxonomies, attributes or variations.
Here's the official overview video from WooCommerce. (Just bear in mind that to use the widgets with product tables, you need to follow the instructions below and not the ones in the video! I've provided a dedicated vide on how to use the WoCommerce Product Table filter widgets below, so this is just a general overview.)
WooCommerce Filter by Rating
This filter widget displays a graphic of 5 stars, which customers can click to refine the product table to view products based on the star rating. They can select 1 or more stars to find products with the exact ratings they want.
WooCommerce Filter by Attribute
This filter lets customers refine the products shown in the table by selecting one or more attributes. It offers a quick way to narrow down the product table's contents to find products with a specific feature or combination of attributes.
WooCommerce Product Table fully supports product attributes, so this feature will be really useful to our customers. You could already display attributes as filter dropdowns above the product table, but the dropdowns did not interact with one another. The attributes filter adds more sophisticated ways to refine the table.
WooCommerce Active Filters
This WooCommerce active filters widget works with the other filters. It displays the active filters so customers can see which filters are already in place. It's a quick way to revert the table to the full list of products.
WooCommerce Price Filter Widget
The WooCommerce price filter widget adds a neat-looking price slider. Customers can drag it to set a budget and refine the product table to view products within their price range. You can set a lower price range, upper price range or both - all within a single price slider.
The price slider works nicely with the other features of WooCommerce Product Table. For example, if customers click on the 'Price' column header then they can sort by price in ascending or descending order. If they have an exact budget in mind then they can use the WooCommerce price widget instead.
Why have you added product filter widgets?
Adding support for the WooCommerce product filters is the most asked-for item on our feature request list. Dozens of you have asked for more flexible ways to filter the product table, in addition to the existing filter dropdowns above the table.
The process for using product tables with WooCommerce product filters is slightly different from how to add them to your main shop page and category pages. This is because the built-in WooCommerce widgets are only designed to work on the shop page and category archives. Product tables are normally added to standard pages (although you can add them to category archives if you prefer), so we've created a special WooCommerce Product Table version of each widget which works perfectly on pages:
Get WooCommerce Product Table and use the documentation to create your first table. Add the table to any page on your WordPress website. Make sure the page has a widgetized area such as a right or left sidebar. (Most WordPress themes come with a page layout that includes a sidebar. Ask your theme developer if you're not sure.)
Go to Appearance > Widgets.
On the list of available widgets on the left, look for the ones that start with 'Product Table'. Drag one or more widgets to your sidebar area on the right.
Choose the options to configure your product filter widget(s) as needed.
Click 'Save' for each widget.
Now view the page with your product table. Test the WooCommerce filter widgets and watch the list of products in the table update with the filters you choose.
Bonus: Add even more advanced filters to your product tables
Update: Since adding the above filters to the WooCommerce Product Table plugin, we have released a brand new plugin - WooCommerce Product Filters. This builds on the filters in WooCommerce Product Table and lets you add even more impressive filters to your store. It either works with the default store layout, or - you guessed it - with the product table view.
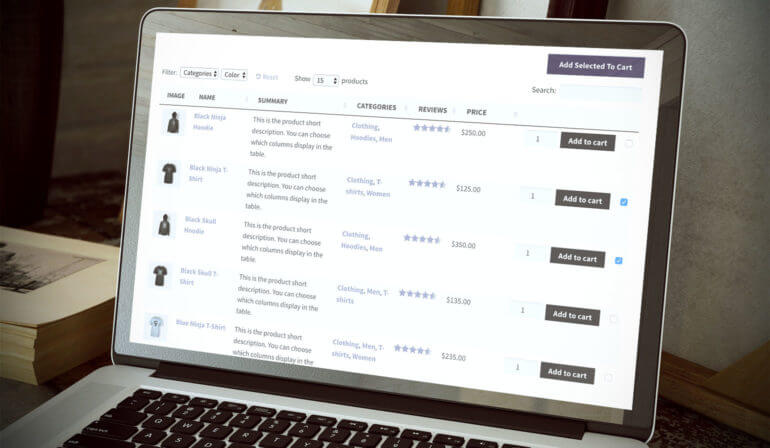
By using the two plugins together, you can filter by absolutely any type of product data. The filters can appear either above or alongside the list of products. And even better, you can choose from a wide range of styles for them. This includes filter checkboxes, radio buttons, images, color swatches, and more.
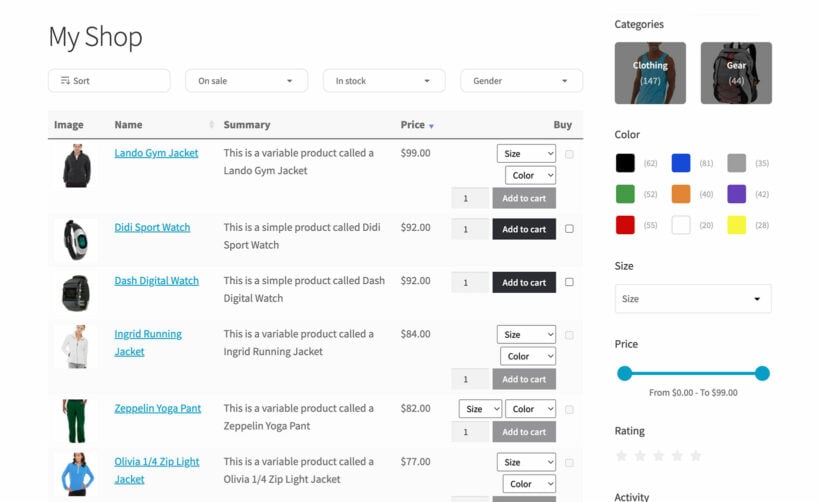
Here's an example:
A WooCommerce Product Table being used with the WooCommerce Product Filters plugin
Where to get the filters
If you're already using WooCommerce Product Table, you can update to the latest version via Dashboard → Updates in the WordPress admin. The new version comes complete with the new WooCommerce product filter widgets. Add them by following the instructions above.
If you haven't got WooCommerce Product Table, buy the plugin today and start creating your product tables with filter widgets.
And if you like the plugin, sign up as an affiliate! We offer a generous 30% commission for reselling it, so it's a good chance to earn some extra pocket money.
I'd love to hear about how you use WooCommerce Product Table with the new filters. Please try it out and add your comments below, ideally with a link to your site!
As the number of WooCommerce websites continues to grow, more and more people are using it for large product directories. A WooCommerce directory plugin lists products on a much bigger scale than typical online stores. Products are listed in a logical structure with extra data to help customers find what they're looking for.
In this article, I'll explain the main features needed in a WooCommerce directory plugin. I'll then provide full instructions on how to use WooCommerce Product Table to create an online store directory.
Your WooCommerce directory will include all the features you need to display large numbers of products. This includes searching, sorting and filtering to help customers find your products more easily. I'll show you how to display different types of product data including all the standard WooCommerce data, plus custom fields and taxonomies. Customers will be able to click from the directory listings to the single product page and/or buy straight from the table.
There are several things that make WooCommerce directory sites different from other types of e-commerce store. Directories need some extra features to list products in a suitable layout, often with extra information.
Essential directory features
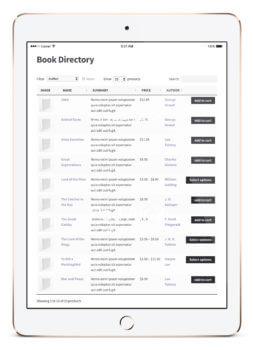
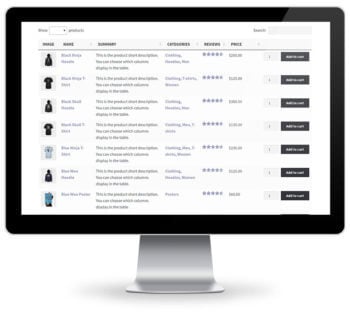
Table-based product layout WooCommerce product directories list many products per page in a less visual way than traditional online stores.
Extra product data Directory databases list various product information. Most WooCommerce stores just list basic data such as name, image and price. A WooCommerce directory can display far more product data. This can include descriptions, embedded audio/video, custom fields, product attributes and variations, prices, reviews, stock and more. You can even include extra options created with the WooCommerce Product Options plugin.
Easy to search & filter With a WooCommerce directory plugin, customers aren't forced to scroll through many pages of products to find what they need. Instead, should be able to use advanced search, sort and filter options to find products matching their criteria.
One-page ordering A lot of product directories function as a one-page WooCommerce order form. This means that customers can view all the directory listings and add products to the cart from a single page. Some WooCommerce directories will disable the add to cart buttons and let customers click to the single product page in order to view more information and purchase. However, one-page ordering is an important feature for many directory sites.
Ability to handle large numbers of products A directory-based e-commerce store may have 100's or even many 1,000's of products. A WooCommerce directory plugin needs to be able to handle large amounts of information without server crashes or performance issues.
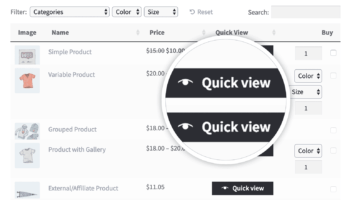
See information quickly without multiple page loads Many online directories are frustrating to use because you have to visit a separate page for each product. It's better to be able to view extra information in a quick view lightbox, without being taken away from the directory listings. You can do this by using WooCommerce Product Table with its sister plugin, WooCommerce Quick View Pro.
What sort of websites need a directory structure?
WooCommerce bookstore
Many WordPress websites sell large numbers of books. A good directory plugin can be used as a WooCommerce bookstore plugin.
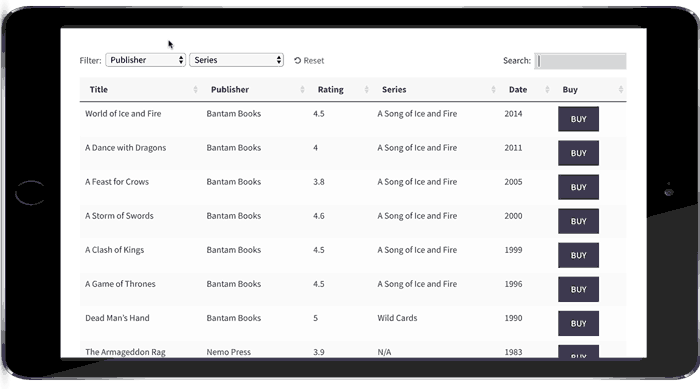
Books for sale can be listed in a table with relevant data such as title, author, publisher, date, price and add to cart buttons. It's even possible to display a small image of the front cover in the book directory listings.
You can sell both printed books and digital e-books in WooCommerce. By adding each book to the directory as a variable product, each version can be sold at a different price. Customers can choose from the directory results page and buy one or more books.
WooCommerce audio directory
If your WooCommerce directory plugin supports embedded audio players then you can use it as a music or audio directory.
Lots of audio stores display 100's or 1,000's of CD's or audio products. Since large images aren't relevant to selling music online, the best layout is a table-based directory view. Many more products can be displayed per page. Customers can use the keyword search, sort options and product filters to quickly find the music products they're looking for.
The best WooCommerce directory plugins support embedded audio players. This is a good opportunity to sell more music by including audio samples, embedded directly into the music directory. You can include sample tracks alongside other information about each product such as CD name, track name, artist, length and more.
If you sell physical CD's and downloadable versions of your audio products then you can add each one as a variation. The variation options can be listed a dropdown on the directory page, or customers can click to the single product page to view the options and buy online.
WooCommerce business directory
Like all WordPress sites, WooCommerce is hugely popular as a business directory. This is less common than a more generic business directory in WordPress because not all business directories need to sell online. However, this is an option with a WooCommerce directory - for example, if you need to sell products for each business via the directory.
(Tip: If you want to create a WordPress business directory without the ability to buy online, check out our other plugin Posts Table Pro. This lets you create a custom post type for your businesses and display these in a tabular directory structure with search, sort and filters.)
Directory of telephone numbers
WooCommerce directory with phone numbers for sale
Directory structures are excellent for selling data-base products such as phone numbers. For example, Numbergroup uses WooCommerce Product Table to create a telephone number directory. Customers can browse the phone numbers and buy using WooCommerce.
You can search the directory for a specific number, change the number of products per page, and sort by telephone number or price. Once you've found the number you want, you can add it to the shopping cart and buy through the usual WooCommerce checkout.
The WooCommerce Product Table plugin is perfect for creating any type of directory like this. Check out our demo of a WooCommerce book directory in action!
How to create a WooCommerce directory to sell absolutely anything!
As you can see, there are lots of reasons to use a WooCommerce directory plugin. Next, I'll show you how to use WooCommerce Product Table to create a directory selling books, music or other types of product.
The first step is to plan your WooCommerce directory. It's worth doing this beforehand to make sure it's logical and intuitive to navigate.
These questions will help you to plan your store's directory structure:
Will you have a central directory page listing all the products?
Would you be better off with multiple pages, each listing different products based on their category, tag or custom taxonomy term?
Will each page of directory listings contain a single table of products? Or will you add multiple tables to each page, listing different products?
Is your server powerful enough to support the number of products per page in the directory? Later, I'll tell you about the lazy load plugin option which boosts performance for large WooCommerce directories. However, if you want to list 100's of products on a single page without pagination, performance could be an issue and you'll need a fast server.
2. Add products to the directory
Next, you need to add the content for your WooCommerce store directory:
Add all your products to the directory in WooCommerce. You can do this manually via Products > AddNew. Or if you have a large product directory, use a WooCommerce listing plugin such as Product CSV Import Suite to import products from CSV to WooCommerce.
3. Set up WooCommerce Product Table
Now you're ready to display your WooCommerce products in a directory structure. You'll need the WooCommerce Product Table plugin for this:
Go to WooCommerce > Settings > Products > Product Table. Enter the license key that you received in your confirmation email and click Save. On this page, you can also choose any default settings that will apply to all your product tables.
Go to any page or post and add the shortcode: [product_table].
This will create a basic directory listing your WooCommerce products in a table-based grid layout.
Use the product table knowledge base to customise your directory. It's hugely flexible and there are many different personalisation options. Here's a summary of the main options you're likely to use to perfect your WooCommerce store directory.
Choose the product data & directory headings
WooCommerce Product Table supports all the standard product data such as name, short and long description, price, dimensions, stock, reviews, and attributes. It also supports custom data via WooCommerce custom fields and taxonomies.
You have full control over which columns appear in the directory. It's also possible to rename or remove the column headings.
Turn your directory into an order form with add to cart buttons, variations & quantity selector
Transform the store directory into a one-page WooCommerce order form by letting customers order straight from the directory page. You can do this by including an 'Add to Cart' column in the table.
Choose between 3 styles of add to cart buttons, including standard boxes and multi-select check boxes. It's also possible to display variable products and a quantity selector directly in the table. Customers can select variations, choose quantities and add multiple products to the cart without having to visit the single product page. You can even disable links to the single product page.
And if you're using the WooCommerce Product Options plugin, then you can also display your add-on options in the product directory. For example, you might want to add checkboxes or text fields to your products and have them appear on the directory page.
Search, sort & filter
You can choose how customers can interact with the WooCommerce directory to find products quickly and easily. There are options to show, hide or reposition various elements such as the keyword search box. Customers can click on a column heading to sort by that column. You can also add product filters so that customers can narrow down the directory listings by category, tag, price, custom taxonomy, etc.
One plugin that can be particularly useful for adding advanced product filtering options to your directory is the WooCommerce Product Filters plugin. With this plugin, you can add a range of different filters, including categories, attributes, tags, custom taxonomies, price, ratings, and stock status, and display them as dropdown lists, checkboxes, radio buttons, labels/tag cloud, images, or color swatches.
By adding these advanced filters, you can help customers quickly and easily find the products they're looking for in your directory, which can ultimately lead to increased sales and customer satisfaction. Plus, with the ability to customize the placement and appearance of the filters, you can create a user-friendly browsing experience that encourages customers to spend more time exploring your product offerings.
Lazy load/AJAX option for large WooCommerce directories
As your WooCommerce directory grows, the plugin needs to grow with it. Fortunately, WooCommerce Product Table has a lazy load option to boost performance as your store grows.
By default, all the product listings in your directory load straight away. This is fine for small directories but can cause a performance hit if you have many products. With lazy load, only 1 page of the directory is loaded at a time. This means that you can have an unlimited number of products in the directory. Even if you have many thousands of WooCommerce products, lazy load keeps everything running smoothly without slowing down your site.
There are further options to boost performance, such as setting a limit for the number of products in the directory. You can also change the number of products shown on each page of the directory.
Embed audio & video in the directory
WooCommerce Product Table supports embedded audio and video. If you're creating a music or video directory then customers can watch or listen straight from the directory listings page. This is ideal if you use audio or video snippets to convince people to buy your products.
Add multiple tables to your directory
Most WooCommerce directories list all their products in a single directory, with easy search options such as the keyword search and filter.
If you prefer, you can add multiple directories to your WooCommerce store. For example, you might want to create a different directory table for each product category.
The plugin supports adding as many directories as you like. For each one, you can choose which products are included (or excluded) based on category, tag, ID, custom taxonomy term, custom field, date, etc.
Create an A-Z directory
You can also use a directory planning to create A-Z listings. Simply use the tabs that come with your theme or a plugin such as Shortcodes Ultimate to create a tabbed layout with a tab for each letter. Include a separate product table to each tab containing a directory of products for that letter.
Add quick view buttons to your WooCommerce directory.
If you use WooCommerce Product Table on its own, then customers can click through to the single product page to view more information about each product.
That's fine if you only expect each customer to buy one product. But most WooCommerce directory websites want to increase the value of each sale. And that requires buying more than one product.
That's why you can significantly increase revenue by adding the WooCommerce Quick View Pro plugin. This lets you add a 'quick view' column to the WooCommerce directory (which you can rename to anything you like). Customers use this button to view more information about each directory product in a handy lightbox popup.
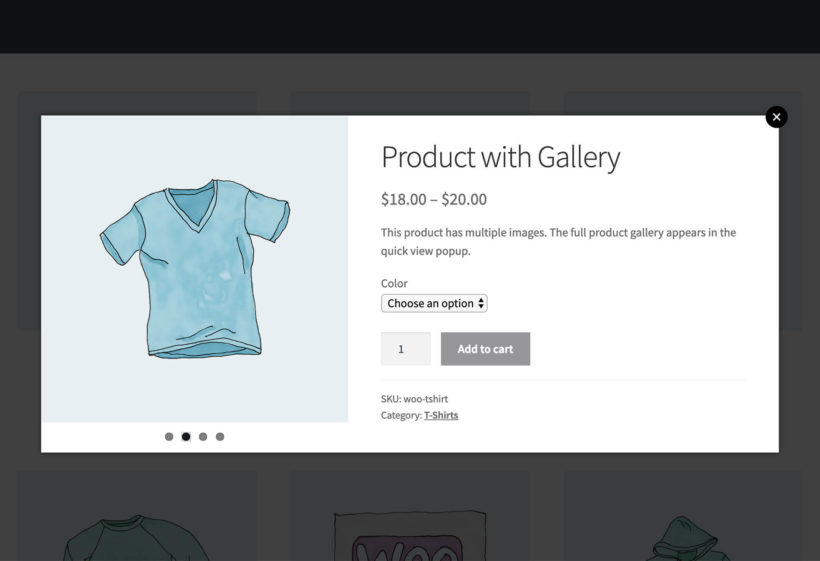
You can choose what information to show in the lightbox. This might be more product images, variation and add to cart options, the short description, meta information such as categories and tags, or something else.
This is a perfect way for customers to learn more about each products without being taken away from the main WooCommerce directory listings. That way, there's no chance they'll get lost. They remain on the list of products at all times. As a result, they spend longer browsing the products in the directory, and are likely to buy more and more.
4. Launch & promote your WooCommerce directory
Your store directory is now complete and ready to launch:
Test everything thoroughly to ensure your WooCommerce directory is running smoothly. You need to be certain that customers can order from you from different browsers, mobile devices etc.
I hope this tutorial has provided everything you need to create a fully functioning store directory using WooCommerce Product Table. The plugin comes with full support from our UK WordPress experts at Barn2 Media.
Get in touch if you have any questions about how it works that aren't covered in the knowledge base, or if you need any advice on setting it up to create the perfect directory. Or if you like the plugin, sign up as an affiliate and we'll pay you 30% commission for reselling it!
I'd love to know which method you use for your own product directory. What do you sell in your WooCommerce directory? Please leave your comments below.
'WooCommerce is great for selling all kinds of products. That's why it powers over 41% of all e-commerce websites. If you're a photographer selling photos online then you can benefit from a WooCommerce gallery plugin.
In this tutorial, I'll show you how to use the Product Table plugin to create a professional-looking WooCommerce image gallery.
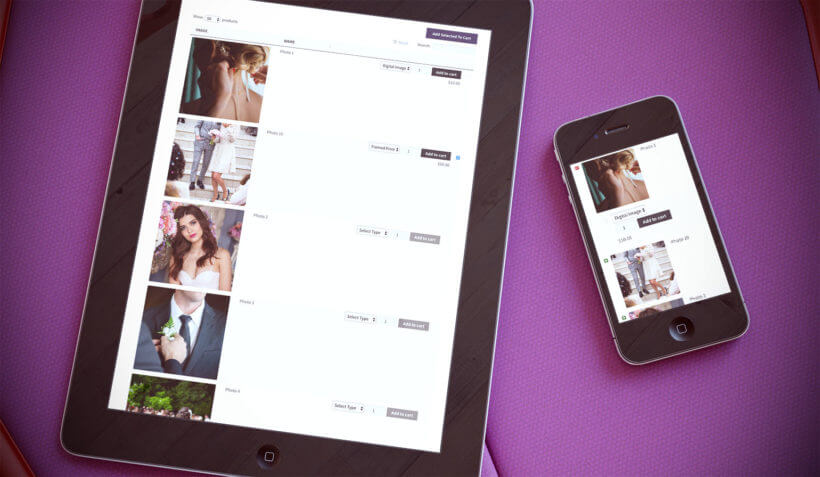
Your customers can search, sort and filter the table to quickly find the images they like. They can select product variations or other options, and add photos to the cart directly from the WooCommerce gallery. You can display any information you like about your products, all within the image gallery view. And if you implement the bonus tip later in this article, then you can also display the full product image gallery in a quick view lightbox. It's the perfect way to sell more photos.
A WooCommerce image gallery is perfect for any website with highly visual products. If images are essential to your sales then a product gallery is a great way to show them off.
Most WooCommerce stores have a layout that consists of a grid of images with the product name, price, reviews and add to cart button. This may not be the best way to appeal to your customers. For example, if you sell variable products then customers have to click through to the single product page to choose options and add to the cart.
With a photography product, you don't really need the single product page as there's no text-based description. It's better to display all the data you need in the WooCommerce gallery where customers can make quicker buying decisions.
Here are some examples of websites that would benefit from a WooCommerce image gallery.
WooCommerce photography website
If you're selling photos or other images on a WooCommerce website then you can display them in a WooCommerce gallery. The gallery can include all the information you want to provide about your images. This might include name, price, variation options, dimensions, frame options etc.
By displaying all this information on a single page in a WooCommerce gallery, customers can choose all the photos they want without clicking elsewhere. Ideally, they should be able to select multiple photos and add to cart in a single click. This helps to increase the value of each sale - simply by having a gallery of products.
Graphic designer website selling images online
A graphic designer might sell image files using WooCommerce. This could be photos, icons, vector graphics, illustrations, PSD's or logos.
Displaying images in a WooCommerce gallery is a great way to showcase your work while providing all the data your customers need. You could include a big column for the image preview, plus information such as image size, file format, options, price and add to cart button.
Any WooCommerce website where images are important
So far, I've focussed on the most obvious uses for a WooCommerce gallery. However a table layout with images can benefit any WooCommerce website where photos of your products are important.
You can choose the size of the images in the table view, and what other information you want to display. By presenting your products in a one-page WooCommerce gallery layout, customers can see everything at a glance. This helps them to find what they want and reduces your bounce rate and lost sales.
First, create a WooCommerce website as usual. If you don't know how to set up WooCommerce, here's a link to the official documentation. This covers a huge range of topics such as adding products and categories, payment options and shipping.
2. Install WooCommerce Product Table
Once you have an e-commerce website set up, it's time to install the Product Table plugin for your WooCommerce gallery layout.
If you already selected any of these options on the plugin settings page, then you can keep it simple and just use the shortcode [product_table]. The options you chose earlier will be used automatically.
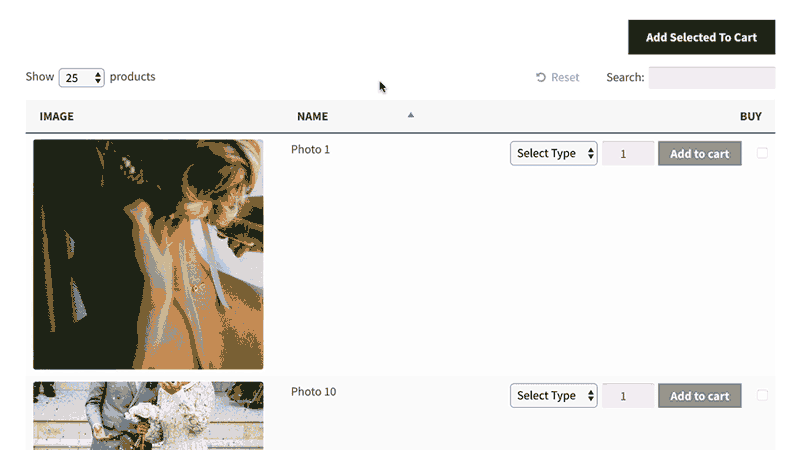
Save the page and view it. You will see your products displayed in a WooCommerce gallery table with columns for image, name and add to cart button.
4. Customise your WooCommerce gallery plugin layout
Here are some extra options you might like to add to the WooCommerce Product Table shortcode:
Change the image size I recommend adding image_size="300x300" (or similar) to make the images bigger. By default, your photos will appear quite small in the WooCommerce gallery. Set the number of pixels to enlarge them.
Change your columns WooCommerce Product Table can display most types of product data in the image gallery. You can choose which columns display in the table view. For example, you might want to display product descriptions, categories, tags, attributes or extra data as custom fields or taxonomies.
Let customers choose the quantityAdd show_quantity="true" to the WooCommerce Product Table shortcode to add a quantity selector dropdown next to the add to cart button. This lets customers buy multiple copies of each photo, which can increase your sales. For example, if you're a school photographer then this can encourage customers to buy a copy for each family member.
Disable links to the single product page Your WooCommerce gallery should include all the information that customers need about your photos, as well as the image itself. This means that you may not want them to be able to access the single product page. By default, the gallery image and product name in the table will link to the single product page. To disable these links, add links="none" to the shortcode.
These are the main options that you're likely to use in a WooCommerce gallery plugin. There are loads more ways to configure the product table so check out the knowledge base.
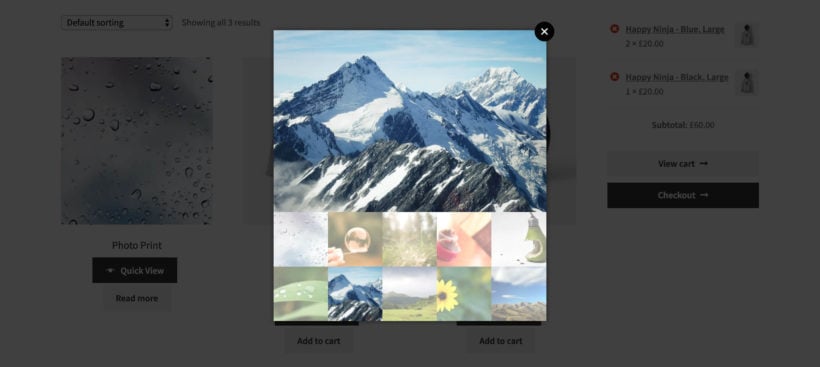
With WooCommerce Product Table, you can list products in a table-based gallery. If you'd like to show multiple images for each product, then you can do this by using it with its sister plugin - WooCommerce Quick View Pro.
When you use both plugins together, customers can click on a product image, title or quick view button to view the full WooCommerce product image gallery in a lightbox popup:
By default, the WooCommerce gallery lightbox shows thumbnail images. Customers click on the thumbnails to navigate between the gallery images. If you prefer, then you can switch to bullet navigation and slide between the images. It's also possible to add product information, variations and add to cart buttons to the
Adding quick view to your WooCommerce gallery is the perfect way to sell more photos. It increases the value of each sale because customers remain on the list of images, and are not taken to a separate page for each product. This encourages them to buy more images from you, increasing your profits.
WooCommerce Product Table is a neat way to create WooCommerce galleries, with a grid of product images alongside other data and buy buttons.
Do you use galleries in WooCommerce on your website? I'd love to know what method you use. Please leave your comments below.
This article has been kindly written for us by Jamil, SEO specialist from CloudWays.
According to a recent report by eMarketer, global retail e-commerce sales are expected to reach $4 trillion by 2020. These trillions explain how online shopping is ready to take over the traditional retail stores.
There are a number of e-commerce platforms and WooCommerce tops this race with a market share of over 40%. Part of the reason lies in the simple fact that WooCommerce is so customisable, ideal for small to large online businesses and startups. As I write this, WooCommerce has been downloaded 45K to 50K times per day, and has more than a million active users.
It seems that the internet is flooded with tricks for boosting your WooCommerce store. Here is my selection of WooCommerce tips to help you stay on top of the fierce online shopping game.
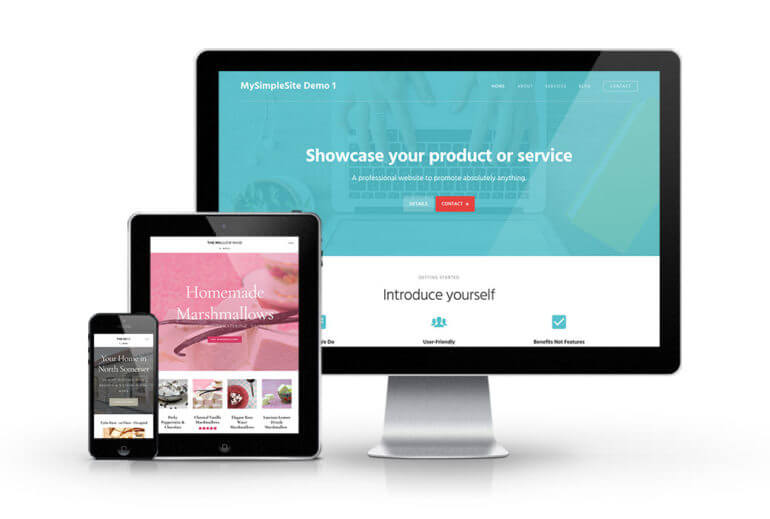
Use an eye-catching WooCommerce theme
The first impression is often the last impression and the first thing that a visitor sees on your online store is the theme and the layout. Based on the theme, the visitor makes a snap decision about whether to continue with the purchase or close the tab!
Web visitors expect an eye-catching store with a very intuitive UI/UX. My advice is that the design should be visually appealing yet simple, so that the widest range of users can interact with the store without thinking twice.
For WooCommerce store owners, themes fall into three options: Free, Paid and Custom. Pick the option that suits your pocket but keep one thing in mind; the theme should be attractive enough to make sure that the visitor enters the sales funnel! If you're looking for an affordable WooCommerce option with a choice of good themes, check out Barn2 Media's MySimpleSite and MySimpleStore services.
A friendly user-experience
According to many experts, a friendly experience is the key to more sales and popularity of the store. Visitors should feel at ease while shopping at your store. Navigation plays a huge role in providing a precise and relaxed environment for your visitors.
Visitors always need to know three important pages: the one they were on, the one they are on and the one that they will go to after clicking a particular link on your store. This can be achieved via breadcrumb links and intuitive navigation menus.
An important plugin to use for your store is WooCommerce Product Table. This plugin presents your product descriptions in separate boxes on the store, along with other information such as product name, price, reviews, attributes, variations and even add to cart buttons. This really helps the shoppers get instant information about the products so they can make quicker buying decisions.
Any e-commerce business depends upon reliability and speed. Most customers will not wait around for slow loading online stores. Thus it is vital that you continuously monitor the load time of the store to ensure a high speed website.
Picking the right WooCommerce hosting is the best way of ensuring the speed of the store. When shopping for a host for your store, you should look for reliable and persistent performance and availability of (free and paid) plugins and themes that help in making your web store blazing fast.
P.S. You should always keep an eye on plugins and themes that could slow down your web store.
Security above all
Security is the ultimate requirement for any web store. An insecure web store simply means no sales.
Online stores are a goldmine of customer information including personal information and credit card numbers. Even the rumour of a breach could permanently destroy the reputation of an online store!
You have to make sure that your WooCommerce store is secured with an SSL certificate. Other ways to secure your store include setting up a complex password for the site’s administrator account, updating the WooCommerce store to the latest version and regular backups of the store.
Engaging and clear product descriptions
Visitors can be converted into customers through clear and engaging product descriptions. The product description is a selling pitch, so it should be unique and attractive.
Another important thing to remember is that you should never mislead your visitors about a product. This is because they will not visit your store again after a bad experience. In fact, this could often result in a vicious social media campaign.
To avoid this situation, your product descriptions should perfectly reflect the products. Research the popular trends and check out your competitors' product descriptions for inspiration. Remember that SEO-based descriptions help in getting your product rank higher in Google.
Impressive product images
The right picture gives customers the right vibe about a product.
Customers do not buy products after reading the engaging product descriptions. Rather, they look at the images to check out the quality of the products. Therefore, your product images should be of top quality and should attempt to capture all details of the product.
Your images should show different aspects of your product. The good thing about WooCommerce is that it supports 360-degree images which offers a very detailed visual description of the product.
Create product videos
Today, the Internet is all about videos. Product videos are the latest trend in the e-commerce industry.
Potential customers always check out product videos because a one-minute video can provide the information that hundreds of pictures simply can’t.
The good thing about product videos is that you can produce a video once and then promote it on several platforms such as Youtube, Snapchat, and WhatsApp.
Focus on store SEO
Optimising your WooCommerce store for search engines is one of the most effective practices of generating more traffic and sales. Always make sure your online store integrates the latest trending keywords to get your pages and products listed on the very first page of Google.
Your store’s interlinking structure should be stable as Google looks for the authority of your store. A sitemap is an essential aspect of the SEO strategy for a WooCommerce store. Each page should be optimised individually. Similarly, using keywords in product descriptions is good.
However, remember that excess of everything is bad. Google penalises web stores filled with keywords.
Live chat
The customer is the king, and customer support is the key to success for any web store. You should provide your customers prompt pre- and after sales services and work toward resolving their queries promptly. If your customers feel valued, they are more likely to return for more shopping and recommend you to others.
Live Chat is a premium WooCommerce plugin that helps in improving customer experience. It saves customers' time because they can contact your store immediately without much waiting. There are also several other plugins that integrate live chat capability straight into your WooCommerce store to make your web store more reachable.
Sell to existing customers!
It's all well and good trying to attract new customers. But it's well documented that your efforts will get the best value for money by focussing on getting repeat business from existing customers. Users Insights have written a good article about how to increase your WooCommerce sales from returning customers.
Refund policy and/or money-back guarantee
This tip relates to all e-commerce stores in general, as well as WooCommerce shops. A well-defined refund policy means that customers at your store can feel easy about their purchases. If they do not like the product, they can easily return the product without any issues.
Similarly, if you feel confident enough, you could offer a money-back guarantee at your store. This is the ultimate offer you could make, but remember that you have follow through and be good for your words.
Customize your checkout page
As an online store owner, your goal is to deliver a seamless shopping experience to your customers. One way to achieve this is by creating a frictionless checkout process.
You can customize your WooCommerce checkout page to make it easier for your customers to make purchases. If shoppers have to click through multiple pages to buy products, they’ll likely end up abandoning their shopping cart in favor of another store.
Another feature to include is allowing your customers to easily add multiple products to their shopping cart. This makes it simpler for them to choose product variants without having to click through to the single product page.
A secure checkout is one of the most important factors in delivering a great shopping experience. You want to be able to let customers know that their contact and billing information is safe. One way to achieve this is by offering a secure (and popular) payment gateway at checkout.
WooCommerce is a wonderful platform for e-commerce stores. If you implement the above WooCommerce tips and tactics in your store, you can see a significant increase in revenues and customer base.
Consider every point of the marketing sales funnel. Each step of the journey should be designed to increase your store sales.
How about saving some money? Use the coupon code "BARN2MEDIA" to get free hosting credit of $10 for Cloudways, a managed cloud hosting platform. If you want your Woocommerce store to perform at optimum speed, you can try Cloudways.
About the author
Jamil is an SEO Specialist at Cloudways, a managed cloud hosting platform. A Digital Marketer, HubSpot Inbound Marketing Certified. Loves WordPress, cricket and sprinting.
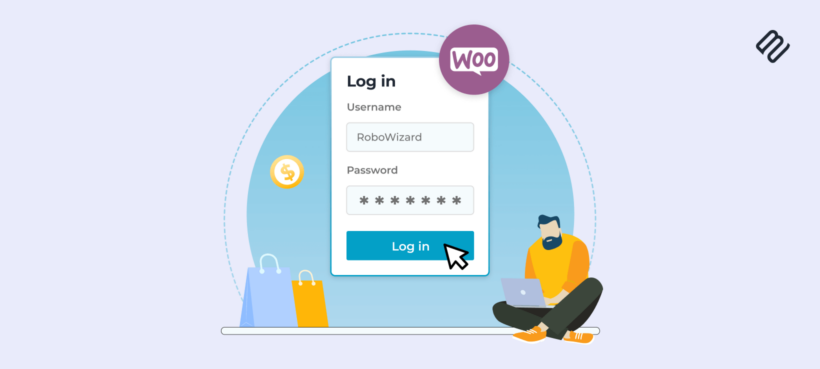
This ultimate guide contains everything you need to know about WooCommerce login for your customers. We'll look at the different ways you can let customers log into a WooCommerce online store, and why.
I'll tell you how to set up a WooCommerce login straight out of the box, with or without compulsory registration and social login. I'll also share some handy login plugins to create a hidden or private WooCommerce store that only logged-in customers can access. You will learn how to:
Add user login to your WooCommerce store (no plugin needed).
Make users log in before purchasing (no plugin needed).
Send your customers WooCommerce auto-login links using the free URL-Based Login plugin.
Read on, or watch this video to see how each login method works.
Importance of a customer login for WooCommerce
Personalized user experience: WooCommerce customer login allows you to provide a personalized experience to your customers. They can easily access their order history, saved payment methods, and shipping details, which can save them time and effort.
Increased security: With a WooCommerce customer login, you can secure customer data by allowing access only to registered users. It also allows you to monitor and track user activity to prevent any fraudulent or suspicious activity.
Targeted marketing: A WooCommerce customer login feature allows you to track customer behavior and preferences, which can be used to create targeted marketing campaigns. You can also offer personalized discounts and promotions to customers based on their purchase history.
Improved customer engagement: WooCommerce customer login feature can help you create a loyal customer base. You can send personalized emails, update them on new products or services, and gather feedback on their experience.
Simplified checkout process: When WooCommerce customers log in, they can save their payment and shipping details, making the WooCommerce checkout process faster and more convenient. This can increase customer satisfaction and encourage repeat business.
What are the different types of WooCommerce login?
By 'WooCommerce login', I'm talking about the process where customers log into your online store. It's quite a vague term and there are several ways to set it up. Which one you choose depends on how you want your store to work.
Public WooCommerce store with guest checkout- This is the most common WooCommerce setup. Anyone can browse your products and there is no hidden WooCommerce content. Customers can buy products as a guest without having to log in, or they can optionally create a WooCommerce account during checkout.
Customer portal with protected product categories - Instead of (or as well as) individual customer accounts, you can password-protect parts of a WooCommerce store or restrict them to specific users or user roles. Anyone can buy from the public areas of your shop, while only customers with the right credentials can access your protected categories. Once a customer logs into your protected categories, they can view and buy the hidden products inside.
100% private WooCommerce store - Some websites want to hide a whole WooCommerce store from public view so that customers must log in or enter a password to access it.
WooCommerce auto-login links - Let customers log in more easily by clicking on a personal login URL. No more usernames or passwords!
With nearly 2 million using WooCommerce sites according to the latest WooCommerce stats, there are plenty of people looking for all these login options.
Which type of customer login is best for my WooCommerce store?
I've created a quick quiz to help you with this. Answer the simple questions about your requirements, and the quiz will recommend the best WooCommerce customer login plugin for your website.
Option 1 - Public WooCommerce store with guest checkout
Most WooCommerce stores let anyone view and buy their products, whether or not they're logged in.
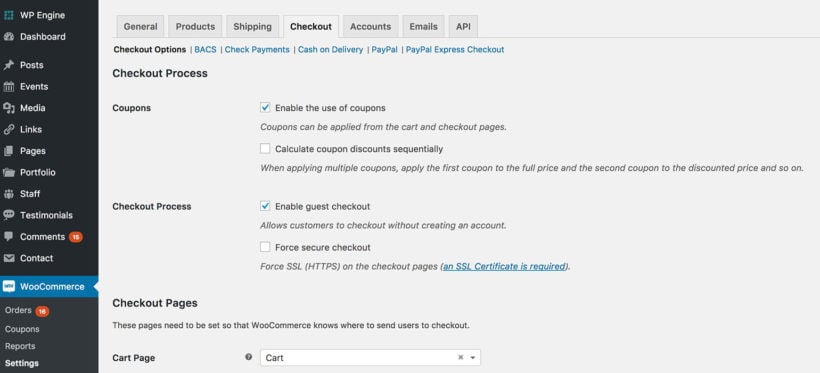
How to enable guest checkout in WooCommerce
Log into the WordPress dashboard and navigate to WooCommerce → Settings → Checkout.
You'll see a box with the label 'Enable guest checkout'.
Tick this box and customers will be able to purchase without logging in or creating a user account.
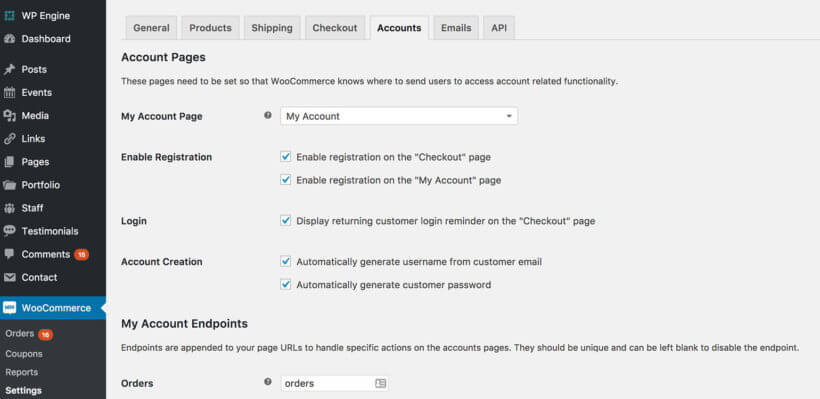
How to prevent user account creation in WooCommerce
If you like, you can prevent customers from creating user accounts at all. To do this, go to WooCommerce → Settings → Accounts. Untick the boxes to enable registration on the Checkout and My Account pages. This will prevent customers from registering for your site at all, so you don't need to provide a login page.
Check out this free Helpie WooCommerce FAQ plugin which helps to create an FAQ section on your WooCommerce product page to easily answer customers' questions about the products.
Option 2 - Public WooCommerce store with mandatory user accounts
How to add a Register/Login page to WooCommerce
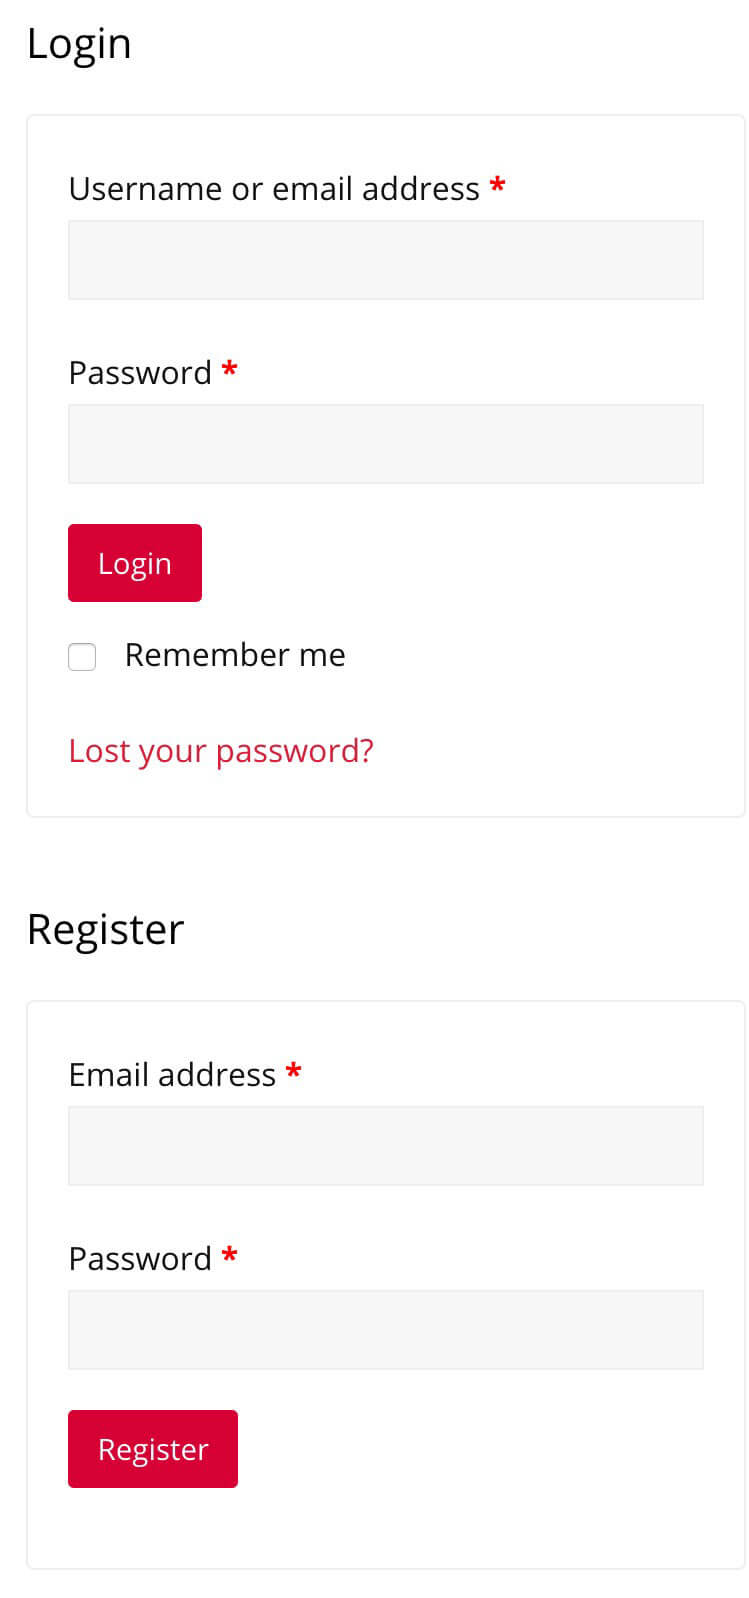
When you first install WooCommerce and run the Setup Wizard, there's an option to automatically create all the essential pages for your store. Do this, and you'll see a 'My Account' page in your list of pages (along with other new pages for shop, cart, and checkout).
The WooCommerce login shortcode [woocommerce_my_account] will appear on the page. You can use this page as your register/login page, for example by linking to it from your header or sidebar.
The WooCommerce login/register form works as follows:
Guest users will see the WooCommerce login form, possibly with a registration form. To include the registration form on the login page, go to WooCommerce → Settings → Accounts and tick 'Enable registration on the "My Account" page'.
Logged-in users will see their Account page, with their order history, profile, and other information.
You can add the WooCommerce login shortcode[woocommerce_my_account] anywhere else on your website to create extra login forms. There are other plugins available to do this such as Sidebar Login and Woocommerce Login / Signup Lite. These let you create more complex WooCommerce login forms. However, you only need an extra plugin if the built-in WooCommerce login shortcode isn't suitable for you.
Tip: If you want to control where users are redirected after they log in, try Peter's Login Redirect. It's easy to set up and we've used it on lots of our client's websites.
How to force WooCommerce customers to log in or register before they buy
In the WordPress dashboard, go to WooCommerce → Settings → Checkout.
Untick the 'Enable guest checkout' box. This will force users to create an account when they buy from your WooCommerce store.
You can further configure how user accounts are created in WooCommerce → Settings → Accounts. This WooCommerce page has several settings such as whether to include a registration form on the checkout page and whether to automatically generate WooCommerce customer login usernames and passwords.
There's also a box to display a login reminder on the checkout so that existing customers can log in. This is really useful if guest checkout is disabled, as you need to make it easy for customers to log in.
Note: If a customer completes checkout without logging in then an account will be created for them behind the scenes. They will receive the login details by email so that they can log in the next time they purchase from you.
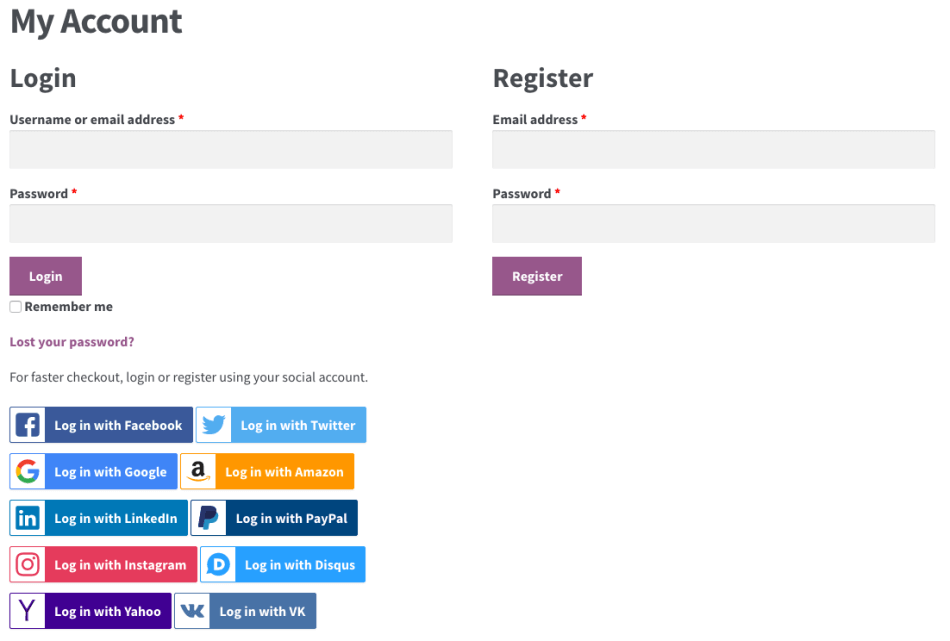
WooCommerce social login
As well as the standard WooCommerce login facility, you can let customers log in with their social media accounts. With WooCommerce's social login, you create a public store as usual so that anyone can browse your products. As part of the checkout, they can log into your website using their social media accounts.
You might offer social login in addition to - or instead of - the option to register directly on your WooCommerce website.
Research suggests that over 77% of customers prefer to log into WooCommerce or other websites using social media. This is hardly surprising given that it saves them the hassle of creating a new WooCommerce account for your website and remembering their logins. (And of course, WordPress insists on secure passwords these days so they can't just log in with an easy-to-remember password!)
Back in 2014, I wrote about a 'deadly embrace' caused by WordPress social login plugins. At the time, the available plugins conflicted with built-in WordPress user accounts. Things have improved since then but if you're considering social login then I recommend you use the official WooCommerce extension. This offers the best chance of creating a user-friendly WooCommerce social login for your website.
How to add social login to a WooCommerce store
To add social login to your WooCommerce website, I recommend the official WooCommerce Social Login plugin. Once you've purchased the plugin, follow the instructions in the knowledge base to enter your license key and set it up.
Given the issues I previously identified with social login, I recommend thorough testing before it goes live. Make sure your WooCommerce login process works seamlessly. In particular, test the following aspects of the login process:
First time WooCommerce logins using each social network.
Repeat logins using the same social network.
Repeat logins using a different social network. (i.e. what happens if a customer forgets which social network they logged in with previously?)
Register using social login and then try logging in directly on the website using the Lost Password link.
Basically, try to break it and send a support request to WooCommerce if you discover any problems. Social login is a great idea but needs thorough testing to get right, as customers may forget how they previously logged into your WooCommerce store.
Option 3 - Login portal with WooCommerce protected categories
Options 1 and 2 are about letting customers log in to a public WooCommerce store. They might have to log in to purchase, but anyone can browse the store and see the products. You can also create a WooCommerce login system where customers have to log in or enter a password in order to see your products or other store content.
The WooCommerce Protected Categories plugin creates a login portal where different customers can see different products. It locks down one or more of your product categories so that no one else can see them. Customers must log into WooCommerce with the correct credentials to see the products inside their portal.
You can create separate categories for different groups of customers, and you can even create customer-specific products. Each customer logs in and views the restricted products that they have access to.
Who needs protected product categories?
You can use WooCommerce Protected Categories in several ways:
Show products from protected categories in the public areas of your store. When someone clicks a protected product, they must enter the password or login to view the single product page or purchase. This lets you display all products in the public store, while only pre-approved customers can buy protected ones.
Hide protected categories and products from the public store. Alternatively, you can hide protected WooCommerce categories and their products from public areas of your store. Authorized users can log in and be directed to the correct hidden category. This is perfect WooCommerce wholesale stores or customer-specific products where you sell different products to each customer.
Hide your entire WooCommerce store. Finally, you can put ALL your products within one or more protected categories. This way, customers have to log in before they can view your products or buy. (Tip: While it's possible to hide your whole store with this plugin, you might prefer Option 5, below. Both plugins let you create a WooCommerce hidden store)
How to create protected categories in WooCommerce
You can read full setup instructions in the plugin knowledge base. Here's a quick guide to get you started:
Go to WooCommerce → Settings → Products → Protected Categories and enter your license key.
Change any settings such as customizing the text on the password WooCommerce login page, and hide protected categories from the public areas of your store.
Now, go to the product category that you want to hide behind the WooCommerce login page. You'll find this in Products → Categories. The plugin has added a new 'Visibility' section with options to password protect the category or make it private. Choose 'Protected' and either password protect the category, or restrict it to specific users or roles.
Repeat step 5 for all the categories you want to protect.
Finally, test your WooCommerce protected categories from different customer login scenarios. For example, try it when you're logged in and out of the website. Also, try it before and after you log in to a category.
Option 4 - Create a login-only store
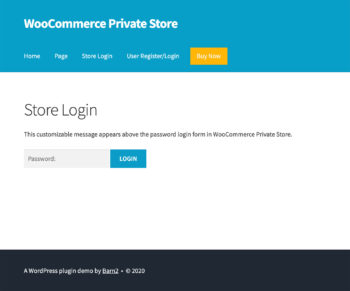
WooCommerce Private Store forces customers to log in to your WooCommerce store before they can see your shop page, products, categories, or any other store content. It's a simple but effective plugin to hide WooCommerce from public view, without affecting the public parts of your site.
By logging into their user account or entering a simple password on the WooCommerce private store login page, customers can unlock the store and access the products and other content inside. Your public users won't even know you have a WooCommerce store unless you decide to link to the WooCommerce login page. (In which case, they will be able to see the WooCommerce login page but none of the content behind it.)
How to hide your whole WooCommerce store behind password protection or a user login form
The plugin knowledge base contains full setup instructions for WooCommerce Private Store. I've also provided details below. Setting it up literally just takes a few minutes:
Go to WooCommerce → Settings → Products → Private Store.
Enter your license key and change any settings such as customizing the WooCommerce login form text. Either choose a password to password protect WooCommerce, or tick the 'Logged In Users' option to automatically unlock it for logged-in users or specific roles.
Once you've saved the settings page, your whole e-commerce store will be protected. Customers will have to log in or enter the password before they can see ANY WooCommerce content such as the main shop page, products, categories, etc. Your WooCommerce content will also be blocked from search engines, so it's a simple yet secure way to make WooCommerce private.
WooCommerce Protected Categories or Private Store?
I realize that the plugins mentioned in options 4 and 5 are quite similar. You can use them in similar ways but they can also be used very differently in terms of WooCommerce login options. Check out my article and quiz on which WooCommerce protection plugin to use.
Option 5 - WooCommerce auto-login by URL
Finally, you might want an easier way for your WooCommerce store's customers to log in.
WordPress and WooCommerce auto login plugins provide a dynamic link that automatically logs customers into their accounts. This saves customers from having to remember or store usernames and passwords. All they need is their personal auto-login URL.
You can use this option with options 1, 2, 4, and 5 listed above.
As you can see, there are many types of WooCommerce login designed for different types of stores. I hope this guide has helped you to choose the right login method for your WordPress site and to set it up properly.
How do you allow customers to log in to your site? Are there good WooCommerce plugins I've missed? What pitfalls did you come across and what would you advise other WooCommerce users? Please add your comments below.
With more and more people using our bestselling WooCommerce table plugin, we're enjoying seeing all the innovate uses that people are finding for it. Here are 3 very different examples of how real customers are using the WooCommerce Product Table WordPress plugin.
The first example uses it as a WooCommerce wholesale plugin, with the table view only available to approved trade users.
The second example adds WooCommerce tables to the single product page. The table lists kitchen parts, letting customers mix and match to order a complete kitchen.
The final example uses WooCommerce tables to create a music store, with embedded audio samples to listen to before buying the music online.
Davora are an e-commerce website selling ethnic and minor season greetings cards. As well as their public WooCommerce store, they use Wholesale Suite's 'Wholesale Pricing' plugin to display wholesale prices in a separate trade area. This lets them control how products are sold to wholesale users, for example with separate trade pricing and minimum order quantities.
When you log into the trade store, you can navigate to a product category. The products in each category are listed in a searchable, sortable table created using WooCommerce Product Table. WooCommerce Product Table is fully compatible with Wholesale Suite's pricing plugin so they can be used together.
Davora have done some custom development work to automatically display product tables on category pages for trade users, while public customers see the normal category layouts. (The knowledge base includes some basic guidance on how to add product tables to category archive templates.)
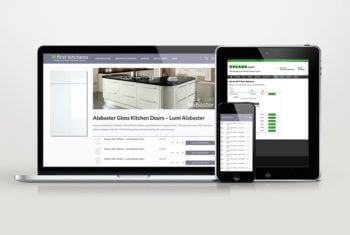
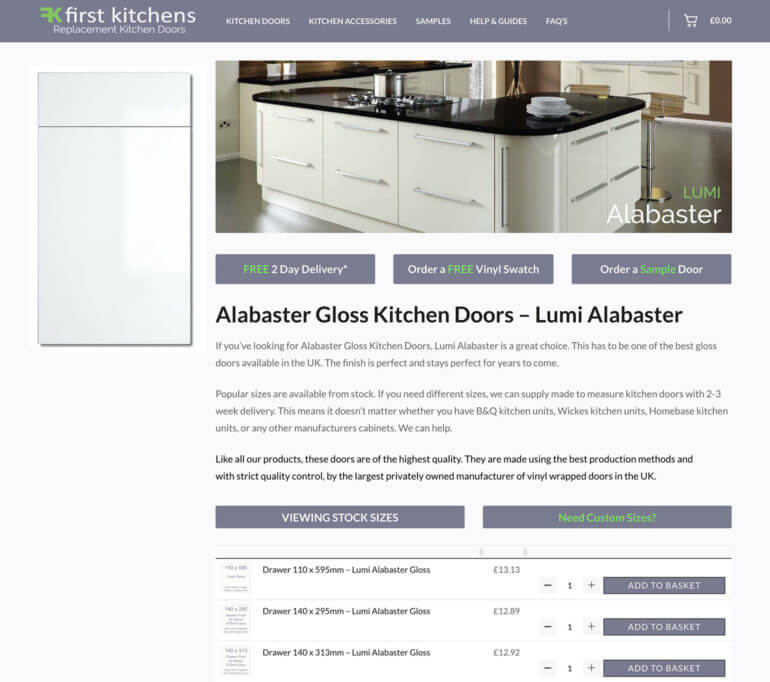
2. First Kitchens - WooCommerce table for optional product add-ons
First Kitchens have a beautiful WordPress website with WooCommerce tables within the main description on the individual product pages. They use the tables to list the available add-ons for their kitchen parts. A product list offers a more structured way to display extra product options than using variable products or an Extra Product Options extension.
Until we saw the First Kitchens website, it hadn't occurred to us that anyone would ever add a product table to the single product page! After all, most WooCommerce sites only list 1 product on the individual product page! However when we saw the tables in action, we saw that it makes perfect sense and is an ideal way to sell kitchens online. A classic example of how people are using the WooCommerce table plugin in innovative new ways!
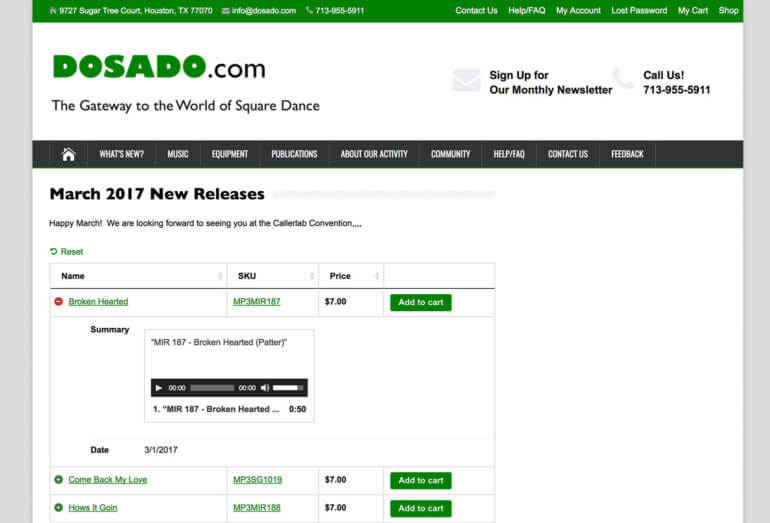
Dosado are a square dance website with a WooCommerce music store where fans can buy their music.
They use our WooCommerce table plugin to list their music products in a responsive jQuery table. The table has columns for name, SKY, price and add to cart. They have cleverly adjusted the column widths to add an expandable cross. This can be clicked on to expand the table to reveal 2 hidden columns. These contain the date and include an embedded audio file so that you can listen to a sample of the music before buying.
Dosado have multiple WooCommerce tables on their site. There's a separate table of products for each month, and also on other locations around the site. This has allowed them to create an entire WooCommerce website without any of the standard built-in category layouts. The result is much better suited to a music store.
Audio samples are an excellent way for music stores to improve conversion rates and increase sales. Dosado have achieved this in a subtle way that doesn't take up too much vertical space, while providing plenty of useful information in the WooCommerce table.
Already using our WooCommerce table plugin, or something similar? Add a link to your own website in the comments below. We'd love to see how you're using tables in WooCommerce!
This will help you to choose the right plugin for your own WooCommerce client area. You can then get your chosen plugin and start setting it up!
Quiz - Help me choose a plugin!
WooCommerce private area plugins - a quick summary
WooCommerce Private Store hides all elements of WooCommerce, so your whole store will be private and hidden behind a single password. You can have a shared password for everyone, or a separate password for each customer. Alternatively, you can automatically unlock your WooCommerce customer area for logged in users or specific user roles.
WooCommerce Protected Categories hides specific categories within your store, and the products within those categories. The rest of your store can remain public. There are several ways to protect categories with this plugin. You can password protect categories, or make them visible to certain logged in users or roles.
Here's a video guiding you through both WooCommerce private area plugins. You can also read the information below to help you choose the right one.
Which private area plugin is best for you?
To choose a WordPress client area plugin for your WooCommerce site, read these 2 lists. Think about which list best applies to you.
Do you:
Sell the same products to all your customers?
Want to complete a completely hidden WooCommerce private shop, with no public area? The rest of your website such as the homepage will still be public, but all elements of your shop will be private.
Need the convenience of a simple password to unlock your whole store which you can give your customers?
Want your WooCommerce store to be hidden from guest users and visible to logged in users?
Require all parts of WooCommerce to be 100% hidden from your menus, widgets, site search, search engines, sitemaps etc. including the main shop page, categories, products and tags? (Note: You can still have a public link to the login page, or you can hide this too.)
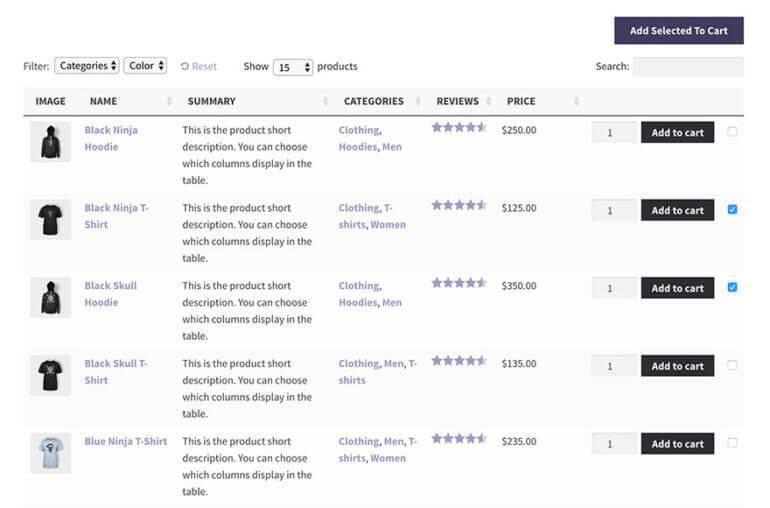
Our bestselling WooCommerce table plugin has yet another new feature! The new version of WooCommerce Product Table lets your customers select multiple products in the table and add them to the cart. All in a single click!
Didn't the WooCommerce table plugin already have Add to Cart buttons?
Yes. Previously, your WooCommerce tables could include an 'Add to Cart' column. Each row of the table had a separate Add to Cart button for each product.
This was very popular, but could be time-consuming for customers wanting to buy lots of products. Quite a few of our WooCommerce Product Table customers have requested a multiple add to cart feature. They wanted to select multiple products and add them to the cart at the same time.
Now you can do this too.
How do the multiple add to cart boxes work?
If you activate the new multiple add to cart boxes in your WooCommerce table then a check box will appear alongside each product. It will be added to the 'Add to Cart' column for each product.
Customers can tick as many products as they like. Once they've ticked them all, they can click 'Add Selected to Cart' to add them all to their WooCommerce shopping basket.
Depending on your WooCommerce settings, a success message will appear at the top of the page. Customers can click to view their cart and check out as usual. (All this is handled by WooCommerce - all the WooCommerce table does is control how products are displayed and added to the cart.)
You might be using plugin to change your Add to Cart behaviour such as Ajax Add to Cart. If so, it will work for your multiple add to cart button as well as the other buttons in your WooCommerce store.
Can customers select variations from the WooCommerce table?
Absolutely - we added support for variable products in a previous release of the WooCommerce table plugin. Customers can use the multiple add to cart option to buy simple or variable WooCommerce products.
If you activate the variations option in the product table then each variation appears as a dropdown in the Add to Cart column. Customers can choose their variations, view the correct price, tick the check box and use the 'Add Selected to Cart' button above the table.
Does my product table have to use the new multiple add to cart?
No. Your WooCommerce table can work in any of these ways:
You can have a check box alongside each product with an 'Add Selected to Cart' button above the WooCommerce table.
If you prefer, you can have an 'Add to Cart' button next to each product (as it was before).
Alternatively the table can have both the check box, multi add to cart AND individual Add to Cart button for each product!
Instead of an add to cart column, you can display a custom field in the WooCommerce table. You can add a link or button to the custom field for each column, instead of the default add to cart button. (e.g. you could use this to add a 'Request Quote' button linking to a page with contact form.)
You don't have to have an add to cart column at all.
The WooCommerce table plugin really is that flexible!
How can I add multiple add to cart boxes to my WooCommerce table?
You can see the new multiple add to cart feature in action on the WooCommerce Product List Demo Site. The main demo features a product table with both Add to Cart options active.
Browse around this site to see the different combinations. This will show you the flexibility of the WooCommerce table plugin before you buy.
Where can I get the WooCommerce Product Table plugin?
Our bestselling WooCommerce table plugin is available on the Barn2 Media website. Get it today - your product tables can be up and running in minutes.
We've added a new WooCommerce customer login feature to our popular plugin 'WooCommerce Password Protected Categories'. It lets you create a hidden or private product category for each customer.
WooCommerce Password Protected Categories - Perfect for protecting specific areas of your WooCommerce, which will run alongside your public shop. With this plugin, different customers can access different product categories. Or you can give multiple customers access to a single password protected category - the choice is yours.
WooCommerce Private Store - Make WooCommerce private by hiding your entire online store from public view. With this plugin, all your customers will have access to the same products within your private WooCommerce shop.
This post is about how to use WooCommerce Password Protected Categories to create individual customer logins, with different products categories for each customer.
What sort of websites need a WooCommerce customer login plugin?
A WooCommerce customer login plugin is suitable for any online store that has different products for different customers. Here are 2 case studies to illustrate how customer-specific products might be used.
Client login for a photographer's website
Professional photographers can use WooCommerce Password Protected Categories to sell the images from their photoshoots. It works like this:
The photographer undertakes a photoshoot for a specific client. This might be wedding photography, a family photoshoot or corporate photography.
After the photoshoot, the photographer creates a password protected WooCommerce category for that client. They add each photo as a product in this category (depending on their pricing structure etc.).
The photographer notifies the client that their photos are available on the website and gives them the password for their WooCommerce category.
The client visits the website and clicks a 'Client Login' link. This shows them the WooCommerce customer login form added by the plugin.
The client enters the password into the login form and are automatically redirected to the category containing their photos. They can browse the photos and order online. If they give the password to others, such as their wedding guests, then they can order photos from the protected category too. The photos will remain private and hidden from public view. Only people with the password will ever know the hidden products exist.
Company branded workwear for an industrial clothing seller
Another popular use case is company-branded workwear. An industrial clothing manufacturer may have a public WooCommerce store selling specialist clothing such as fire retardant workwear. Most of their customers probably use the public categories, but they may have deals with certain companies to provide branded versions of their products. For example, a company might order personalised versions of their workwear with its logo and brand colours, for an agreed price.
You can use WooCommerce Password Protected Categories to add the personalised clothing as products in a password protected category which is only available to the relevant company. They can click a 'Trade Login' link on the website, enter their password and be directed to the WooCommerce category with their branded workwear. The company can then order the customised items - and products from the public site at the same time, if they wish - without anyone else knowing they exist.
Go to the plugin settings page at WooCommerce > Settings > Products > Password Protected Categories. (find this at: /wp-admin/admin.php?page=wc-settings&tab=products§ion=protected-cats)
Click on the dropdown list next to 'Category Login Page'. Select the page where you want your WooCommerce customer login form to appear.
Scroll down and click 'Save changes'.
This will automatically add a shortcode to the page you have selected and the customer login form will appear.
Method 2 - Add the category login shortcode
For an even more flexible option, simply add the following shortcode to any page, post or text widget:
[category_login]
This will add a login form where customers can enter the password for their protected WooCommerce category.
A lot of sites will want to use the shortcode to create a WooCommerce sidebar login widget. This lets people log into their private category wherever they are on your website:
You can even customise the login form wording...
You can add other content above or below the shortcode as needed. Just go to the page, post or widget where you added the login form and add your other content.
You can also customise the message that appears within the customer login form as follows:
[category_login message="Add your custom message here."]
...And add private sub-categories for each customer
The above instructions tell you how to create a single WooCommerce product category for each customer. The plugin also lets you divide the private shop for each customer into sub-categories. For example:
A photographer might create a main category for each customer, with a sub-category for each of their photoshoots.
An industrial clothing seller might have a main category for each company they provide branded workwear for. This might be sub-divided into categories for office wear, heavy duty wear etc.
To create customer-specific sub-categories:
Create a main top level category for each customer. Do this in Products > Product Categories in the WordPress admin. Select 'Password protected' and choose a password.
Next, add all the sub-categories for that customer. Select the main category for that customer as the 'Parent'. Leave the sub-categories set to Public.
Add the customer's unique products to the relevant category and sub-categories.
You also need to set up your WooCommerce category pages to display sub-categories so that customers can navigate to their other categories. Do this in WooCommerce > Settings > Products > Display (find it here: /wp-admin/admin.php?page=wc-settings&tab=products§ion=display). Under 'Default Category Display', choose 'Show subcategories & products' if you want the customer's main page to show both products and sub-categories. Or choose 'Show subcategories' if you just want their sub-categories to appear so that they have to click on one to view the products within.
Click 'Save changes'.
How did people create customer-specific products before?
Most WooCommerce stores have various products which are available to the public. We developed the WooCommerce Password Protected Categories plugin nearly a year ago to let people protect or hide some or all of their product categories.
The plugin has proved very popular. It's used for various types of website ranging from WooCommerce wholesale stores to shops with customer-specific products.
Until now, the only way to create customer-specific products was to give each client a secret link to their password protected category. This worked fine, but a lot of plugin users have asked us for a central WooCommerce customer login page. This is now available and I hope this article helps you to create your own login page for customers to access hidden categories.
Where can I test the WooCommerce customer login plugin?
We've added a WooCommerce Login page to the Password Protected Categories plugin demo. If you enter the password 'letmein' then you'll be directed to the Clothes category. The password 'teatime' will direct you to the Food category.


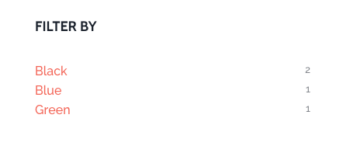 This filter lets customers refine the products shown in the table by selecting one or more attributes. It offers a quick way to narrow down the product table's contents to find products with a specific feature or combination of attributes.
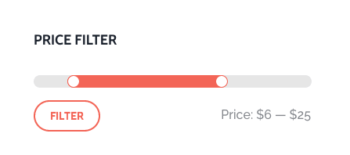 The WooCommerce price filter widget adds a neat-looking price slider. Customers can drag it to set a budget and refine the product table to view products within their price range. You can set a lower price range, upper price range or both - all within a single price slider.
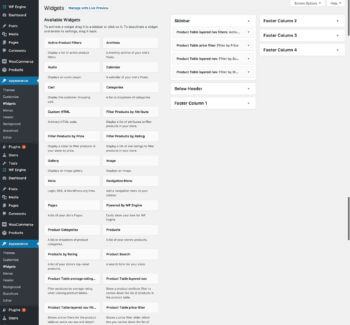 Get WooCommerce Product Table and use the documentation to create your first table. Add the table to any page on your WordPress website. Make sure the page has a widgetized area such as a right or left sidebar. (Most WordPress themes come with a page layout that includes a sidebar. Ask your theme developer if you're not sure.)
 Many WordPress websites sell large numbers of books. A good directory plugin can be used as a WooCommerce bookstore plugin.
 If your WooCommerce directory plugin supports embedded audio players then you can use it as a music or audio directory.
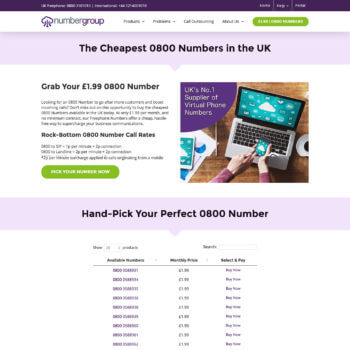
 Now you're ready to display your WooCommerce products in a directory structure. You'll need the WooCommerce Product Table plugin for this:
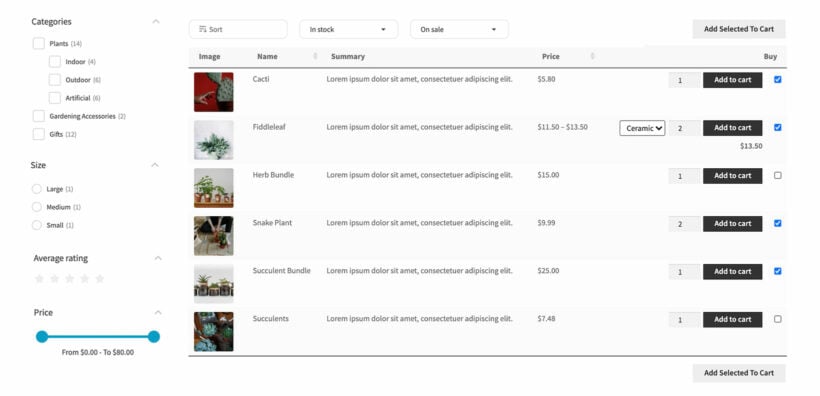


 In the Pages section of WordPress, create a page for your WooCommerce gallery view.
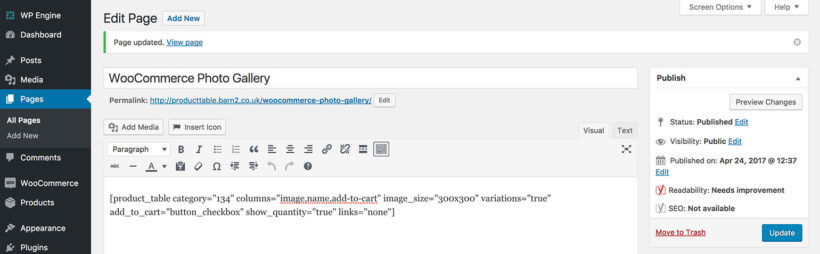


 Options 1 and 2 are about letting customers log in to a public WooCommerce store. They might have to log in to purchase, but anyone can browse the store and see the products. You can also create a WooCommerce login system where customers have to log in or enter a password in order to see your products or other store content.