How to create a WooCommerce daily order form with multiple quantity inputs
If you run a WooCommerce store where you deliver different items or quantities depending on the day of the week, you might want to create a WooCommerce daily order form. I'm going to show you how to set one up.
Customers can select multiple quantity inputs per product for each day of the week. This makes it easy to create their entire weekly order on either a one-off or recurring basis.
This approach is something you'll commonly see with delivery food services. For example:
- Bakeries Customers might want to set up a recurring order for a certain baked food, with different values each day.
- Coffee deliveryIf you deliver coffee to businesses, you might need a system where businesses can choose how many containers they want to be delivered each day.
- Meal delivery services Whether you sell to individuals, schools or offices, you might want to let customers order a certain quantity for each day in advance or on a subscription basis. This works for normal restaurants, as well.
In this article, you're going to learn how you can use a WooCommerce daily order form using a choice of two plugins – WooCommerce Product Table and WooCommerce Bulk Variations.
The daily order forms will have multiple quantity inputs per product to let your customers choose how many items they want to order for each day of the week. You'll also be able to make these either one-off orders or ongoing subscriptions, depending on your needs.
But first, I'll explain how your customers will use your days-of-the-week order form to place a one-off or regular order for each day.
2 plugins for creating a daily order form
There are two easy ways to create a WooCommerce daily order form for your e-commerce store.
- The WooCommerce Product Table plugin works with the Product Add-Ons plugin to list multiple products in a table with a quantity box for each day of the week. This method works for one-off purchases and on-going subscriptions. It's ideal if you want to list multiple products in the same order form. For example, in the 'Method 1' screenshot above, we can see two separate products - each with a quantity box for each weekday.
- The WooCommerce Bulk Variations plugin, on the other hand, creates a grid showing the variations for a single product. This method works for one-off purchases. It's ideal if you want to set up all the options in the daily order form as variations of a single product. For example, in the 'Method 2' screenshot above, we can see one product with two attributes which are used for variations: one for 'Day of the week', and one for the different food items.
With both approaches, you create the daily order form by adding each food item as a different product or option, and then list them on the front-end each with their own quantity selectors. Customers can enter the quantity they’d like to purchase for each day of the week and place their orders.
Method 1: WooCommerce Product Table
Here, we'll explain how you can create daily order forms using the WooCommerce Product Table plugin. This is perfect for anyone looking to accept one-off orders or offer ongoing subscriptions.
How your WooCommerce daily order form will work
Your order form will feature a separate quantity field for each product for each day of the week. Here's how your customers will use it...
First, they'll use the form to enter the quantity they want for each day. As they add a quantity to each day, the order form will automatically add up the total for their order:
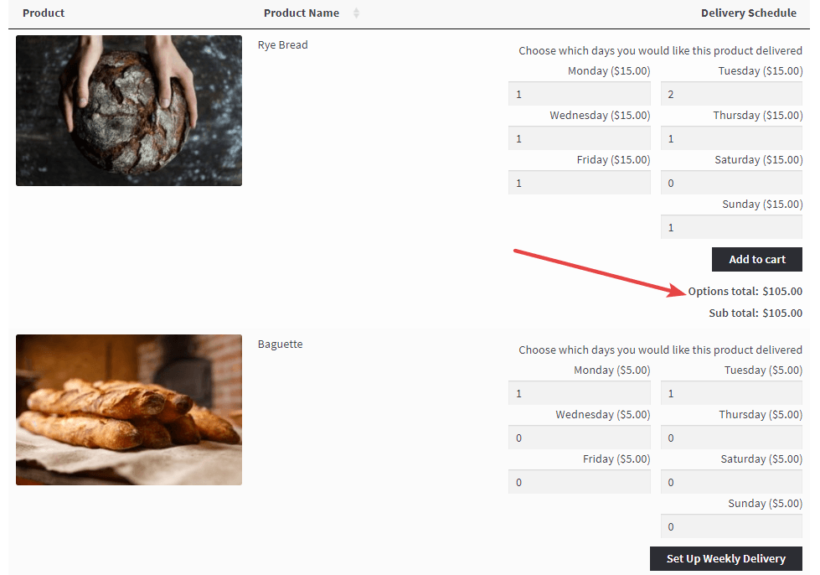
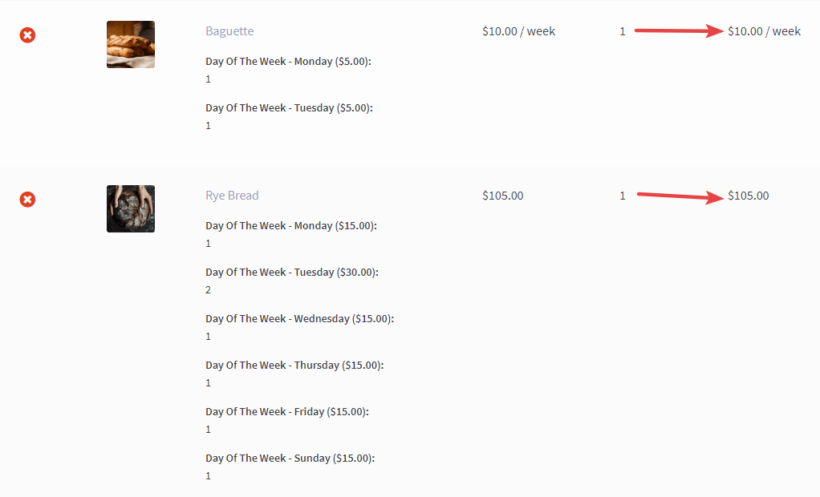
Once they click Add to Cart, or Set Up Weekly Delivery, they'll be able to view their cart. In their cart, they'll see a summary of their order (note the difference between one-off orders and subscriptions):
And then they can complete the checkout process as normal.
Next, I'll explain exactly how you can create a weekly order form to take daily orders from your own WooCommerce store. I'll reveal which plugins you need, with full step-by-step instructions on how to set it up.
Let's get started!
How to create a WooCommerce daily order form with multiple quantity inputs
Since this article is about WooCommerce, we'll assume that you already have WordPress and WooCommerce installed on your site.
Beyond those bare minimums, here's what you'll need to create a WooCommerce daily order form:
- WooCommerce Product Table - required This plugin lets you create a flexible table that includes any of your WooCommerce products. It's what you'll use to create the actual order form so that shoppers can see multiple products on one page.
- WooCommerce Product Add-ons - required You'll use this plugin to create a separate text entry field for each day of the week so that customers can choose a daily quantity for each product.
- WooCommerce Subscriptions - optional If you want to let customers set up automatic recurring orders, you'll need WooCommerce Subscriptions. But if you're ok with having your customers manually place their order each week, you don't need it.
Now, I'll show you step-by-step how to create the order form the example above. The only thing I will assume is that you already have WooCommerce installed and configured, as well as the required plugins from the list above.
Step 1: Add products and configure them the right way
Ok, the first step is to add your offerings as Woo products and get them properly configured.
To begin, go to Products → Add New as normal. Fill in the core details just like you would any other product. That is, enter the product:
- Title
- Image
- Description
- Etc.
Once you've filled out all the basic information, it's time to configure the Product data box. This is where you'll need to do things a little differently to make things work.
Configuring the product data box
For this first example, I'm going to show you how to configure things for a one-off order. In the next section, I'll share how to adapt it to subscription orders.
First, choose Simple product from the dropdown. Then, set the Regular price equal to 0. Yes - zero. Don't worry - you'll hide the price column on your order form so that shoppers never see this information:
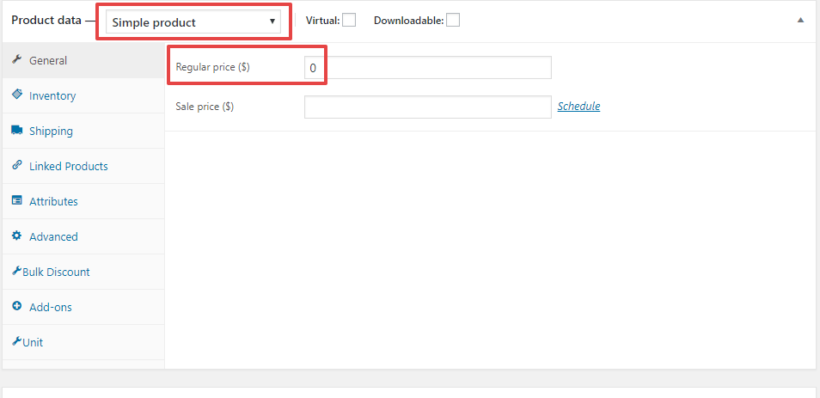
Because you're making the product's price 0, it's important that you don't display the normal WooCommerce catalog so shoppers can't access the 0 price item. Or, if you do still need to use the regular catalog, you can hide these products from the public parts of your store. For example, schools might need to create a private area for taking orders for school dinners.
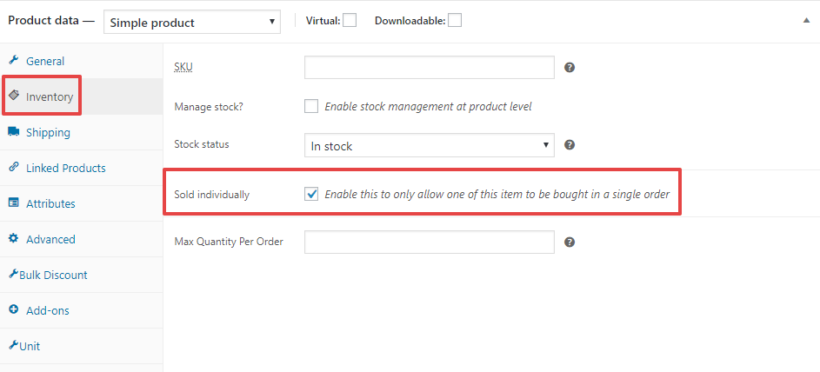
Next, go to the Inventory tab and check the box for Sold individually. This will remove the quantity field for the Woo product itself so that your shoppers only see the add-on quantity fields for each day of the week:
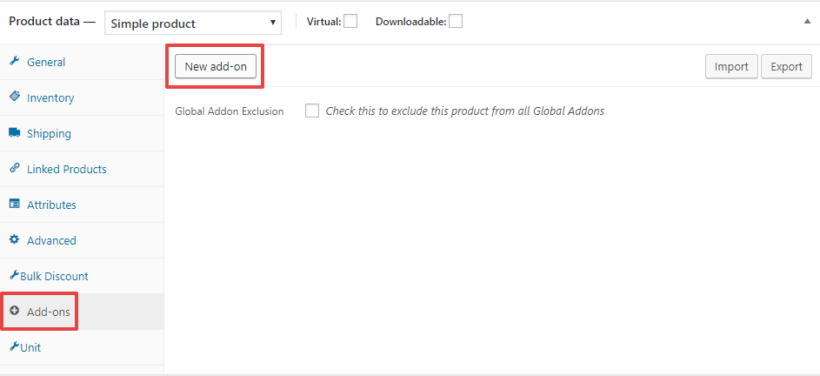
Then, go to the Add-ons tab in the Product data box and click New add-on (you'll only see this tab if you've activated the WooCommerce Product Add-ons plugin):
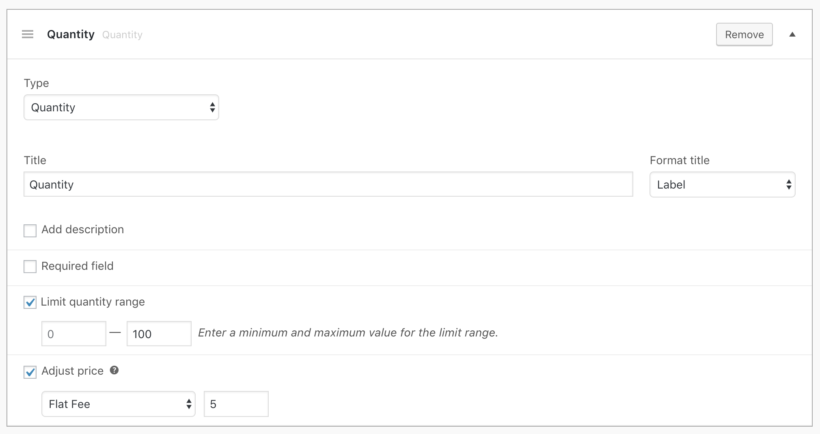
Then, select Quantity from the dropdown and add the price for each item. This will multiple up depending on the quantity selected. So, if the item price is '$5' and the customer selects 2, then the price will be multiplied up to '$10':
Once you've done that:
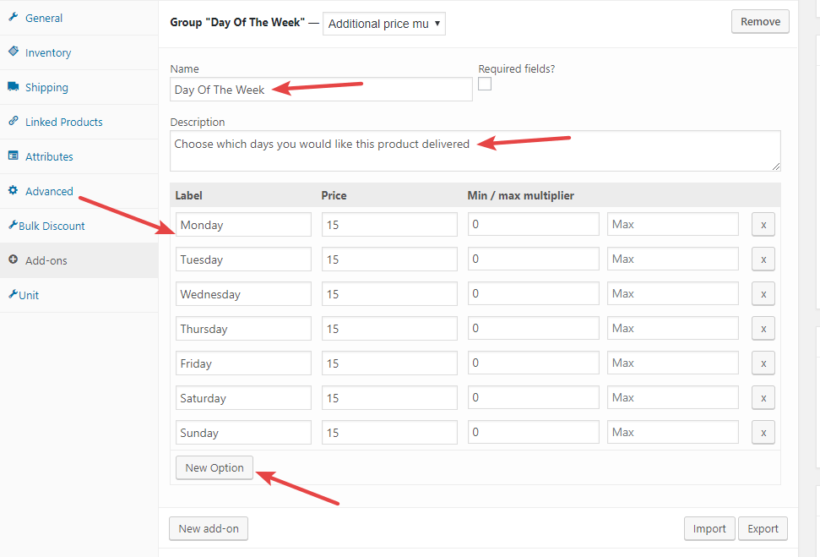
- Enter something like "Day Of The Week" for the Name (this will display on the checkout page, but not on the weekly order form).
- Do not check the Required Fields option (unless you want to force customers to purchase this product each day).
- Enter something like "Choose which days you would like this product delivered" in the Description field. (This message will display on your order form.)
- Use the New Option button to create an option for each day of the week.
- Enter the unit price of your item in the Price column for each day of the week.
- Enter 0 in the Min column for each day of the week.
It should look something like this:
And that's it! Make sure to publish your product. Then, repeat the process for all the items you want to include in your WooCommerce weekly order form.
What if you want people to order on a recurring basis?
If you want to have people sign up for a recurring subscription instead of a one-time purchase for each week, the process is almost identical. You just need to change one thing.
Remember - you will need the WooCommerce Subscriptions plugin to do this.
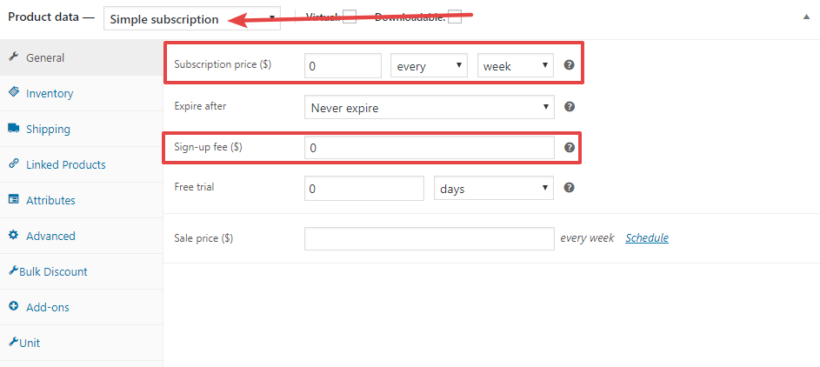
Once you have that installed, all you need to do is change the Product type to Simple Subscription. Then:
- Enter 0 for the Subscription price (when users choose the day of the week, it will add that price to the subscription charge).
- Use the dropdowns to choose the duration of the subscription.
- Enter 0 for the Sign-up fee.
It should look something like this:
Then, perform the other steps shown in the section above.
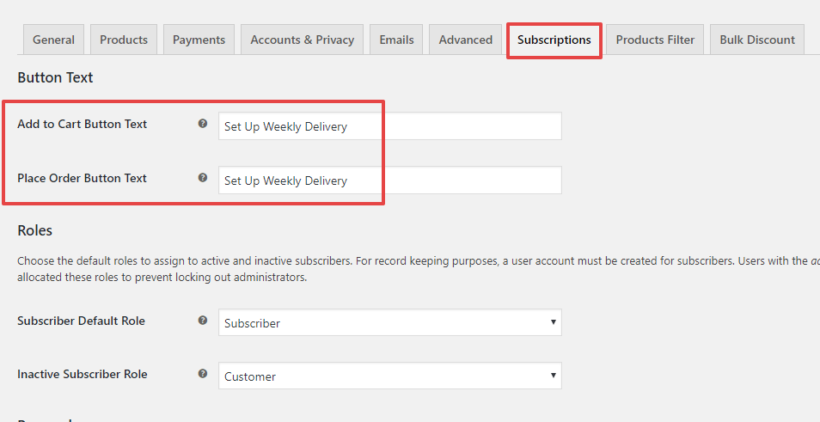
I would also recommend that you go into the WooCommerce Subscriptions text and change the Add to Cart Button Text to something like "Set Up Weekly Delivery", as it will be more user-friendly for your shoppers:
Step 2: Create a daily order form with WooCommerce Product Table
At this point, you've already done the heavy lifting! Now, to finish things out, you just need to create the actual WooCommerce daily order form using WooCommerce Product Table.
To do that, all you need is to add the WooCommerce Product Table shortcode to the page where you want your order form to appear. If you go to the plugin settings page at WooCommerce → Settings → Products → Product Tables, you'll find dozens of options to configure your weekday order forms. Check out this article to learn about all the available options:
But to save you time, here's a quick shortcode that you can use to create the exact order form shown in my screenshots:
[product_table category="bread" columns="image:Product,name:Product Name,buy:Delivery Schedule" show_quantity="true" page_length="false" sort_by="date" sort_order="asc" widths="25,15,60" image_size="medium" links="false"]
Make sure to change category="bread" to the actual category of products you want to display. Or, if you want to display all products, you can remove this parameter.
If you want to divide your order form into different sections, you can include multiple shortcodes on the page, with each shortcode displaying a different category of products:
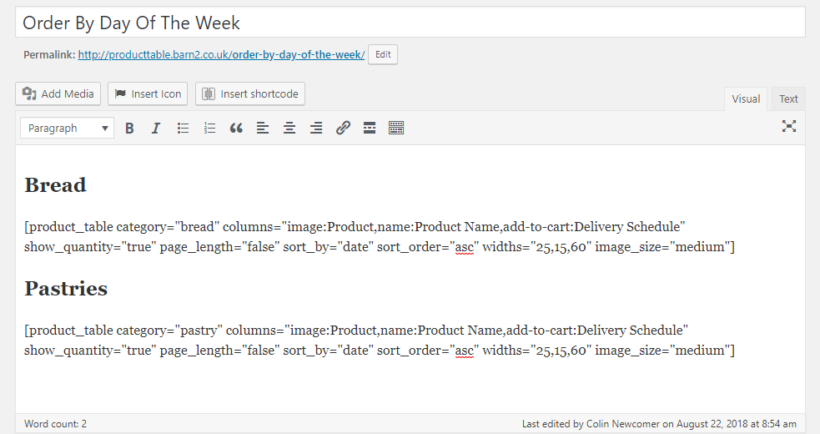
If needed, you can also edit the columns option to include more, or less, information in the daily order form. Similarly, you can change the column headings.
To finish things out, make sure to Publish your WP page.
Method 2: WooCommerce Bulk Variations
Here, we’ll show you how to create a daily order form using the WooCommerce Bulk Variations plugin. This is perfect if you’re looking to create an order form for one-off purchases.
How your WooCommerce daily order form will function
Customers can use the quantity selectors to enter the quantity they require of each attribute or variation. Once that’s done, they click the Add to Cart button to add the selected product variations in the correct quantities to their shopping cart and place their order.
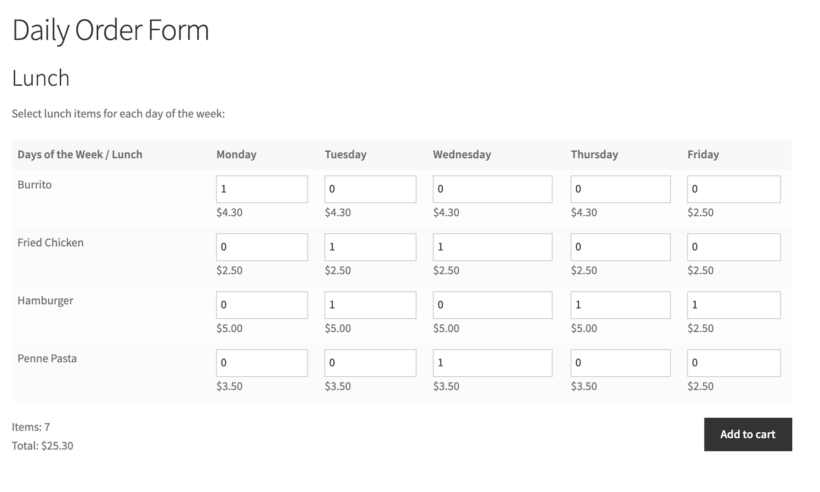
Displaying product variations in a grid layout simplifies the user flow allowing users to quickly place their orders.
How to create a WooCommerce daily order form for one-off purchases
For this tutorial, we’ll assume you already have the WooCommerce plugin installed on your website. Aside from that, you’ll need to get the WooCommerce Bulk Variations plugin and install it on your website. This plugin lets you display product variations in a user-friendly grid layout. It also makes it easier to manage and edit variations in the WordPress admin.
Step #1: Create product attributes
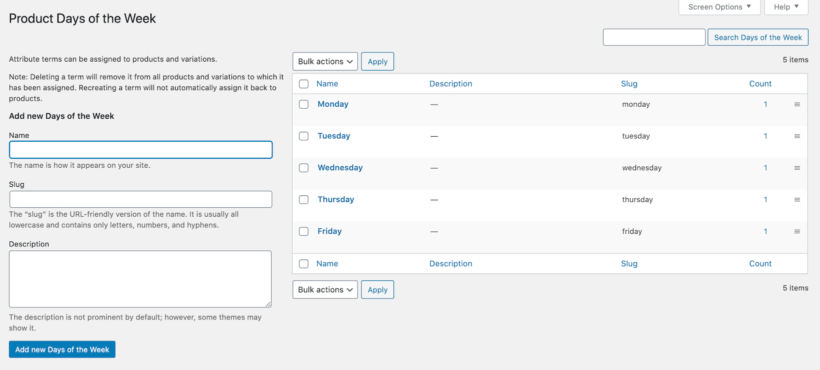
The first thing you need to do is create attributes. Head over to Products → Attributes from the WordPress admin panel to get started. Since we want to create a daily order form, we’ll create two attributes – Lunch and Days of the Week. If you offer breakfast and dessert options then you can create an attribute for that, as well.
Once that’s done, configure the terms for both attributes. For Lunch, you’ll need to add the food items you want to offer as lunch meals as individual terms. It will look something like this:
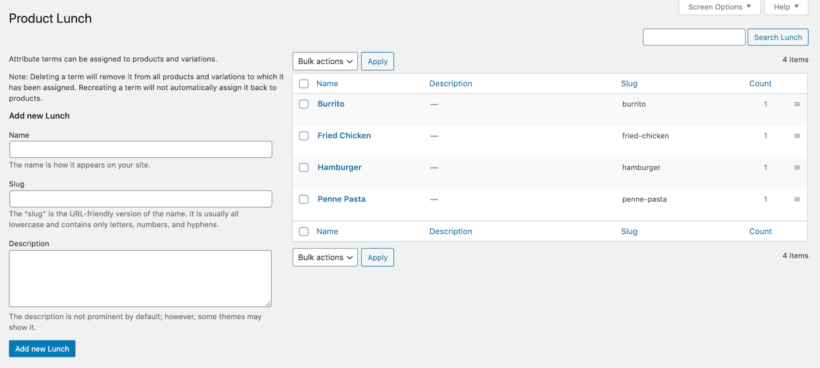
Similarly, configure the terms for the Days of the Week attribute. Add the days of the week you will deliver food on.
Step #2: Add a new WooCommerce product
Create a new WooCommerce product for presenting the different meal options for lunch. You might call it something like Lunch Menu. Scroll down to the Product data section and select the Variable product option using the dropdown.
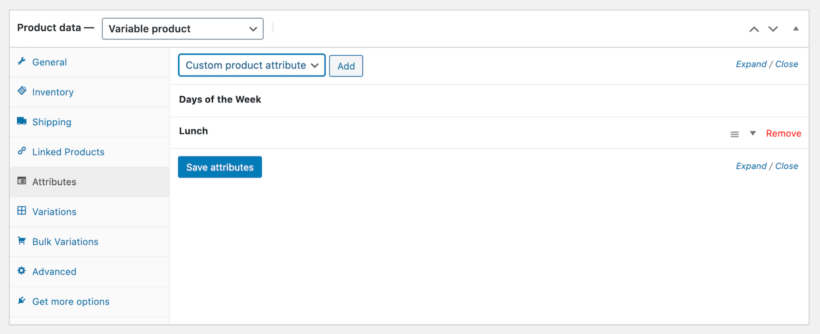
Click on the Attributes tab and add both the Lunch attribute and the Days of the Week attribute. Click the Save attributes button to proceed.
Next, go to the Variations tab and use the dropdown to select the Create variations from all attributes option. Click the Go button.
You’ll notice that all of the product variations will be added automatically. You can expand each variation and enter a price for each food item. You can also offer special pricing on certain days of the week. For example, you can offer all meals for a special price on Fridays only. This is a great way to boost orders.
To apply the same pricing and other data to multiple variations at once, you can use the bulk management features in WooCommerce Bulk Variations:
- Use the 'Filters' bar to select the variations you want to edit together. For example, select the 'Friday' attribute if you want to add the same price for all meals on a Friday.
- Next, use the 'Add variations' dropdown above the filters bar to apply the bulk actions.
Step #3: Configure bulk variations settings
Click on the Bulk Variations tab to configure the WooCommerce Bulk Variation plugin's settings for the product.
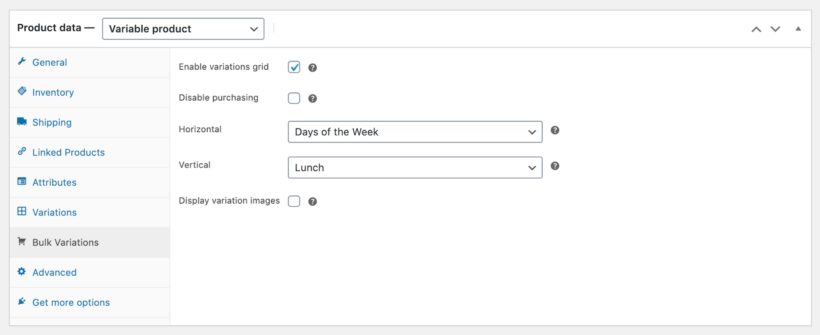
Tick the checkbox next to the Enable variations grid option. Set the Horizontal option to Days of the Week using the dropdown and Vertical to Lunch.
Step #4: Display the WooCommerce daily order form on the front-end
Head over to Pages → Add New from the WordPress dashboard to create a new page and give your page a title. Next, use the shortcode [bulk_variations include="2662"] to add the WooCommerce product you created in Step #2 to your order form. Simply replace 2662 with the product ID of the WooCommerce product you created.

This will generate a grid showing the variations for the lunch product on the front-end.

If you want to let customers place orders for breakfast items or desserts, then you can add shortcodes for their corresponding WooCommerce products in the same way.
Bonus - Set min & max quantities
Sometimes, you need to control how many items your customers can select from the daily order form. For example, if you're using it to take orders for staff lunches, then there may be a limit to what's included.
You can easily do this by installing the WooCommerce Quantity Manager plugin. Use it to add minimum and/or maximum quantities to the products in the daily order form.
Create your WooCommerce daily order form today!
By using multiple quantity fields for each day of the week, you can make it easy for customers to order different quantities depending on the day of the week.
For one-off weekly orders or on-going subscriptions, all you absolutely need is WooCommerce Product Table and WooCommerce Product Add-ons - plus WooCommerce Quick View Pro, if required. And if you want to enable recurring orders, then you can add WooCommerce Subscriptions.
Alternatively, you can use the WooCommerce Bulk Variations plugin to create a grid showing the variations for a single product.
Have any other questions about implementing a WooCommerce daily order form like this? Let us know in the comments!


21 Comments
This plugin is very good! I made a lot of money by creating my Client's website!
I lot of Thanks barn2 developer Team!!
Hi Aminul! Thanks so much for your kind words, and we are glad to hear that our plugin was helpful in your projects. Have a great day!
Hi - wondering if we can change the layout of the template in child themes? (not just css) - thanks!
Hello, Hana! Please, could you give us more information about what you're trying to do? Alternatively, you can also get in touch with us via our dedicated Support Center and we'll be happy to advise on the best way to do it while using our plugin(s).