List WooCommerce products in a table with front end editor

WooCommerce Product Table is perfect for creating a simple product list or quick order form. Our colleagues at WP Sheet Editor have provided an easy way to allow your users to edit the products in the table directly from the front end of your website. Keep reading to learn how to create a WooCommerce product front end editor.
We've previously told you how your users can submit products to your WooCommerce store and display them in a product table. Since then, lots of you have requested a way to allow your staff or customers to edit the products in the table from the front end, without having to access the WordPress admin. Today, we're revealing a new method that will let you do this!
Used alone, WooCommerce Product Table is a great way to list products. However, the table is for displaying public information. If you want to allow users to edit products from the table, then you need to follow this tutorial. We will show you how to create an editable frontend table for your WooCommerce store.
There are lots of reasons why you might need a WooCommerce product front end editor. For example:
- Your employees might need to edit products, but you don't want to let them loose in the WordPress back end. Instead, keep it simple by providing a front end product editor that only a specific user role can access.
- If you're creating a WooCommerce multi-vendor marketplace then you can list each vendor's products in a different table or order form. You can then add a front end editor to allow your vendors to edit their own products without having to use the WordPress admin.
- Perhaps you allow users to upload their own products to your store. Add a WooCommerce front end editor so that each user can edit their own products, but not anyone else's.
1. Create the product table
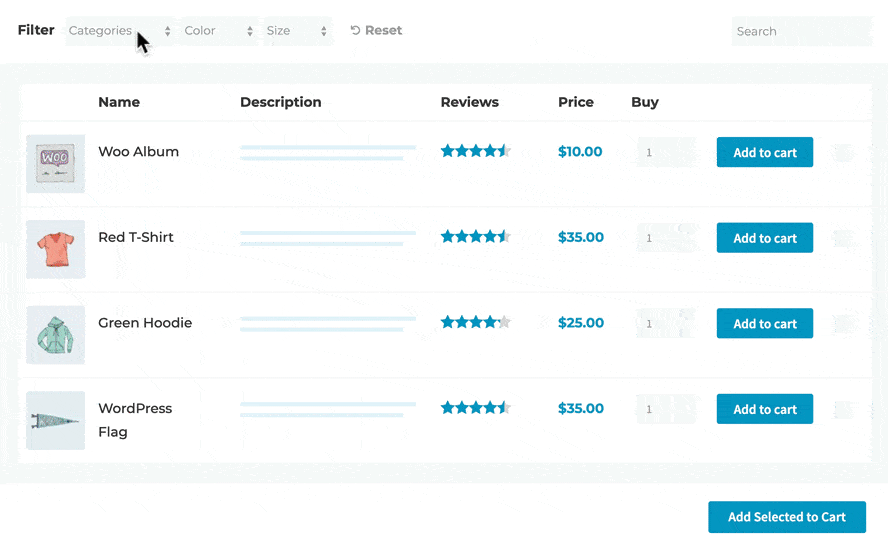
The first step is to list some or all of your products in a product table view. This is the view that your customers will see when they visit your store. Later, you'll learn how to add an 'Edit' button which will take logged in users to the WooCommerce product front end editor (depending on their role).
To set it up, get WooCommerce Product Table and follow the instructions in the 'Getting started' email.
The plugin knowledge base is hugely comprehensive. It includes instructions on everything you need, including which columns to include in the table, how to add filters to help people to find products more easily, how to display product variations, and more.
You can either create a table containing all your products, or you can create tables listing specific products (e.g. products from a specific brand or vendor only).
2. Install the WP Sheet Editor's frontend editor plugin
WP Sheet Editor is a collection of plugins that provide an easy-to-use front end table editor for any information that is stored in the WordPress database - including WooCommerce products.
In Step 2, we will use the Universal Frontend Editor plugin to create a spreadsheet-style WooCommerce front end editor for the products in your table. So you need to buy and install the plugin on your WordPress site to continue with this tutorial.
3. Create the frontend editor for WooCommerce
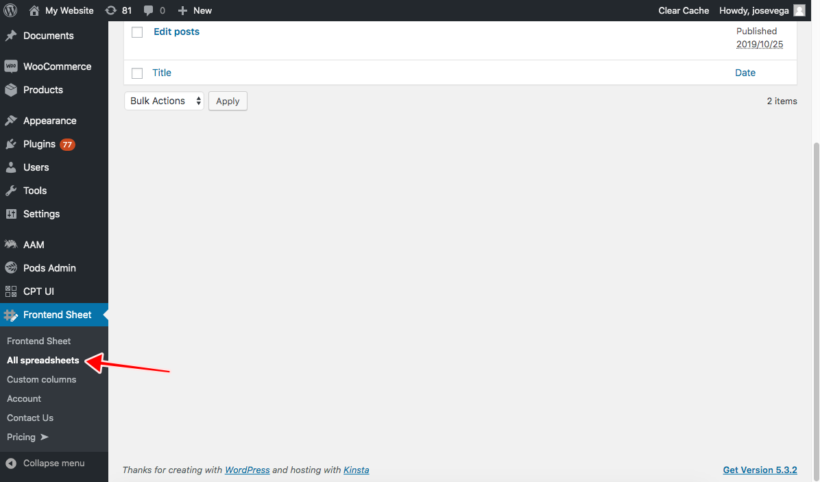
In the WordPress admin, go to Frontend Sheet > All Spreadsheets:
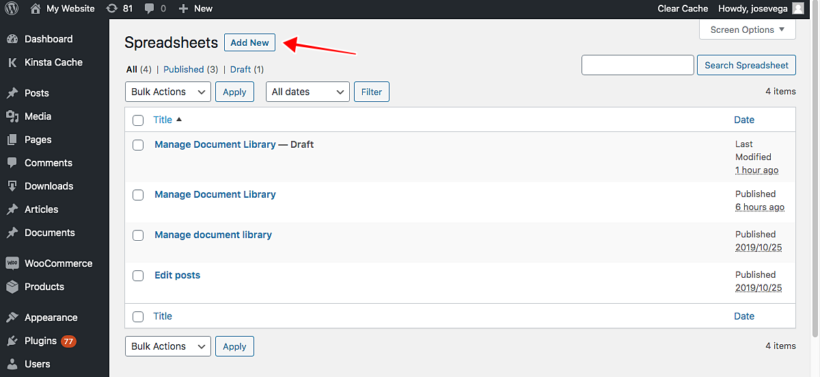
Once there, click on Add New to create a new table editor for your WooCommerce products:
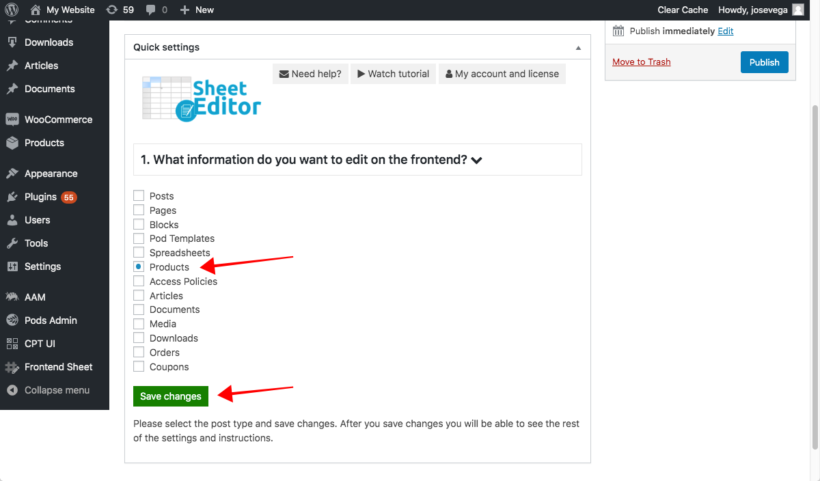
Now you need to enter the editor title. This title is private and is only used for identifying the editors in the backend. You may call it something like Manage Products.

Then, select the post type you want to edit with it. In this case, you need to select Products. Next, click Save changes:
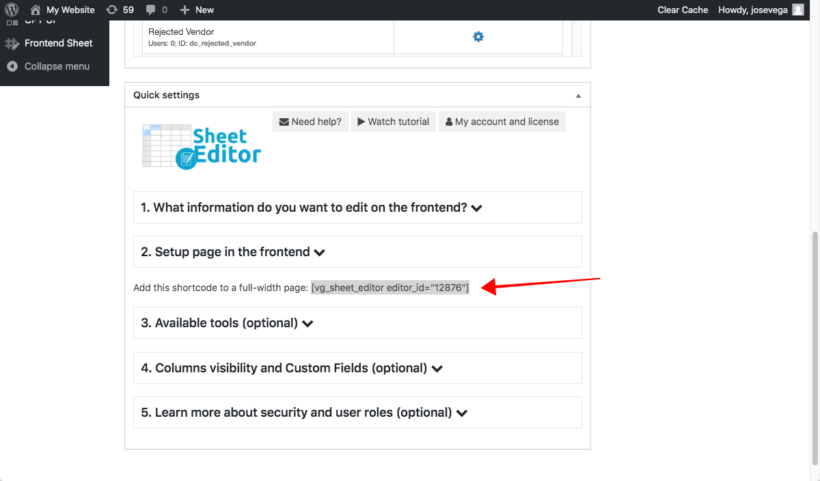
After that, you'll see that the plugin will generate a shortcode, which you'll need to add to a full-width page. But we'll do it later. Now we need to configure the frontend editor.
4. Configure the WooCommerce product front end editor
As we learned earlier, the WooCommerce product frontend editor can be used for many purposes:
- Employees can manage the stock and prices from the frontend. In this case, they only need to edit the product name, SKU, stock status, stock, and price fields.
- Vendors can upload products to your store directly. In this case, they need to edit all the product fields to upload all the product information.
- Clients, shop managers, or administrators can manage the full product catalog from the frontend. In this case, they need to edit all the fields.
For this reason, the WooCommerce frontend editor plugin allows you to customize the toolbar options and the columns. You can create a simple editor or an advanced editor based on your needs.
Note. If you have a marketplace with multiple vendors, the frontend editor integrates with Dokan, WooCommerce Frontend Manager, and WooCommerce Marketplace. The integration works like this:
- Vendors will view and edit products created by them only.
- The editor settings have the option to display a button inside the marketplace dashboard. This allows vendors to launch the inline spreadsheet editor from their own dashboards, as well as by using the other methods discussed in this tutorial.
a) Select the toolbar tools
Next, you need to decide which tools to include in the WooCommerce frontend editor. Think about what you want people to be able to edit from the front end, and only include tools they actually need. This keeps the product front end editor as simple and user-friendly as possible.
In the settings for your spreadsheet, select which tools to show on the Primary toolbar and the Secondary toolbar of the editor:

Secondary toolbar
You can display the Help options, which contains tutorials on how to use the editor.
Primary toolbar
In this toolbar, you can display or hide these options:
- Add new - Users can add new rows (products) to the store.
- Search - Users can filter the products by keyword, status, category, attribute, tag, date, price, etc.
- Bulk Edit - Users can edit thousands of products in seconds using this tool.
- Create variations - Users can create variations for one or for several products and copy variations from one product to many products to manage the variations quickly
- Display variations - Users can display variations right below the main products as rows
- Locate cell - Users can find specific cells by typing the content in them.
- Locate column - If the editor has many columns, users can find columns by entering a keyword in this field.
If you want to show a simplified editor, you can enable the Add New and Search tools, and deactivate the rest.
Finally, click Save changes.
b) Select the columns to include in the WooCommerce frontend editor
After selecting the tools that will appear on the toolbar, you need to select the columns you'll display on the spreadsheet-style inline product editor.
The list of columns automatically detects all the fields that are available for your products. This includes fields added by other plugins, such as YITH WooCommerce subscriptions, Advanced Custom Fields, all the WooCommerce extensions, etc. So you can easily enable, disable, sort, or rename any field.
You can create multiple editors for different users based on their needs. For example, you might add one editor with full columns for shop managers, and a simple editor with fewer columns for employees.
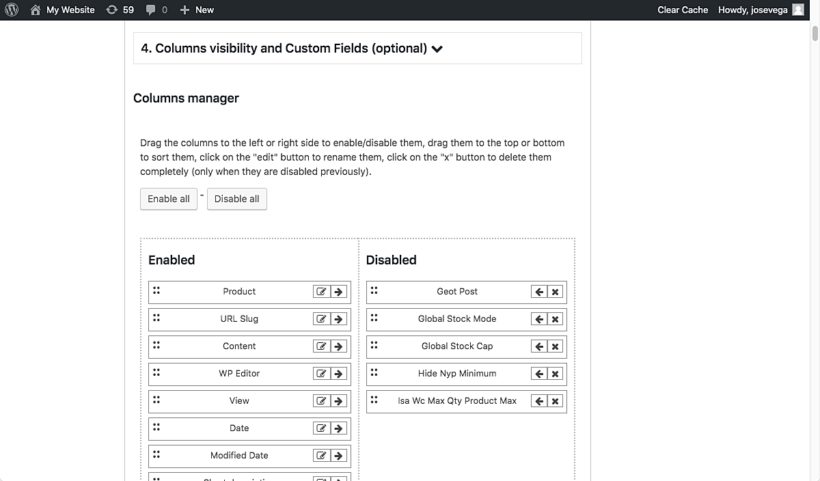
We generally recommend having the same columns in your public-facing product table and the front end editor. That way, users will see the information in the same format as they switch between the main product table and the spreadsheet editor views.
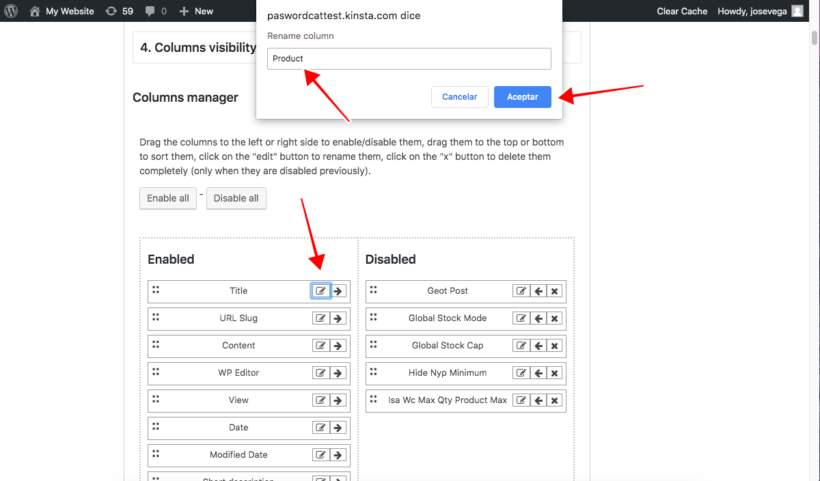
You can rename the columns. For example, you may rename the Title column to Product name. Just click on the Edit button in each column, change the name, and save. Again, try to keep the column names the same as your main product table.
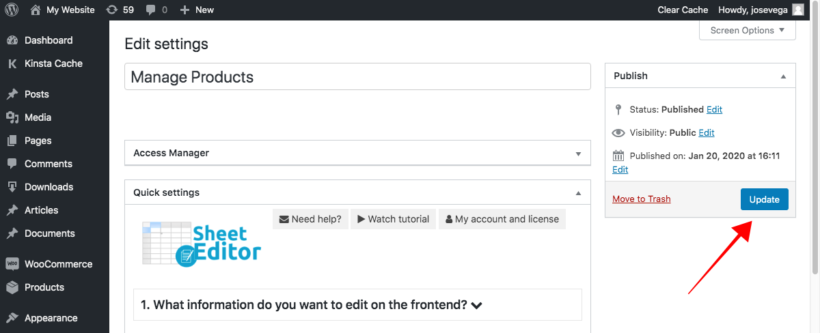
Once you're done configuring the frontend editor, click on Publish to finish.
Now, it's time to integrate the new frontend editor with the public-facing product table that you created in Step 1.
5. Add an 'Edit' link to the product table
In Step 1, we used WooCommerce Product Table to list products in a public-facing table view. Now, we need to add an 'Edit' link so that people can get from the table view to the front end product editor.
To do this, we'll add a button titled Edit store above the product table so that users can log in to start editing products right there.
a) Create the frontend editor's page
First, we need to create a page and add the WooCommerce product front end editor to it. To do this, copy the shortcode from the frontend editor plugin settings (we first saw this in Step 3):
Now go to Pages > Add New to create a new page for the frontend editor:
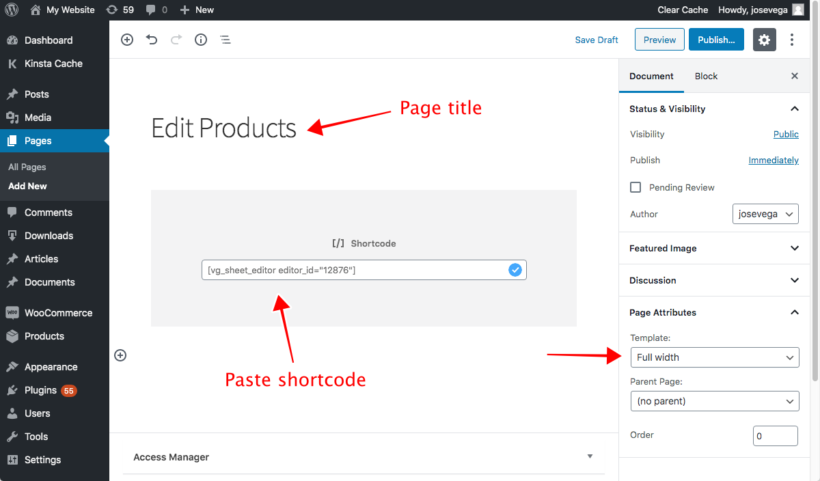
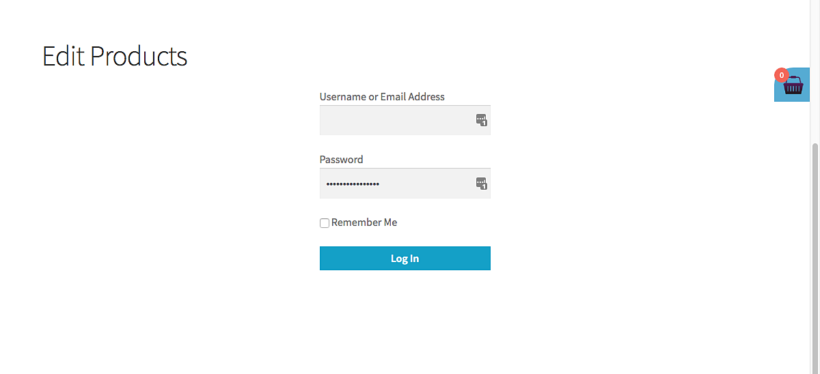
Once here, just enter the page title (we'll call it Edit Products), paste the shortcode in the page content, and select a Full width page template (if your theme has one).
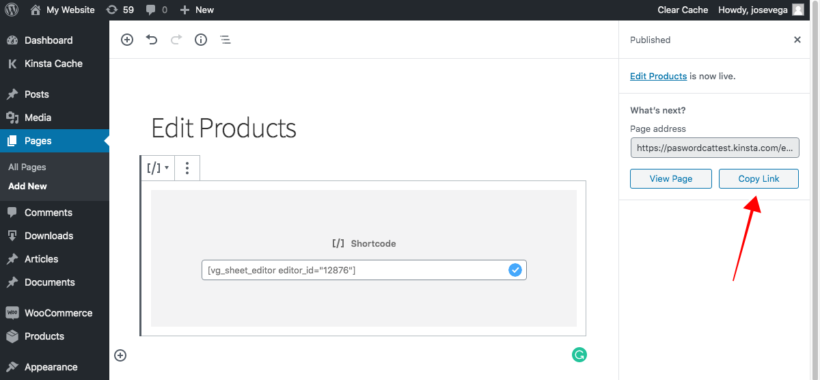
Finally, click on Publish. After it's published, copy the page link to paste it on the Product Table page.
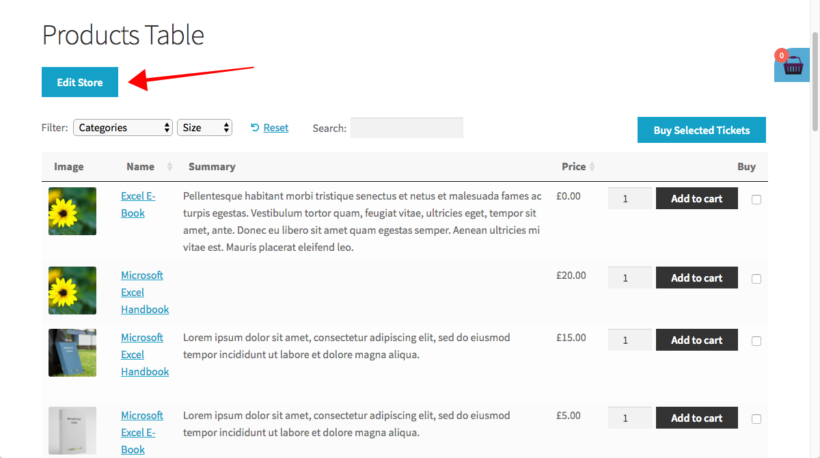
b) Link to the editor page from the product table
Now go to the page where you used WooCommerce Product Table to add a product table, and add a new link or button. This should link to the page that you just created, which contains the frontend product editor:

We've created the button with the Gutenberg editor, but you can create it with any page builder or button shortcode.
Finally, Update the page to add the button to it.
c) Optional - Hide the 'Edit' link from normal customers
You might want everyone to be able to see the 'Edit' link, as it provides a simple way for guests to log into their account before editing the products in the table. Alternatively, you can hide it from public view so that only certain logged in users see it.
There are a few options for hiding the edit link:
- Instead of adding an 'Edit' link to the same page as your product table, you can give certain users a direct link to the page containing the frontend product editor.
- You can add the edit link to a more subtle location such as the footer.
- Or if you prefer, you can install the Advanced Access Manager plugin. This plugin comes with shortcodes which you can use to make the button visible to users with a specific role, and hidden from everyone else. This is a neat compromise because you can still add the Edit link above your product table, but only the appropriate people can see it.
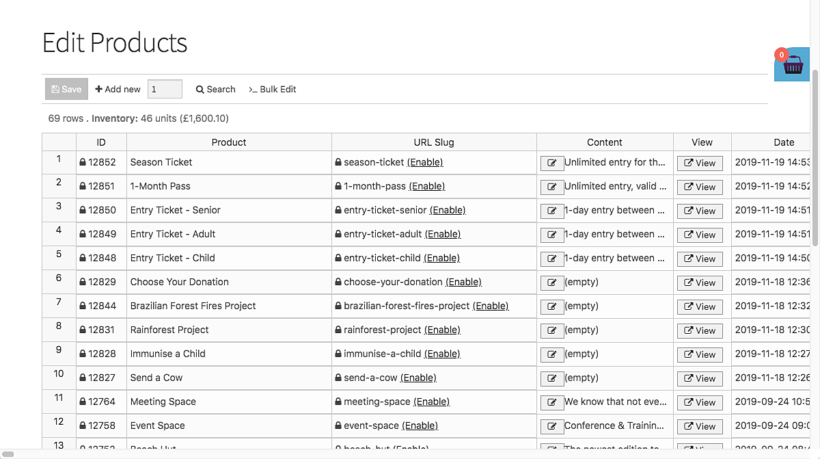
6. Test out the WooCommerce product front end editor
After these steps, users will be able to see the Edit Store button above the product table.
And when they hit that button, they will be asked to log in to start editing the products:
After they log in, users will be able to use the frontend editor:
It's really simple. You can easily create a frontend editor for WooCommerce and integrate it with the products table you created with the WooCommerce Product Table plugin.
7. Who can use the WooCommerce frontend editor?
The WooCommerce products frontend editor is available only for logged-in users. Logged out users or guests will see a login form when they click the 'Edit' button.
It uses the default permissions from WordPress, so the products can be edited by these roles:
- editor
- administrator
- shop manager
- any user role that has the "edit_products" capability
You can create new user roles with the free user role editor plugin and assign it with the "product" capabilities. This is helpful if you want to allow users to edit products without having permission for anything else.
Just want users to edit their own products?
If you've set up your site to allow users to upload their own products, then you might want them to be able to edit these products but not anyone else's. There are a few ways to do this:
- Universal Frontend Editor has an option to allow users to add new products to the table, as well as existing existing ones. If you use this to accept front end product submissions, then each user will automatically only be able to edit their own products in future.
- If you're using Dokan, WooCommerce Frontend Manager or WooCommerce Marketplace, then logged in product vendors can only view and edit their own products.
- If you're using Gravity Forms to allow front end product submissions, then you can use the free User Role Editor plugin to edit the appropriate user role, adding the capability "edit products" and removing the capability "edit others products".
Where to get the plugins
You'll need 2 plugins to list information in an interactive table with frontend editing capabilities:
- WooCommerce Product Table - creates the product table that your public visitors will see.
- Universal Frontend Editor - creates a spreadsheet editor so that logged in users with the correct role can edit the products in the table.
Get the plugins today, and then follow this tutorial to set it all up!
2 Comments
Hello!
What about invoices?
If the customer has bought a product, is it possible for a vendor and buyer to view /download invoices?
Thanks!
Hi, Rudolf. You will need an invoicing plugin such as PDF Invoices, Flexible Invoices, etc. to automatically do this. Invoices can accessed via a Download Invoice link on the Thank You page or in the My Orders area of your account, depending on the plugin you are using. For more options/information, you can also reach out to WooCommerce Support.
Should you have other questions, please let us know via our dedicated Support Center.
Many thanks.