How to create a WordPress file manager
Having a WordPress file manager system makes it easy to keep all of your files organized and accessible to your team. With the right WordPress file management solution, you can choose to keep it private and available to your team only - or share it publicly with your site’s visitors.
Although there are a number of WordPress file management systems, only a few allow you to create a WordPress file manager that’s accessible from the front end.
With this in mind, in this article, I’ll show you how to use the Document Library Pro plugin to create a professional WordPress file manager. You'll learn how to control who has access to the files and how users can upload them. I'll also show you how to sell files directly through the file management system.
Before we begin, let’s take a quick look at how a WordPress document management system can help you maximize productivity and stay organized.
What is a WordPress file manager plugin?
A WordPress file manager is a system for organizing and/or displaying files which are stored on a WordPress website.
This is a slightly different meaning of the phrase "File manager", which is more commonly used to refer to managing files on a computer hard drive. A file manager plugin in WordPress has two main purposes:
- Providing website administrators with a better way to organize files in the WordPress admin.
- Displaying files in an easy-to-find, structured format - either for the benefit of public website visitors or internal users.
The best WordPress file manager plugins meet both of these needs.
The best WordPress file manager plugin
The Document Library Pro plugin is a complete file manager solution for your WordPress website. It makes it easy to add and organize files in the WP Dashboard, while also providing a searchable front end WordPress file manager.
Let's look at what it can to do transform your WordPress fie management. Afterwards, I'll show you how to set it up.
Quickly add and import files 🗳️
The file management plugin provides a choice of 4 ways to add files to your WordPress website:
- Add files individually (just like adding a blog post to WordPress, but with a downloadable file attached).
- Select files which are already in the WordPress Media Library.
- Drag and drop files directly into the WordPress admin.
- Import files in bulk from a CSV.
Supports all file types (plus externally hosted files) 🌎
You can add literally any file type to your WordPress file manager. This includes PDFs, text files, presentations, spreadsheets, or any other type of file.
You can use this to enhance the user experience by enabling visitors to view PDFs directly on your site. Learn more about how to incorporate a WordPress PDF viewer into your file library.
This file manager plugin in WordPress also lets you add files from multiple sources. If you don't want to host your files in the WordPress Media Library, that's fine. Instead, you can host them anywhere you like on the internet - e.g. Dropbox, Google Drive, Microsoft OneDrive, and so on. The Document Library Pro plugin will display them in exactly the same way - the only difference is that when users click the 'Download' button, they will access the file from its third party location.
Structure your files into categories, tags, and more 🗂️
One of the most important features of a WordPress file manager plugin is being able to keep files organized. After all, that's something that the Media Library does very badly on its own.
With Document Library Pro, you can create an unlimited number of categories and tags for your files. This gives you multiple ways to structure them in the back end, and to display them as a WordPress file manager front end directory.
File categories are particularly useful because they are hierarchical. This means that you can create complex structures of categories, sub-categories, and so on. You can easily view files by category, and if you like then you can even display them in a collapsible folder structure.
Keep files public or private 🔐
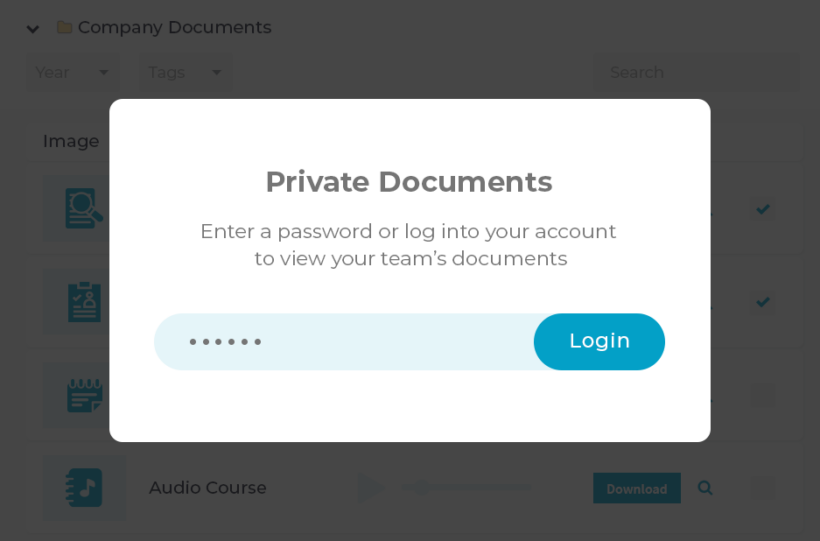
Used alone, the Document Library Pro plugin displays your files on the front end of your website for anyone to see. This is ideal when you want to share resources with your website visitors.
However, there are plenty of people who want to create a private WordPress file manager. To do this, you need to select the option to buy Document Library Pro as a 2-plugin bundle with its sister plugin, Password Protected Categories. This lets you restrict access to any or all of your file categories.
Instant search, sort and filter 🔎
The Document Library Pro file manager plugin makes it easy for people to find your files. It does this by adding an instant AJAX-powered search box above the file manager. The columns in the file manager are sortable, and you can even add category and tag filters above the list of files.
3 file manager layouts 📑
When you list files on your WordPress site, you can choose how to display them. The file management plugin comes with 3 professional-looking layouts:
- Table layout, which displays files in a structured table with whichever columns of information you choose to include.
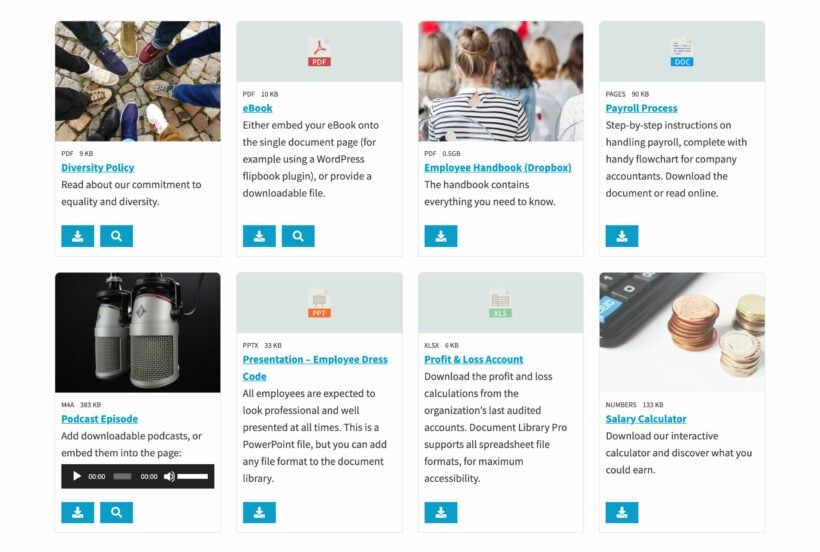
- Grid layout, which displays files as attractive tiles.
- A collapsible folder structure (which you can use with either the table or the grid layout).
Easy-to-use interface 😌
Of course, a WordPress file management system is only worth having if it's easy to use. With Document Library Pro, it's easy to add and manage files. It's also equally easy to choose how they are displayed in the front end file manager, if you choose to do this.
Everything is designed for beginners to be able to do in minutes. However, there are plenty of developer hooks and filters for more technical users who wish to customize the file manager.
100% flexible 🛠️
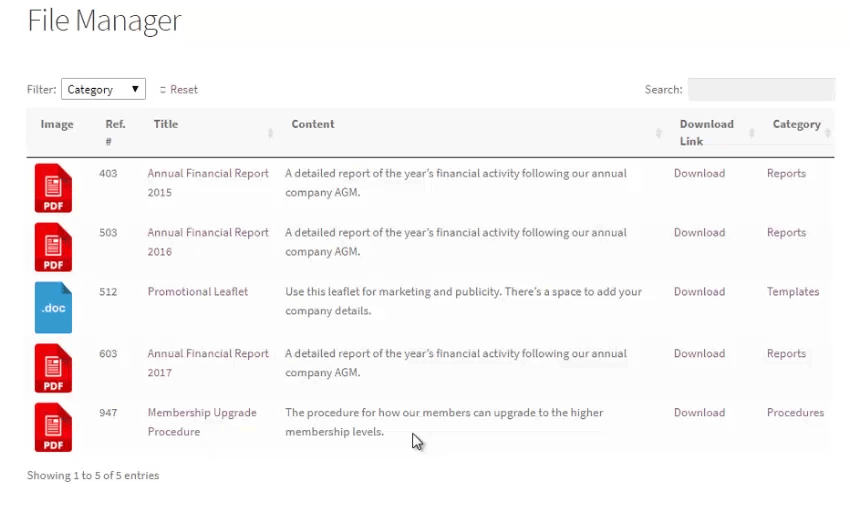
And finally, this WordPress file manager plugin is incredibly flexible. You can choose exactly what information to display about each file. For instance, you could display image thumbnails, the date the file was published, the author’s name, file type, last update, and/or download buttons.
And for even more flexibility, you can even add custom fields or taxonomies for storing custom data about each file.
Additional benefits of using a file manager
A WordPress file manager also provides a single location for all tasks related to file management, making it incredibly convenient and easy to use. With just a few clicks, you can perform a variety of actions: edit files, upload and download, delete files, zip, and copy and paste files and folders directly from the WordPress backend.
Another benefit is access control. You can set permissions for each user or group of users, ensuring that sensitive files are only accessible to those who need to see them. This helps you protect your confidential information and ensures that everyone is working with the right level of access.
Moreover, a WordPress file manager provides a single location for all file management tasks, eliminating the need to log in to the WordPress web hosting cPanel or FTP to access files, as all WordPress files and media can be accessed from within the WordPress file manager plugin.
How to use a WordPress file manager
Small and medium businesses use file managers on their WordPress websites to store all kinds of important files. These might be public, or they might be published on their private staff intranet. An internal WordPress file manager may include contracts, templates, and policies.
An online file manager is also an excellent way to create an internal knowledge base. You can use it to store training material and marketing collateral. Having an internal file system for your organization allows you to keep all of your important files in one place. This way, all staff members can access the latest version of each file whenever they need it - no more version control nightmares!
Now you know how you can use a WP file manager on your website and the benefits of using one. Next, let’s step through a quick tutorial on how to create a file management system on your WordPress website.
Related: How to Create a WordPress Document Library Tutorial
How to create a WordPress file manager
In this section, I’ll show you how to create a WordPress file manager for your files and other resources. We’ll cover:
Watch the video, or scroll down for step-by-step written instructions:
Step 1: Install and activate the WordPress file manager plugin
Before we begin, you’ll need to purchase the Document Library Pro plugin if you haven’t done so already.
- Log in to your WordPress admin panel, head over to Plugins → Add New, and click the Upload Plugin button. Next, click Choose File and find the plugin zip file on your computer. Once it’s uploaded, click the Install Now button to install it to your WordPress website.
- Click the 'Activate Plugin' button on the following screen to activate the WP file manager plugin.
- Finally, navigate to Documents → Settings and enter your license key. Click on the 'Save Changes' button at the bottom of the page to proceed.
Note that there are three ways to install WordPress plugins: through the WordPress dashboard, the official WordPress Plugins directory, or manually. Now that we’ve installed and activated the WP file manager plugin, we need to add our files to WordPress.
Step 2: Add files to WordPress
There are 4 different methods you can follow to add files to your website. To help you choose, here's a summary of each method. Use these to decide which method is best for your WordPress file manager.
Tip: You can create additional custom fields and taxonomies to display any further information about your files (such as reference number, author, etc...).
Method 1: Add files manually
Adding files is just like creating a normal page or post in WordPress. The only differences are that you do it in the 'Documents' section of the WordPress admin, and there are some extra fields for your WordPress file manager:
- Navigate to Documents → Add New.
- Add all the information about each file, such as the title and an excerpt or description. Ignore the file size because this will be calculated for you automatically.
- Go to the 'Document Link' panel and select the File Upload option. Use this to upload the file to the file management system.
- Click the blue 'Publish' button to finish adding it to the WordPress file manager.
- Repeat the process for each file.
Method 2: Add files already in the Media Library
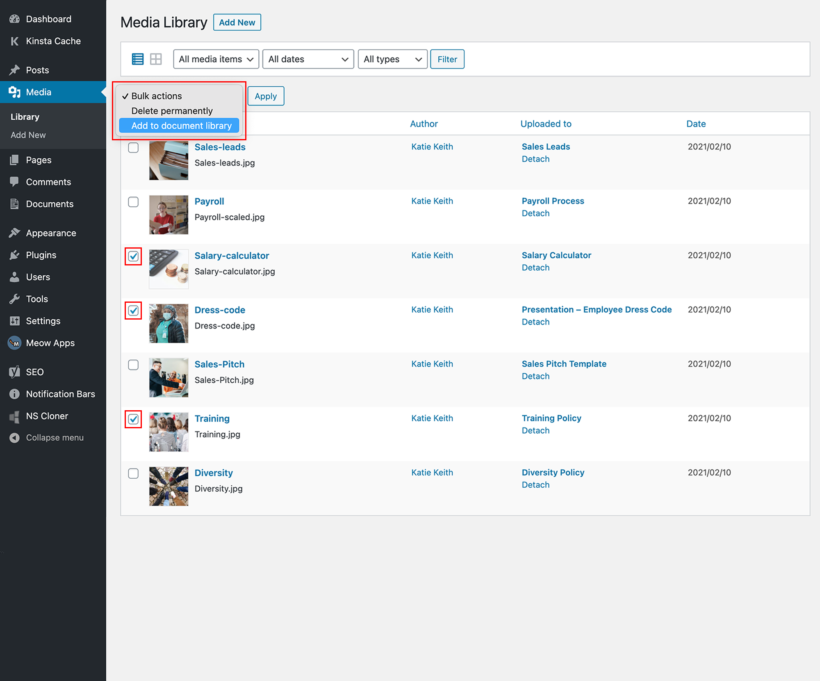
Perhaps your files are already in the WordPress Media Library. You can still use Method 1, which I described above - simply select the existing file instead of uploading a new one. However, it's easier to just convert your existing Media Library files into 'Documents':
- Open the WordPress Media Library (the 'Media' section of the WP admin).
- Make sure you're viewing the files as a list rather than a grid. There's an icon at the top left which lets you toggle between the two Media Library views.
- Use the checkboxes on the left to select the files that you want to display in the file management system.
- Open the 'Bulk actions' dropdown and click on 'Add to document library'.
- Now go to the 'Documents' section of the admin, and you'll see all the files listed. The filename has been added as the file title. You may wish to edit files to change the title to something more user-friendly and to add extra data such as an excerpt, categories, and tags.
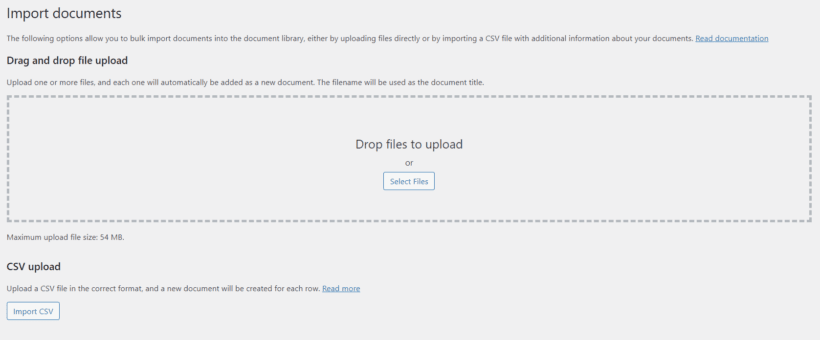
Method 3: Drag and drop file upload
This is similar to Method 2, except that it is for files that aren't in the WordPress Media Library yet:
- Navigate to the Documents → Settings page in the WP admin.
- You'll see a drag-and-drop file upload area. Drag one or more files here, and wait for them to upload.
- As with Method 2, each file will be added to the 'Documents' section of the admin. Edit these are needed to add information about each file.
Method 4: Upload files from CSV
If you have a very large number of files to add to the WordPress file manager, then CSV upload is your best bet. It takes time to prepare the data but is then incredibly quick to add to WordPress.
To upload files via CSV, use the instructions in the WP file manager plugin knowledge base. These include a sample CSV file that you can download to make sure your data is in the right format.
Add file manager categories and tags
When you add files to Document Library Pro, you can structure them into categories and tags. This is an excellent idea if you're adding lots of files to the WordPress file manager. As well as allowing you to list files from different categories separately, visitors can filter the file manager WooCommerce by category or tag. This makes it much easier to find specific files.
You can do this in the 'Categories' and 'Tags' pages in the 'Documents' section of the WordPress admin. Once you've created the WordPress file manager categories and tags, you can select them for your files. Alternatively, you can just create them when you add or import files.
Create your WordPress file manager
Now you've added all the files to WordPress, it's time to display them on your website.
The good news is that this has already been done for you! To find your WordPress file manager page, go to the 'Pages' section of the WordPress admin and find the page called 'Document Library'. If you like, you can rename this to something else like 'File Manager'.
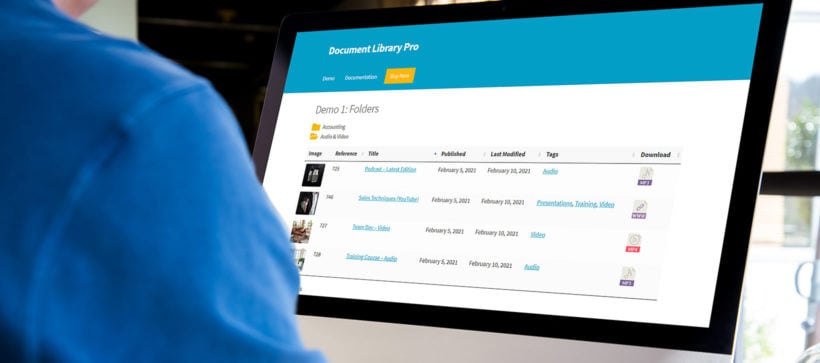
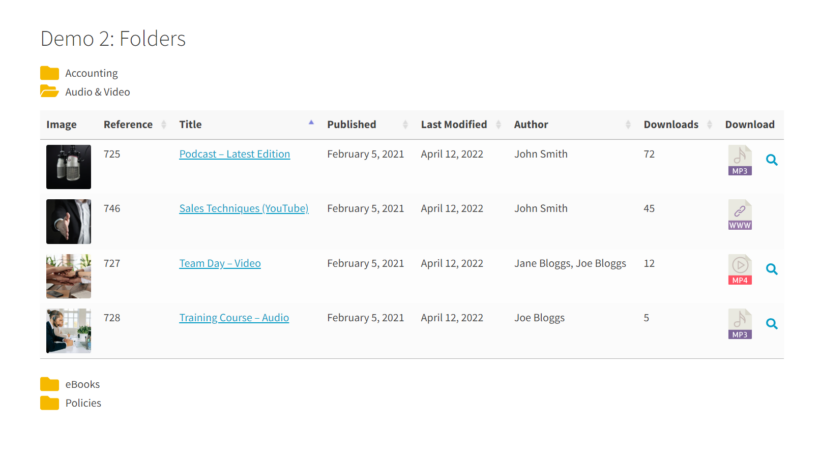
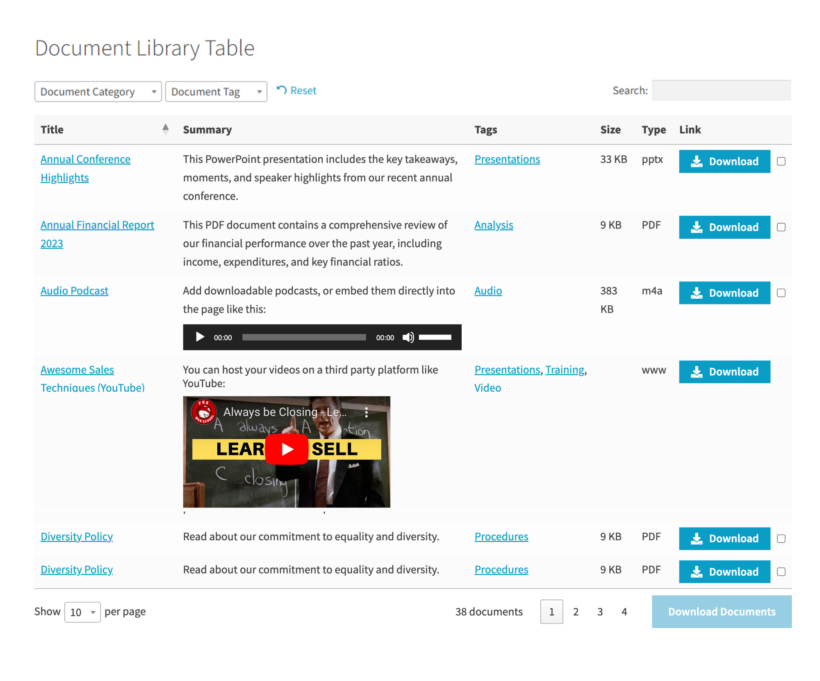
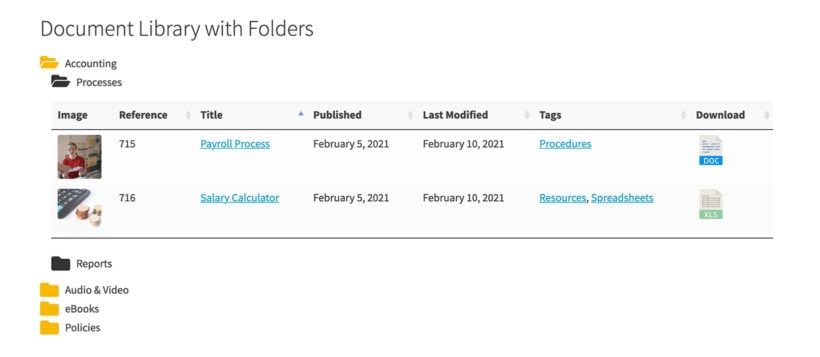
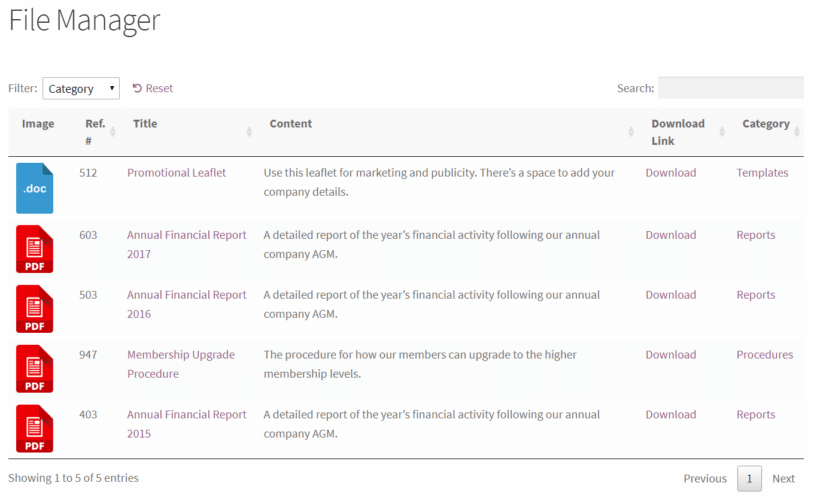
View the page and you'll see all your files listed in a searchable table or grid. It should look something like this:
Perfecting the file manager page
Now you've seen what the WordPress file manager looks like straight out of the box. It's incredibly flexible, so the next step is to customize it to your exact needs. For example, you can add filter dropdowns to help visitors to find files more easily. You can also change which columns of data are displayed about your files, add download buttons, and more. You can also spread the file manager WooCommerce across multiple pages or tabs, for example structuring them into folders or listing different categories on each page. (See a full list of WordPress file manager options here.)
Options for an effective WordPress file manager
To configure the page listing your files, go to Documents → Settings → Document Libraries and change the options as needed. There are lots of options, and I particularly recommend these ones for a WordPress file manager:
- Folders - If you have created categories, then you might want to enable this option to display the WordPress file manager within folders. If you do this then the file manager WordPress page will be structured as a list of hierarchical folders, representing the structure of categories and sub-categories that you created in Documents → Categories. If you don't want this then leave it unticked, and all the files will be displayed in a single list. Visitors can still easily find files by category by using the filter dropdowns.
- Columns - Choose which columns to include in the file manager. For example, you might want to add
file_typeandfile_sizecolumns. (The data in these columns will be generated automatically based on the file that you uploaded to the file manager WordPress plugin.) - Link style - Set this to either button or an icon. That way, visitors can either click on a button to download files; or they can click on a file type icon.
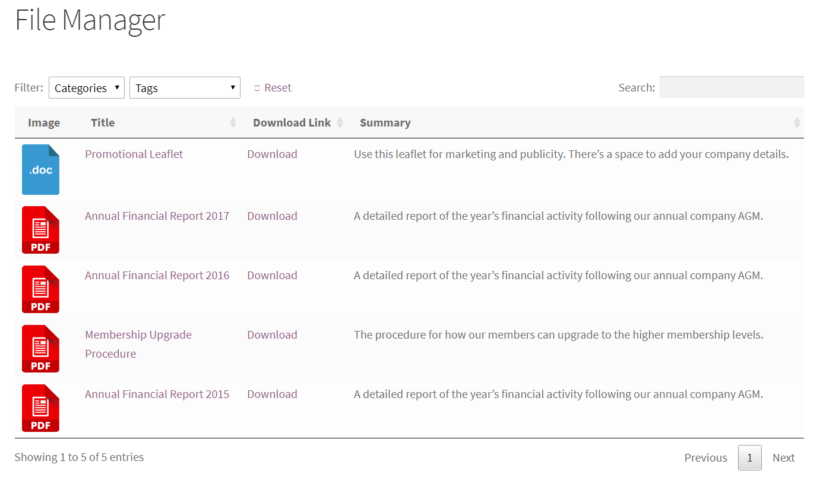
- Filters - Set the Search filters option to Custom using the dropdown menu and add
doc_categories, doc_tags. (Only do this if you have structured your WordPress file manager using categories and tabs.)
Once you're done, click the Save Changes button. Your WordPress front-end file manager should look something like this:
How to list items from a specific file manager category
So far, we've learned how to list the entire contents of your WordPress file manager automatically. The files will either be listed in a single searchable table or grid or structured into clickable folders based on their categories.
The Document Library Pro file manager plugin also comes with a shortcode to list files in more flexible ways. It's very flexible and you can use it to list specific files based on their category, tag, date, author, and much more. See the documentation for a full list of the possibilities.
For example, the following shortcode will list files from the 'Finance' category only:
[doc_library doc_category="finance"]
The shortcode method has lots of useful applications for your WordPress file manager:
- Add multiple lists of files to the same page - for example, with a different heading between each one.
- Create a multi-page file manager on your WordPress site and list different files on each page.
- Use your page builder file manager plugin (e.g. Divi Builder or Elementor) to create tabbed layouts and list different files in each tab.
- List files in relevant places throughout your website, for example by listing technical downloads on the product page on an e-commerce site.
What else can you do with a WordPress file manager?
To get even more value for money, read through our bonus tips to find out what else you can do with your WordPress file manager to improve user experience and make sales.
Bonus: See who has downloaded your files
Most WordPress websites use Google Analytics to track how people are using the site. You can use the instructions in this tutorial about how to track how many people are downloading your files.
Control who has access to the files
If you’re creating a WordPress file management system for your team members or staff (either public or internal), you might want the flexibility to control who has access to the files. Our WordPress Password Protected Categories plugin provides 2 easy-to-use ways to make them private:
- One way to do this is by marking categories as Private. Private categories and their files can only be accessed by logged-in users with the correct role capabilities. By default, only Administrators and Editors are able to view private categories. If you want to make them available to other user roles then check out our tutorial on how to choose which roles can access the private content.
- The other option available with this file manager plugin is to password-protect categories within your WordPress file management area. This way, only users with the correct password are able to view the files listed under the password-protected category.
Let users add files themselves
With Gravity Forms, you can let other users upload files and list them in the WordPress file manager with a frontend file upload form. It works something like this:
- You install and activate the Gravity Forms plugin on your website.
- Store the files which users submit as WordPress posts (or custom post types).
- Use Document Library Pro to display the files as a WordPress file manager front end plugin.
If this is something you’re interested in doing, check out our tutorial on how to accept user submissions and display them on the front end. You can even limit your frontend file upload form to specific user roles. For example, you might do this if you want employees within your organization to be able to upload files, but not the general public.
Advanced WordPress file management techniques
Advanced file management techniques can make managing files on a WordPress site much more efficient and streamlined. Here are some techniques that can help:
- Bulk uploading and downloading: If you have a large number of files to upload or download, you can use the bulk upload and download functionality of your WordPress file manager. This allows you to select multiple files at once and upload or download them all at the same time.
- Search functionality: Many WordPress file managers offer search functionality, which can be a powerful tool for finding specific files quickly. By using the search functionality, you can search for files by name, extension, or other criteria, and quickly locate the file you need.
- Folder organization: Another advanced file management technique is to organize your files into folders. This can make it easier to find specific files and keep your files organized. By grouping similar files together in a folder, you can quickly locate the files you need and avoid clutter in your file manager.
- Custom file naming: When uploading files to your WordPress file manager, it's important to use descriptive file names that accurately reflect the content of the file. This can make it easier to find specific files and avoid confusion when working with multiple files. By using custom file naming conventions, you can ensure that your files are easy to identify and locate.
- File versioning: Many WordPress file managers offer file versioning, which allows you to keep track of different versions of a file. This can be particularly useful when working on collaborative projects or when making changes to a file over time. By using file versioning, you can track changes to a file and ensure that everyone is working with the most up-to-date version.
Ongoing file management
The Document Library Pro plugin is easy to use, so it will be easy to keep your WordPress file manager updated. Also, any user with the role of Contributor or above can add and edit the files, so you don't need to worry about them breaking anything else on your site.
To update or replace files in the future, simply go to the 'Documents' area in the WordPress admin and make the changes. This normally means uploading a new file to replace the previous one.
It is also possible to overwrite the existing file so that the old one is no longer in the WordPress Media Library. To do this, install the free Enable Media Replace plugin. This adds a 'Replace' button to each file in the Media Library.
Where to get the plugin
Having a WordPress file manager on your website enables you to share resources within your organization through a front-end, user-friendly interface. It facilitates file management and makes it easy for team members and/or the wider public to access files.
I have shown you how to use the Document Library Pro plugin to create a file manager to display your files and files on your WordPress website. It has everything you need for easy file management:
- Easily add, import, upload and manage files.
- Supports all file types, plus externally hosted files.
- Choice of attractive front end file manager layouts.
- Instant searching, sorting and filtering to find files more easily.
- No-risk 30-day money back guarantee.
Now you're ready to take things further:
What are some of the ways you use file managers on your WordPress website? Let us know by commenting below!
12 Comments
It looks to be very good, but I would like to ask a question? Is it possible to add and upload files and other documents on the frontend, so frontend users can upload documents straight to the table?
Hi, Ros. Thanks for your comment and for asking. Please see my reply to your other similar query at this link. Thanks!
Can i also add a read me button and a direct downloadable button like, read or download using the same code you stated above.
Yes, you can and both would work in the same way as the Download Link text that leads to the file. For more details, please see: Can I add links, downloads, icons or buttons in Posts Table Pro? Thanks.