Create a WordPress job board with the Posts Table Pro Plugin
Today, I'm going to show you how to use Posts Table Pro as a WordPress job board plugin. This WordPress table plugin is an ideal way to list job vacancies in an easy-to-find, user-friendly format. Job hunters can quickly search, sort and filter the list of jobs to find the vacancies they're interested in.
As companies post job alerts on your site, you'll build your backlinks and authority with search engines, boosting your SEO and your traffic - creating a virtuous cycle that will help cement your site's place as the job site in your niche. Who needs LinkedIn?
I'll also show you how to add extra features to the job portal. This includes online job applications, a 'Submit a job' form with PayPal payments, and automatic expiry dates for when a job reaches its closing date. I'll provide step-by-step written instructions as well as a YouTube video tutorial that you can follow along with.
Before we start, I'll share three case studies of companies who have used this tutorial to create a real-life WordPress job board. Afterwards, I'll tell you how to do the same on your own website!
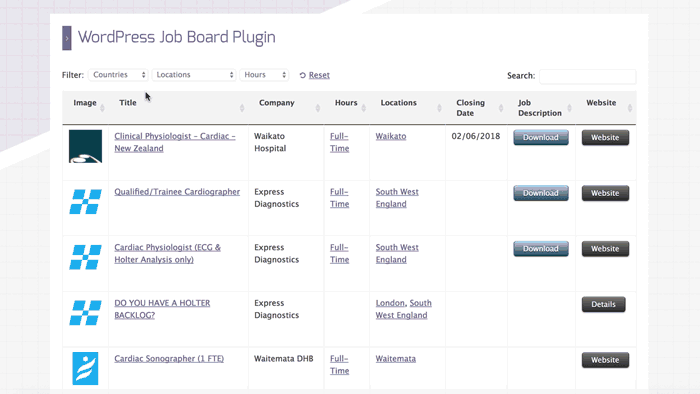
Case study #1 - WordPress job board plugin for Cardiac Output

Cardiac Output is a cardiology job board owned by ourselves at Barn2 Media. It has been the UK's leading cardiology job portal for over 25 years. We took it over back in 2013 to give it a fresh start and modernize its online presence.
We originally used WPJobBoard as the WordPress jobs plugin for Cardiac Output. However, it has never been as reliable as we would have liked. And at $97/year, it was more than we wanted to spend on a WordPress job board plugin. Our web host WP Engine recently told us about a security loophole in WPJobBoard. This was the final straw, so we decided to rebuild the job manager using our own Posts Table Pro plugin.
Posts Table Pro is hugely popular as one of the best WordPress job board plugins, and lots of our customers use it in this way. It made perfect sense to use it for Cardiac Output, so we decided to make the change.
In this tutorial, I will tell you exactly how I used Posts Table Pro to create a WordPress job portal for Cardiac Output. I'll include detailed screenshots and a full video tutorial. You can even see it in action on the Cardiac Output website! This will give you everything you need to create your very own WordPress job board.
Case study #2 - TVProductionContacts.com's Job Board
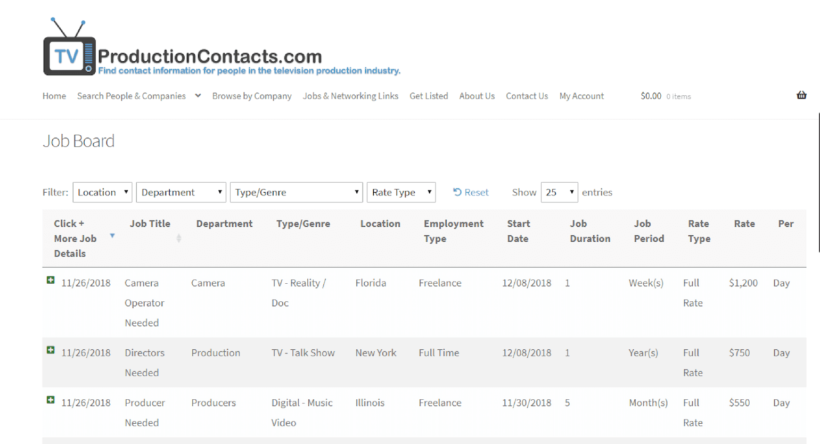
TVProductionContacts.com is a networking site for professionals in the TV production industry. The site's creator wanted to add a sortable job board to his site, to do this he chose to use Posts Table Pro. And this is the tutorial that he used to help him create the job board.
The job board has been customized to show just the right amount of columns. Info varies from job title and location, to rate of pay and contract duration. Job seekers can quickly sort through the table by using the dropdowns above the job board to filter out what they're looking for.
The table is easy to manage as there's a job submission form powered by the Gravity Forms plugin and the Gravity Forms + Custom Post Types add-on. Once each job submission has been approved, the table is automatically updated with the information.
Case study #3 - Ian Martin Job Board
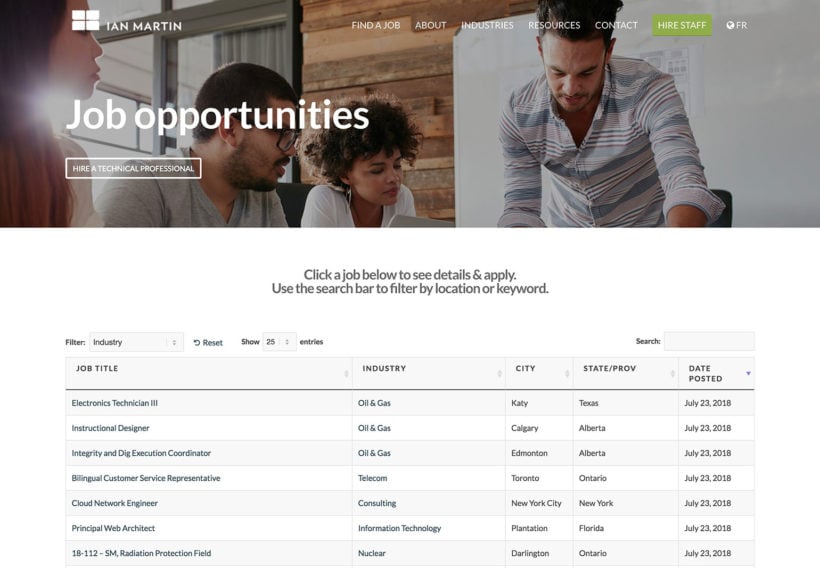
IanMartin.com followed the instructions in this tutorial to create a job board for their WordPress website. They chose the Posts Table Pro plugin specifically because it handles custom post types and displays jobs in the required layout.
Developer Scott Russell said: "We do engineering, IT and technical project staffing so have a LOT of jobs we need to display, organize etc. We’re using a plugin called Matador that pulls jobs from our applicant tracking system, displays the job ads as custom post types and allows people to apply for jobs."
Each job is added to the custom post type created by the Matador plugin. The jobs can be divided into categories and industries, with an 'Industry' filter dropdown above the table. This makes it easy for jobseekers to sift through the long list of jobs and quickly find jobs in their industry. They can also click on an industry in the table to filter by that industry.
As well as the central list of all jobs, they have used the job board plugin to list jobs from specific industries only. For example, there's a page listing Power Generation jobs only. They also have location-specific pages where users can sort by location to find jobs in their area.
Read on to find out how to create your own job board.
How the WordPress job board works
We'll create a WordPress job manager by combining Posts Table Pro with free plugins to add all the features we need. This is what you'll need:
- WordPress website with a theme, a domain name, and hosting. Note that Posts Table Pro is designed to work with any page builder plugin, such as Elementor, Beaver Builder, etc. It also works with the Gutenberg or Classic WordPress editors and has its own Gutenberg block. So however you've built your site, you'll be covered!
- Easy Post Types and Fields - you'll use this free, lightweight plugin to save your jobs in the WordPress back end. It does this by creating a 'Jobs' custom post type, which adds a dedicated Jobs area to the WordPress admin. This is where you'll create jobs, add extra fields of information, and structure job types into categories.
- Posts Table Pro - this WordPress job search plugin lists your job postings in a table layout on the front end of your website. It provides extra functionality such as search, sort, and filter.
- (Optional) Post Expirator - use this free plugin if you want to automatically remove vacancies from the job board after the closing date.
- (Optional) To add even more features to your WordPress job board portal, you can use a WordPress forms plugin (e.g. the free Contact Form 7 plugin) to take job applications online. Or you can use Gravity Forms to create a 'Submit a Job' form where employers can post vacancies directly to your website.
Video - How to create a WordPress job board
Watch this video to see me create a complete WordPress job portal with these plugins. You can pause as many times as you like, and create your own job board alongside me. I've also provided step-by-step written instructions below:
Step 1 - Create somewhere to store your job vacancies
To build a WordPress jobs board, you need an area for storing the job vacancies. We'll do this by creating a 'Jobs' custom post type. You'll have a dedicated 'Jobs' section on the left hand side of the WordPress admin. This keeps your job vacancies separate from other content, such as pages and posts.
1a. How to create a Jobs custom post type in WordPress
- Install and activate the free Easy Post Types and Fields plugin from WordPress.org.
- Look for Post Type → Manage in your WordPress dashboard. Click 'Add New'.
- Click 'Create New' on the next screen.
- Enter the singular and plural post type names.
- Singular Label - The singular name for your jobs, e.g. 'Job' (make a note of this, as you'll need it to list the vacancies using the WordPress job board plugin in Step 2).
- Plural Label - A plural name for your vacancies, e.g. 'Jobs'.
- Click 'Next'.
- Select the type of information you wish to display and click Create.
Next, it's time to use the Easy Post Types and Fields plugin to create custom fields and taxonomies. These let you store extra data about each job vacancy in WordPress, such as job grade, hours, job description download link, and the 'Apply now' button.
Use custom fields to store one-off data about each job, such as the job reference or 'Apply now' link or button. Use custom taxonomies for data that you want to use to filter the WordPress job portal. For example, you might want to add filter dropdowns so that people can refine the jobs list by grade or hours, so use custom taxonomies for these.
Tip: You only need to create custom fields or taxonomies for data that WordPress can't store by default. Your Jobs custom post type can have all the standard WordPress core fields such as title, content, excerpt, featured image, tags and categories. You just need to create any additional fields that are needed on top of this, such as working hours or salary.
1b. Create custom fields for storing extra data about your jobs
- Head over to Post Type → Manage in your WordPress dashboard.
- If you want to add a custom field to a custom post type, click on the custom fields button for the respective custom post type. If you can't locate your pre-built post type in the list, it should be in the other post types tab (Such as posts, pages, products, or media).
- On the manage custom fields page, click on the Add new button to add a custom taxonomy.
- Give your custom post type a name, slug, and select the field type (text or visual editor). Click the Add custom fields button.
- Repeat these steps for all the custom fields that you wish to create.
1c. Create custom taxonomies for grouping and filtering the jobs
- Go to Post Type → Manage in your WordPress dashboard.
- This time, click on the Taxonomies button for the post type you wish to customize.
- Click on the Add New button.
- Enter the singular and plural names and the slug for your new taxonomy, as before. (Remember to make a note of the singular label for Step 2.)
- Click on the Add taxonomy button.
- Repeat the steps above to add more custom taxonomies.
Now, you'll see a 'Jobs' section on the left of the WordPress admin. This is where you'll manage the vacancy in your WordPress job board. When you create a job board, you'll see all the extra fields available to fill in for each job listing.
1d. Add vacancies to the WordPress jobs plugin
Next, it's time to add the job vacancies to WordPress:
- Go to Jobs > Add New on the left of the WordPress dashboard.
- Add all the information for the job and click 'Publish'.
- Repeat steps 1 and 2 for each job vacancy.
Tip: To create clickable links, you should either add the HTML for a link to a Text custom field, or use a WYSIWYG Visual Editor field and add a link using the 'Insert/edit link' icon from the WordPress toolbar. If your WordPress theme comes with buttons, you can also add buttons to these fields. For example, you might want to create a 'Download' button where people can access a PDF of the job description. (If your theme doesn't have a button style, then I recommend the free Shortcodes Ultimate plugin.)
Ok, so now you've finished creating the backend infrastructure for your website job portal. The next step is to use Posts Table Pro as a WordPress job board plugin that will list your jobs in a filterable table layout on your public-facing website.
Step 2 - Create a WordPress job board page
- Install and activate the Posts Table Pro WordPress table plugin.
- Once activated, the setup wizard will appear and guide you through the process of entering your license key.
- Once you have installed the plugin, you can use the automatic setup wizard to create your first table. However, if you prefer to start right away or are already familiar with the plugin, you can create new tables anytime by going to Post Tables → Add New.
- Follow the table wizard and customize your table by columns, filters, sort, and more.
- To add your table to your WordPress site, you have two options. Firstly, you can use the Gutenberg editor by adding a 'Post Table' block and customizing it further with your preferred settings. Secondly, you can copy the shortcode from the WordPress table builder and paste it anywhere on your site, such as a page, post, or widget. You can find the shortcode for each table in the main list of tables in Post Tables → Tables.
2b. Choose your columns
On the table builder, you can add columns to your job board. To customize the columns displayed on your board, you have the option to select which columns to display and in which order. For instance, you can add:
- Image
- Title
- Company
- Hours
- Locations
- etc.
You can add a column by choosing the type of column from the dropdown menu and selecting 'Add'. As you add columns, they appear in the list of columns above, and you can rearrange them by dragging and dropping the sort icon on the left or the column title.
2c. Add filters to help people find a job
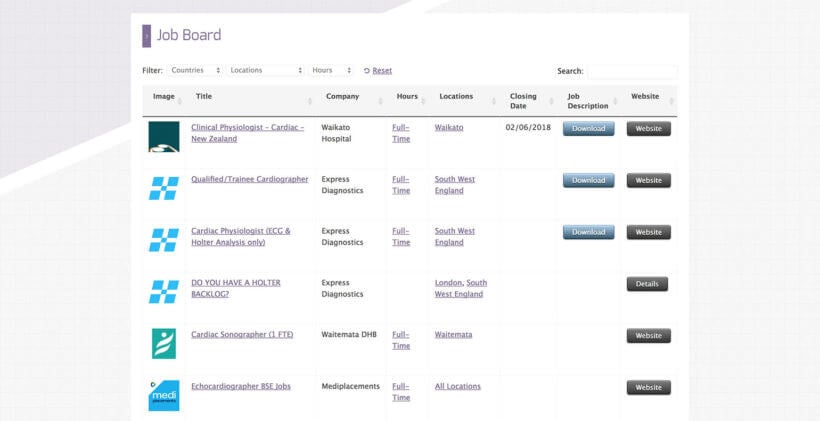
If you're planning to list more than about 5 jobs, then I recommend adding filter dropdowns at the top of the WordPress job board. You can add filters for categories, tags, or any custom taxonomy - each as a separate dropdown. This job portal has 3 filters, so users can find jobs of all stripes based on the country, location, and working hours:
To add a filter, select the appropriate option from the dropdown menu and then click on the 'Add' button.
Lastly, choose how to sort the table. You can set the default sorting option and the sort direction.
Job seekers can now sort by any column or use the search box or filters to find a job. If you've included any custom taxonomy columns in the list of jobs, then they can also click on this to filter the table. Any links or buttons will appear as clickable links on the job board.
Step 3 - Configure the single job page
In your WordPress job board, you'll see that people can click on the job title or image to access a separate page about that job. This page will show the job title, main content (where you may have added the full job description or person specification), and possibly the featured image - depending on your theme.
The easiest way to show extra information such as location and salary is to add this within the main content box for each job. There are 2 ways to automate this:
- If you're technically minded, then you can create a custom template for the Jobs post type and use it to display the custom fields and taxonomies. For non-developers, I recommend posting a job on Codeable - this is a good way to find good developers with specific skills.
- If you don't want to create a custom template, then you can use Posts Table Pro to display the custom fields and taxonomies directly on the single job pages. I'll tell you how to do this next. It's a neat way to show custom fields and taxonomies for specific jobs without having to edit any template files.
Use Posts Table Pro to show the extra job fields on the single vacancy page

For example, in this screenshot, you can see two extra tables, which I added directly to the main content box for the job vacancy. The first table shows the job image, working hours, company name and location. The second table appears under an 'Apply for this job' heading and contains the contact details for enquiries, plus buttons linking to the downloadable job description and website.
The process for showing these fields on the single job vacancy page is similar to creating a table listing all your jobs, which I showed you in Step 2. However, there are a few differences to be aware of:
- Add
id="123"to the Posts Table Pro shortcode, replacing 123 with the ID of the job vacancy post. You can find the ID by going to the Edit Job screen for that job, and looking for post=123 in the URL. For example, if the URL ends in /wp-admin/post.php?post=33563&action=edit then the ID for the post is 33653. - Add
links="none"to the shortcode to disable the links to the single job page. Your users are already on that page, so these links aren't needed! - Add
page_length="false" reset_button="false" search_box="false" totals="false"to the shortcode. This will remove any elements you don't need such as the number of jobs and search box, which aren't appropriate here.
For example, I used this shortcode to create the table shown at the top of the above screenshot:
[posts_table post_type="job" include="123" columns="image,tax:hours,cf:company,tax:location" shortcodes="true" links="none" page_length="false" reset_button="false" search_box="false" totals="false"]
Step 4 - Automatically expire vacancies from the job portal on the closing date
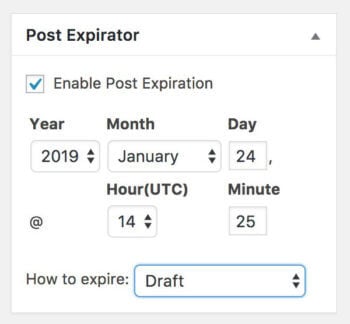
You can easily achieve this by adding the free Post Expirator plugin. Install the plugin and it will add a 'Post Expirator' box on the right of the Add Job screen. Use this to set a job vacancy expiry date to change the job status to 'Draft' when it expires.
Can jobseekers apply for a job vacancy online?
It's easy to add an 'Apply online' facility to your WordPress job board or portal.
You just need to create an enquiry form to use alongside the WordPress job board plugin.
You can do this using any WordPress contact form plugin. These instructions are for Contact Form 7 as it's free and hugely popular, but any contact form plugin is fine. (Tip: If you're planning to add a 'Submit a job' facility anyway, then you might as well use Gravity Forms for this. As you'll see in the next section, you'll be needing Gravity Forms so that employers can upload a job.)
- Install Contact Form 7 and go to the 'Forms' section on the left of the WordPress dashboard.
- Use the Contact Form 7 Documentation to create a Job Application form with all the fields you need. You can create short or long text fields, check boxes, radio buttons, and even extras like file uploads.
- Add the contact form to a separate page on your website.
- Next, add an 'Apply for Job' link to one of the fields in your job board. I recommend creating a custom field for the job application link (see Section 1b, above). You can display this as a column in the job board table (see Section 2). For each job, add a clickable button or link to the page with the contact form.
Do I need a separate application form for each job?
It's entirely up to you. The simplest option is to create 1 job application form and use it for all your jobs. Include a compulsory 'Job Title' field in the form so that applicants can tell you which job they're applying for.
Alternatively, you could create a separate form for each job. This is obviously more work, or you could ask a developer to dynamically generate separate forms for each vacancy and link to these from the 'Apply for Job' column in the job board.
Can I link to a 3rd party job applications page?
Absolutely. If you want people to apply via a third party job site (e.g. NHS Jobs if you're listing NHS jobs), just link to that URL from the 'Apply for Job' column in your WordPress job board, instead of using your own contact form.
If you're just using the WordPress job board plugin to list your own job vacancies, then you can stop now and start setting up your jobs portal. Keep reading if you want employers to be able to post job vacancies directly to your website.
You may also like: how to create a WordPress member directory
Can employers submit and pay for jobs online?

When a job advertiser submits the job vacancy, you will receive an email notification and a new job post will automatically be added to your WordPress job board. (If you want to approve each vacancy before it's added to the job board, then you can hold each post for moderation by an administrator.)
Check out our full tutorial on how to use Gravity Forms to create a form, which will automatically add job posts to your website. You can also see it in action on the TV Production Contacts website - they followed the instructions in this tutorial to create their own 'Post a job' form:

You can use this method for free job listings, or you can take payment via invoice or PayPal:
- Manual payment for job listings Set up the form as described above. Make sure it's held for moderation if people have to pay before the job advert goes live. Manually send an invoice to the job advertiser.
- PayPal payment for job adverts Gravity Forms has a PayPal add-on that lets employers pay using PayPal before they can submit a vacancy to your WordPress job board.
How will you use the WordPress job search plugin?
In this tutorial, I've told you everything you need to know about how to combine different, simple job board software to create a fully functioning jobs site. You've learned how to create a dedicated 'Jobs' section within WordPress. You know the customization potential of adding extra fields of information to your jobs. You've also learned to list your jobs in a front end WordPress job board, with extra features such as job search and filters. And you know how to set up approvals for the email alerts you'll receive each time a recruitment agency submits a vacancy to the site.
Now it's time to put it into practice. Posts Table Pro comes with full support, so get in touch if you need any help or advice. I'd love to hear how you get on with our WP job manager plugin - please leave your comments below.
12 Comments
Please tell me about blogger job posting templete
Hello there. Using a custom single post template file for the Jobs post type allows you to display/include any or all the custom fields and taxonomies that you've added/created, as these will not be shown by default when viewing the single post pages. Thanks.