WordPress resource library plugin: Step-by-step guide
Looking for a user-friendly way to display documents or resources on your company website? The best WordPress resource library plugin can help you create a searchable, filterable resource library for any file type.
In this tutorial, we'll show you step-by-step how to create a flexible WordPress resource library. We'll use a WordPress resources plugin, so you won't have to write a single line of code.
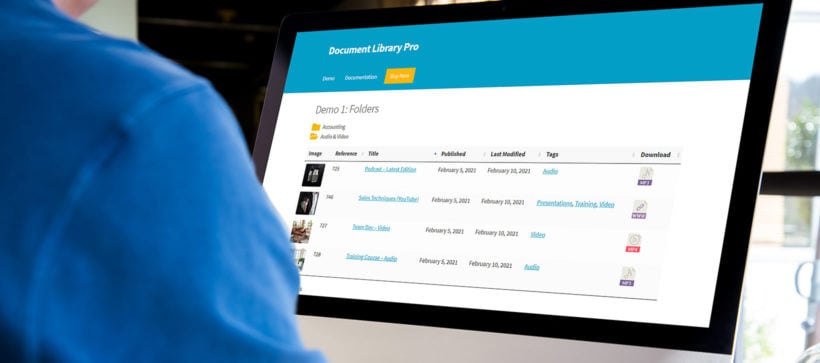
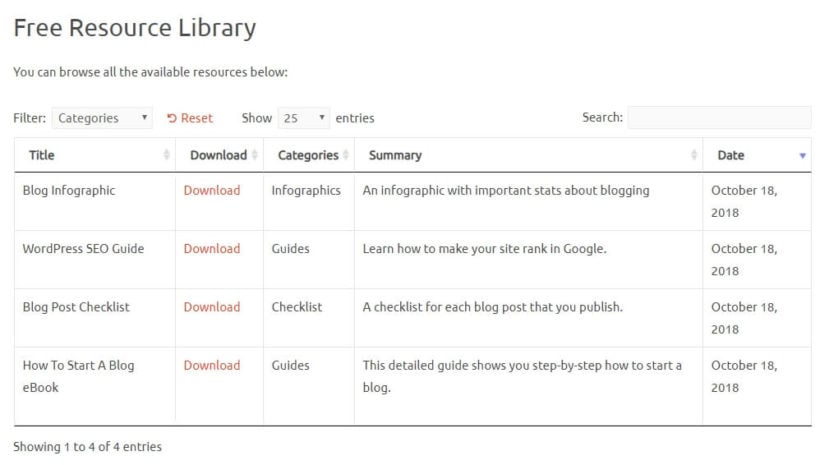
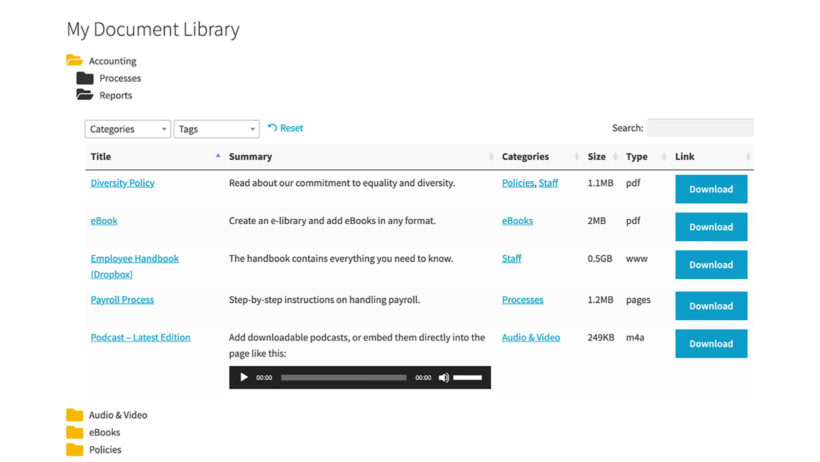
Your finished resource library will look something like this:
With the WordPress resource library plugin that we show you, you'll be able to create a PDF library, image library, or any other type of document library. Or maybe you want to create a modern take on a traditional 'Links' page, with extra information about each resource to boost your SEO.
Either way, your visitors will be able to sort, search, and filter all the resources in your library. The WordPress resources plugin helps them find exactly what they need.
And you'll also be able to divide resources into categories, password protect your resource library, and just generally create a library that's built for your unique needs.
Keep reading for more information and a step-by-step guide on how to create your own resource library today!
Why Document Library Pro is the best WordPress resource library plugin
Document Library Pro helps you display any type of file or link in a flexible table or grid format. And you guessed it - "any type" includes resources.
Simply add, upload or import the resources to your WordPress site. The WordPress resources plugin automatically displays them in a searchable directory on the front-end.
This is the best way to create a WordPress resource library because you can:
- Choose exactly what information to includeFor example, you can add a short excerpt to describe each file, include an image, or lots more.
- Make it easy for visitors to find resourcesYou can let them search by keyword, give them filter drop-downs, and more.
- Organize resources into different librariesIf needed, the WordPress resources plugin lets you create multiple resource libraries for different content/users.
- Still use core WordPress functionalityFor example, it's easy to create a private WordPress resource library just by using the built-in WordPress Visibility settings.
WordPress resource library example - Huckleberry Hearts
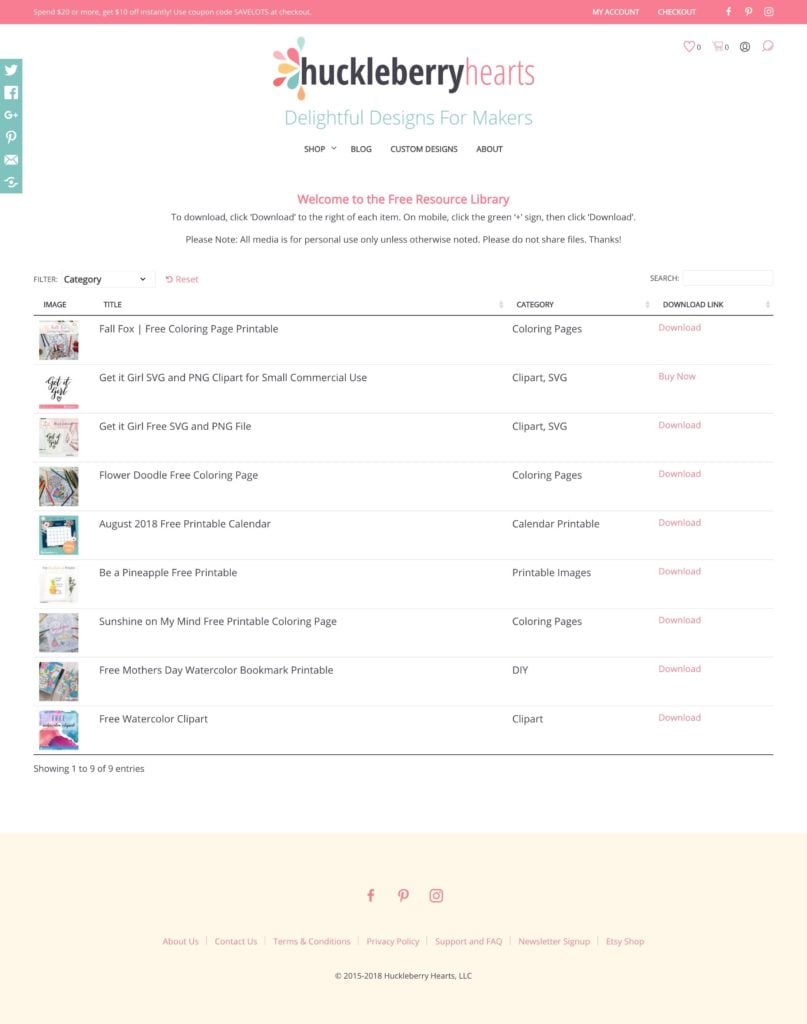
Huckleberry Hearts uses Document Library Pro as a WordPress resource library plugin to share free downloadables. Here's why Shanna chose the plugin for her resource library:
I'm a freelance graphic designer and artist and I sell my digital art on my website. I also have a blog, and since I offer a lot of free printables to my readers, it seemed logical to have a resource library. So once my members sign up for a free membership, they are given access to the library.
How to create your own WordPress resource library
Ready to create your own resource library? Over the next few sections, we'll show you step-by-step how to use Document Library Pro as a WordPress resources plugin for your content.
We'll start with a general guide for creating a simple resource library. Then, we'll share some additional tweaks that you can use to enhance your library.
What you'll need to create your resource library
To follow this guide, you'll need to have the Document Library Pro installed and activated on any WordPress website. You'll use this WordPress resources plugin to:
- Add and manage the files or links in your resource library.
- Display them in a resource library on the front-end of your site. The resources will be listed in a flexible, user-friendly table layout.
Once you've installed the plugin, here are the steps to set up your resource library. You can also watch our video tutorial below:
- Add or upload your resources
- View your WordPress resource library page
- Make your resource library private (optional)
- Enhance your resource library's navigation with tabs, subcategories, or other tweaks (optional)
Step 1: Upload resources to WordPress
Install the WordPress resources plugin
The first thing you'll need to do is install the Document Library Pro plugin. Get the plugin, download the zip file from the confirmation email, and upload it to WordPress via Plugins → Add New.
Next, go to the resource library plugin settings page at Documents → Settings. Paste in the license key from the confirmation email.
Now you're ready to start adding resources to the library!
Adding resources to WordPress
The next step is to upload all the files that you want to include in your resource library. Or if you're adding links rather than files, then you need to add them now.
Document Library Pro will let you add pretty much any type of resource, including:
- PDF files
- Images
- Word documents
- Spreadsheets
- ZIP files
- ...you name it!
You can also add resources and add them as actual web page content (e.g. by adding text and images directly to the resource in WordPress). It's even possible to link to resources which are hosted on third party websites. For example, perhaps you store your resources on sites like SharePoint, Dropbox, Box, or Office 365.
Wherever your resources are stored, you can display them in your WordPress resource library.
Uploading your first resource
To add your first resource, go to Docouments → Add New. There, you'll see an interface that looks a lot like the regular WordPress editor, with a few additions:
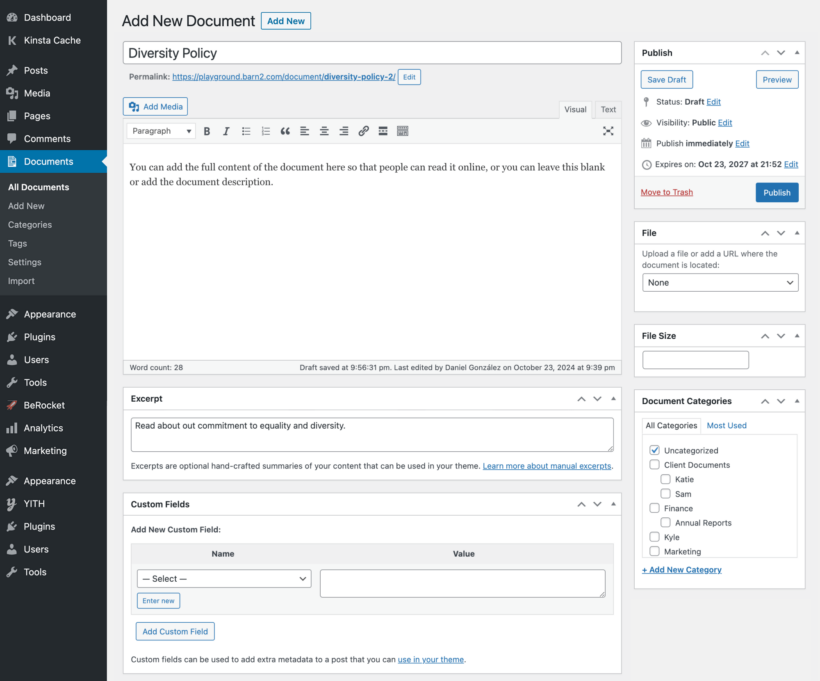
Add all the information about the resource, including any extra data that will be displayed on the resource library page. For example, you might add an excerpt describing it so that people can find it more easily.
Organize your WordPress resource library into categories and tags, just as you would with a regular WordPress post. Later, I'll show you how to add filter dropdowns so that users can quickly find searched by category or tag.
In the 'Document Link' section, either upload the resource file (e.g. a PDF or any other file type) or add a link to its location online (e.g. Dropbox).
If desired, you can include an excerpt that describes the file, as well as a featured image. You'll be able to display any/all of this information in the resource library.
Once you've entered the information, click the Publish button.
Adding resources in bulk
If you have lots of resources to add to the library, don't worry. The WordPress resource library plugin makes it quick and easy to add resources in bulk.
There are several ways to add multiple resources to the library:
- Select existing files in the Media Library and use the 'Bulk Actions' dropdown to convert them to documents. They will then appear in the resource library.
- Go to Documents → Import and drag and drop files straight to the resource library.
- Also on Documents → Import, upload a CSV file containing all the information about your resources.
Easy!
Use custom fields or taxonomies to store more information (optional)
This step is optional - but if you'd like to store more information about each file in your resource library, you might want to use custom fields and/or custom taxonomies.
- Custom fieldsThese help you store information that's unique to each individual item in your resource library. For example, you could create a custom field for each resource's document ID number. Both of those pieces of information will be unique to each resource.
- Custom taxonomiesThese are basically categories and tags but unique to your downloads. They're a good option when more than one resource will fit into the same taxonomy. For example, you could create taxonomies for Year. Then, you can let visitors filter by these criteria.
To create custom fields and taxonomies, you can use the free Easy Post Types and Fields plugin. It comes with all the options to create custom post types, fields, and taxonomies to manage the website's content.
Learn how to add custom fields or custom taxonomies to the resource library.
Step 2: Set up your WordPress resource library page
Once you've uploaded all the files to your WordPress resource library, the next step is to create the front-end resource list that your visitors will use.
The Document Library Pro WordPress resources plugin lists resources in a flexible way that makes it easy for visitors to find what they're looking for.
Choose your resource library settings
To get started, head to Documents → Settings to configure the resource library plugin options.
First, choose what content you want to include in your resource library. The exact content that you include will depend on what data you have added for each resource. Each piece of data will be displayed separately in the resource library. There are lots of content options to choose from including title, excerpt, file size, file type, date, and download link.
Here's an example:
title,excerpt,file-size,link
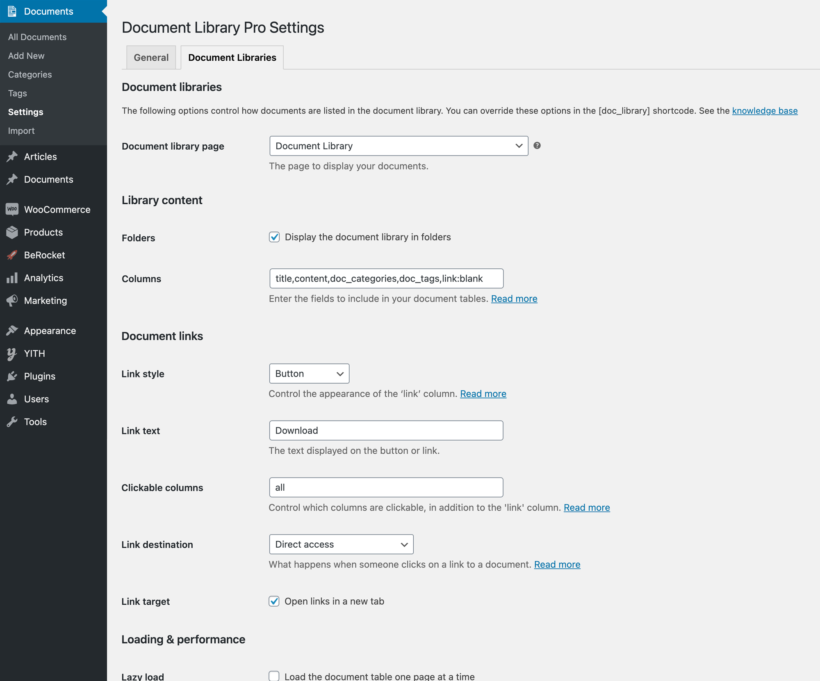
If you want to include an image for each resource like the example from Huckleberry Hearts, then you can add an image column. This will display each resource's featured image:
image,title,excerpt,file-size,link
Choose your download link style
If you've included a 'link' column then people can click to access the resource - whether it's a downloadable file or an external URL.
The WordPress resource library plugin provides lots of options for the link column, so select the ones you require. For example, you can choose whether to display the links as basic text, as file type icons, or as styled buttons. Here are some screenshots of what each option looks like:
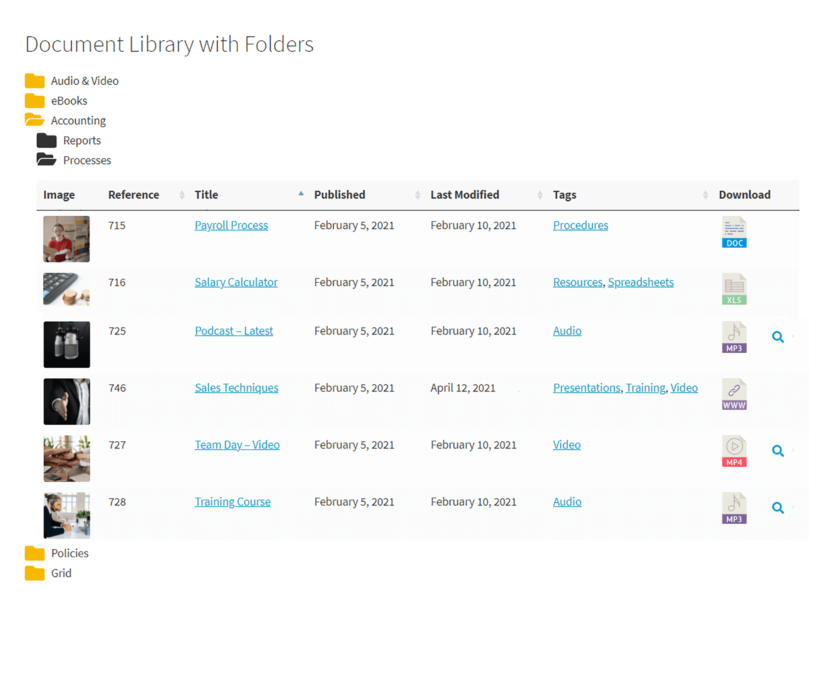
As you can see from the screenshot above, you can also structure the resource library into folders. To do this, enable the 'Folders' option on the settings page.
The WordPress resources plugin also lets you control details such as whether to open links in a new tab or the same tab.
Keep configuring your resource library
Next, continue and configure the other settings. Here are some of the most important settings to consider:
- Shortcodes - if you want to embed audio or video in the content column, then tick this box so that the embedded media players will work.
- Filters - if you want your visitors to be able to filter your resource library, you can choose what content is filterable with this setting. For example, if you add
doc_categories,doc_tags, visitors will be able to filter resources by their category or tag. Learn more about filter options. - Search box - by default, the WordPress resources plugin will add a search box above your resource library. But you can disable this feature if desired.
View your WordPress resource library
Once you've configured the document library plugin settings, it's time to view the WordPress resource library.
Tip: If you want to list different resources on different pages, then you can do this using a shortcode.
- Go to the Pages section of the WordPress admin. You'll find a page called 'Document Library' which has been created for you.
- Rename the page to something like 'Resource Library'. You can also add regular text and other content elsewhere on the page if you'd like.
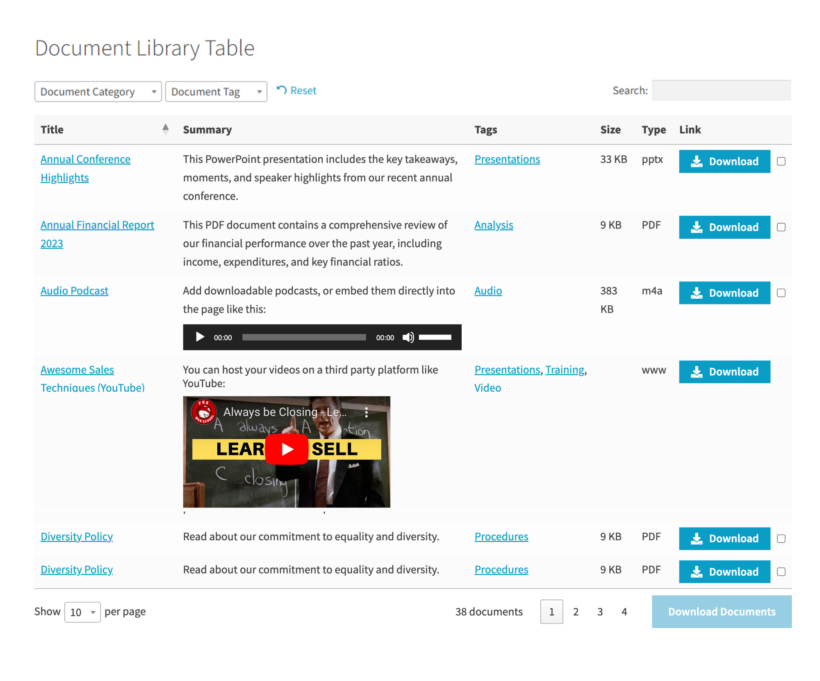
- View the page and you should see your working resource library.
And that's it! Visitors can now browse all your available resources and download them straight from your WordPress document list.
Now, let's cover a few ways to enhance your resource library, including:
- Private resource libraries.
- More complex navigation structures, like creating separate resource libraries for different types of files.
- A tabbed interface to view different types of resources.
Create a private WordPress resource library
If you don't want anonymous visitors to be able to browse your resource library, you can use core WordPress functionality to either:
- Require users to log in.
- Make users enter a password.
Go to the page that houses your resource library and use the Visibility control to select your desired preference:
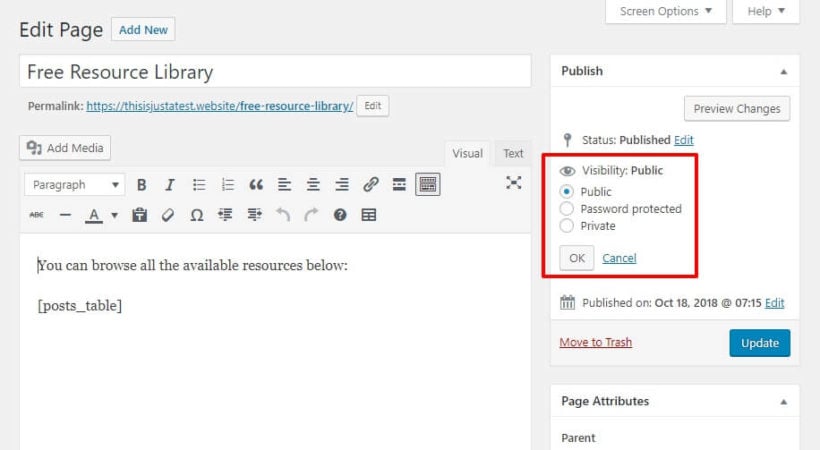
If you choose the Private option, only logged in users with the capability to read_private_pages will be able to see the resource library. By default, that's WP users with the roles of Administrator or Editor. If you'd like to change that, then you can use a free plugin like User Role Editor.
Of course, this only protects the main resource library page and not the actual resources. You can do that by using the Password Protected Categories plugin to set each resource category to private. That's much faster than manually setting each individual resource to private!
Create separate resource libraries
If you'd prefer to divide your resources into different libraries, you can use Document Library Pro's shortcode to list specific resources in each location.
You have a lot of flexibility here. You can choose which resources to include based on:
- Category
- Tag
- Custom taxonomy
- Custom field
- Publish date
- Author
Or, you can just manually choose which resources to include.
By using these rules, you can create separate pages that each contain resource libraries with different information. Or, you can include multiple resource libraries on the same page and use headings to divide them.
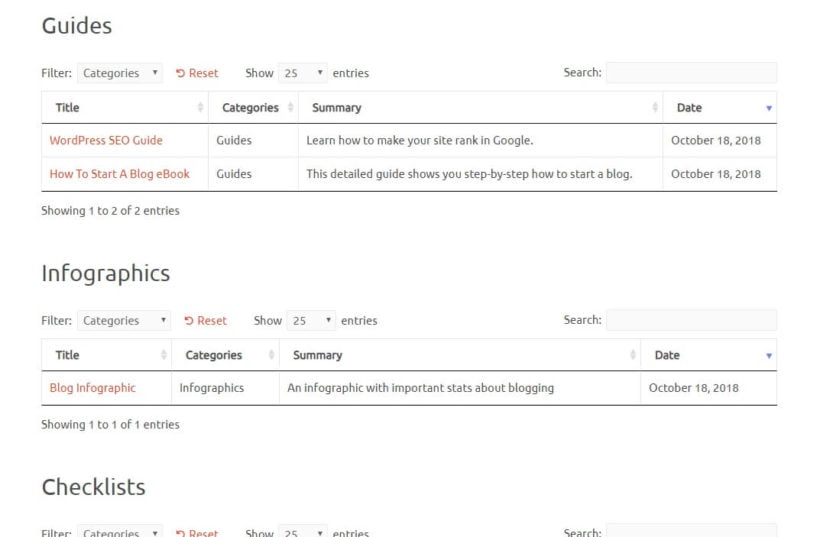
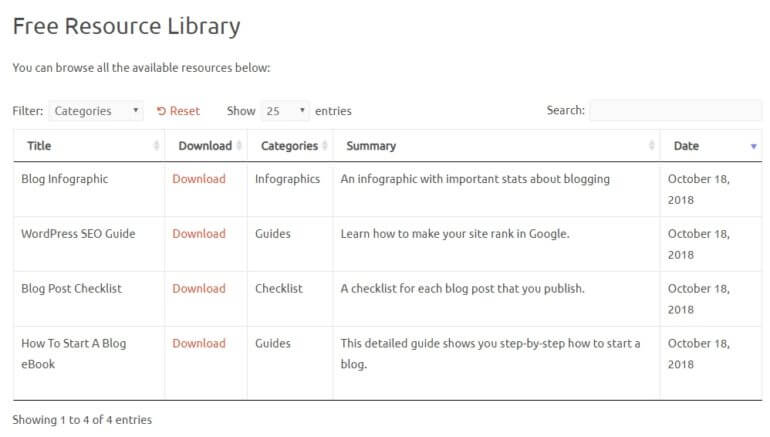
Create a tabbed interface for different resource library categories
As another way to help users navigate your resources, you can also create a tabbed interface that lets users click on tabs to browse different types of resources (no page reload required). Here's an example of what we mean:

To create this tabbed interface, you can use the free Shortcodes Ultimate plugin. Or if you're using a page builder plugin such as Elementor or Divi Builder, then use the tabs that come with that plugin.
Once you've installed the WordPress resources plugin, you can use Tab shortcode to create the interface. All you need to do is add the Document Library Pro shortcode in the tab's content.
Install the WordPress resource library plugin today!
The Document Library Pro plugin makes it easy to create a flexible WordPress resource library that you can adapt to your exact needs. Whether that's a PDF library, a document library, or any other type of file library, it's the easiest way to add and display resources.
- 4 easy ways to add resources
- Searchable, sortable resource lists for your users
- Full documentation and expert support provided
- Try it risk-free
Now buy Document Library Pro and install the WordPress resources plugin today:
2 Comments
Hello,
It doesn't appear so from the screenshots/demos, but wondering if you can add the filtering and sorting in grid view? Or is that only possible in table view?
Hi, John.
Thank you for your comment.
You're right. The filters are only available in the table layout, and not the grid layout which is designed for listing smaller numbers of documents. While we don’t have any immediate plans to implement this, a few other customers have previously requested this feature and we’re tracking the amount of demand to help us decide whether to prioritize it in future.
I have added your ‘vote’ to our feature request list, and we will let you know if we add this to a future version of the plugin.