Demo 5 is one of designs available under our MySimpleSite affordable web design service. It's perfect for creating cheap websites for small business.
This documentation offers a personalised overview on managing your website. It covers the main features you will need to use. Please read it alongside the WordPress Codex, which is the online manual for WordPress websites. If you're using the WooCommerce plugin to create an online shop then you can also refer to the official WooCommerce documentation.
Barn2 Media will keep your website maintained and running smoothly behind the scenes. You can make changes to the content of your website such as adding and editing pages, writing new blog posts and adding images.
- Logging In
- Homepage
- Navigation Menu
- Footer
- Other Pages
- Blog Posts
- Formatting Content
- Images
- Image Galleries
- Right Hand Column
Logging In
Your MySimpleSite has been developed using the WordPress content management system (CMS). You can edit your website content by logging into the WordPress admin.
- The address for your WordPress admin is your website address followed by /wp-admin. For example, if your website is https://mywebsite.com then you need to go to https://mywebsite.com/wp-admin.
- Add the username and password that we have provided to you. Use the 'Lost password' link if you don't know your password.
You will then be taken to the Dashboard. This is the homepage for the WordPress admin and you will see various links on the left for editing your website content.

Homepage
The homepage of your website is edited via Appearance > Customize in the WordPress admin.
 Front Page Background Images
To change any of the full-width background images on the homepage:
- Go to Appearance > Customize
- Click 'Front Page Background Images'
- Click 'Change Image' for the image you wish to replace
- Either choose a different image from the media library or upload a new one
- Click 'Choose image'
- Once you are happy, click 'Save & Publish'

Tips on adding effective background images:
- Background images should be approx. 1,920 pixels wide and 1,250 pixels high.
- The website will automatically add a dark overlay to the bottom part of the image. This will make the text easy to read over the top. If you feel the image is too dark, you can lighten it before uploading it to the website or use a different image that works better in this format.
- Reduce the width of your web browser to test the background image on smaller screen sizes - if it doesn't look good on all screen sizes, you will need to try a different image or crop your image differently before uploading it.
Homepage Content
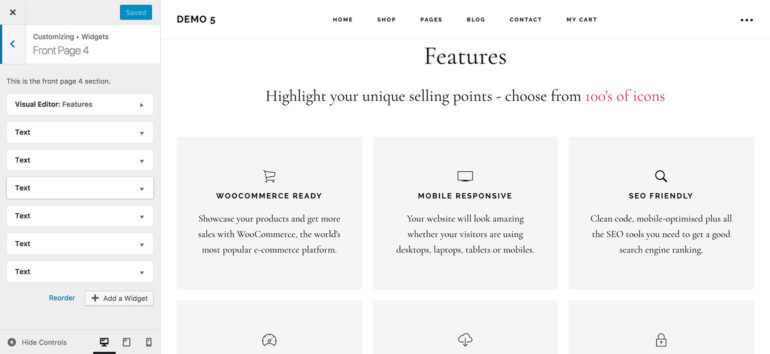
The content of your homepage edited via Appearance > Customize > Widgets in the WordPress admin.
You can find the content for the different sections on the homepage within the 'Front Page 1-7' widget areas. For example this screenshot shows section 4 of the homepage, which includes a heading widget plus 6 separate widgets for the 6 icon boxes underneath.
Homepage icons
 To change the icons in the 4 columns on the homepage:
- Go to Appearance > Customize > Widgets and click on the relevant widget for the icons (this is usually in the 'Front Page 3' widget area, unless we have changed the order of your homepage content).
- Go to https://ionicons.com and find the name of the icon you want to use
- You will see some HTML code in the widget, similar to this screenshot. Replace the name of the icon (e.g. ion-ios-monitor-outline) with the name of the new icon. Be careful not to change any of the HTML code such as the quotation marks or square brackets.
- You can also replace the text that appears underneath the icon. Make sure you don't edit anything in <> brackets.
- Click 'Save & Publish'
Navigation menu
 You can edit the navigation menu at the top of website via Appearance > Customize > Menus > Main Menu in the WordPress admin.
Tips:
- Click 'Add Item' to add a new link to the menu.
- Use drag and drop to change the order of menu items.
- To create a dropdown menu, drag a menu item to the right to indent it. This will automatically put it within a dropdown underneath the previous menu item in the list.
When you have finished, click 'Save & Publish'.
Footer
The 'footer' on the sub-pages of your small business website consists of the 3 columns in the coloured area at the bottom of the website. The social links and copyright info appear on every page including the homepage. You can edit it via Appearance > Customize > Widgets in the WordPress admin.
Footer Areas 1-3 are used for the 3-column footer area on the sub-pages. Footer Area #1 is used for the social links.
Please note that you can only edit Footer Areas 1-3 from the Customize screen if you are viewing a page where these widgets are visible (i.e. not the homepage).
Meet the Team
Each of the team members in the Meet the Team section in Demo 5 is added as a separate page. You can edit or delete team members by finding the relevant page in the Pages section of the WordPress admin.
To add new team members, you need to create a page for them. Look at one of the existing team members and copy it to make the new team member exactly the same.
Your new team members will appear at the bottom of the 'Team' page automatically, if you have one. To display them in the 'Team' section of the homepage, you need to add a Genesis - Featured Page widget and select the page for the new team member. Look at the settings for the existing Featured Page widgets and copy these to make sure the new one is the same.
Other Pages
If there are other pages on your website then you can edit these via the 'Pages' section of the WordPress admin, or by clicking the 'Edit Page' link in the black toolbar at the top of each page.
You can make any changes to a page and click 'Update' to save your changes. Please note that the homepage has no content if you access it from the 'Pages' list because the homepage content is added via Appearance > Customize, as described above.

Blog posts
If your website has a blog section (which you might call Articles, News or something else) then you can add as many posts as you like.
To add a new post:
- Go to Posts > Add New in the WordPress admin
- Add the title of your post to the top of the page
- Add your content within the big white box
- Tick one or more categories on the right hand side
- Add a feature image on the right hand side. This should be 700 pixels wide and can be any height, although landscape images will work better than portrait. The featured image will automatically appear on the main Blog page and at the top of the post
- Click the blue 'Publish' button

Tips:
- To optimise your blog posts for search engines, see our article on how to optimise a blog for SEO. Your website already has the Yoast SEO plugin installed which you can use to add SEO titles and descriptions
- To schedule a post for future publication, click 'Edit' next to 'Publish Immediately' in the top right hand corner. The post will automatically appear on your website on the date and time you select. This is a good opportunity to save time by adding lots of posts at once and then drip feeding them onto your website over time
- You can divide your blog into as many categories as you like via Posts > Categories
Changing the order of posts on your website
Posts are listed on your website with the most recent first. You can change the order in which they are displayed by editing the publication date.
By default, the date of a post will be the current date. You can amend this to make it appear as if the post was made earlier or later by modifying the date.
- Click ‘Posts’ on the left hand side of the Dashboard
- A list of all the posts on the website appears. Hover the mouse over the post to be edited and click ‘Quick Edit’
- Change the Published date as needed
- Click ‘Update’
Formatting text
All the text on the website uses the WordPress editor, which includes a handy toolbar similar to Microsoft Word.

Hover over the various toolbar icons to find out what each one does. The most useful are:
- Bold text
- Italics
- Bullet and numbered lists
- Add link
- The 'Paragraph' dropdown - use this to select from Heading styles 1-6. This is better than using bold text for headings and achieves a consistent and professional look across your site (as well as being better for SEO/search engines)
Tip: If you're pasting text from another program such as email, MS Word or Google Docs into your website, it can cause formatting problems. Click the 'Paste as text' toolbar button before pasting the text to remove any dodgy formatting from the other program.
Images
You can add images anywhere you see the WordPress toolbar. Click the 'Add Media' button above the toolbar and follow the instructions to upload a new image.
When you upload an image, you will see some options on the right:
- Title – This will appear when you hover the mouse over the image if the image is placed inside a link (see Link URL below)
- Caption (optional) – Enter text here if you want to display a caption underneath the image
- Alt Text (optional) – A brief description of the image. This will be used by search engines, visually impaired people or those whose web browsers cannot display images
- Description (optional) – A longer description of the image. This will also be used by visually impaired people and search engines
- Alignment – Whether you want the image to display in the default position or the left, center or right of the screen. If you want the image to display alongside text then you need to align it to the left or right, and the text will flow around it
- Link To – Choose whether you want the image to be clickable. If you want to add a link to the image, we'd usually recommend adding a custom URL or choosing 'Media File' to open the image file directly
- Size – It is recommended that you size the image before uploading it to the website using photo editing software such as Photoshop. If you have done this, simply click ‘Full size’ and the image will display correctly on the website. If you have not already sized the image then choose Thumbnail, Medium or Large. Do not click ‘Full size’ unless you have previously sized the image because it is likely to be a large image and will result in the web page taking a long time to load
Tips:
- When sizing images before uploading them to the website, do this by altering the size of the image in pixels rather than setting the size in cm or inches or by altering the image resolution (dpi).
- If you don't have image editing software, you can use Photoshop Online to size and crop your images. Click 'Resize' and choose the 'Custom' option to change the size of the images in pixels. Use 'Crop' to crop an image and change the proportions. You can then click 'Done' save your image and upload it to the website.
Image Galleries
Your website supports WordPress galleries, which means that you can add as many galleries as you like to your pages and posts. A gallery automatically displays multiple images in a grid layout.
Gallery images are automatically cropped to square format. Depending on how you set up your gallery, visitors can click on an image to view it full-size.
To add a gallery to a page or post:
- Click 'Add Media' above the WordPress toolbar on any page or post
- Click the 'Create Gallery' tab on the left
- Upload new images, or tick any existing images from your media library that you wish to include in the gallery. A tick should appear next to each of the images that you will be adding to the gallery
- Click the blue 'Create a new gallery' button
- On the next page you can add any captions, choose what will happen when someone clicks on an image in the gallery, choose the size of the images in the grid, and how many columns will appear
- Finally, click 'Insert Gallery'


This will add a gallery to the page/post. You can hover over it and click the pencil icon to edit it.

Right hand column
Your sub-pages and blog posts may include a right hand column. You can edit this via the 'Primary Sidebar' area in Appearance > Customize > Widgets.
(Note: The Primary sidebar section will only appear if you are on a page that has a right hand column - so if you're on the homepage in the Customize screen, navigate to a page with a right hand column to edit the sidebar.)
WooCommerce online shop
If you're using our affordable WooCommerce service then you will also need to know how to manage products and view orders. All of this is covered in the official documentation for WooCommerce which is very comprehensive and easy to follow.
We hope this documentation has given you everything you need to update your cheap website for small business. Let us know if there's anything we've missed!